In this tutorial, we will focus on using the downloadImage() function from Plotly.js, which allows us to download an image of a Plotly plot.
Installing Plotly
The first step is to ensure you have Plotly.js installed and running on your system. You can either include the file as a CDN or install it via NPM.
For simplicity, we will include the plotly-js package as a CDN. This allows us to avoid installing and downloading Node.JS and NPM.
However, if you have Node installed, you can run the following command to install plotly.js in your project.
Once installed, we can go ahead and use it in our projects.
Basic Bar Chart
The next step is to prepare the plot we wish to create. For our example, we will use a bar chart.
Start by creating an index.html file. This will include all the code for the data and the type of plots we wish to execute.
In the index.html file, add the code as shown below:
<html lang="en">
<head>
<meta charset="UTF-8" />
<meta http-equiv="X-UA-Compatible" content="IE=edge" />
<meta name="viewport" content="width=device-width, initial-scale=1.0" />
<script src="https://cdn.plot.ly/plotly-2.12.1.min.js"></script>
<title>Plotly Bar Plot</title>
</head>
<body>
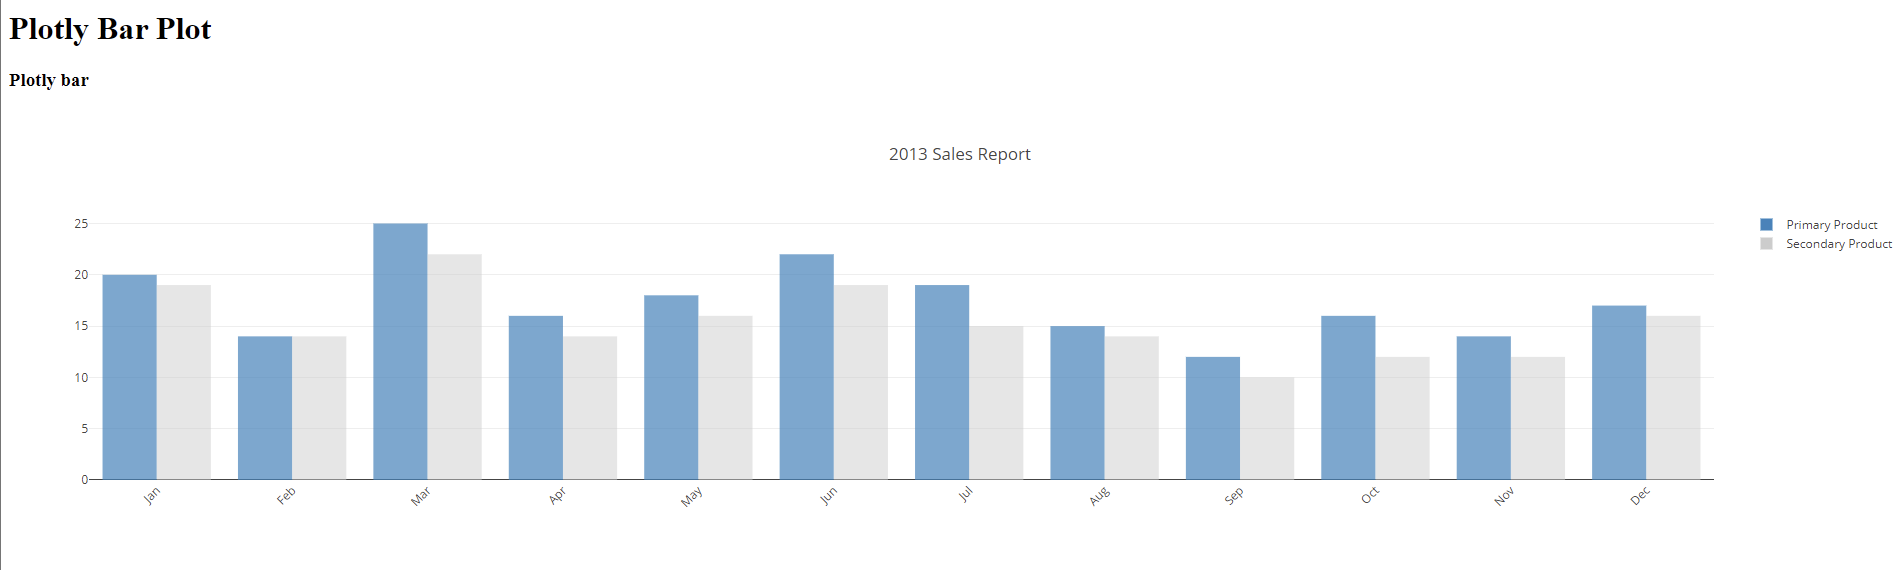
<h1>Plotly Bar Plot</h1>
<h3>Plotly bar</h3>
<div id="plotly_div"></div>
<script>
var trace1 = {
x: [
"Jan",
"Feb",
"Mar",
"Apr",
"May",
"Jun",
"Jul",
"Aug",
"Sep",
"Oct",
"Nov",
"Dec",
],
y: [20, 14, 25, 16, 18, 22, 19, 15, 12, 16, 14, 17],
type: "bar",
name: "Primary Product",
marker: {
color: "rgb(49,130,189)",
opacity: 0.7,
},
};
var trace2 = {
x: [
"Jan",
"Feb",
"Mar",
"Apr",
"May",
"Jun",
"Jul",
"Aug",
"Sep",
"Oct",
"Nov",
"Dec",
],
y: [19, 14, 22, 14, 16, 19, 15, 14, 10, 12, 12, 16],
type: "bar",
name: "Secondary Product",
marker: {
color: "rgb(204,204,204)",
opacity: 0.5,
},
};
var data = [trace1, trace2];
var layout = {
title: "2013 Sales Report",
xaxis: {
tickangle: -45,
},
barmode: "group",
};
Plotly.newPlot("plotly_div", data, layout);
</script>
</body>
</html>
We start by including the default HTML boilerplate code in the previous example. Then, we have the Plotly js as a CDN using the script tag.
Finally, we created three HTML elements to decorate the page. First, ensure to include the div with your specific id. Plotly will use this div element to display the plot as shown in the Plotly.newPlot() function.
We can then open the index.html file in our browser and see the plot as shown below:
Plotly downloadImage()
The downloadImage() function allows you to trigger an image download of a specific plot.
The function accepts the name of the plot you wish to download, the format, width, height, and the filename as the parameters.
The syntax can be expressed as shown below:
Feel free to replace the names with your target values.
In our example bar plot provided, we can use the then function in JavaScript to load the downloadImage() image function.
Plotly.downloadImage(download, {
format: 'jpeg',
height: 800,
width: 1200,
filename: 'plot'
})
});
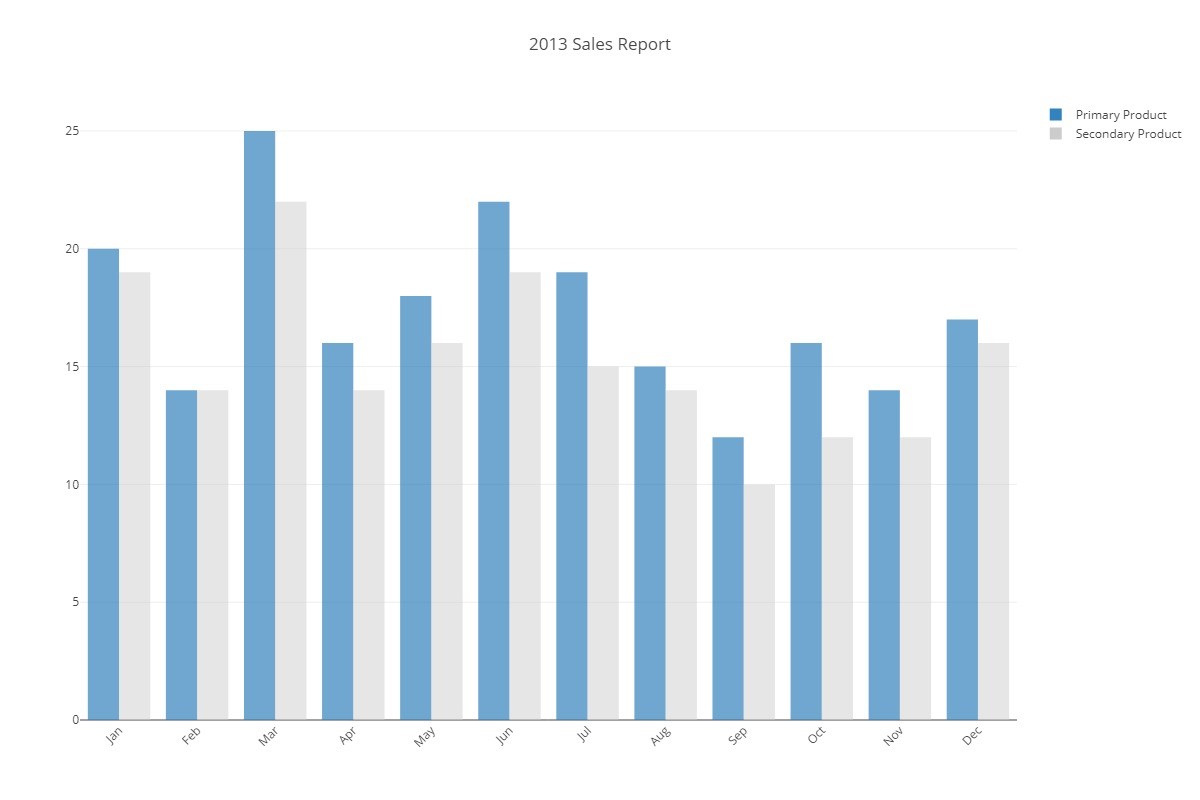
Once we run the index.html file, the browser should display the image and download the image with the specified parameters.
The resulting file is shown below:
The function accepts the following image formats when exporting an image:
- PNG
- JPEG
- WebP
- SVG
- full-JSON
Example 2
To download an image in JSON format, set the format as “full-json” as shown:
Plotly.downloadImage(download, {
format: 'full-json',
height: 800,
width: 1200,
filename: 'plot'
})
});
The previous code should return a JSON file with all the properties of the specified plot.
Conclusion
In this tutorial, we covered how to use the downloadImage() function in Plotly.js to download the image of a plot. Several examples were provided that showed the use of the basic bar chart before using the Plotly downloadImage() function.