Salesforce Apex List is a data structure which helps to load more data at a time into the Salesforce database. In this article, we will discuss the “List” collection in Apex programming language and its methods. Apart from these, we will also discuss how to insert the data into the Salesforce objects using the list in the applications section using the insert DML statement.
Introducing Salesforce
As we know, Salesforce is a web-based company and OneCRM Platform which offers software as a service. Day to day, Salesforce is increasing its productivity by maintaining customer relationships. We can call salesforce a cloud that stores the data in it and provides us with manipulation in a better way. Like other cloud platforms, Salesforce also offers us a language that easily communicates with customers and salesforce which is known as “Apex”. Let’s discuss about Apex first.
Apex
Apex is the programming language which is strongly typed and supports the Object Oriented Concepts. Its syntax is closer to Java and supports conditional statements, control structures, and other variables and datatypes which are similar to Java. Apex also maintains stored procedures like SQL. It supports three collections – “List”, “Map”, and “Set”.
List and It’s Methods
Basically, “List” is a collection that is similar to an array in other programming languages which stores the elements/items in a sequential manner. It can also store the Salesforce objects (sObjects) like “Account”, “Contact”, “Opportunity”, and “Other Custom” objects. It can be possible to have the nested lists and elements in a list to be duplicated.
Before starting with “List”, we need a code environment so that our codes are executed.
To do this, let’s login into the Salesforce Account by typing the following URL in your browser: https://login.salesforce.com/. (If you don’t have an account, you can register by opening the same link)
Steps:
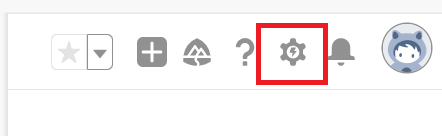
1. Go to the right beside your profile. Click on the gear icon.
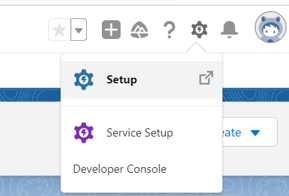
2. Click on the “Developer Console” below the “Service Setup”. Immediately, a new window is opened which we can refer as a “Console”.
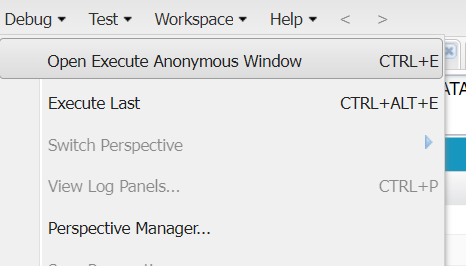
3. Click on “Debug” and choose “Open Execute Anonymous Window”.
4. An editor will open which is used to execute instant Apex classes and statements.
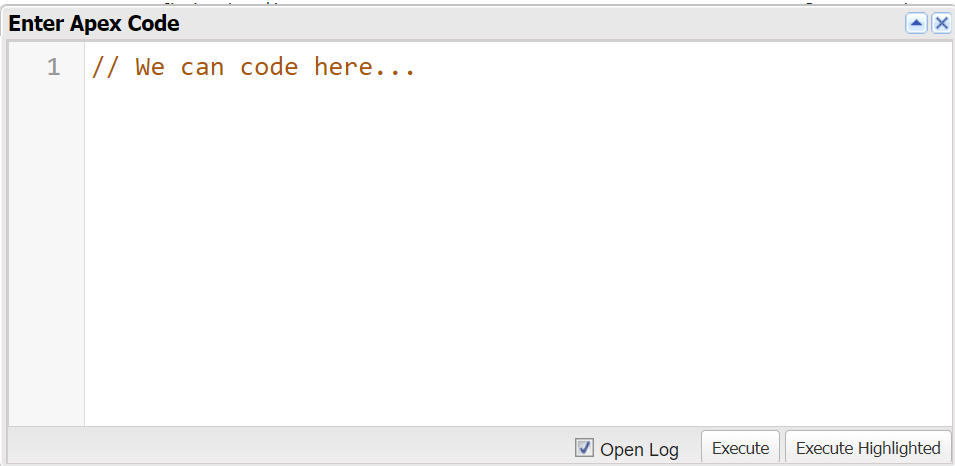
5. After writing the code, we can select the Apex statements that we want to execute and click on the “Execute Highlighted” button. If you want the entire code to be executed, simply click on “Execute”.
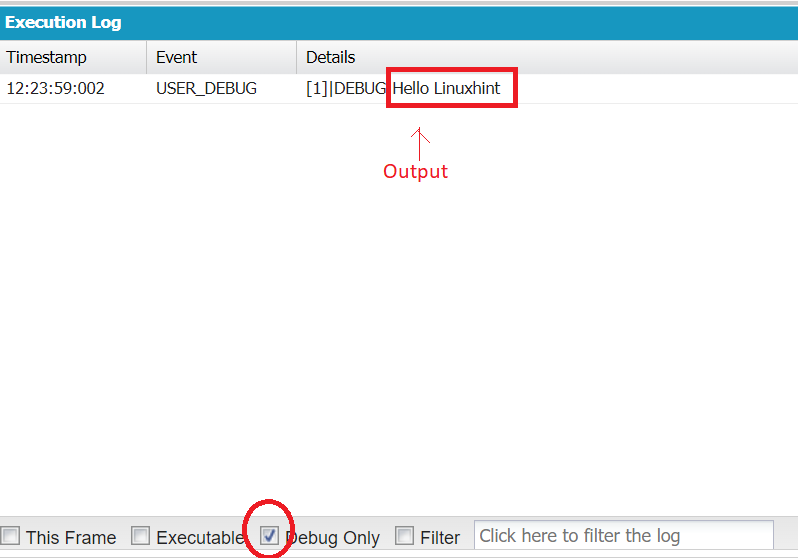
6. Make sure that you tick the “Open Log” checkbox to open the log. You are only able to see the log by opting it.
Let’s display a “Hello” message using the following command:
7. Finally, check the “Debug Only” to see only the current code output.
List Creation
By specifying the data type along with the object name, the “List” can be created. Here, new keyword is used to create it. It can be optional to pass the elements during creation.
Syntax:
1. List.add()
Using this method, we can directly add an element at a time to the list object.
It can also be possible to add an element at a particular index position by specifying the index as a first parameter and an element to be added as the second parameter.
Syntax:
list_object.add(index_position,element)
Example:
Let’s create a list with 3 items and add some items one by one using the add() method.
List<String> furniture = new List<String>{'Table','Chairs','Others'};
system.debug('Actual Items: ');
system.debug(furniture);
// Add 3 items one by one using the add() method.
furniture.add('wood');
furniture.add(2,'plates');
furniture.add(2,'Beds');
system.debug('Final Items: ');
system.debug(furniture);
Output:
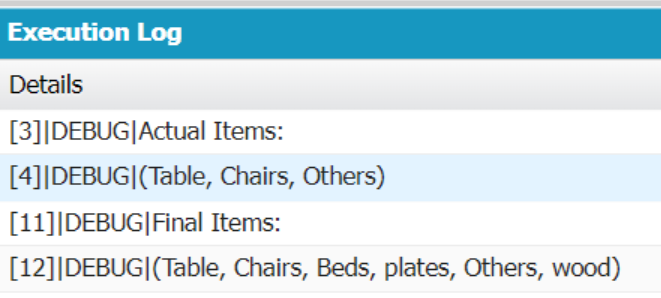
First, we add “wood”. Then, we add “plates” at the second index position. We also add “Beds” at the second position. Finally, the list holds the items in the following order: [Table, Chairs, Beds, plates, Others, wood].
2. List.addAll()
The previous method adds only one item at a time into the list object. Using this method, we can add multiple elements from one list to the new list. It can also be possible to add an element at a particular index position by specifying the index as the first parameter and add an element as the second parameter. Make sure that both the lists are of the same type.
Syntax:
Here, the list_object is our actual list and the list_object_another is the list that will have some items which are to be added to the list_object.
Example:
Similar to our first example, create another list which is “furniture2” and pass the first list which is “furniture1”.
List<String> furniture1 = new List<String>{'Table','Chairs','Others'};
system.debug('List-1: ');
system.debug(furniture1);
// Create an Empty List - furniture2.
List<String> furniture2 =new List<string>();
system.debug('Actual List-2: ');
system.debug(furniture2);
// Add items of furniture1 to furniture2 using addAll().
furniture2.addAll(furniture1);
system.debug('Final List-2: ');
system.debug(furniture2);
Output:
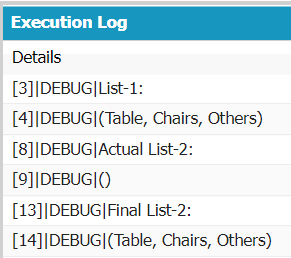
The first list (furniture1) holds three items while the second list (furniture2) is empty. We add all the elements from “furniture1” to “furniture2”. Finally, the list-2 (furniture2) holds 3 elements which are the same as “furniture1”.
3. List.size()
In some scenarios, we need to know the total items that are present in the Apex list. Size() is the method that returns the total items that exist in the list. Parameters are not needed for this method.
Syntax:
Example:
Create an Apex list with some order quantities and return the size.
List<Integer> orders = new List<Integer>{900,98,98,600,65};
system.debug('List: ');
system.debug(orders);
// return the size of the List.
system.debug('Total Orders: ');
system.debug(orders.size());
Output:
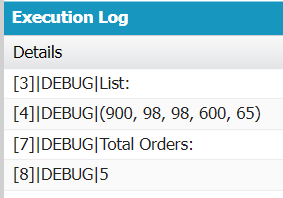
There are 5 orders in our list.
4. List.get()
Accessing the items from the list is very important. To do this, the Apex list supports the get() method which returns the element based on the index position. Indexing starts from 0. If the index does not exist, it raises the following error:
![]()
Syntax:
Example:
Create an Apex list with some order quantities and return some elements.
List<Integer> orders = new List<Integer>{900,98,98,600,65};
system.debug('List: ');
system.debug(orders);
// get() method
system.debug('First Order: '+ orders.get(0));
system.debug('Fourth Order: '+ orders.get(3));
Output:
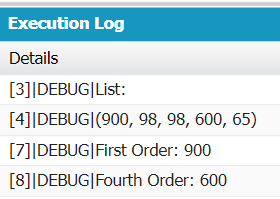
There are 5 orders in our list. First, we access the element that is present at index-0, i.e. 900. Then, we access the element that is present at index-3, i.e. 600.
5. List.isEmpty()
We can check whether the list is empty or not using the isEmpty() method. True is returned if the Apex list is empty. Otherwise, false is returned. Similar to the size() method, it won’t take any parameter.
Syntax:
Example:
Check whether the list is empty or not by creating an empty list.
List<Integer> orders = new List<Integer>();
// isEmpty() method
system.debug('Is the List Empty: '+ orders.isEmpty());
Output:
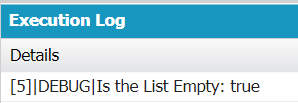
True is returned since the list is empty.
6. List.clear()
All the elements in an Apex list can be deleted at a time using the clear() method. It won’t take any parameters.
Syntax:
Example:
Remove all elements from the list that have 5 student names.
List<String> students = new List<String>{'sravan','ram','raghu','raby','honey'};
system.debug('List : '+ students);
// clear() method
students.clear();
system.debug('List : '+ students);
Output:
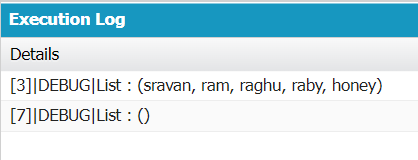
After applying the clear() method, the “students” list is empty.
List Applications
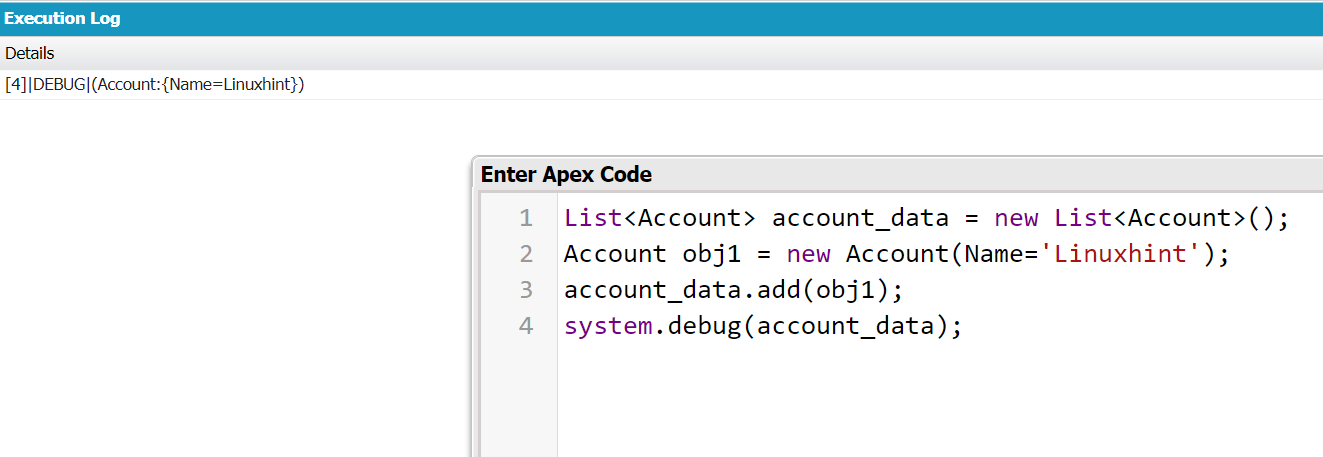
1. sObject
We can insert the data into the Salesforce standard objects like “Account”, “Contact”, etc. In this scenario, we need to provide the sObject name in place of the list data type.
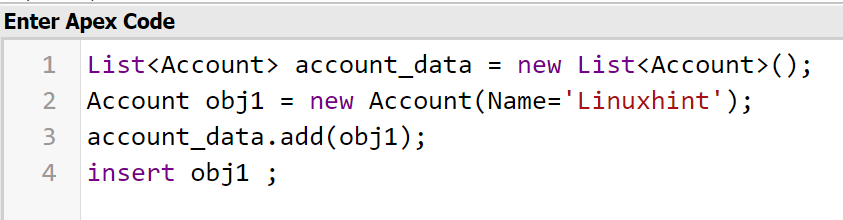
Let’s look at this example: Here, we create a list with the sObject type as “Account”. We add the name to it and add it to the list.
2. DML Operation
We can use the lists to store the records that are inserted into the Salesforce data. With the insert statements, we can insert the record/s into the Salesforce database.
Look at the following code. We just add an insert statement here:
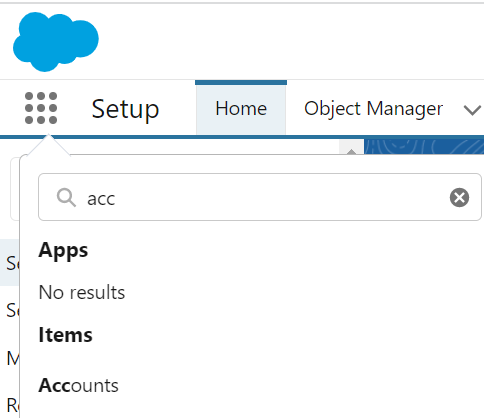
Let’s check whether the record is created or not.
- Go to the “App Launcher” and search for “Accounts”.
- The “Account Record” detail page will open. Now, search for the “Linuxhint” account.
- Click on the “Account Name”. You can see the details here.


Conclusion
We now came to the end of our guide. As part of this guide, we discussed the Salesforce platform and Apex. List is one of the collections that is supported by the Apex programming language. After that, we learned the methods that are supported by “List” along with examples and syntax. We wrapped up this guide by discussing the “List” collection applications with examples.