Events in LWC are used to communicate with the components. If there are related components, it can be possible to communicate from Parent to Child or Child to Parent. If there are two unrelated components, we can communicate through the PubSub (Publish-Subscribe) model or with the Lightning Message Service (LMS). In this guide, we will discuss on how to communicate with events from Parent to Child, Child to Parent, and interrelated components using the PubSub model.
You can place the components in your Record Page, App Page, or Home Page. We will not specify this file (meta-xml) again under the example code snippets:
<LightningComponentBundle xmlns="http://soap.sforce.com/2006/04/metadata">
<apiVersion>57.0</apiVersion>
<isExposed>true</isExposed>
<targets>
<target>lightning__RecordPage</target>
<target>lightning__AppPage</target>
<target>lightning__HomePage</target>
</targets>
</LightningComponentBundle>
Parent to Child Communication
If two components are related to each other, this communication is possible. Here, the Parent sends the data to the Child. The parent component holds the Child component. With this approach, we can pass the Primitive data (Integer, String, Boolean, etc) from Parent to Child, pass the Non-Primitive data (Array, Object, Array of Objects, etc) from Parent to Child, passing the data to the Child component with the action on the Parent.
In order to communicate the Parent to Child, we need to make the fields, properties, and methods available in the Child component publicly visible. This can be possible by decorating the fields, properties, and methods with the “api” decorator.
Example: Declare a variable with “api” in the Child component “js” file.
Now, the Parent component uses the Child component in the HTML file via the HTML attributes.
Example: Use the variable in the Parent HTML file.
Let’s discuss some examples that describe how to communicate with Parent to Child.
Example 1:
This basic example demonstrates getting an information that is sent by the Parent to the Child.
childtComp.js
First, we create a Child component that holds the “information” variable which is publicly available.
@api information
You can view the entire “js” code in the following screenshot:

childtComp.html
Now, we specify this variable in the HTML file within the center tag.
<lightning-card title="Child">
<center>
<!-- Display the Information -->
<b>{information}</b>
</center>
</lightning-card>
</template>

parentComp.js
We are not doing anything in the “js” file.
parentComp.html
Place the previous Child component in your Parent HTML by passing the public variable (information) with some text.
<lightning-card title="Parent" icon-name="standard:account">
<!-- Get the child component -->
<c-childt-comp
information="Hello, I received information..."
></c-childt-comp>
</lightning-card>
</template>
Output:
Now, go to your Salesforce Org and place the Parent component to the “Record” page. You will see that the Child component received the information from the Parent.

Example 2:
Let’s create two input text fields which will accept the text dynamically from the UI in the Parent component. If we insert the first text in the Parent component, the child component receives this text in uppercase. Similarly, it receives the text in lowercase if we insert the second text.
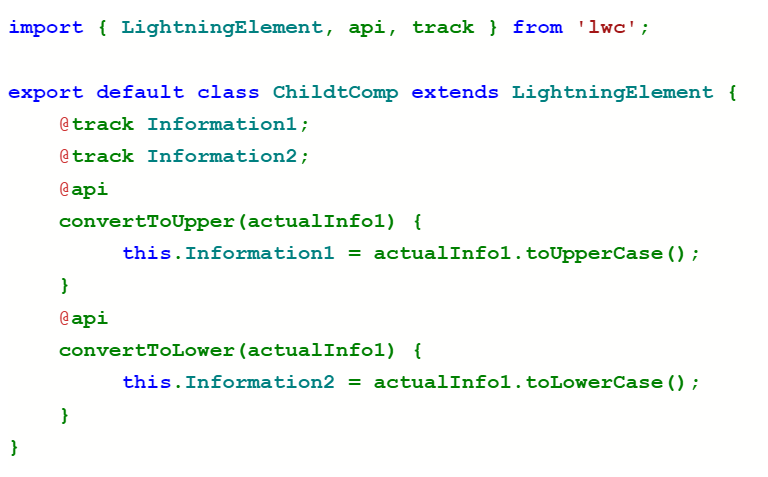
childtComp.js
Create two variables – information1 and information2 – with a track decorator.
- Create the convertToUpper() method with the “api” decorator which converts the first input text to uppercase.
- Create the convertToLower() method with the “api” decorator which converts the second input text to lowercase.
@track Information2;
@api
convertToUpper(actualInfo1) {
this.Information1 = actualInfo1.toUpperCase();
}
@api
convertToLower(actualInfo1) {
this.Information2 = actualInfo1.toLowerCase();
}
The entire “js” code looks like the following:
childtComp.html
We display the values (Information1 and Information2) that come from the “js” file.
<lightning-card title="Child">
Upper Case: <b>{Information1}</b><br>
Lower Case: <b>{Information2}</b>
</lightning-card>
</template>
parentComp.js
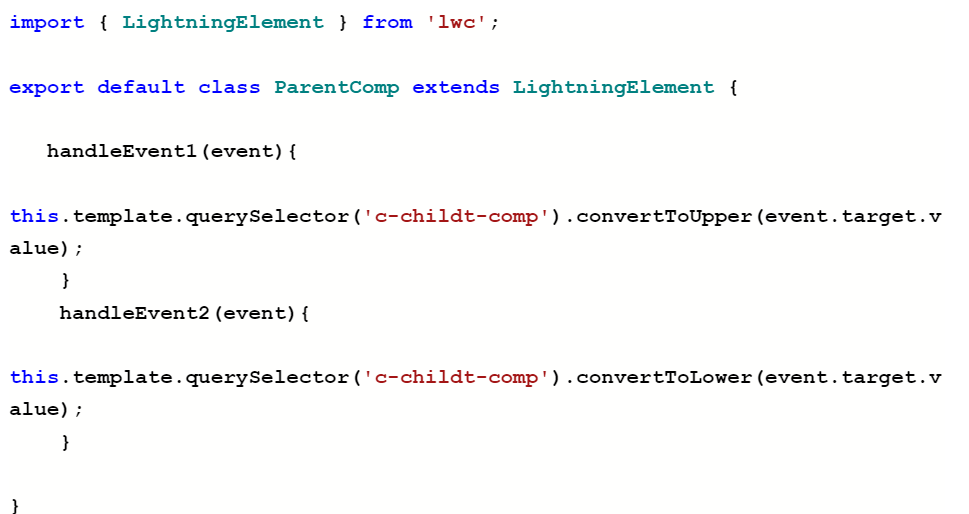
We create two handler methods that select the child HTML template through the querySelector(). Make sure that you need to pass the correct methods that convert the text into uppercase or lowercase.
this.template.querySelector('c-childt-comp').convertToUpper(event.target.value);
}
handleEvent2(event){
this.template.querySelector('c-childt-comp').convertToLower(event.target.value);
}
The entire “js” code looks like the following:
parentComp.html
Create an input text with handle events for both of them. Place the Child component in this Parent component.
<lightning-card title="Parent">
<center>
<lightning-input label="Enter the text in lowercase" onchange={handleEvent1}></lightning-input>
</center>
<br><br>
<center>
<lightning-input label="Enter the text in uppercase" onchange={handleEvent2}></lightning-input>
</center>
<br><br><br>
<!-- Place the child components-->
<c-childt-comp></c-childt-comp>
</lightning-card>
</template>
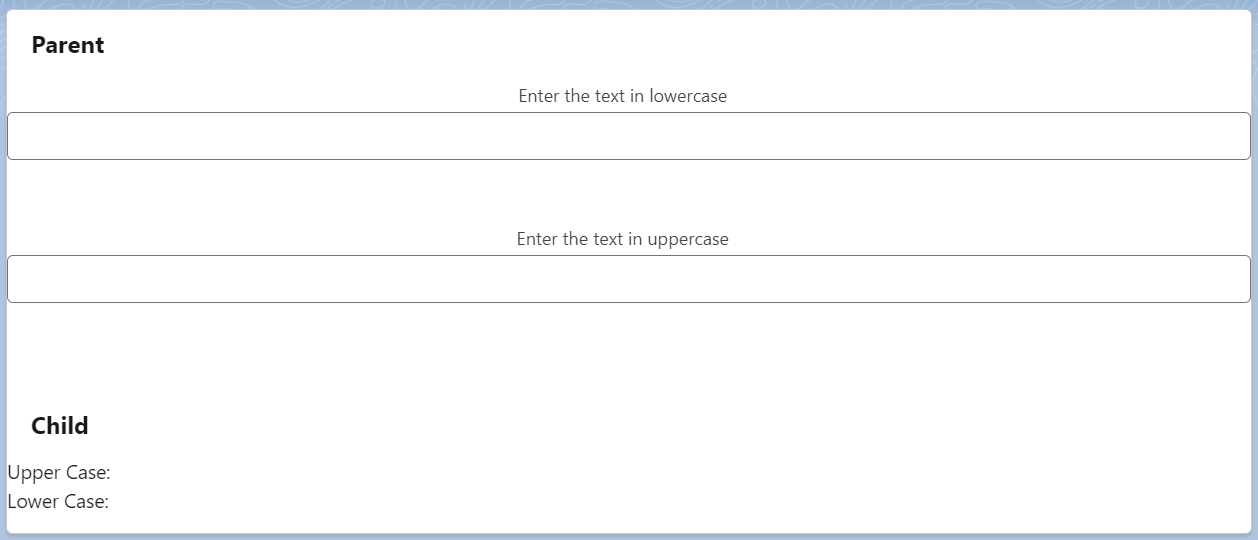
Output:
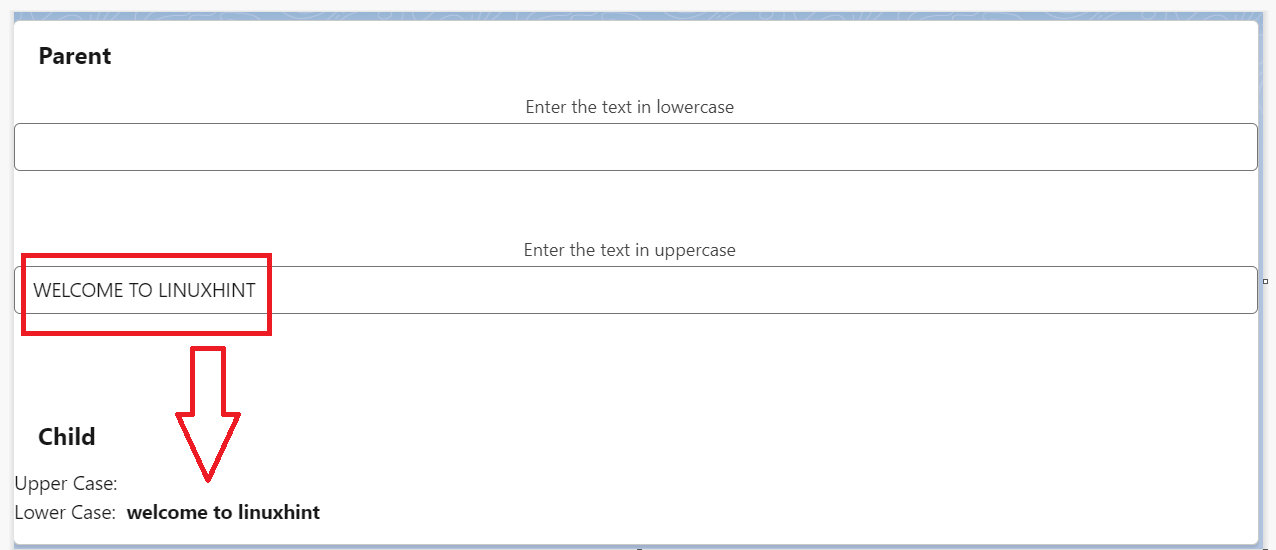
Now, go to your Salesforce Org and place the Parent component to the “Record” page.
You will see two text inputs on the UI.
Let’s write some text in the first input and you will see that the text is converted to uppercase and is displayed in the Child component.
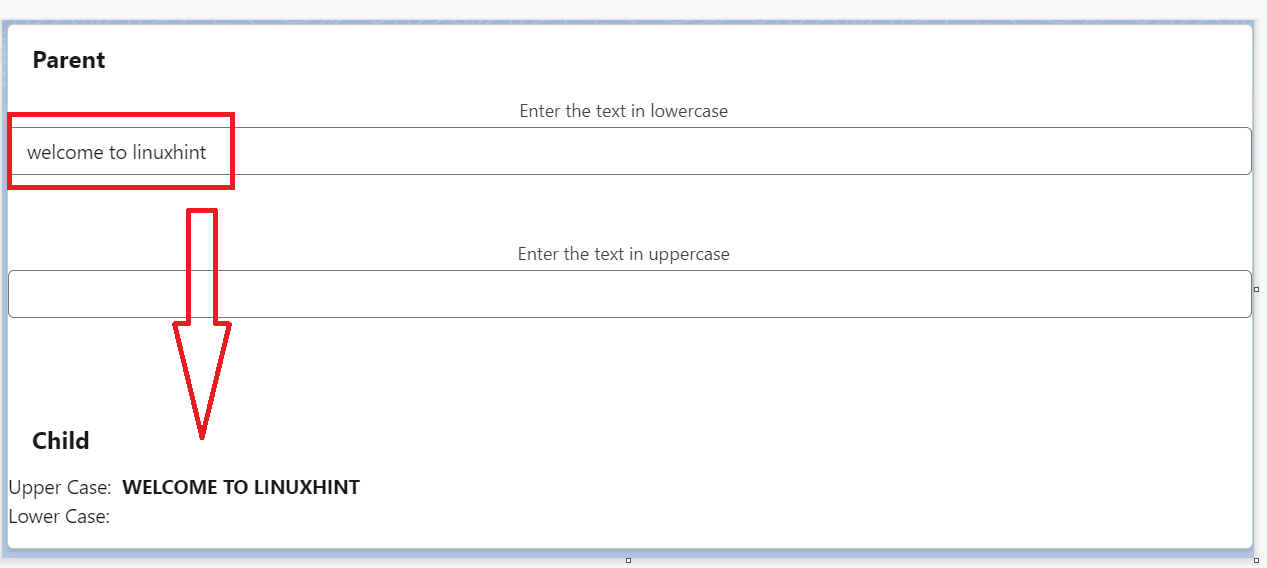
Write some text in the second input and you will see that the text is converted to lowercase and is displayed in the Child component.
Child to Parent Communication
Similar to the previous communication, to communicate the Child to the Parent, both components should relate to each other. We can communicate the Child to the Parent in three different approaches: calling the Parent to the Child using a simple event and calling the Parent to the Child using an event with the data and event bubbling. We will look at the simple event in this guide.
In order to communicate the Child to the Parent, we need to create and dispatch the events. For that, a custom event has to be created. A custom event is an event which is created by yourself. We can create it using the new keyword. The Event_Name can be anything (it can be a string, not beyond the uppercase, or digits). For now, we won’t discuss the options.
Syntax: new CustomEvent(‘Event_Name’,{options…})
Now, you have the custom event. The next step is to dispatch the event. To dispatch the event, we need to specify the event that we created in the EventTarget.dispatchEvent() method.
Syntax: this.displatchEvent(new CustomEvent(‘Event_Name’,{options…})
Finally, we need to handle the event. Now, we have to call the child component in your Parent component. Pass your event name by specifying the “on” prefix to your event name. This takes the event listener handler.
Syntax:
Example:
In this example, we create one Parent component (exampleParent) and two Child components.
- In the first Child (exampleChild), we create an input text that allows the user to provide some text. The same text is displayed in the Parent component in the uppercase.
- In the second Child (child2), we create an input text that allows the user to provide some text. The same text is displayed in the Parent component in the lowercase.
exampleChild.js
We create a handleChange1 method that creates the “linuxhintevent1” CustomEvent with the detail as the target value. After that, we dispatch this event. Embed the following snippet in this “js” file.
handleChange1(event) {
event.preventDefault();
const name1 = event.target.value;
const selectEvent1 = new CustomEvent('linuxhintevent1', {
detail: name1
});
this.dispatchEvent(selectEvent1);
}
exampleChild.html
The previous handle method that is created in “js” is handled based on the lightning input in the HTML component.
<lightning-card title="Child 1">
<div class="slds-m-around_medium">
<lightning-input label="Enter Text in lowercase" onchange={handleChange1}></lightning-input>
</div>
</lightning-card>
</template>
child2.js
We create a handleChange2 method that creates the “linuxhintevent2” CustomEvent with the detail as the target value. After that, we dispatch this event.
event.preventDefault();
const name2 = event.target.value;
const selectEvent2 = new CustomEvent('linuxhintevent2', {
detail: name2
});
this.dispatchEvent(selectEvent2);
}
child2.html
The previous handle method that is created in “js” is handled based on the lightning input in the HTML component.
<lightning-card title="Child 2">
<div class="slds-m-around_medium">
<lightning-input label="Enter Text in uppercase" onchange={handleChange2}></lightning-input>
</div>
</lightning-card>
</template>
exampleParent.js: Embed this snippet in your “js” file inside the class.
- Convert the input to uppercase using the toUpperCase() function in the handleEvent1() and store it in the Information1 variable
- Convert the input to lowercase using the toLowerCase() function in the handleEvent2() and store it in the Information2 variable.
// Convert the input to uppercase using toUpperCase() function
// in the handleEvent1() and store in Information1 variable
handleEvent1(event) {
const input1 = event.detail;
this.Information1 = input1.toUpperCase();
}
@track Information2;
// Convert the input to lowercase using toLowerCase() function
// in the handleEvent2() and store in Information2 variable
handleEvent2(event) {
const input2 = event.detail;
this.Information2 = input2.toLowerCase();
}
exampleParent.html
Now, display the two variables (Information1 & Information2) in the Parent HTML component by specifying both the Child components.
<lightning-card title="Parent">
<div class="slds-m-around_medium">
Child-1 Message in Uppercase : <b>{Information1}</b><br>
Child-2 Message in Lowercase : <b>{Information2}</b><br>
<c-example-child onlinuxhintevent1={handleEvent1}></c-example-child>
</b><br>
<c-child2 onlinuxhintevent2={handleEvent2}></c-child2>
</div>
</lightning-card>
</template>
Output:
Now, go to your Salesforce Org and place the Parent component to the “Record” page.
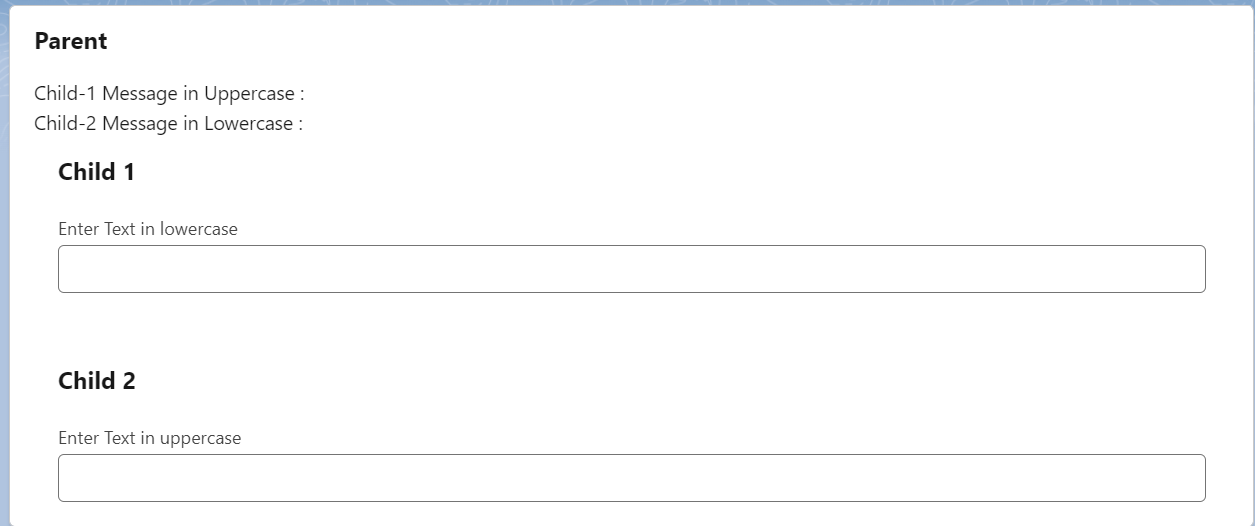
You can see that two Child components exists in the Parent.

Let’s type some text in the input text under the Child 1 component. We can see that our text is displayed in uppercase on the Parent component.
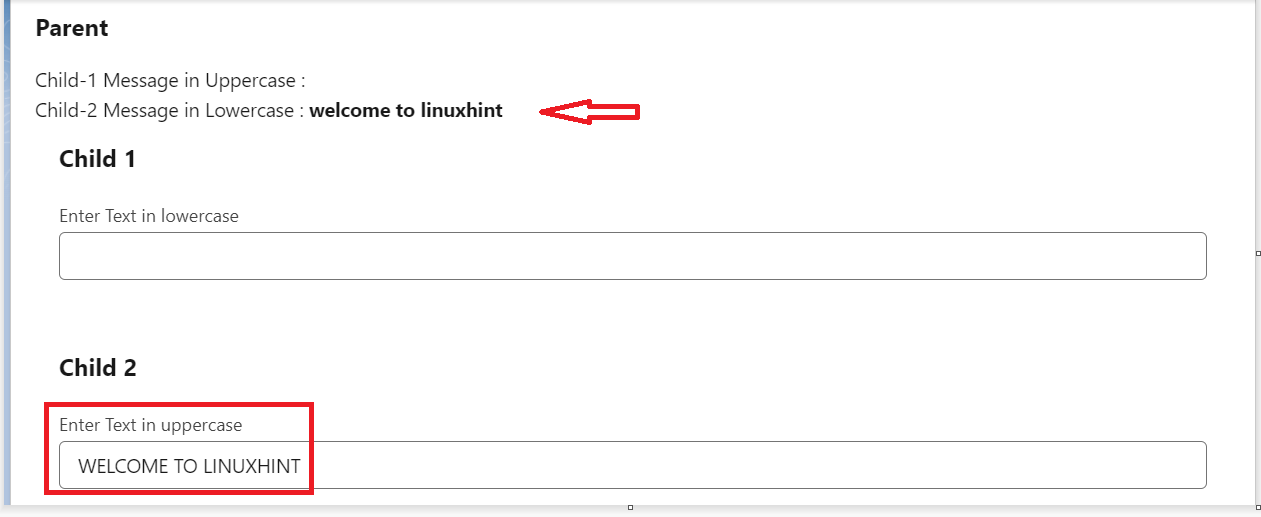
Give some text in the input text under the Child 2 component. We can see that our text is displayed in lowercase on the Parent component.
It can also be possible to enter both texts at a time.
PubSub Model
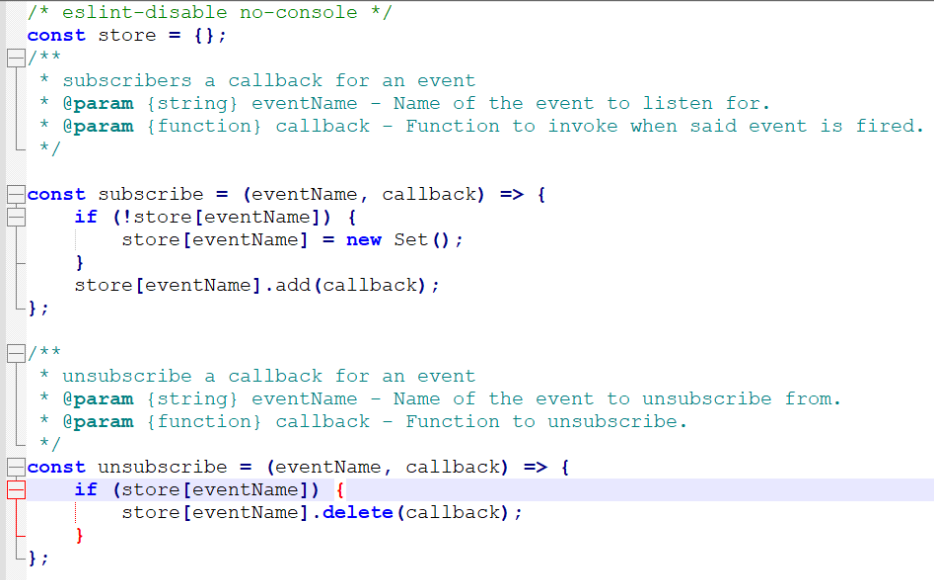
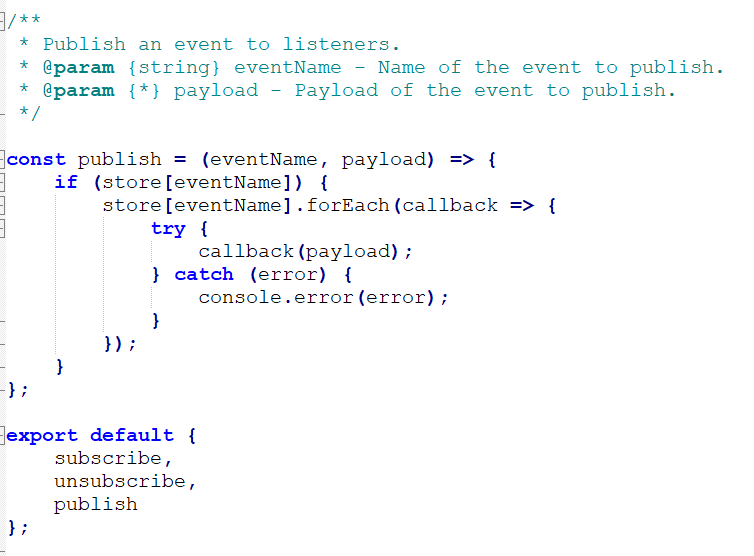
When you are working with independent components (not related to each other) and if you want to send the information from one component to another, you can use this model. PubSub stands for Publish and Subscribe. The component that sends the data is known as the Publisher and the component that receives the data is known as the Subscriber. It is required to use the pubsub module to send the events between the components. It’s already predefined and given by Salesforce. The file name is pubsub. You have to create an LWC component and type this code in your javascript file which is “pubsub.js”.
Example:
Let’s create two components – Publish and Subscribe.
In Publish, we allow the users to create an input text. In clicking the button, the data is received in uppercase and lowercase in the Subscribe component.
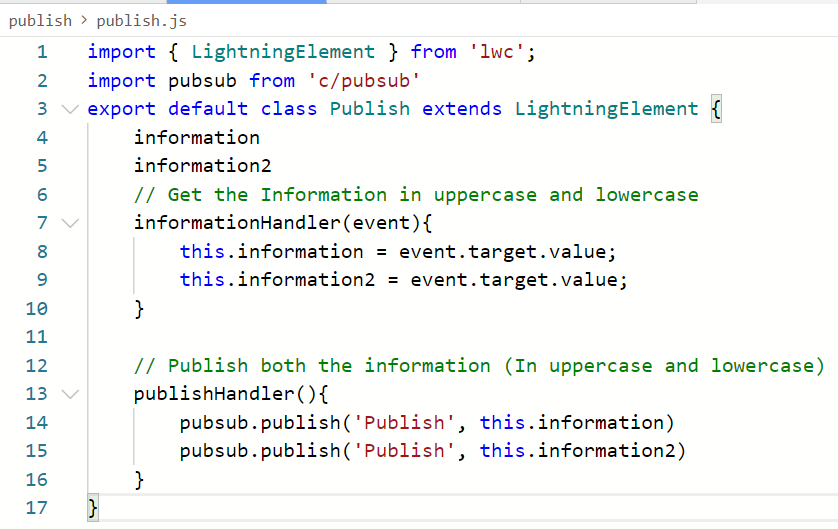
publish.js
Embed this code in your JSON file. Here, we get the information and publish the information.
The information variable will be uppercase and the information1 will be lowercase. Make sure that you include this import statement at the starting of the code – import pubsub from ‘c/pubsub’.
information2
// Get the Information in uppercase and lowercase
informationHandler(event){
this.information = event.target.value;
this.information2 = event.target.value;
}
// Publish both the information (In uppercase and lowercase)
publishHandler(){
pubsub.publish('Publish', this.information)
pubsub.publish('Publish', this.information2)
}
It should look like:
publish.html
First, we create the lightning-input to accept the text with the handler information. After that, one button is created with the onclick functionality. These functions are in the previous “js” code snippet.
<lightning-card title="Publish your text">
<lightning-input type="text" onkeyup={informationHandler} ></lightning-input>
<lightning-button onclick={publishHandler} label="Send Data"></lightning-button>
</lightning-card>
</template>
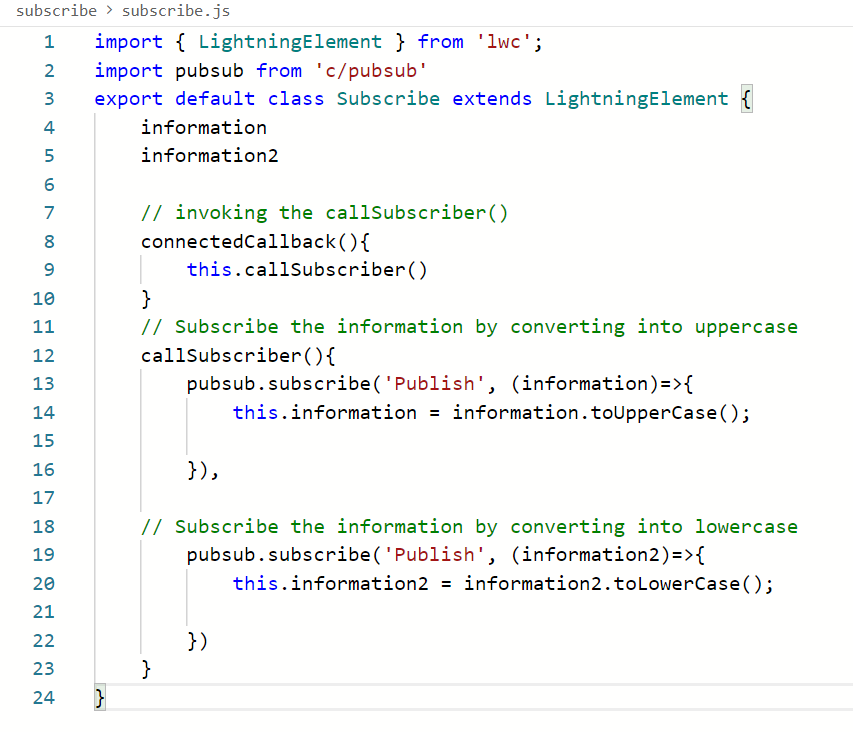
subscribe.js
Embed this code in your JSON file. Here, we first Subscribe the information by converting it into uppercase and lowercase separately inside the callSubscriber() method. After that, we invoke this method through the connectedcallback() method. Make sure that you include this import statement at the starting of the code – import pubsub from ‘c/pubsub’.
information2
// invoking the callSubscriber()
connectedCallback(){
this.callSubscriber()
}
// Subscribe the information by converting into uppercase
callSubscriber(){
pubsub.subscribe('Publish', (information)=>{
this.information = information.toUpperCase();
}),
// Subscribe the information by converting into lowercase
pubsub.subscribe('Publish', (information2)=>{
this.information2 = information2.toLowerCase();
})
}
It should look like this:
subscribe.html
We display the text in uppercase (stored in information) and lowercase (stored in information2).
Output:
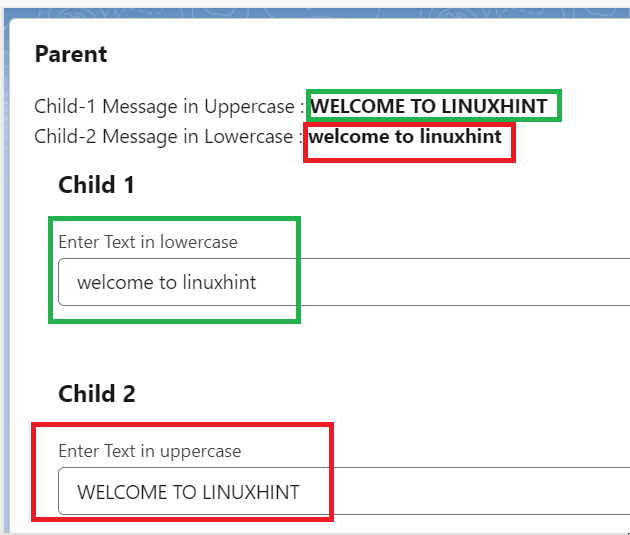
Add these two components to your page. Make sure that both the components are on the same page. Otherwise, the functionality won’t work.
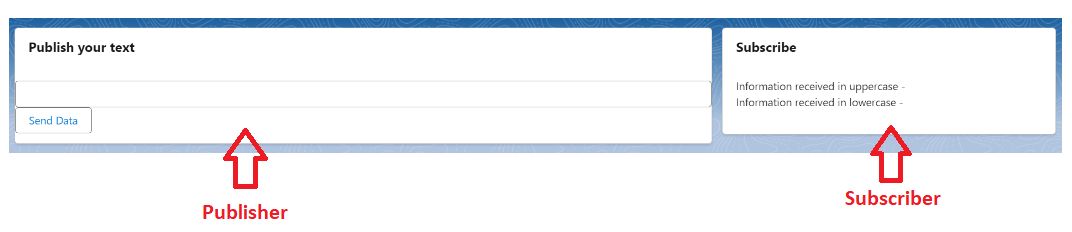
Let’s enter some text in the “Publish” component and click the “Send Data” button. We can see that the text is received in uppercase and lowercase.

Conclusion
Now, we are able to communicate with the LWC components through the event concept in Salesforce LWC. As part of this guide, we learned how to communicate from the Parent to the Child and from the Child to the Parent. The PubSub model is used in case your components are not related to each other (not Parent – Child). Each scenario is explained with a simple example and make sure that you include the code that is provided at the start of this guide in the “meta-xml” file.