We must note that we must activate this universe repository before proceeding with any installation because sometimes this repository is not enabled, and while running commands on the terminal, we get errors like this package was not found. So to overcome these types of common errors, first run this command before proceeding further.
To enable the “universe” repository on your machine, run the sudo add-apt-repository universe command. This program adds the required repository configuration to your system’s package manager (APT), enabling you to use apt-get or other common package management tools to install applications from the “universe” repository.
You can use the apt-get or apt command to install software from the “universe” repository after running the below command.
Keep in mind that this setup is for both GPU and CPU systems. I have clearly mentioned which installation is for the CPU and GPU. So read carefully and install according to your system.
Setting Up YOLO Prerequisites: Fundamental Components for Object Detection Installation
Establishing a solid foundation by installing the necessary requirements is crucial before beginning your adventure into object detection with YOLO. Whether you intend to leverage the CPU or the GPU acceleration of your computer, these components are essential. As we analyze each prerequisite, it will become clear why it is essential for a successful YOLO installation:
1. Getting CMake >= 3.8: Making Software Building Easier and To Support CUDA (For CPU and GPU)
CMake is a handy tool that makes building and compiling software easier. It helps turn code that people can read into instructions that computers can follow.
How to Install
1. Open your terminal.
2. Type the following command to install CMake:
2. GPU Acceleration: Graphics Power (For GPU Only)
Using an NVIDIA graphics card equipped with CUDA cores offers the possibility of GPU acceleration, which can significantly improve object recognition performance. CUDA NVIDIA’s parallel computing platform leverages the immense processing power of GPUs for tasks beyond graphics rendering. The result is faster computations through parallel processing, leading to speed increases in object recognition, processing of complex models and large data sets, and cost-effective performance. By enabling GPU acceleration through CUDA, you can realize the full potential of your graphics card and take object recognition to new levels of efficiency and speed.
To install GPU on your system, click on this link for complete details on how to setup cuDNN.
3. OpenCV >= 2.4: (For CPU and GPU)
OpenCV is like a toolbox full of specialized tools for computers to understand and edit images and videos in real time. It’s a bit like giving your computer eyes and teaching it to recognize things in images and videos.
OpenCV is like a bonus feature for Yolo. When you install it, it adds a cool window that shows you what Yolo finds in images. It’s like Yolo saying, “Hey, look, I found a cat!” If you skip the installation of OpenCV, Yolo will still do its job, but it won’t show you images; it’ll show them as files instead.
How to Install
Method 1: Using Package Manager (apt-get)
1. Update Package List: Open a terminal and update the package list to ensure you have the latest information about available packages.
2. Install OpenCV Development Files: Install the OpenCV development files, which include libraries and header files required for development.
3. Install Python Bindings: Install the Python bindings for OpenCV.
4. Verify Installation: To verify that OpenCV is installed, open a Python interpreter in the terminal.
Inside the Python interpreter, import OpenCV and check the version.
print("OpenCV version:", cv2.__version__)
Method 2: Using the Python Package Manager (pip)
1. Install pip: If you don’t have pip installed, you can install it using the following commands:
sudo apt-get install python3-pip
2. Install OpenCV via pip: Install the main OpenCV package using pip.
3. Install OpenCV Contrib Modules via pip: If you want additional modules, install the opencv-contrib-python package.
4. Verify Installation: Open a Python interpreter and check the OpenCV version.
import cv2 print("OpenCV version:", cv2.__version__)
4. cuDNN for CUDA (for GPU)
CuDNN, short for CUDA Deep Neural Network, is a software library that enhances your graphics card’s ability to process complex deep learning computations. It’s like giving your graphics card an extra boost for handling tasks that require super-intelligent computations, such as training AI models and recognizing patterns in data.
The reason for installing CuDNN along with CUDA is simple: CuDNN is designed to work seamlessly with CUDA to run deep learning tasks much faster and more efficiently. While CUDA provides the platform for general parallel computation, CuDNN focuses specifically on optimizing the key operations needed for deep neural networks.
To install cuDNN on your system, click on this link for complete details on how to setup cuDNN.
5. OpenMP (for CPU): Parallel Processing
OpenMP facilitates parallel processing on CPUs, enhancing performance by simultaneously tackling tasks in smaller chunks.
Installation Steps:
1. Open your terminal.
2. Execute the following command to install OpenMP:
6. Additional Requirements (for CPU and GPU)
Here are some more prerequisites for configuring the CPU and GPU:
Installation Steps
1. Open your terminal.
2. Type this command and press enter:
Now, we are going to install YOLO, as our all-important prerequisite for YOLO is done.
7. Downloading YOLO
Now that we have the necessary prerequisites, let’s move on to acquiring the YOLO repository.
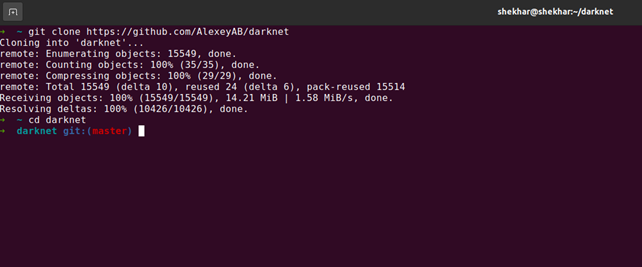
1. Clone the YOLO Repository: In your terminal, type the following command to clone the YOLO repository:
2. Navigate to the YOLO Directory: Move into the darknet folder by entering:
8. Makefile YOLO (edit the file according to the CPU or GPU system)
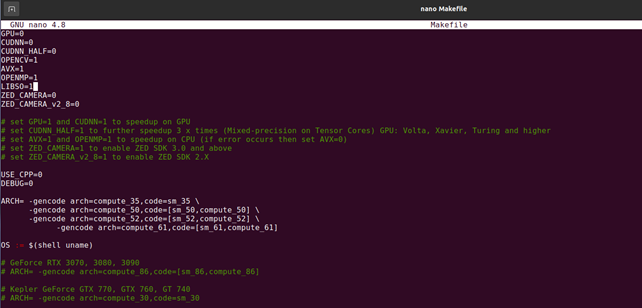
Now, we are going to build the YOLO. To do that, first we have to navigate to the darknet directory. As we have shown in step 7, after entering the darknet directory, open the Makefile in any editor of your choice. You can also open this through the system editor, nano.
We have to edit this Makefile according to the CPU or GPU system.
Option 1: For CPU System
If your system doesn’t have a GPU, then edit the Makefile variables like this (for CPU systems):
1. Open your terminal and type the following command to open the ‘Makefile’.
2. For the CPU, we have to set the below parameters inside of the Makefile.
Enable AVX = 1 and OpenMP = 1 for CPU acceleration (if an error occurs, disable AVX = 0), Enabling LIBSO = 1 creates a shared library called ‘libdarknet.so,’ which connects Darknet to Python for easier interaction.
CUDNN=0
CUDNN_HALF=0
OPENCV=1
AVX=1
OPENMP=1
LIBSO=1
3. Save and exit the text editor by pressing Ctrl + O, then Enter, and finally Ctrl + X.
Option 2: For GPU System
If your system has a GPU, then edit the Makefile variables like this (for GPU systems):
1. Open your terminal and type the following command to open the ‘Makefile’.
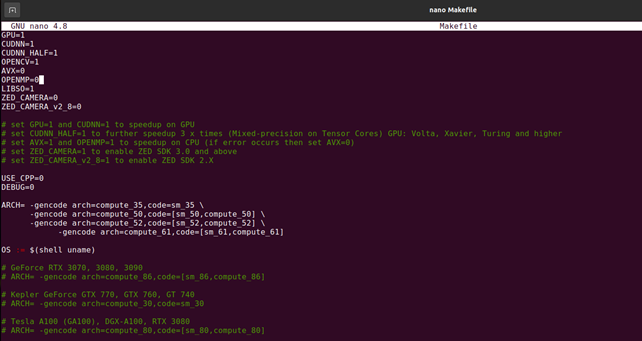
2. For the GPU, we have to set the below parameters inside of the Makefile.
Enable GPU = 1 and CUDNN = 1 for GPU acceleration or speed up. For a 3x speedup (Mixed-precision on Tensor Cores), set CUDNN_HALF=1
CUDNN=1
CUDNN_HALF=1
OPENCV=1
AVX=0
OPENMP=0
LIBSO=1
3. Save and exit the text editor by pressing Ctrl + O, then Enter, and finally Ctrl + X.
9. Building YOLO (Use either make or cmake for build)
Option 1: Using make command
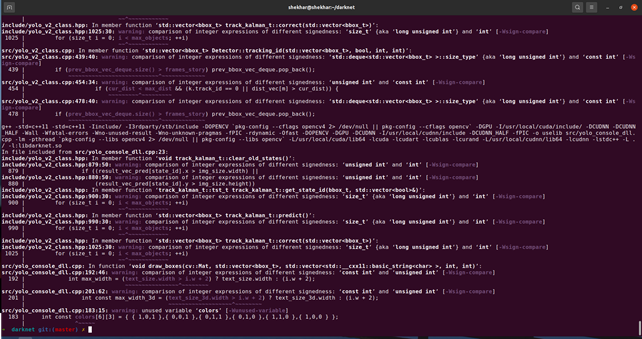
Now, we are going to build YOLO using the make command. Open the terminal inside the darknet directory and type the following command:
You might receive the output displayed below if everything goes according to expectations.
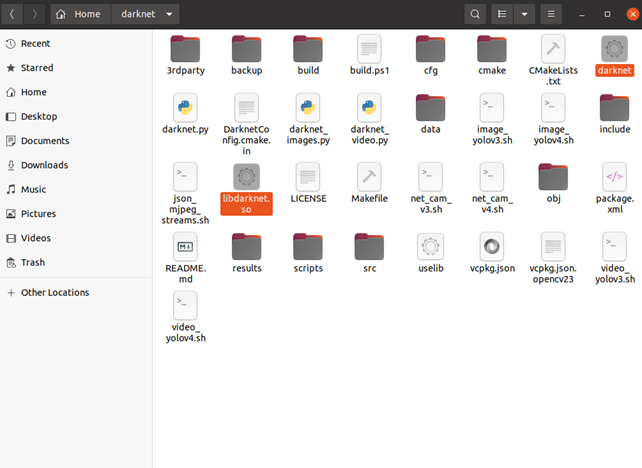
You will see two builds inside the darknet directory as shown in the screenshot:
1. darket
2. libdarknet.so
Option 2: Using CMake Command
To build using the CMake, you must have CMake version 3.18 or higher. If your CMake version is below this required version, then your installation will encounter errors. Therefore, it’s essential to update the CMake before starting the installtion procedure.
To check your current version of the CMake, use the following command.
If you find out that your CMake version is lower than the prerequisite, uninstall it using the following command and reinstall it.
To reinstall CMake with the new updated version, use the following command:
Using CMake build, you may create the darknet. Simply execute the commands listed below to build using Cmake. It is important to remember that the commands must be run from the darknet directroty inside.
cd build_release
cmake ..
make
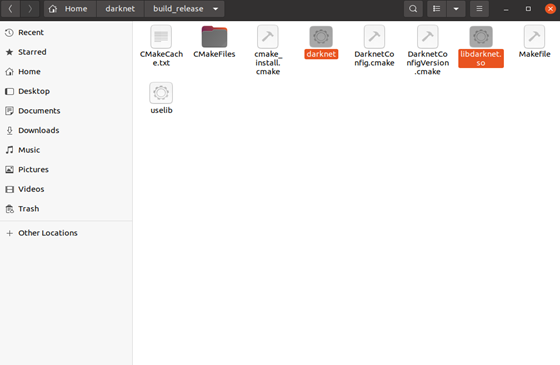
You will see two builds inside the build_release directory as shown in the above screenshot:
1. darket
2. libdarknet.so
Copy the darknet and libdarknet.so from the build_release folder to the darknet directory after creating those files. If the build creates libdark.so, simply rename it to libdarknet.so.
Testing YOLO
Now, let’s test whether YOLO is functioning correctly.
1. Download the YOLO Pretrained Model: Fetch the pretrained YOLO model for testing:
2. Run Object Detection: Perform object detection on a sample image using the downloaded model:
Output
After running the above code, you will see results like below, which show that you have successfully installed the Yolo Darknet on your system.

Real-Time Detection on a Webcam
To detect objects in real-time using the webcam, we can use the following command: As we already downloaded the Yolo3 weights before, just run this command.
Conclusion:
Congratulations! You have successfully installed YOLO on your Ubuntu or Linux machine. You have now equipped your computer with a powerful tool for object recognition in images and videos. By following these steps, you have taken a big step into the world of deep learning and computer vision. Try YOLO on various images and videos to see its capabilities in action.