Here are some of the benefits of using plugins in MLflow:
- Extensibility: Plugins allow you to extend the functionality of MLflow without having to modify the core MLflow code.
- Customization: Plugins allow you to customize the behavior of MLflow to meet your specific needs.
- Community: Developers and users of MLflow collaborate and exchange the plugins in an extensive and dynamic community.
Here are the steps on how to use the plugins in MLflow for extended functionality:
Understand the Plugin Architecture
Lets get familiar with the MLflow plugin architecture. Python plugins offer tailored implementations for particular MLflow features such as Tracking Server, Model Registry, and UI to design the plugins that can improve or alter how these components operate.
Structure of a Plugin
Here’s a basic structure for an MLflow plugin:
├── my_plugin/
│ ├── __init__.py
│ ├──<plugin_name>.py
├── setup.py
- The plugin package must be named mlflow_<plugin_name> where <plugin_name> is the name of the plugin.
- The plugin package must contain a “setup.py” file that defines the plugin entry points.
- The package must contain a <plugin_name>.py file that implements the plugin logic.
ATM Plugin
An ATM is a complex system that requires various software components to function correctly. The plugin needs to interact with the ATM’s operating system to get the user’s account balance, process withdrawals, and deposits, and dispense cash.
Create the Plugin Structure
Here is the directory structure to create a plugin, let’s say atm_plugin:
├── atm/
│ ├── __init__.py
│ ├── atm_machine.py
├── setup.py
Screenshot of the Plugin Directory


Define the Functionality of Plugin
Define the classes and methods that reflect the functionality of the ATM machine in “atm_machine.py”. The ATM class represents an ATM. These methods are available in the following classes:
- __init__(): This function is the class’s constructor. The initial account balance is an optional input that the constructor accepts. One-thousand (1000) is the initial account balance by default.
- check_balance(): This method currently gives the account balance.
- Withdraw(): This method lets you take money from a bank account. The approach accepts a number as an argument. The sum has to be a positive integer. The procedure gives an error message if the amount is more significant than the balance of the current account. If not, the process returns a message that verifies the withdrawal and withdraws the money from the account.
- deposit(): The money is deposited into the account using this method. The method used accepts a number as an argument. The sum has to be a positive integer. The process adds the funds to the account and sends a message back to confirm the deposit.
def __init__(self, cust_account_balance=1000):
self.cust_account_balance = cust_account_balance
def check_balance(self):
return self.cust_account_balance
def withdraw(self, withdraw_amount):
if withdraw_amount <= 0:
return "Invalid withdrawal amount"
if withdraw_amount > self.cust_account_balance:
return "Insufficient funds"
self.cust_account_balance -= withdraw_amount
return f"Withdrawn {withdraw_amount} units. New balance: {self.cust_account_balance}"
def deposit(self, deposit_amount):
if deposit_amount <= 0:
return "Invalid deposit amount"
self.cust_account_balance += deposit_amount
return f"Deposited {deposit_amount} units. New balance: {self.cust_account_balance}"
Create the Plugin Entry Point
The “setup.py”, which requires multiple parameters, adds a plugin’s entry point, name, version, packages, and entry points to configure a Python module.
The setup() method is setup in the following code:
- The atm_plugin is the package’s name.
- Change the package’s version to 1.0.
- Locate and add to the package every package in the current directory.
- Include a point of entry for the atm command. A console script called “atm” launches the ATM machine.
- Any package in the current directory can be found using the find_packages() method. Python packages are looked for using the find_packages() function in the current directory and any subdirectories.
sp( version='1.0', packages=fp(), name='atm_plugin',
entry_points={
'console_scripts': [
'atm = atm.atm_machine:main',
],
},
)
Register the Plugin
The entry_points arguments to the setup() function provides the entry points for the package. An entry point can be registered via command or with the help of function that is reachable from the command line interface.
Install and Use the Plugin
To install the plugin, use the pip command in the bash or command prompt. For instance, the subsequent command is used to install the atm_plugin:

Install the Plugin Package in Edit Mode
The “pip install -e.” command is employed to install a Python package that can be modified. This means that the package is installed in the current directory, and any changes made to the module’s source code are reflected in the final output.
The word “editable” is denoted by the -e option to the pip install command.
The command instructs pip to install the package from the current directory and finishes with a dot (.). Pip makes a link to the package’s source code in the Python environment when we install a package in editable mode. As a result, any modifications made by developers to the package’s source code are mirrored in the finished product.
The Python package development benefits from editable mode. We can modify the source code while the Python package is still operational without reinstalling it by installing it in editable mode.

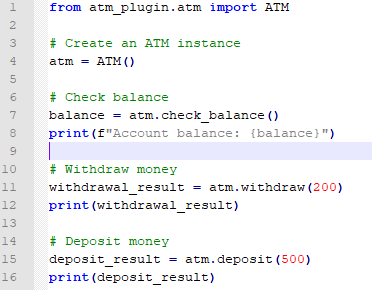
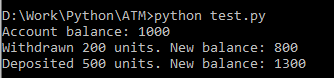
Run the ATM Simulator
The atm_plugin module or plugin is imported in the first line which is where the ATM class is found. The ATM class represents an ATM machine. A new instance of the ATM class is created in the second line. The atm_obj variable is given the instance. The check_balance() method is invoked on the atm_obj instance in the third line. The user’s account balance is returned via the check_balance() method. The console receives a printout of the balance. The withdraw() method is invoked on the atm_obj instance in the fourth line. The user’s account is withdrawn using the withdraw() method.
The withdraw() method receives the withdrawal amount as an argument. The console is printed with the withdrawal’s outcome. The deposit() method is invoked on the atm_obj instance in the fifth line. The user’s account receives money through the deposit() method. The deposit() method receives the deposit amount as an argument. The console is printed with the deposit’s value.
Uninstall the Plugin
Pip first checks to see if the atm_plugin package is installed on the system when we issue the pip uninstall atm_plugin command. If it isn’t set up, Pip just stops working. If the atm_plugin has previously been installed on the system, Pip then uninstalls it. The atm_plugin package is eliminated by pip from the system file system and the Python environment.
Please take note that Pip also uninstalls any dependencies that were set up along with the atm_plugin package. For instance, Pip also uninstalls the requests package if the atm_plugin package depends on it.

![]()
Conclusion
Plugins are a potent tool to increase MLflow’s functionality. We may add support for new machine learning frameworks, model serving platforms, and other tools using plugins.