The most impactful act to increase website security is by configuring the HTTP security headers which can be done by the utilization of specific middleware like helmet.js.
This guide illustrates the procedure to secure a node.js application using helmet.js by covering the following sections:
How to Secure Applications Using Helmet.js in Node.js?
Setting Up Express Application Without Helmet.js
Securing Express Application With Helmet.js
Configuring the Security Headers in a Helmet.js Module
- Setting Up Strict-Transport-Security Header
- Setting Up Content-Security-Policy Header
- Setting Up Referrer-Policy Header
- Setting Up X-Content-Type-Options Header
- Setting Up X-Frame-Options Header
How to Secure Applications Using Helmet.js in Node.js?
The “Helmet.js” is a node.js module that is used as a middleware in express applications to secure the website headers that may get attacked. By the utilization of this module, an extra layer of security in the form of website headers gets generated which makes it a lot harder to exploit client-side vulnerabilities like Cross-Site Scripting or Clickjacking.
Let’s first have a look at the below sections to get a better understanding of the importance and working of helmet.js in node.js.
Setting Up Express Application Without Helmet.js
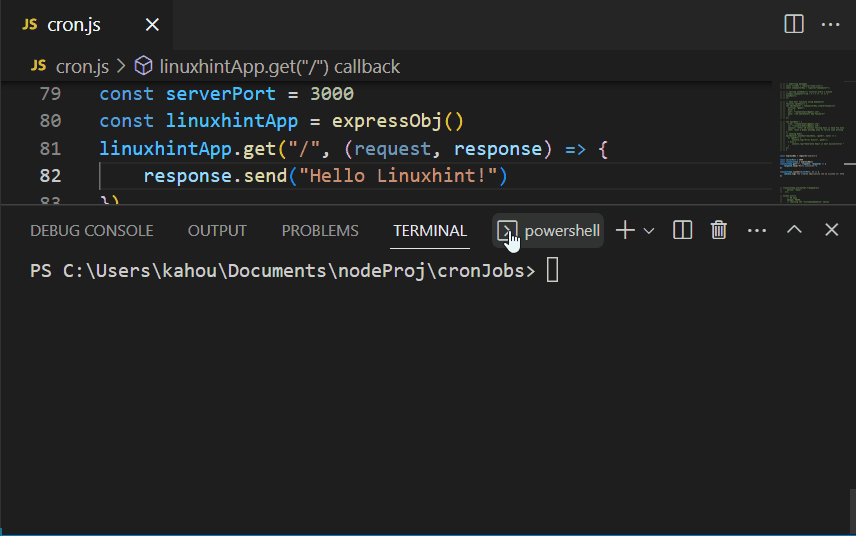
Traverse into the already created node.js application and create a new “.js” type file with a random name which is “cron.js” in our case. After that, insert the below lines of code in it, to set up a basic express application:
const serverPort = 3000
const linuxhintApp = expressObj()
linuxhintApp.get("/", (request, response) => {
response.send("Hello Linuxhint!")
})
linuxhintApp.listen(serverPort, () => {
console.log(`The created application can be visited on: http://localhost:${serverPort}`)
})
In the above code:
- First, import the “express” module using a “require()” method and store the output in the “expressObj” variable. Using this variable an express application named “linuxhintApp” is created and the port number of “3000” is also set in a “serverPort” variable.
- Next, attach the “get()” method that uses its “response” callback parameter to display or send dummy text over the user side via the “send()” method.
- Finally, the created “linuxhintApp” is executed or configured over the specified port number by invoking the “listen()” method.
Now, run the containing “cron.js” file by executing the below-mentioned command:
After That, open the “Windows Powershell” or a new terminal window and execute the below-stated command to display the running application “linuxhintApp” headers:
Our custom-created application is running on localhost with the port number of “3000”. So, the above command modifies according to our condition like this:
The below gif demonstrates the execution process and the website headers of the created express application:
If you are a “Linux” user, then execute the below command to retrieve the application headers:
Securing Express Application With Helmet.js
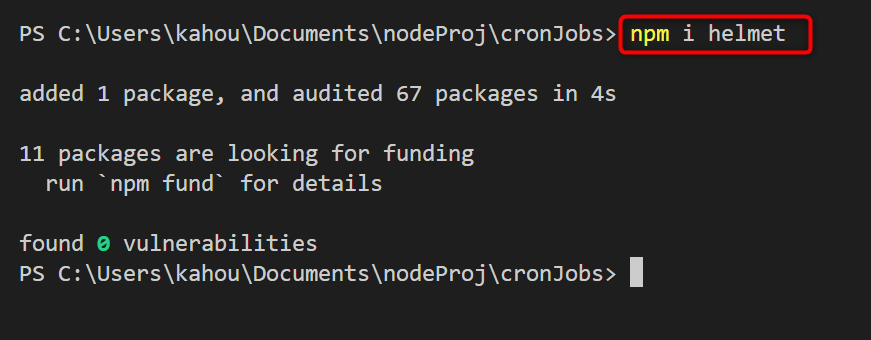
The “helmet” module secures the express application headers to ensure that the data does not get leaked by the application headers when the attack gets launched. Multiple headers get inserted or added with the express application which makes the application headers more secure and less prone to attackers. This “helmet” application does not install by default, so it needs to be installed locally by executing the below command:
The below figure shows the installation of the “helmet” module:
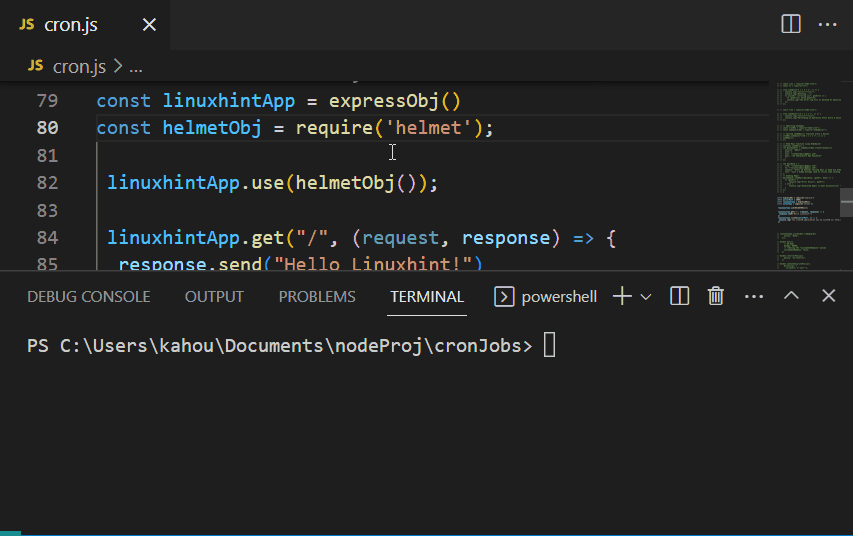
Now, the previous code of the express application gets modified like this:
const serverPort = 3000;
const linuxhintApp = expressObj()
const helmetObj = require('helmet');
linuxhintApp.use(helmetObj());
linuxhintApp.get("/", (request, response) => {
response.send("Hello Linuxhint!")
})
linuxhintApp.listen(serverPort, () => {
console.log(`The created application can be visited on: http://localhost:${serverPort}`)
})
In the above code, the installed “helmet” module is imported and its object is stored in the “helmetObj” variable. This variable is then passed as a middleware for the express application by the utilization of an express “use()” method, the rest of the code remains the same.
The practical implementation of the “helmet.js” module in the express application is shown below:
Configuring the Security Headers in a Helmet.js Module
It is clear from the above output that the “helmet.js” module sets multiple headers by default to achieve better security for the application. However, these headers can be configured and set according to the application owner’s requirements. These header’s default values can be modified and only one or some of these headers can be applied to an application.
The purpose and meaning of these headers are illustrated in below tabular format:
| Security Headers | Description |
| Content-Security-Policy | The “CSP” sets up the security policy to mitigate attacks like cross-site scripting and data injection. It has the default value of “default-src ‘self’;base-uri ‘self’;font-src ‘self’ https: data:;form-action ‘self’…”. |
| Cross-Origin-Opener-Policy | This header specifies the origin of your express application and it is set to “same-origin” by default. |
| X-DNS-Prefetch-Control: | It is utilized to control the fetching operations of the currently used browser DNS. |
| X-Powered-By | It is Utilized to remove information provided by the “X_Powered-By” header, as it leaks information about the application version and vendor name. |
| Referrer-Policy | Identifies if there is any referrer of the express application or not. It has the default value of “no-referrer”. |
| Strict-Transport-Security | It is also referred to as “HSTS” and it specifies that the assets are only accessible from “HTTPS” or “HTTP” in case of utilizing the “max-age” variable. It has the default value of “max-age=15552000; includeSubDomains”. |
| X-Content-Type-Options | This header specifically deals with the prevention of sniffing attacks and has the default value of “nosniff”. |
| X-Download-Options | It handles the downloading options and sets if the downloaded file gets opened automatically or not. It is by default set to “no open”. |
| X-Frame-Options | The “X-Frame-Options” specifies whether or not the rendering of the single webpage is allowed by the browser. |
| X-XSS-Protection | It adds an extra layer of protection from XSS attacks. |
Now, consider a couple of examples to implement and attach a specified single header with our express application.
Setting Up Strict-Transport-Security Header
This header deals with the application resources transportation configuration by navigating the browser to use HTTPS instead of HTTP. This header provides a parameter named “maxAge” containing seconds for which the browser remembers to use “HTTPS” as a preference.
It has the default value of “15552000” which is equivalent to “180” days. In the below code snippet, the value of “maxAge” is going to be set for 2 days or “172800” seconds, as shown below:
const serverPort = 3000;
const linuxhintApp = expressObj()
const helmetObj = require('helmet');
linuxhintApp.use(helmetObj.hsts({
maxAge: 172800,
}));
linuxhintApp.get("/", (request, response) => {
response.send("Hello Linuxhint!")
})
linuxhintApp.listen(serverPort, () => {
console.log(`The created application can be visited on: http://localhost:${serverPort}`)
})
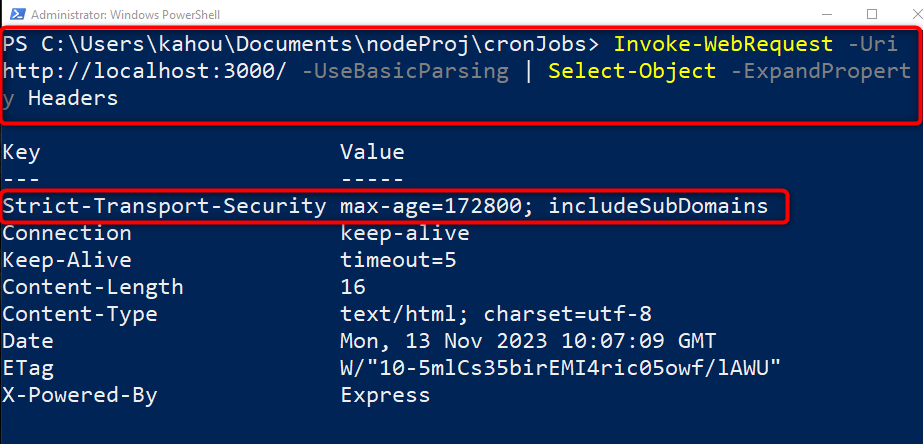
The above-shown code is the same as has already been discussed in the above section. Only the “hsts()” method is attached to the “helmet.js” module object. The “hsts()” method identifies the “Strict-Transport-Security” header and the value in seconds for which the browser can remember to give preference to the “HTTPS” site is assigned to its “maxAge” parameter. In our case, the provided value in seconds is equivalent to “2” days.
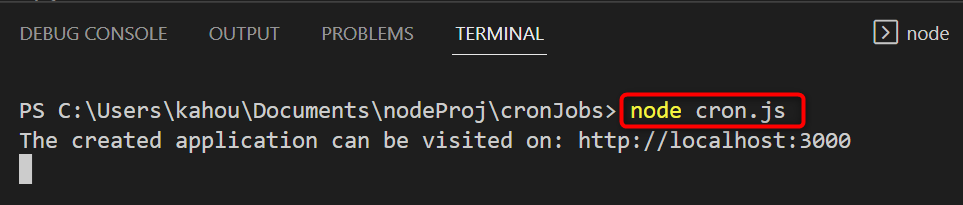
Now, execute the containing “corn.js” file to serve the application over the localhost by executing the below command:
The below figure shows that the file has been executed and the application is served to a specified port number “3000” successfully:
Then, execute the below-mentioned to retrieve data about the headers:
The below output shows that now only specified header with custom-defined value is applied:
Setting Up Content-Security-Policy Header
The “Content-Security-Policy” or CSP allows you to specify the web page resources that are allowed to load and run. By restricting the resources of a webpage, the chances of successful data injection or XSS attacks are reduced a lot. It has the default value of:
According to the above-stated default value of the “CSP” header, the webpage is not allowed to load or run remote styles, scripts, or fonts. To customize this behavior use the “contentSecurityPolicy()” method and pass the allowed resources as parameters, as shown below:
linuxhintApp.use(helmetObj.contentSecurityPolicy({
useDefaults: true,
directives: {
"style": "bold",
},
})
);
In the above code block:
- The “useDefaults” with the value set to “true” is passed showing the default values for other parameters that are going to be used.
- Then, inside the “directives” section the allowed resources with custom values are assigned which is “style” in our case.
- The remaining code remains the same as described in the above section.
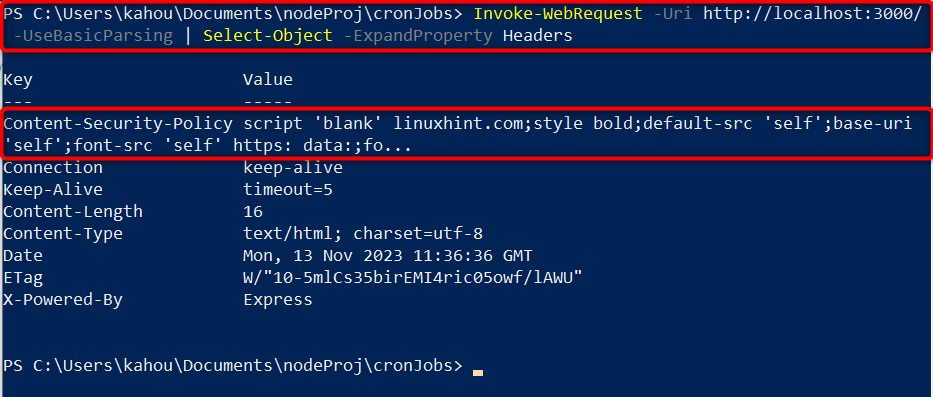
Now, execute the containing file and retrieve the header information by executing the below commands:
node cron.js
// for Headers Retrieval
Invoke-WebRequest -Uri http://localhost:3000/ -UseBasicParsing | Select-Object -ExpandProperty Headers
The output shows that the only single “helmet.js” header has been attached along with the custom-allowed values and the remaining properties are displayed unchanged:
Setting Up Referrer-Policy Header
The “Referrer-Policy Header” deals with the data sent by the referrer whenever the user clicks on a third-party website link. Although, the referrer data is passed for caching or analytics purposes, if these referrer data also contains sensitive data that may lead to the vulnerability of a whole application.
The “referrerPolicy()” method provided by “helmet.js” restricts or blocks the “referrer” policy which affects the caching process but prevents the chances for unethical attacks. Visit the below code for a practical demonstration:
linuxhintApp.use(helmetObj.referrerPolicy({
policy: "no-referrer",
})
);
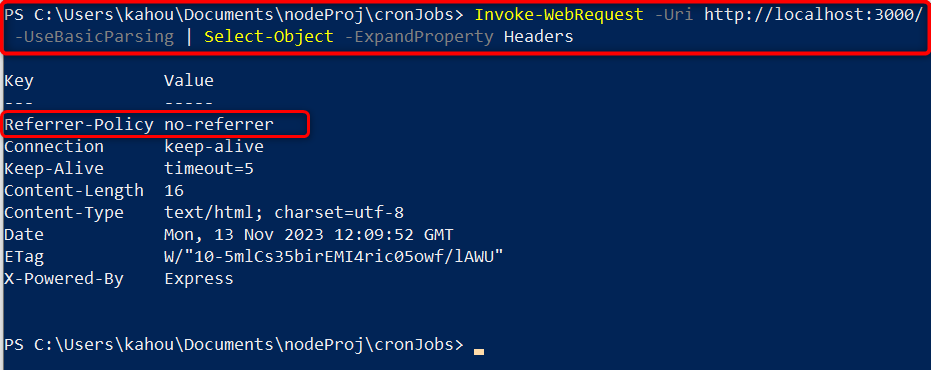
The above code block describes only the modified part, the rest of the code remains the same as described in the above sections. After serving the application, run the header data fetcher command to retrieve the data about attached headers by executing the below commands:
node cron.js
// for Headers Retrieval
Invoke-WebRequest -Uri http://localhost:3000/ -UseBasicParsing | Select-Object -ExpandProperty Headers
The below-retrieved headers data shows that a single “Referrer-Policy” header of helmet.js is attached and a custom value is assigned to it:
Setting Up X-Content-Type-Options Header
To helmet.js “X-Content-Type-Options” header is specifically configured and set up with the targeted express application to prevent the “ClickJacking” or MIME type “Sniffing”. It is done by directly applying the “noSniff()” method with the “helmetObj” variable, as shown below:
linuxhintApp.use(helmetObjnoSniff());
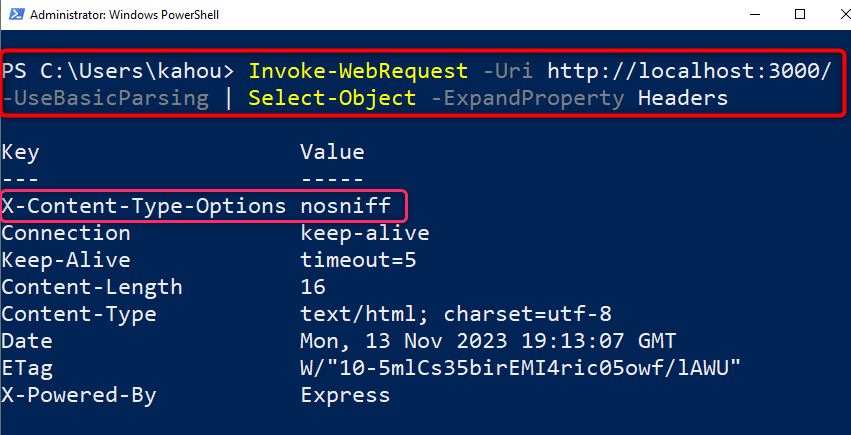
After the specified modification, execute the containing file and retrieve the header information by executing the mentioned commands:
node cron.js
// for Headers Retrieval
Invoke-WebRequest -Uri http://localhost:3000/ -UseBasicParsing | Select-Object -ExpandProperty Headers
The retrieved headers show that the desired header having a specified value has been applied to our express application:
Setting Up X-Frame-Options Header
The X-Frame-Options HTTP header allows or prevents the browsers to re-render the HTML element like “<frame>”, “<object>”, “<embed>” and “<iframe>”. By preventing the content of your webpage from embedding the famous click-jacking attacks can be prevented which arise when the user clicks on some faulty ads or UI elements.
The default value of the “X-Frame-Options” header is set to “SAMEORIGIN” which allows the browser to embed the elements if the request is sent from the same origin. This header is specifically set from the “frameguard()” method, as shown below:
linuxhintApp.use(
helmetObj.frameguard({
action: "deny",
})
);
In the above code block:
- the modified code to be placed inside the express module “use()” method is displayed.
- Inside this method, the “frameguard()” method is invoked via the “helmetObj” variable, and the operation to stop any embed content operation is set. Bypassing the parameter of “action” along with its value of “deny”.
- The remaining code about sending dummy data and serving this application on localhost with the port number “3000” remains the same.
Now, execute the containing “cron.js” file via:
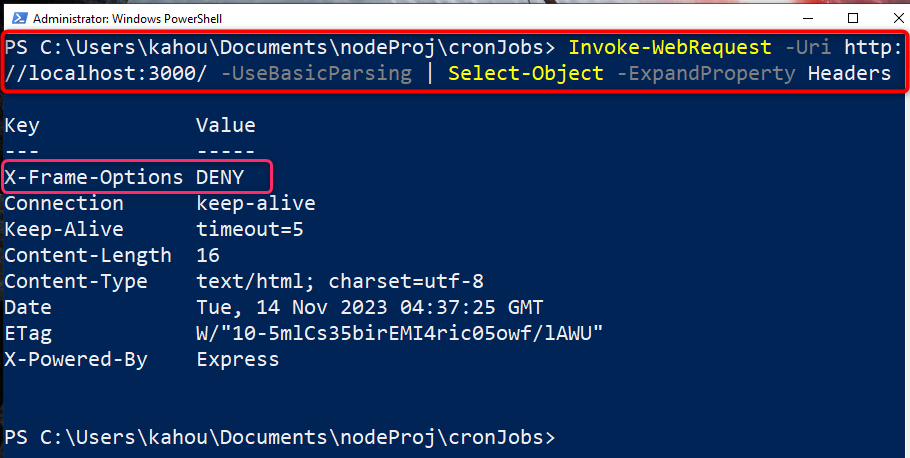
After serving the application locally, retrieve the information about the assigned headers by running the below-stated command:
The below output shows that the targeted “X-Frame-Options” header has been set having custom defined value:
That’s all about securing the applications using helmet.js in node.js.
Conclusion
The “helment.js” module is specifically used to secure express-based Applications in node.js. It is added via the “use()” method as a middleware and by default applies various headers with the application that prevent the leakage of any sensitive data and various attacks. These headers can also be modified and only specific headers can also be attached to the applications. This guide has explained the procedure to secure the applications using helmet.js in node.js.