Let’s understand the basics of what Node.js is.
The request is sent to the server whenever a web application user clicks on a button. The request is processed at the server’s end, and a response is sent back to the client. Node.js is a framework of javascript that helps in establishing and handling the working of the server. Node.js is a powerful tool that allows your application to function smoothly outside the web browser. It is used in industry to create server-side applications for real-time tasks like video streaming and online chatting.
Node.js: The core of Backend Web Development.
Node.js is a powerful and versatile tool in the domain of web development. It uses a powerful V8 Javascript engine(the same that powers Google Chrome). It works beyond the scope of the web browsers which is a key functionality of Node.js. Many developers prioritize it due to its speed.
Conventional servers encounter some errors because they generate distinct threads for every request which causes complications. Node.js takes a different and more efficient approach. Due to its asynchronous I/O functionality, it can handle multiple tasks simultaneously. When Node.js is fetching some info from the database it does not halt but does some more tasks in the background and sends the required information for the generated requests.
Lastly, the best-known functionality of Node.js is that it can manage multiple connections at once with a single server. Node.js effectively handles the problems that arise with thread management.
Now let’s have an overview of the architecture of Node.js for proper understanding.
The Overview of Architecture of Node.js
Now that we have a basic understanding of Node.js, let’s examine its architecture. Node.js operates on a single-thread architecture, which allows it to handle multiple event loops at once. Below is an image that shows the architecture of Node.js:
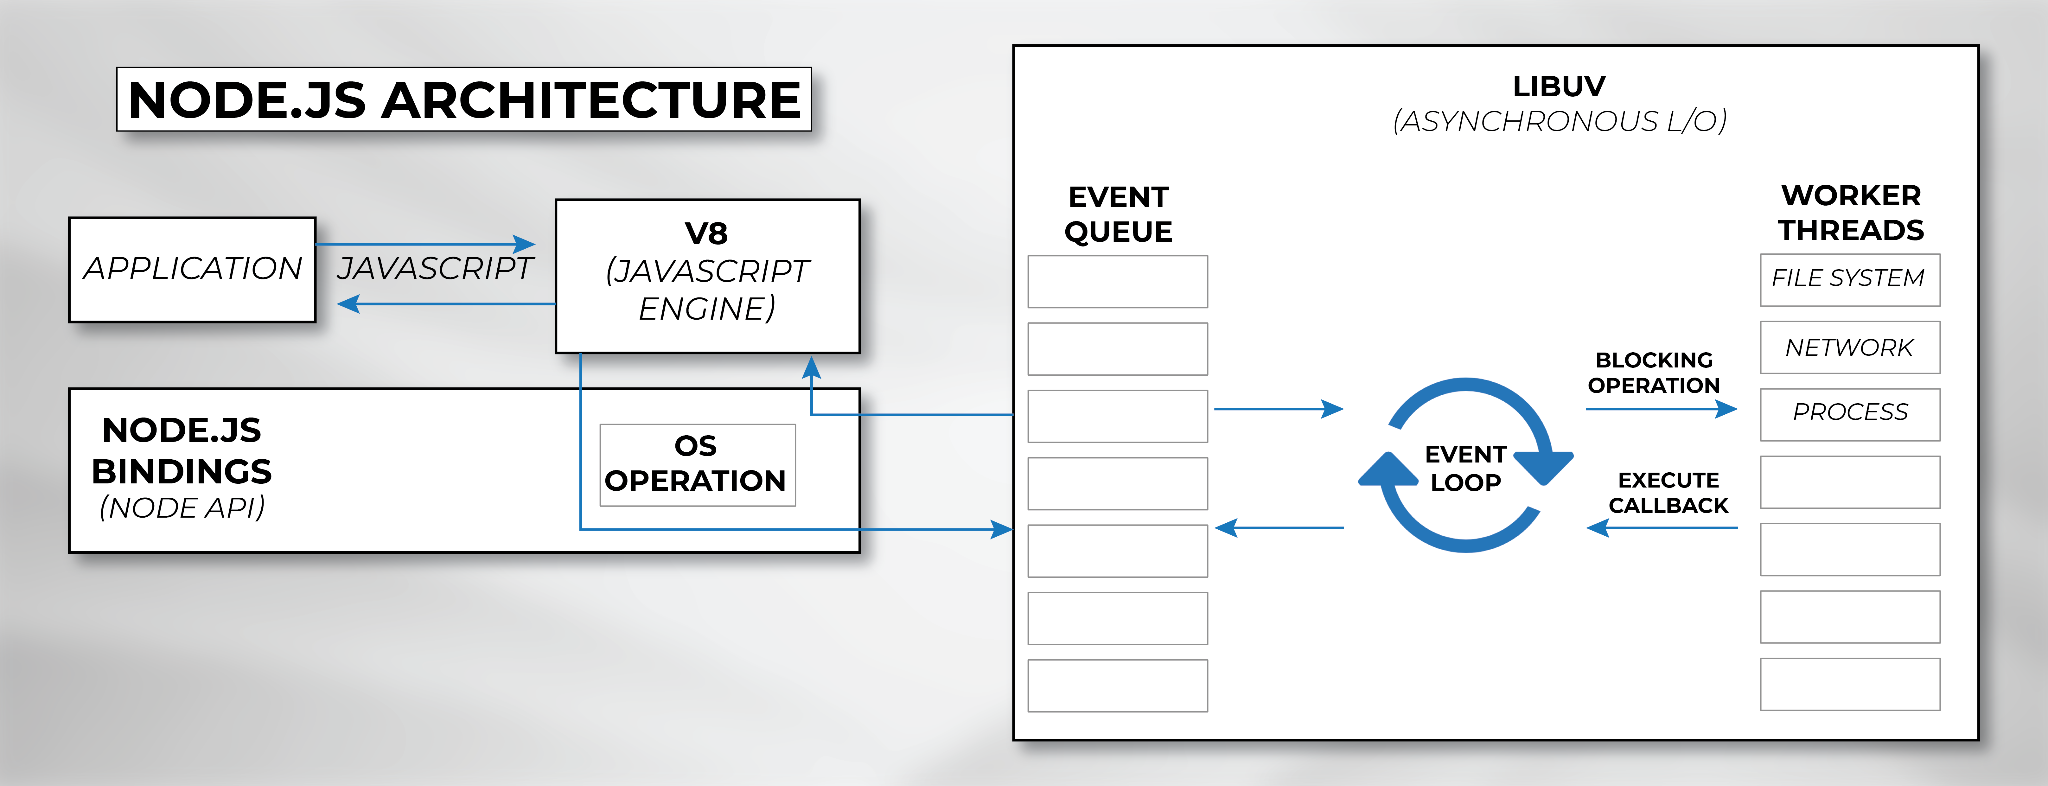
Because of the architecture, Node.js can effectively manage many tasks at once, improving its performance when managing different events on a single thread.
Node.js Components
These are the main components of Node.js to get a server-side understanding.

Let’s break down each component.
Node.js Modules
In Node.js modules are the libraries of Javascript that offer numerous functionalities. By importing the desired ones in the code, users can use their functionality instead of writing custom code for those features. A module can be included using the “require()” function in Node.js. In its parameter, the module is passed that the user wants to use.
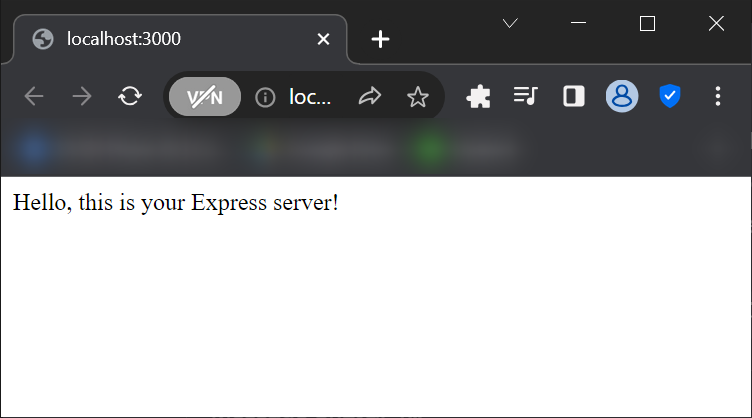
An example is given below in which the express module is used and the server is created in the local host:
const app = express();
const port = 3000;
app.get('/', (req, res) => {
res.send('Hello, this is your Express server!');
});
app.listen(port, () => {
console.log(`Server is running on http://localhost:${port}`);
});
In the above code:
- “const express = require(‘express’)” imports the express module in the code to make an express server.
- “const app = express()” creates an instance of the express application and the “app” object is the core of an Express application. Users can use this to handle HTTPS requests and configure routes.
- “app.get(‘/’, (req, res) => {})” defines the route for the HTTP requests where ‘/’ shows the root path at the local host, “req” shows the incoming HTTP request, and “res” shows the response from the server side.
- “app.listen(port, () => {})” shows that the server has started and is listening on port 3000 for the local host.
The above code just shows the functionality of the require() function which in the above case uses the express module.
Output
Users can verify the code result by running the following command on the server:
Example.js is the name of the file. After running this command the terminal will show the following result:

This indicates that the server is now running on port 3000 and user can paste the link into the browser and the following result will appear:
Now let us explore some other components of Node.js.
Node.js Console object
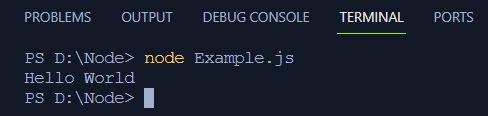
The console used with the .log() function is used to log the results to the terminal or more simply used for showing the outputs of the code script. It is used for debugging and shows the code flow by appropriately displaying the output of the code. A simple example that every programmer starts with is by printing the “Hello World” in the terminal:
This would log the Hello World line in the terminal by running the “node Example.js” command:
Node.js Cluster
Users can scale the Node.js applications by using the cluster module to create multiple processes or workers to handle the incoming requests. The core advantage of the multi-core processor is that each worker functions in a separate thread. The worker processes’ responsiveness and efficiency are increased by the master process, which distributes incoming connections among them.
Now consider a simple cluster example to understand the use of it:
if (cluster.isMaster) {
console.log(`Master process ID: ${process.pid}`);
cluster.fork();
cluster.on('exit', () => cluster.fork());
} else {
console.log(`Worker process ID: ${process.pid}`);
const http = require('http');
http.createServer((req, res) => {
res.writeHead(200);
res.end(`Hello from worker ${process.pid}!`);
}).listen(3000);
}
In this code:
- “const cluster = require(‘cluster’)” imports the cluster module in Node.js and the user can use its functionality to create workers in a multi-core system.
- “if (cluster.isMaster)” checks if the current process is a Master process
- “console.log(Master process ID: ${process.pid})” logs the process id to the terminal. It returns the PID of the current process.
- “cluster.fork()” creates a new worker process. It would work in conjunction with the master process.
- “cluster.on(‘exit’, () => cluster.fork())” checks for if a worker has exitted. If this is the case then the master would create another worker using the “cluster.fork()”.
- “console.log(Worker process ID: ${process.pid})” would print the process ID of the worker process to the console.
- “const http = require(‘http’)” imports the http module which is used to create the HTTP server.
- “http.createServer((req, res) => {“ creates an HTTP server that handles the incoming requests.
- “res.end(Hello from worker ${process.pid}!)” sends a response body that includes a simple message containing the process id.
- “}).listen(3000)” listens on port 3000 for incoming requests.
Output
Run the following command in the terminal:
In the terminal, the master and worker process IDs would show up:

The port 3000 in the browser would show up as:

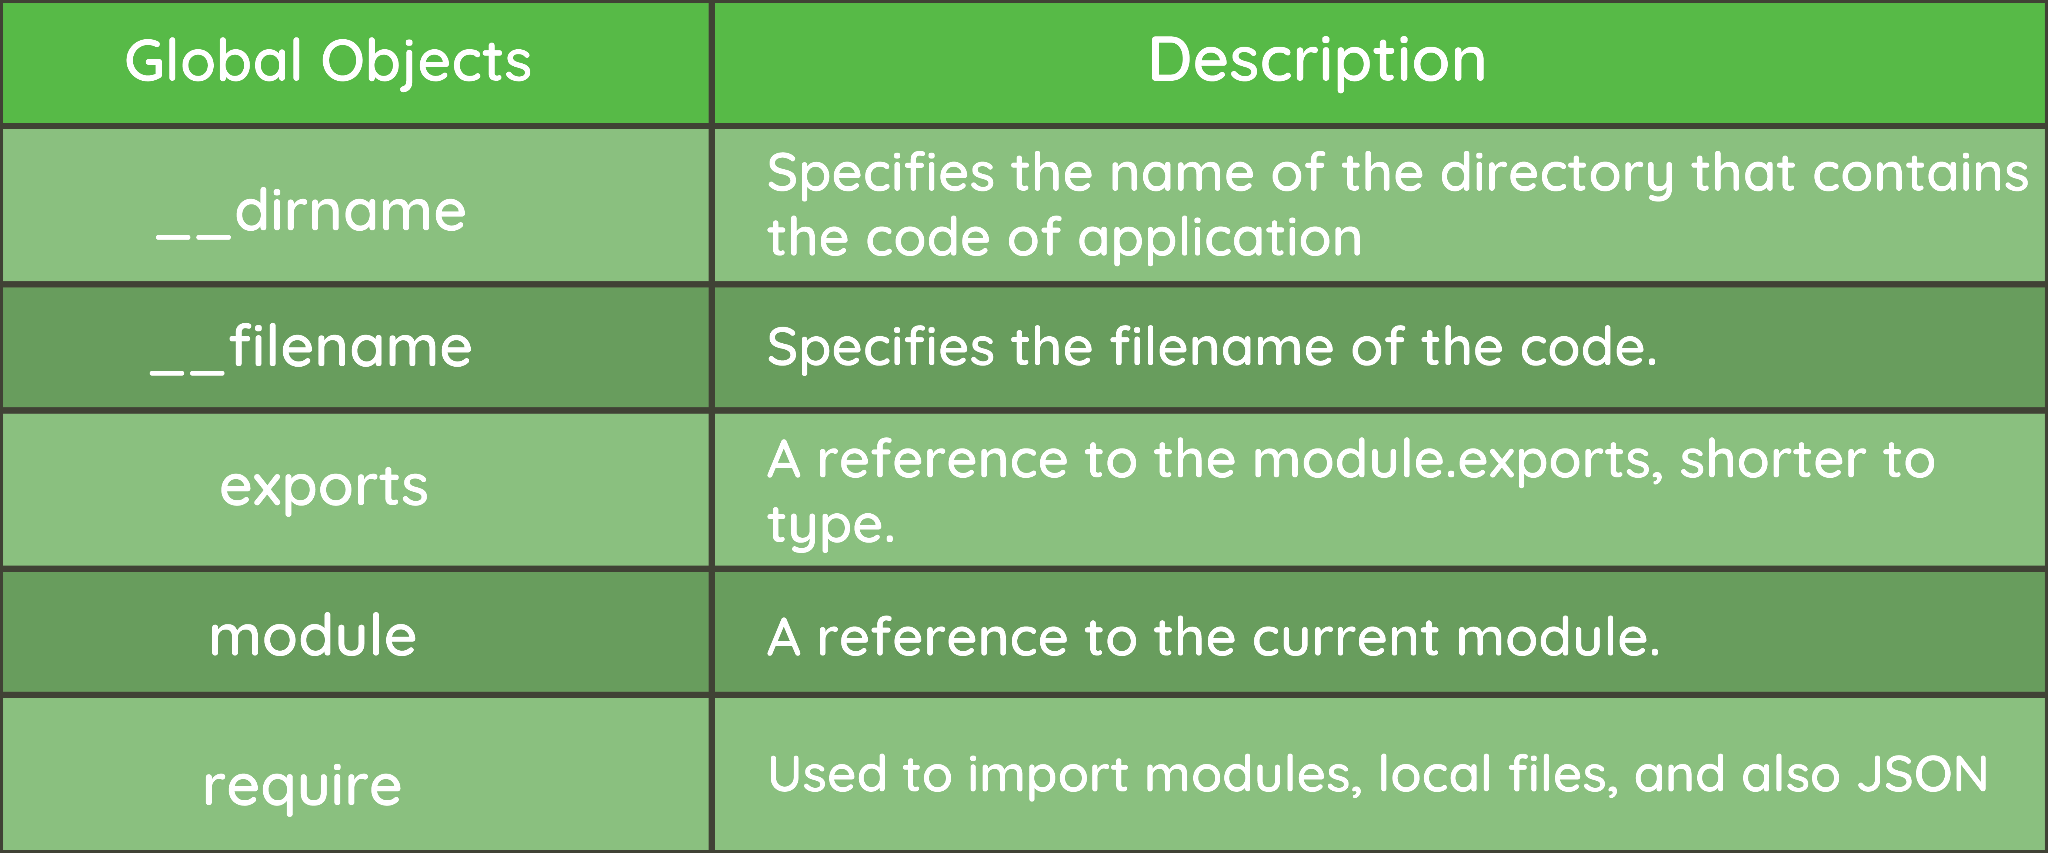
Node.js Global Objects
Global objects in Node.js are available in all modules and contain necessary features like timers, processes, and consoles. The objects serve as a foundation for creating and interacting with Node.js applications, guaranteeing consistency across various modules.
Error Handling In Node.js
Node.js applications encounter 4 types of errors:
- Standard Javascript errors
- System errors
- User-specified errors
- Assertion errors
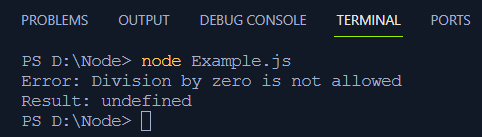
For handling errors in Node.js exceptions are used. For example, an error occurs when a number is divided by zero. This would crash the Node.js application so proper handling of the error will continue normal execution.
In the above code, the division error by zero is handled using try-catch. The above code would ensure smooth code execution would not stop the code execution at any point and would show the following result in the terminal:
Node.js Streaming
Node.js streams are categorized as Readable, Writable, Duplex, and, Transform. They efficiently process data in parts by minimizing memory usage. They are best for handling file operations and network communication as they continuously read, write, or transform data.
Node.js Buffer
The Node.js buffer module makes it easier to work with binary data streams by allowing empty buffers to be created and offering data manipulation functions. It is an essential part of effectively managing binary data in Node.js applications.
An example to consider is writing an integer value to a buffer and then decoding the value:
buffer.writeInt32BE(42, 0);
const value = buffer.readInt32BE(0);
console.log(`Encoded Buffer: ${buffer.toString('hex')}`);
console.log(`Decoded Value: ${value}`);
In this code:
- “const buffer = Buffer.alloc(4)” allocates 4 bytes to the buffer.
- “buffer.writeInt32BE(42, 0)” writes the number “42” to the buffer.
- “const value = buffer.readInt32BE(0)” decodes the number from the buffer and stores it in the value variable.
- In the end, the encoded and decoded values of the buffer are logged to the terminal.
Output
The output produced by the execution of the above code would be:

Node.js Domain Module
The domain module in Node.js can intercept errors internally and externally by binding them to certain error events. This enables centralized management of uncaught errors in a domain. This practice enhances the error-handling strategy for applications.
Node.js DNS
The DNS module is responsible for connecting the Domain names and IP addresses. It can support network-based resolution for handling external queries and local resolutions without network communication. This module handles all the things related to the domain servers in Node.js applications.
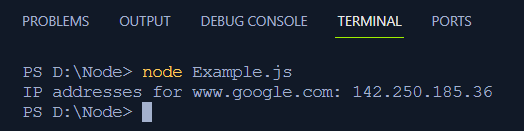
Consider a simple example that converts the domain name into its IPv4 address:
const domainToResolve = 'www.google.com';
dns.resolve5(domainToResolve, (err, addresses) => {
if (err) {
console.error(`Error resolving ${domainToResolve}: ${err.message}`);
} else {
console.log(`IP addresses for ${domainToResolve}: ${addresses}`);
}
});
In this code:
- “const dns = require(‘dns’)” imports the DNS module in Node.js.
- “const domainToResolve = ‘www.google.com’” specifies the domain for which the IP address is to be resolved.
- “dns.resolve4(domainToResolve, (err, addresses) => { … })” uses the dns.resolve4 method to asynchronously resolve the Ipv4 address for the mentioned domain.
- The if-else block checks if there is any error then it logs the error message otherwise it would print the resolved IP address.
Output
The resolved IPv4 address of the associated domain would log into the terminal:
Node.js Debugger module
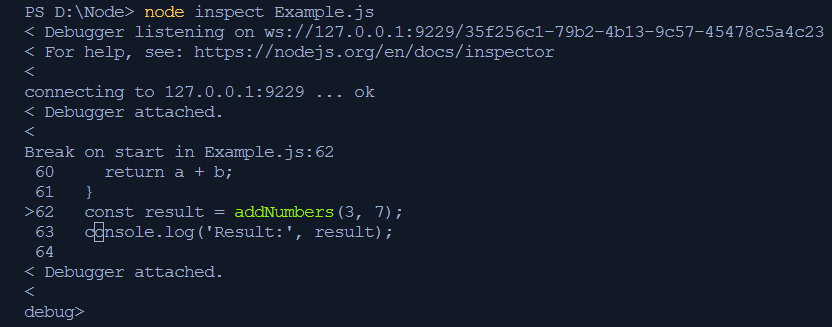
You can use the debugging tool offered by Node.js by adding the ‘inspect’ keyword to the JavaScript file name in the terminal. This activates the integrated debugging client, which enables developers to utilize Node.js’s debugging features to efficiently inspect and debug their code.
Let’s consider a simple example for debugging:
debugger;
return a + b;
}
const result = addNumbers(3, 7);
console.log('Result:', result);
This is a simple code to calculate the sum of the two numbers.
For running this code by using debugging techniques run the following command with the desired filename:
It would give the following output in the terminal:
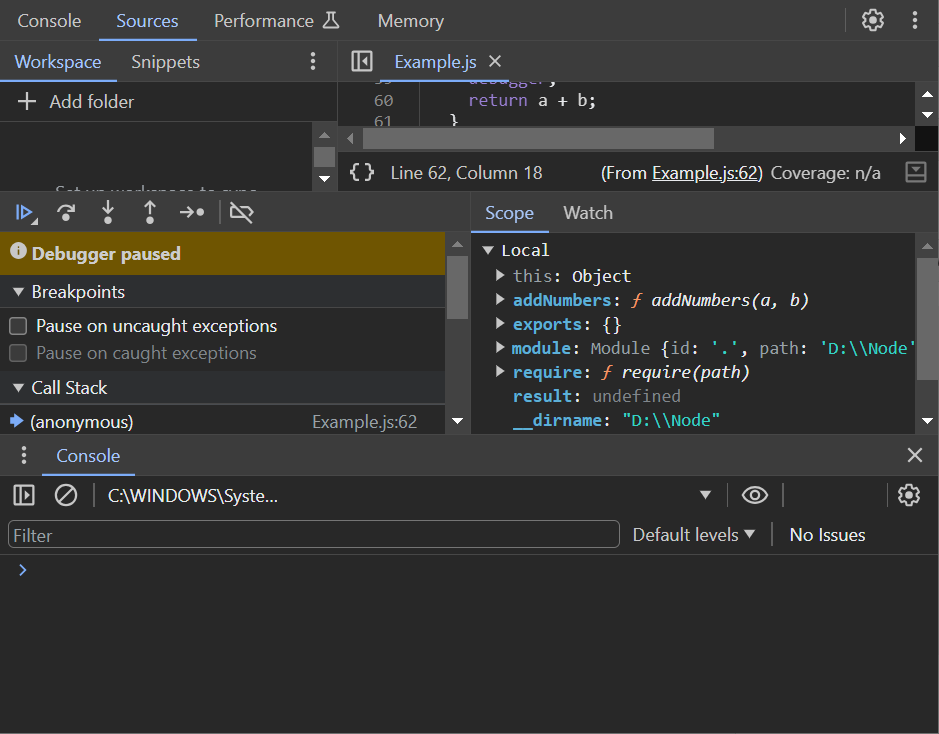
Now go to Chrome browser and type “chrome://inspect” in the address bar.

After this click on the inspect button and the following window will appear where the user can inspect and debug the code:
Now that we have an understanding of each component of Node.js let us have a look at its real-life applications.
Node.js Practical Applications
Node.js is becoming a choice of every developer due to its versatility and reliability. Its extensive integration into the applications highlights its importance. Big businesses like NASA, Netflix, Walmart, Uber, PayPal, and Walmart use Node.js because of how well it handles data-intensive applications. Node.js’s ability to manage a large number of concurrent users makes it a potent rival in the web development domain.
Its extensive use in the world and more importantly, by market-dominant companies makes Node.js a potent competitor.
That’s all to have a basic understanding of Node.js.
Conclusion
This article explains the important concepts of Node.js, its role in web development, architecture, and core components. All the modules were discussed with appropriate examples like streams, buffers, domains, DNS, etc. Major corporations such as NASA, Netflix, and Walmart have adopted Node.js in the real world, demonstrating its ability to handle big data applications and manage all the users simultaneously thus proving itself a potent tool in the web development domain.