This blog explains the procedure to read a CSV file and display the residing data with the help of JavaScript.
How to Read a CSV File and Display\View its Content Using JavaScript?
The CSV files are converted into readable form to display the information residing in them. To read the file, JavaScript provides built-in methods like “readAsText()”, “split()”, “insertRow()”, “FileReader()” and, so on. These methods can help developers in reading any CSV format file.
Let’s have a look at a couple of examples for reading and displaying the content of the CSV file.
Example 1: Reading and Displaying CSV File on Webpage
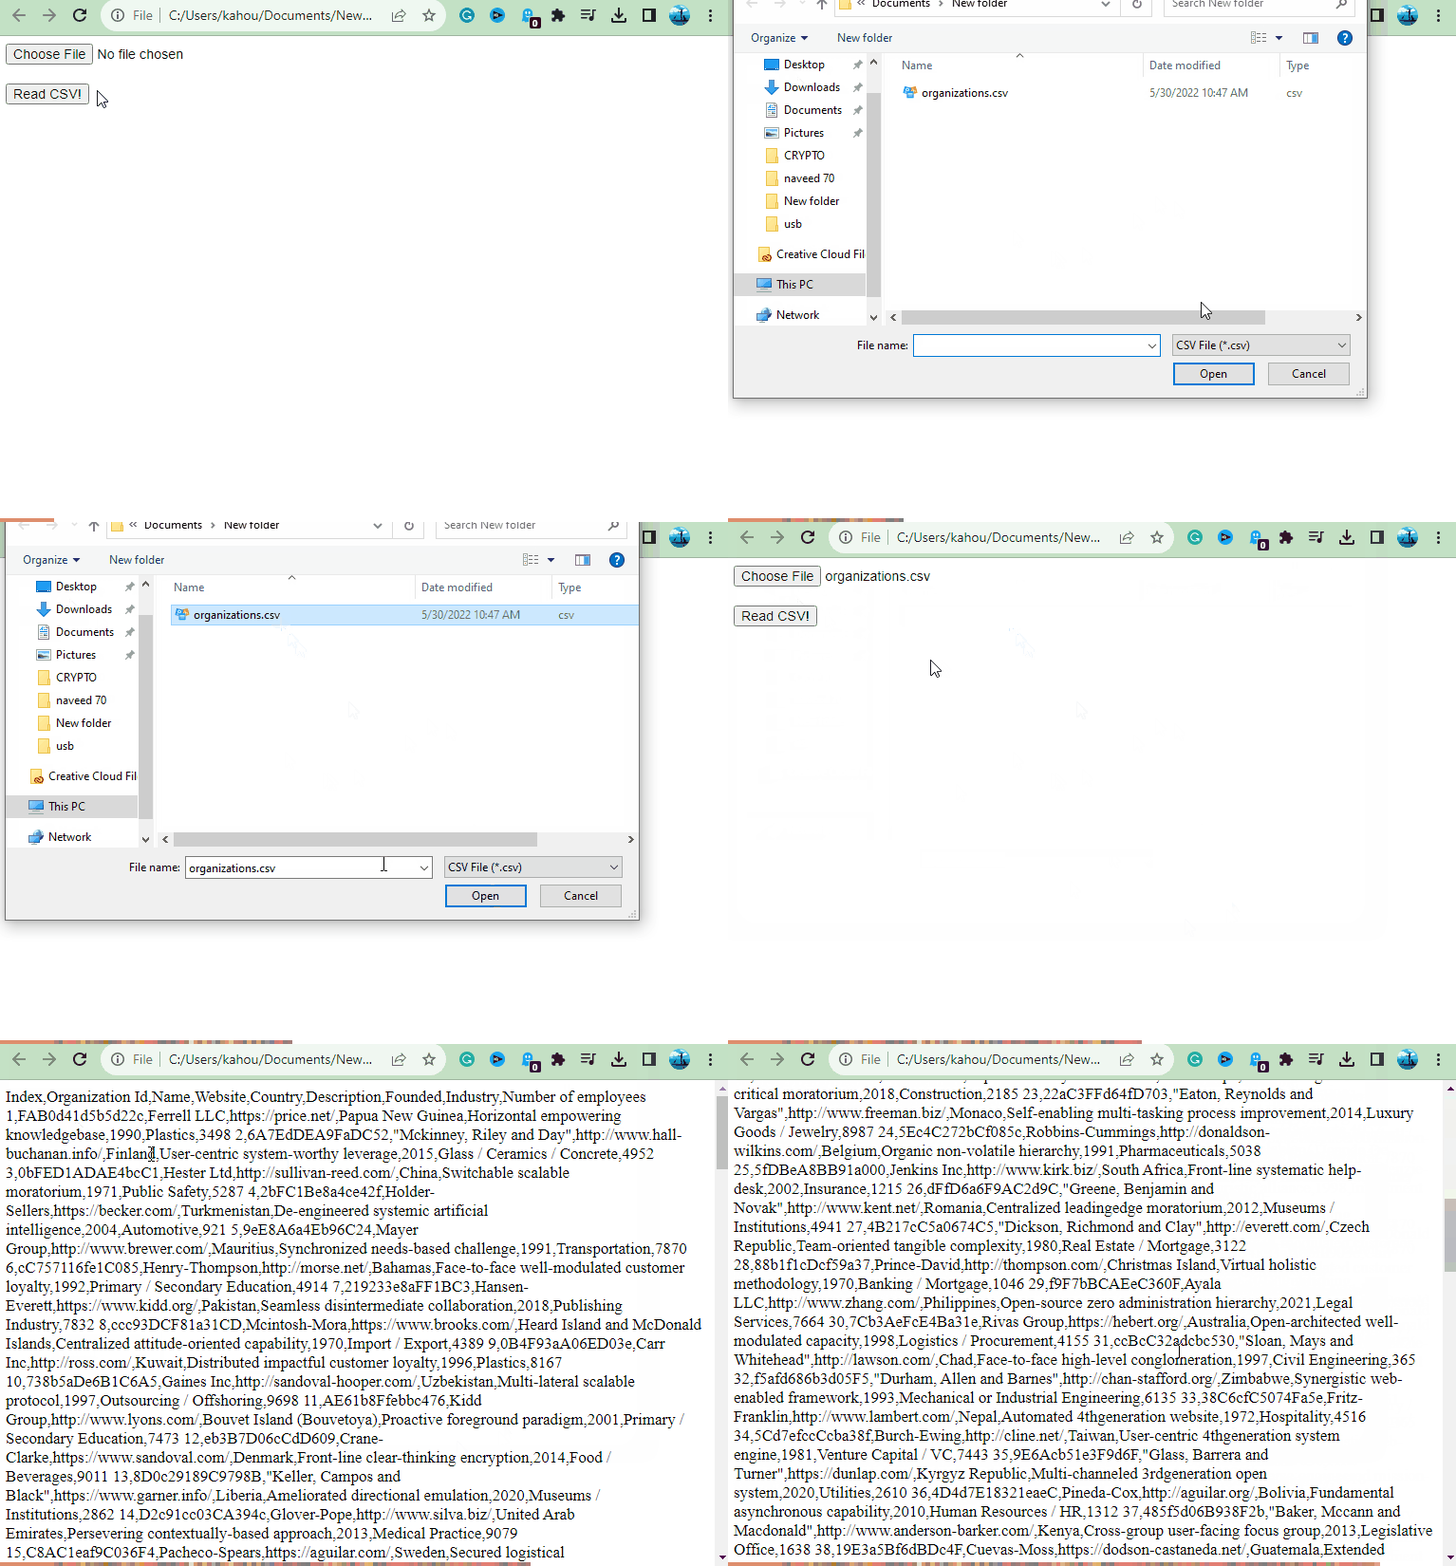
In this case, a random CSV file is selected from a local directory which is fetched and displayed on the web page in an unformatted manner as shown below:
<input type="file" name="csvFile" id="csvFile" accept=".csv" > <br><br>
<input type="button" value="Read CSV!" onclick="fetchCSVFile();" >
<script>
const csvFile = document.getElementById("csvFile");
function fetchCSVFile(){
const selCSVFile = csvFile.files[0];
const readCSV = new FileReader();
readCSV.onload = function (e) {
const data = e.target.result;
document.write(data);
};
readCSV.readAsText(selCSVFile);
};
</script>
</body>
The explanation of the above code is as follows:
- First, create two “input” elements having “type” and “accept” attributes. Set the value of the “type” attribute as “File” to select only files and “accept” as “csv” to accept only CSV files:
- The second “input” element uses the “onclick” event listener to invoke the “fetchCSVFile()” function. This function deals with the reading and displaying of CSV content.
- Now, utilize the “<script>” tag and store the reference of the first “input” element into the “csvFile” variable.
- Next, define a body for the “fetchCSVFile()” function. In it, the received file is stored in the “selCSVFile” variable.
- Then, create an object for the “FileReader” method named “readCSV” which displays the CSV file data on the webpage using the “document.write()” method. When all CSV file data has been fetched successfully.
- After that, this object “readCSV” uses the “readAsText()” method to read the CSV file data as text.
After the end of the compilation phase, the webpage works like this:
The output shows the data for the selected CSV file has been read and displayed over the webpage using JavaScript.
Example 2: Reading CSV File and Display Data on Table
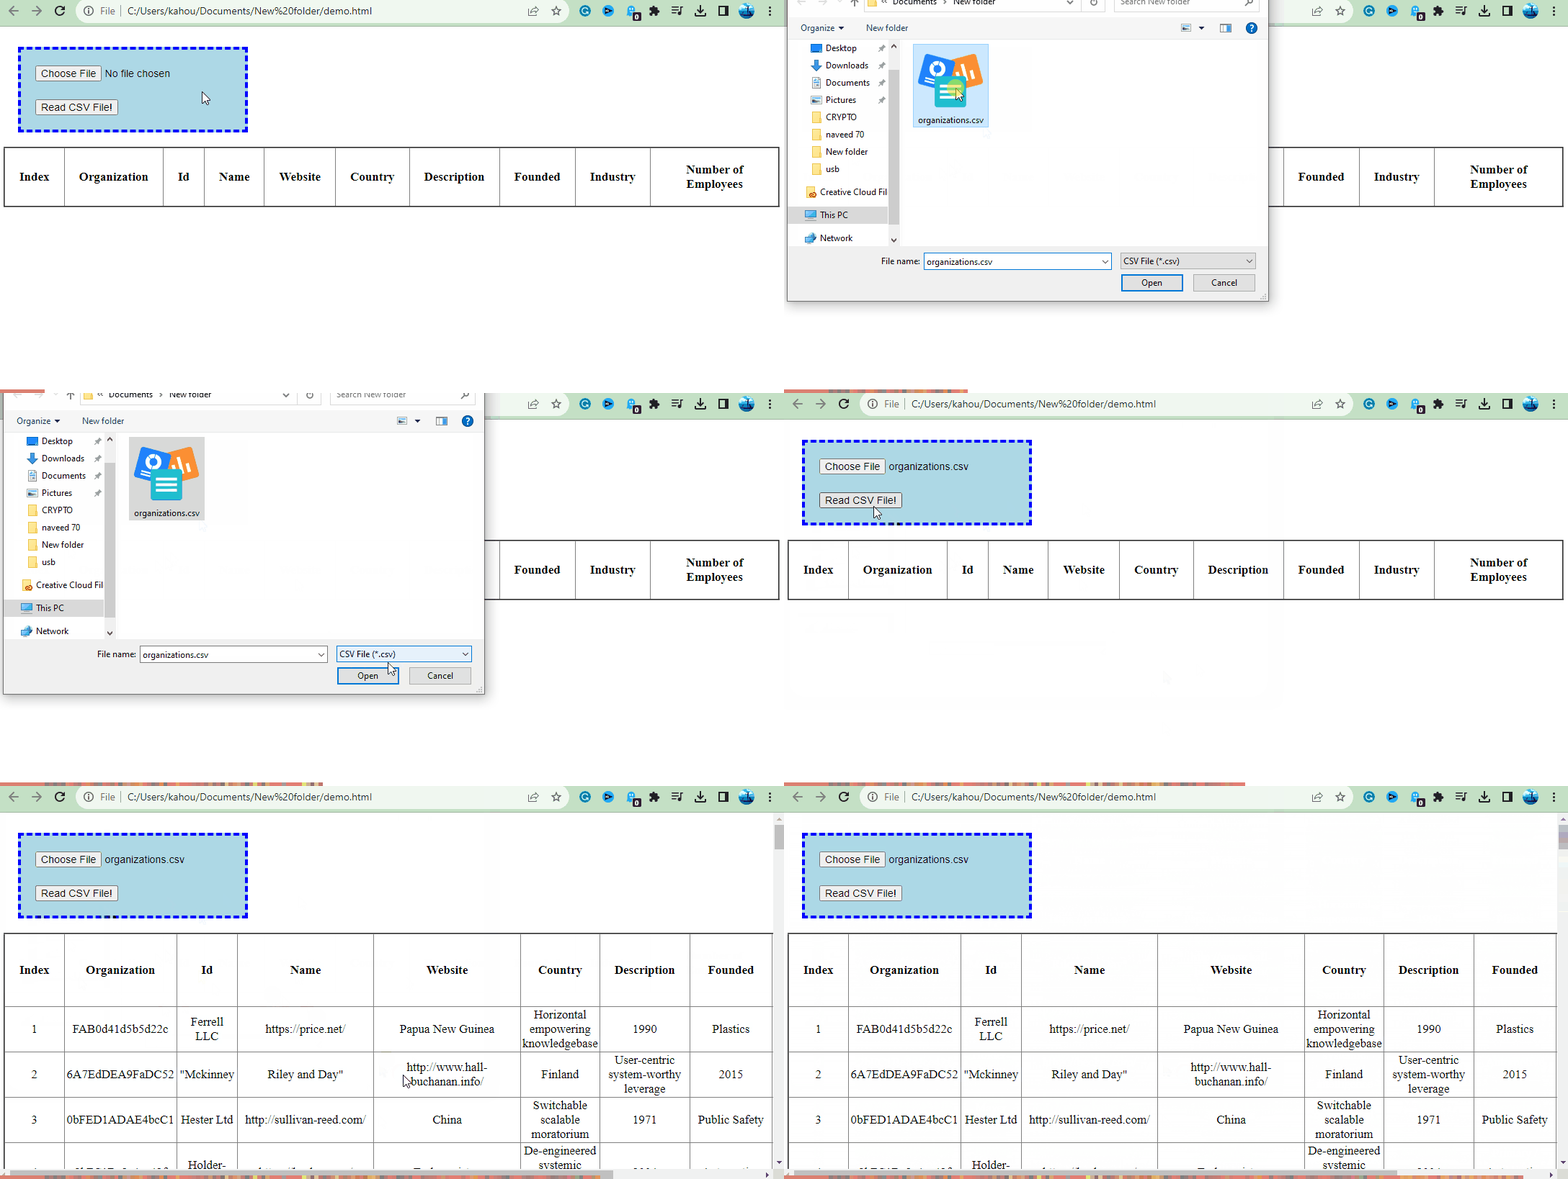
In the following example, the first CSV file will be selected and data of each cell will be inserted or placed over the HTML table to display the CSV file data in a more presentable and visually appealing format. To do this, follow the below steps.
Step 1: Defining HTML Part
Start by creating an HTML file where the table structure is going to be created along with the “input” element to receive CSV file and “button” element to trigger the process of fetching CSV file data as done below:
<input type="file" name="csvFile" id="csvFile" accept=".csv" > <br><br>
<input type="button" value="Read CSV File!" onclick="fetchCSVFile();" >
<br><br>
<table id="displayData" border="2" style="border-collapse: collapse;">
<thead>
<tr>
<th>Index</th>
<th>Organization</th>
<th>Id</th>
<th>Name</th>
<th>Website</th>
<th>Country</th>
<th>Description</th>
<th>Founded</th>
<th>Industry</th>
<th>Number of Employees</th>
</tr>
</thead>
<tbody>
</tbody>
</table>
</body>
Explanation of the above code:
- First, two “input” elements are created having a type of “file” and “button” respectively. The first one has an attribute of “accept” having the value of “.csv” to download or select only CSV-type files. The second “input” element uses the “onclick” event listener to invoke the “fetchCSVFile()” function.
- Next, the table is created using the “<table>” tag, and the unique id of “displayData” is provided to it. Also, apply some custom CSS styling according to your choice.
- Inside the “<table>” tag, utilize the “<tr>” tag for declaring rows of the table. Then, inside the “<tr>” element, use the “<th>” tag to define the header of each column for our CSV file.
- Leaves the “<tbody>” section empty because it will be filled by the data retrieved from the CSV file later on.
Step 2: Reading and Parsing the CSV File Data
In this step, the CSV file is selected inside the “<script>” tag for reading and parsing the data residing in that file as shown via code:
function fetchCSVFile(){
var csvSel = document.querySelector('#csvFile').files;
if(csvSel.length > 0 ){
// Selecting CSV file residing at first index
var provFile = csvSel[0];
var readCsv = new FileReader();
// Method to Read file as String
readCsv.readAsText(provFile);
// invokes when file is read successfully
readCsv.onload = function(e) {
// Reading the provided CSV file data
var csvFileData = e.target.result;
// Generating rows Array of the data by splitting through line breaks
var tableRow = csvFileData.split('\n')
Explanation of the above code:
- First, define a function named “fetchCSVFile()” which is invoked by the button declared in the HTML part.
- Inside it, declare a variable “csvSel” that stores the reference of our received CSV file by selecting the input field id “csvFile”.
- Next, the length of the file is checked to ensure that the selected file is not empty. The instance or object “readCSV” of the “FileReader()” method is created. This object is utilized along the “readAsText()” method and the variable in which the CSV file reference is stored gets passed inside this method parenthesis.
- The “readAsText()” method reads the provided CSV file as a string and stores the result in the “readCSV” object. When the reading of the CSV file is completed, the anonymous function gets invoked having the “e” event as its parameter.
- Then, the already-read CSV file data as a string is stored in the variable “csvFileData”. The read content or data is split by line breaks “\n” via the “split()” method to create the rows named “tableRow”.
Step 3: Populating Read Data on the HTML Table
Below stated code is placed after the above JavaScript under the same “<script>” tag. The main functionality happening in this part of the code is the entering of fetched CSV file data into the already created HTML table. Let’s Proceed:
tableBody.innerHTML = "";
for (var loopOverRow = 1; loopOverRow < tableRow.length; loopOverRow++) {
var newRow = tableBody.insertRow();
// Splitting to generate Column Array
rowColData = tableRow[loopOverRow].split(',');
for (var loopOvercol = 0; loopOvercol < rowColData.length; loopOvercol++) {
var newCell = newRow.insertCell();
newCell.innerHTML = rowColData[loopOvercol];
}
}
};
</script>
Description of the above code:
- Initially, the reference to the “tbody” element is stored in the “tableBody” variable by selecting the table “id” and then the tag name of “tbody”.
- Also, set the initial data of the “tbody” section to empty by setting it to the empty string.
- Next, iterate over each row of the read CSV data that executes the length of rows available in the CSV file starting from the “1” index to leave the header in the CSV file.
- In addition, use the “insertRow()” method to insert each iterated row from a CSV file into the HTML table row “newRow”. To create a column array split each row by a comma “,” and store it in the “rowColData” array.
- Again with the help of the “for” loop, each column data of the CSV file is iterated and placed inside a newly created cell “newCell”. In it, the row data is inserted corresponding to each column data.
After that compilation of code snippets stated in the above steps, the final output looks like this:
The output shows provided CSV file data has been read and displayed in readable and presentable format over the screen.
Note:
To convert the HTML table into a CSV file with the help of JavaScript, you can visit our other article by traversing to this link.
Conclusion
To read CSV Files and display their content over the web page, the CSV file reference is retrieved inside the JavaScript code. Then, using the “FileReader()” and “readAsText()” methods the CSV file is read as a string, and rows and columns are generated by splitting the data from each comma symbol. After that, to display data in tabular form, the “insertRow()” and “insertCell()” methods are used. This blog has explained the procedure to read and display the content of selected CSV files over a web page using JavaScript.


