Now, let us understand the console object which acts as a Node.js print function, and look at various ways to use it.
Understanding of console output
In Node.js, the print function is deployed using the “console” object. This object offers a variety of functions that let developers show the output of their code on the screen. It serves as a helpful tool when developers are creating or fixing their application code.
Below are the methods users can use to implement the functioning of the print function in Node.js
Method 1: Simple “console.log()”
The primary method for print function in Node.js is console.log(). This method enables you to display messages on the console screen, proving a valuable tool for debugging and code monitoring.
This function will print the string message in the terminal(or console).
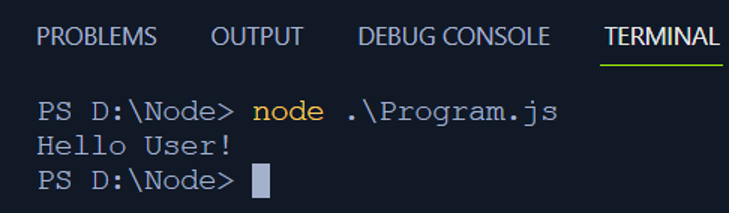
Output
The output of the above code will appear as:
To implement a properly formatted display users can use the format specifiers as per need to make the output more presentable and user-friendly.
Method 2: Formatting “console.log()”
The console.log() function can also be used through the access modifiers to present a formatted display on the screen.
Consider the code below for a formatted output using access modifiers:
const age = 18;
console.log('User: %s, Age: %d',name,age);
In the above code:
%s is for string
%d is for numbers(%i can also be used for integers)
In the console.log() method, the value of the “name” and “age” variables will be inserted inside the string at the place of “%s” and “%d” respectively.
Output
The output using the format access specifiers will show up as:

Now, let’s understand how error messages can also be displayed efficiently using the console object.
Method 3: Error message handling using “console.error()”
Users can use “console.log()” for general output statements but when it comes to handling error messages “console.error()” method is the best choice. It prints the error message in the terminal in a way that makes it easy to spot the error.
Consider the code below for this code implementation:
Output
The output of the above code will show up as:
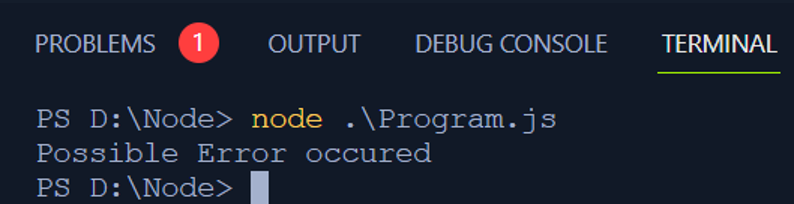
It can be seen along with the “Problems” tab, 1 error in red color is mentioned.
It can also be demonstrated in the console:
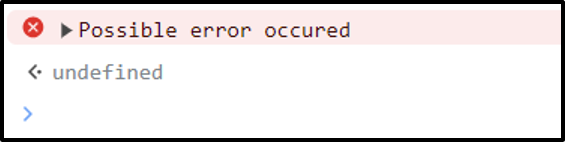
The red cross before the message depicts that it is an error message.
That’s it from the console.error() method. Let’s see how we can add colors to messages as well.
Method 4: Colored console output
Printing output in the terminal with the same color can become boring, but nothing to worry about, the console method has the ability to add colors to your output. This can help users emphasize some important things by adding suitable colors.
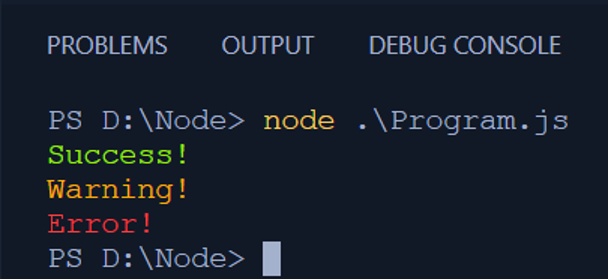
Consider the code below in which three different messages are printed using three different colors:
const warningMessage = '\x1b[33mWarning!\x1b[0m';
const errorMessage = '\x1b[31mError!\x1b[0m';
console.log(successMessage);
console.log(warningMessage);
console.log(errorMessage);
The functioning of the ANSI escape codes in the above code is:
- “\x1b[32m” sets the color to green. “\x1b” represents the escape character, and the start boundary for the color is indicated using ‘[‘. The code “32” sets the “Success!” message color to green.
- “\x1b[33m” specifies the yellow color for the “Warning!” message.
- “\x1b[31m” sets the “Error!” message color to red.
Output
The output of the above code will print with three different colors:
The console object’s perks are not restricted to coloring the text. Node.js console object offers to display the output in a tabular format as well.
Method 5: Console tabular structured Output
When the user wants the output to be displayed in the form of a structured tabular form, particularly when dealing with arrays, the console.table() proves to be a useful method.
Consider the example below for practical implementation:
{ name: 'User 1', age: 19 },
{ name: 'USer 2', age: 21 },
];
console.table(users);
Output
If we pass an array of objects to the console.table() method, the output will appear in a formatted tabular structure as:

That’s all for the Node.js print function. Users can use the desired print functionality using the “console” object for displaying the output of the executable code on the screen.
Conclusion
Getting an in-depth understanding of the basics of Node.js can be useful for development. Knowing the use of the print function can help greatly in code debugging and code fixing. Users can display the output of code simply using the “console” object or can utilize the other methods mentioned in this article for more optimal output.