Spring Boot Features
Some important features of Spring Boot are described in this part of the tutorial.
- The string application can be executed from the main() method of the class.
- It can be used to implement the event-based applications that contain the event-handling tasks.
- The “spring.application.admin.enabled” property can be used to add an admin feature in the spring boot application.
- The basic Spring Boot project structure can be created easily by using the Spring Initializr tool.
- The “spring-boot-starter-web” module of the Spring Boot is used to develop the web applications.
- It contains the logging feature by default that stores all logging information.
- The Spring Boot contains many property files which are used to set the different properties of the application.
- The spring application can be developed faster using the Spring CLI feature.
- The basic authentication system of Spring Boot in all HTTP endpoints makes the Spring Bboot applications more secure.
Advantages of Spring Boot
Many benefits of using Spring Boot to develop the web applications are mentioned as follows:
- It is very easy to set up.
- It contains a built-in web server.
- The integration and unit testing can be done easily.
- It does not require the war files for deployment.
- The features of the Spring framework make the development tasks faster because less code is required to write to develop the Spring application.
- The XML configuration does not require to develop the Spring application.
Disadvantages of Spring Boot
- It is not suitable for large applications.
- It creates many unused dependency files that make the deployment file larger.
- The modification task is not easier as compared to the other application.
- The application that is developed by the Spring framework can’t be easily integrated with other frameworks.
Prerequisites:
The Spring Boot application can be developed in multiple ways. The easiest way is to utilize the Spring Initializr tool that is used in this tutorial. You have to complete the following tasks before practicing the Spring Boot examples that are shown in this tutorial.
- The latest Spring framework requires at least JDK version 17. So, install the latest version of Java.
- Install the latest version of Eclipse editor that contains the Maven 3+. You can install this editor here.
- Install the latest version of the MySQL server and MySQL client.
Different Examples of Web Applications
The methods of developing different types of Spring Boot web applications are shown by creating multiple Spring Boot projects in this part of the tutorial.
Example 1: Create a Simple Web Application Using the Spring Initializr
The method of developing a simple web application that displays a simple text message in the browser using a Tomcat web server is shown in this example. Do the following steps to create a simple web application that runs on the web server.
Steps:
1. Go to the following URL address to create a web application using Spring Boot and the Java application development tool named Maven.
Do the following tasks to create a Spring Boot project with the basic structure:
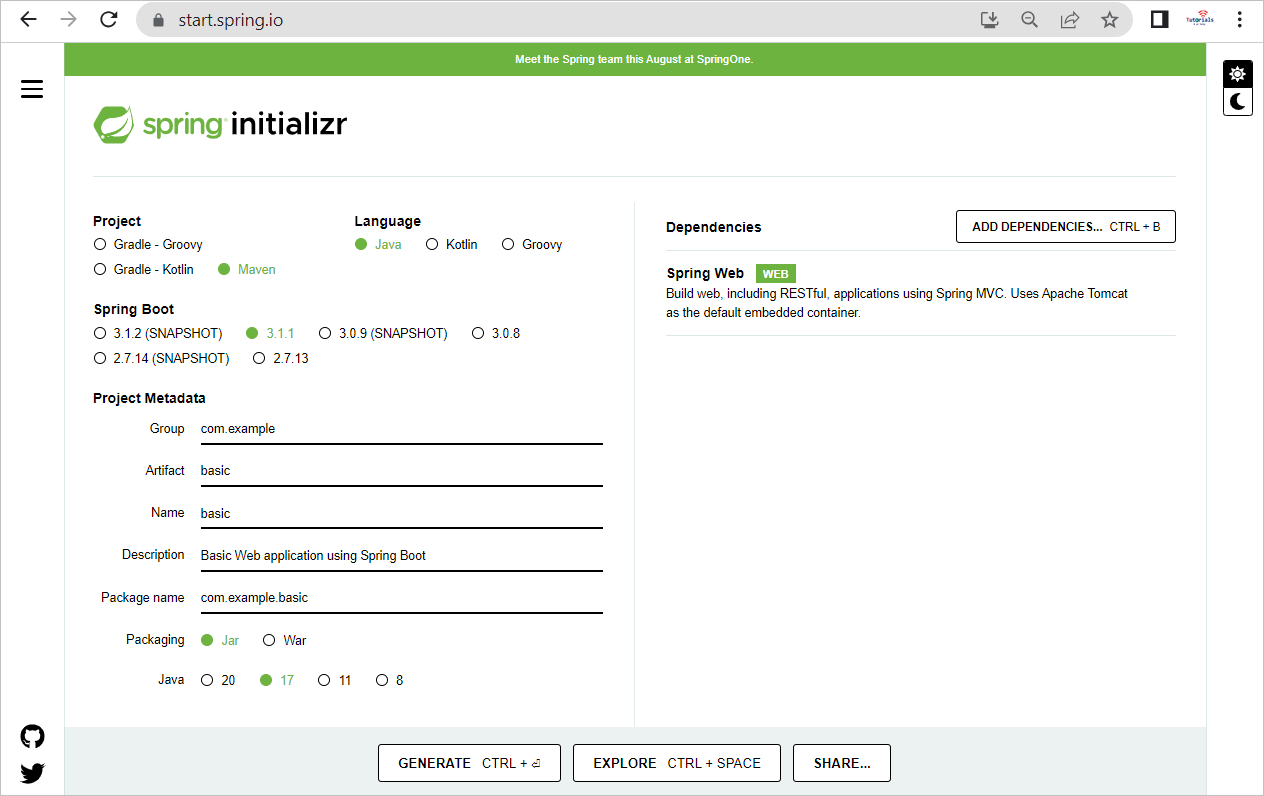
1. Select Maven as the project type, Java as the programming language, and 3.1.1 as the Spring Boot version.
2. Type the group name, artifact name, and project description.
3. Add the Spring Web dependency to use Tomcat as the default web server.
4. Click on the GENERATE button to download the zip file of the project.
The values of Spring Initializr look like the following setup:
1. The “basic.zip” file is generated after clicking the GENERATE button. Unzip the file.
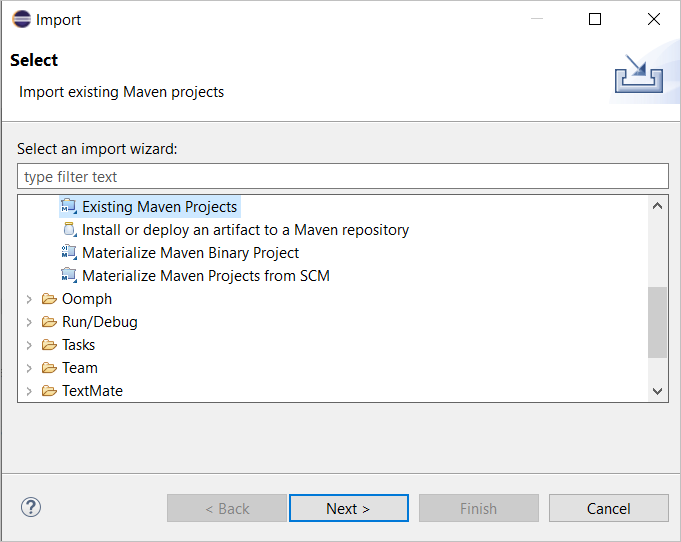
2. Open the Eclipse editor to import the basic project. Select the “Existing Maven Projects” from the “Import” dialog box and click on the “Next” button.
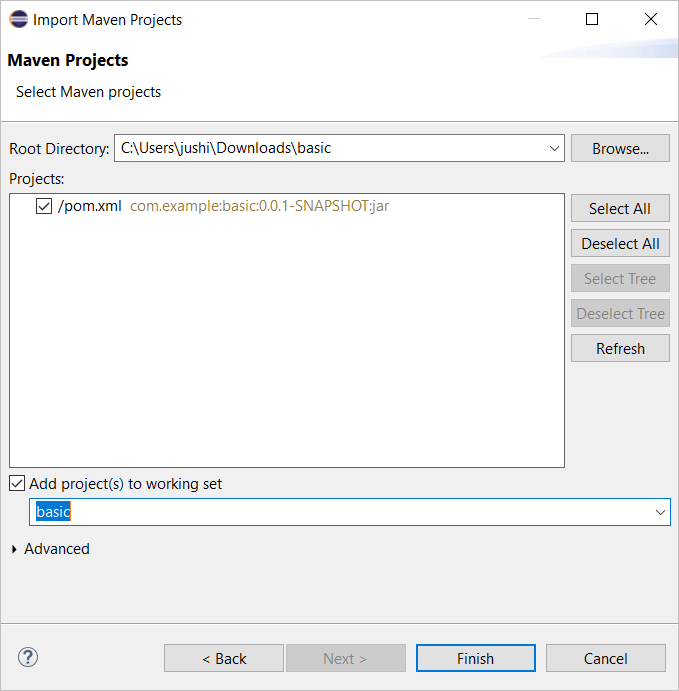
3. Browse the project that is downloaded in the previous step and click on the “Finish” button to complete the import task.
4. The HTTP requests are handled by a controller in the Spring Boot project. The @Controller annotation is used to identify the component. Create a controller file named “TestController.java” for this project with the following code. This file returns the “Learn Spring Boot” text to the browser when the root URL(/) of the application is routed from the browser.
import org.springframework.web.bind.annotation.GetMapping;
import org.springframework.web.bind.annotation.RestController;
@Controller
public class TestController {
@GetMapping("/")
public String index() {
return "Learn Spring Boot.";
}
}
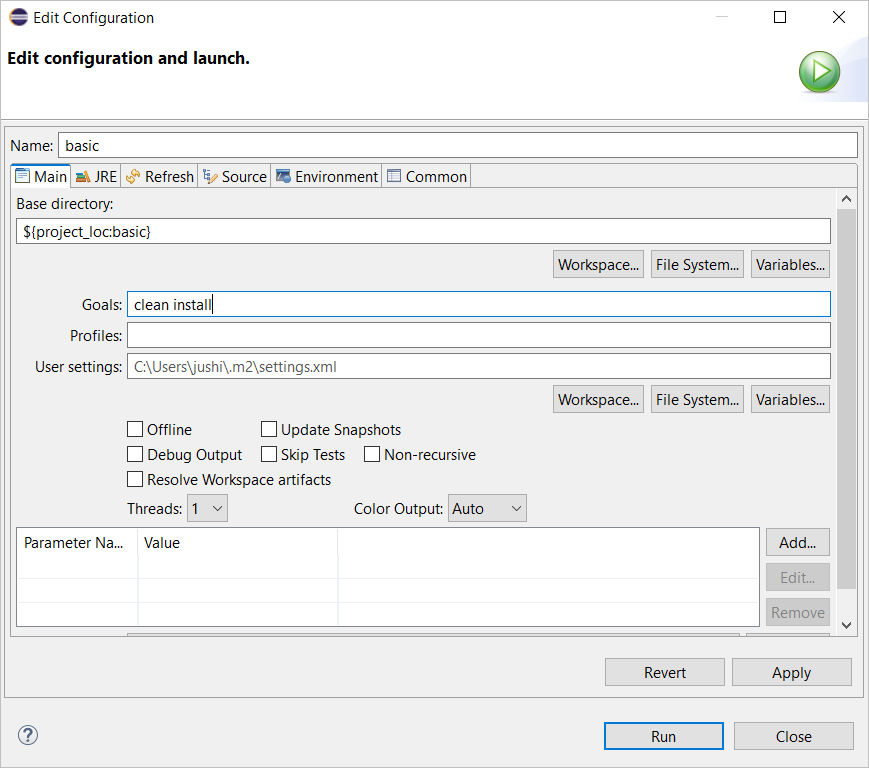
5. Now, right-click on the project folder and select the Maven build menu item from the “Run As” menu option.
6. Type “clean install” in the “Goals” field on the edit configuration window if you build the project for the first time and click on the “Run” button.
7. Run the “BasicApplication.java” file. The Tomcat web server starts at port number 8080 by default if the project does not contain any error.
8. Open a browser and run the following URL: http://localhost:8080
The following output appears in the browser that is returned from the TestController:

Example 2: Handling the HTML Form in the Spring Boot Web Application
The method of designing the HTML forms using the Bootstrap classes and displaying the submitted values of the forms are shown in this example. The “bootstrap.min.css” file can be added to the HTML file of the project in two ways. One way is to add a dependency block of the bootstrap jar file in the “pom.xml” file and another way is to add the CDN link directly in the HTML file. Both ways are shown in this tutorial. Do the following steps to create a simple web application with an HTML form that is displayed in the browser through the Tomcat web server.
Steps:
1. Go to the following URL address to create a web application using the Spring Boot and Java application development tool named Maven like the previous example:
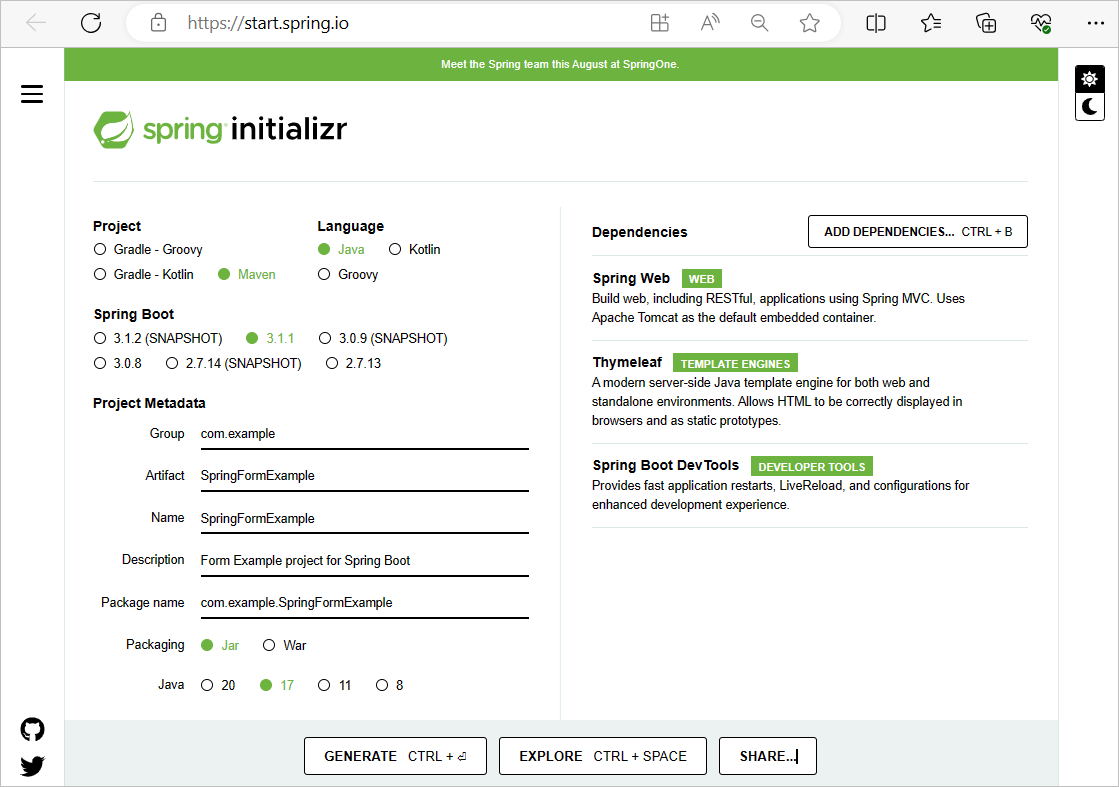
Do the same tasks that are shown in the earlier example to create a Spring Boot project named SpringFormExample with the basic structure. But add two more dependencies for the new project to design the HTML form. Add the Thymeleaf dependency to display the HTML form and the Spring Boot DevTools to make the application faster.
The values of Spring Initializr looks like the following setup for this project. Click on the GENERATE button to download the zip file of the Spring Boot project:
2. Do the same tasks that are shown in steps 2 to 4 of the first example to import the newly created Spring Boot web project in the Eclipse editor.
3. You can get the information about all the available jar files that can be used in the Spring Boot web application from the following URL address:
Open the “pom.xml” file from the Spring Boot project folder and add the following lines inside the <dependencies> tag to use the bootstrap version 5.3.0 in the project. After adding this dependency, the bootstrap link can be added in the HTML file:
<groupId>org.webjars</groupId>
<artifactId>bootstrap</artifactId>
<version>5.3.0</version>
</dependency>
4. Create a model file named “Client.java” inside the /src/main/java/com/example/SpringFormExample folder.
5. Add the following code in the “Client.java” file that defines the set and get the methods for the four fields. Here, four variables are defined to read the client id, name, address, and contact number using an HTML form that contains these fields and return the submitted values to the browser through another HTML file. The “setter” methods are used to set the values of the variables and the “getter” methods are used to return the values of the variables.
public class Client {
private long id;
private String name;
private String addr;
private String contact;
public long getId() {
return id;
}
public void setId(long id) {
this.id = id;
}
public String getName() {
return name;
}
public void setName(String name) {
this.name = name;
}
public String getAddr() {
return addr;
}
public void setAddr(String address) {
this.addr = address;
}
public String getContact() {
return contact;
}
public void setContact(String contact) {
this.contact = contact;
}
}
6. Create a controller file named “ClientController” in the same location with the following code. The controller is used to handle the client requests that are received from the browser and send the output to the browser after processing using a template file. Here, the clientForm() method is called and the content of the “client.html” file is displayed when the “/client” path arrives after the base URL (http://localhost:8080). This file displays an HTML form to take an input from the user and the code of this file is given in the next step. When the user presses the “Submit” button after filling up the form, the clientSubmit() method is called and the values of the submitted form are displayed in the browser using the “output.html” file. The code of the “output.html” file is given in step 8.
import org.springframework.stereotype.Controller;
import org.springframework.ui.Model;
import org.springframework.web.bind.annotation.GetMapping;
import org.springframework.web.bind.annotation.ModelAttribute;
import org.springframework.web.bind.annotation.PostMapping;
@Controller
public class ClientController {
@GetMapping("/client")
public String clientForm(Model model) {
model.addAttribute("client", new Client());
return "client";
}
@PostMapping("/client")
public String clientSubmit(@ModelAttribute Client client, Model model) {
model.addAttribute("client", client);
return "output";
}
}
7. Create an HTML file named “client.html” inside the resources/template folder with the following HTML script. The “bootstrap.min.css” file is used in the script to use the bootstrap classes. A responsive HTML form with two buttons is displayed in the browser when this file is loaded. The “Submit” button sends the submitted form data to the model that is displayed in the browser through the “output.html” file.
<head>
<title>Client data entry form</title>
<link href="webjars/bootstrap/5.3.0/css/bootstrap.min.css" rel="stylesheet">
</head>
<body>
<div class="container">
<div class="row align-items-start">
<div class="col"></div>
<div class="col">
<h1>Client Entry Form</h1><br/><br/>
<form action="#" th:action="@{/client}" th:object="${client}" method="post">
<table >
<tbody>
<tr> <td width="50%">ID: </td><td> <input type="text" th:field="*{id}" /> </td> </tr>
<tr> <td>Name: </td><td> <input type="text" th:field="*{name}" /> </td> </tr>
<tr> <td>Address: </td><td> <input type="text" th:field="*{addr}" /> </td> </tr>
<tr> <td>Contact No.: </td><td> <input type="text" th:field="*{contact}" /> </td> </tr>
<tr><td> <br/></td><td> </td></tr>
<tr>
<td></td>
<td><input type="submit" value="Submit" /> <input type="reset" value="Clear" /></td>
</tr>
</tbody>
</table>
</form>
</div>
<div class="col"></div>
</div>
</div>
</body>
</html>
8. Create an HTML file named “output.html” inside the resources/template folder with the following HTML script. This file displays the data that is submitted by the form through the “client.html” file:
<head>
<title>Read data from the Client Form</title>
<link href="webjars/bootstrap/5.3.0/css/bootstrap.min.css" rel="stylesheet">
</head>
<body>
<div class="container">
<h1>Submitted values:</h1>
<br/>
<p th:text="'Id: ' + ${client.id}" />
<p th:text="'Name: ' + ${client.name}" />
<p th:text="'Address: ' + ${client.addr}" />
<p th:text="'Contact: ' + ${client.contact}" />
<a href="/client" class="btn btn-info" role="button">Add next client</a>
</div>
</body>
</html>
9. Now, right-click on the project folder and select the Maven build menu item from the “Run As” menu option like the first example to compile the project.
10. Run the “SpringFormExample.java” file to start the Tomcat web server at port number 8080.
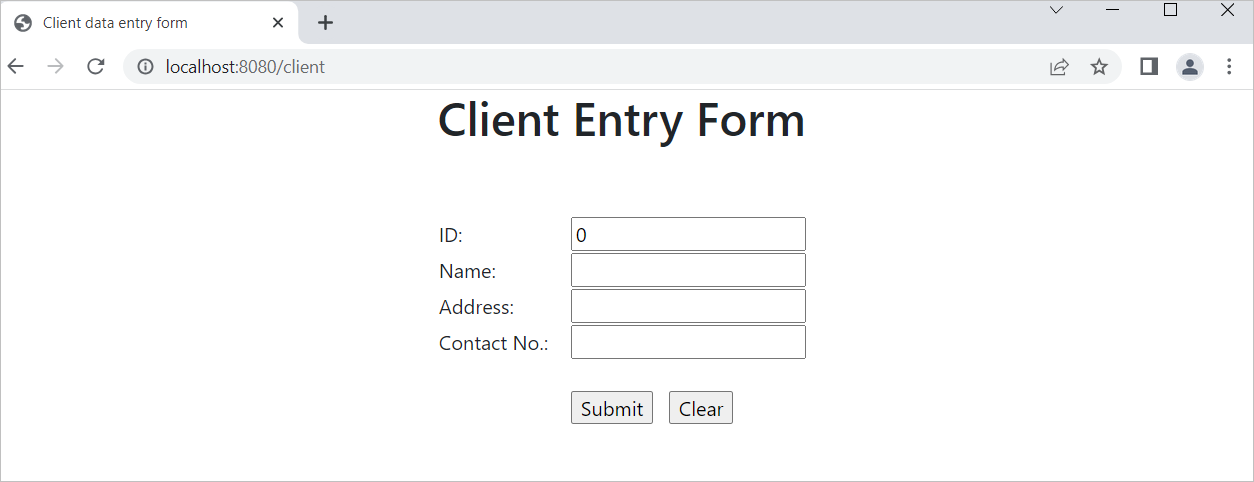
11. Open a browser and run the following URL: http://localhost:8080/client
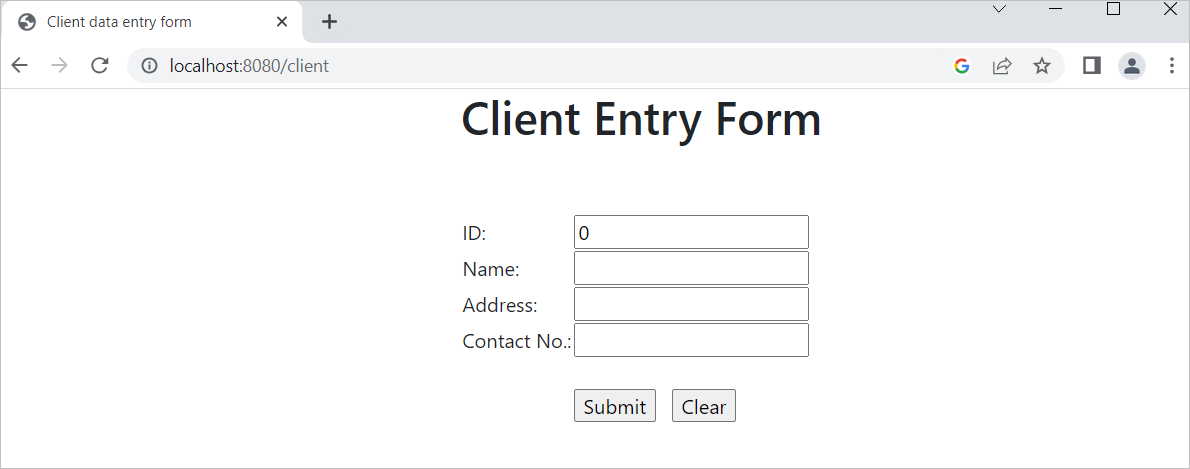
The ClientController loads the “client.html” file in the browser and the following output appears in the browser. If the user presses the “Submit” button after filling up the form, the data is submitted to the server through the ClientController for the next processing. If the user presses the “Clear” button, the form data will be cleared.
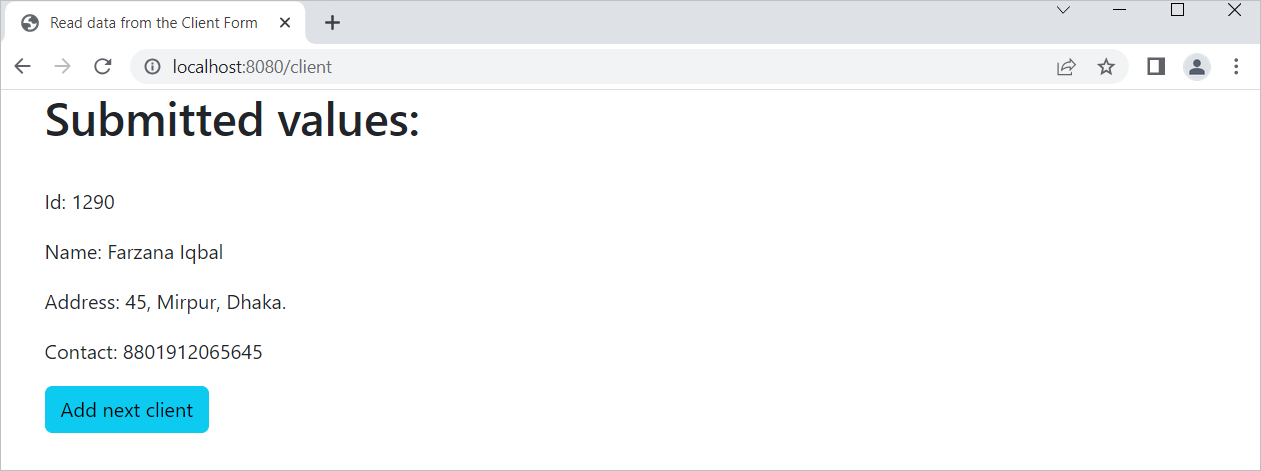
12. Fill up the form and click on the “Submit” button. The following output appears for the form values “1290” in the “id” field, “Farzana Iqbal” in the name field “45”, “Mirpur, Dhaka” in the address field, and “8801912065645” in the contact field. If the user presses the “Add next client” button, the “client.html” file is loaded again to take the other client data.
Example 3: Form Validation of the Spring Boot Project
The form validation task can be done in various ways in the Spring Boot web project. The method of validating the HTML form of the Spring Boot web application using the validation dependency of the spring boot is shown in this example. Do the following steps to create a simple web application with an HTML form that displays the submitted values of the form in the browser through the Tomcat web server after validating the form.
Steps:
1. Go to the following URL address to create a web application using the Spring Boot and a Java application development tool named Maven like the previous example:
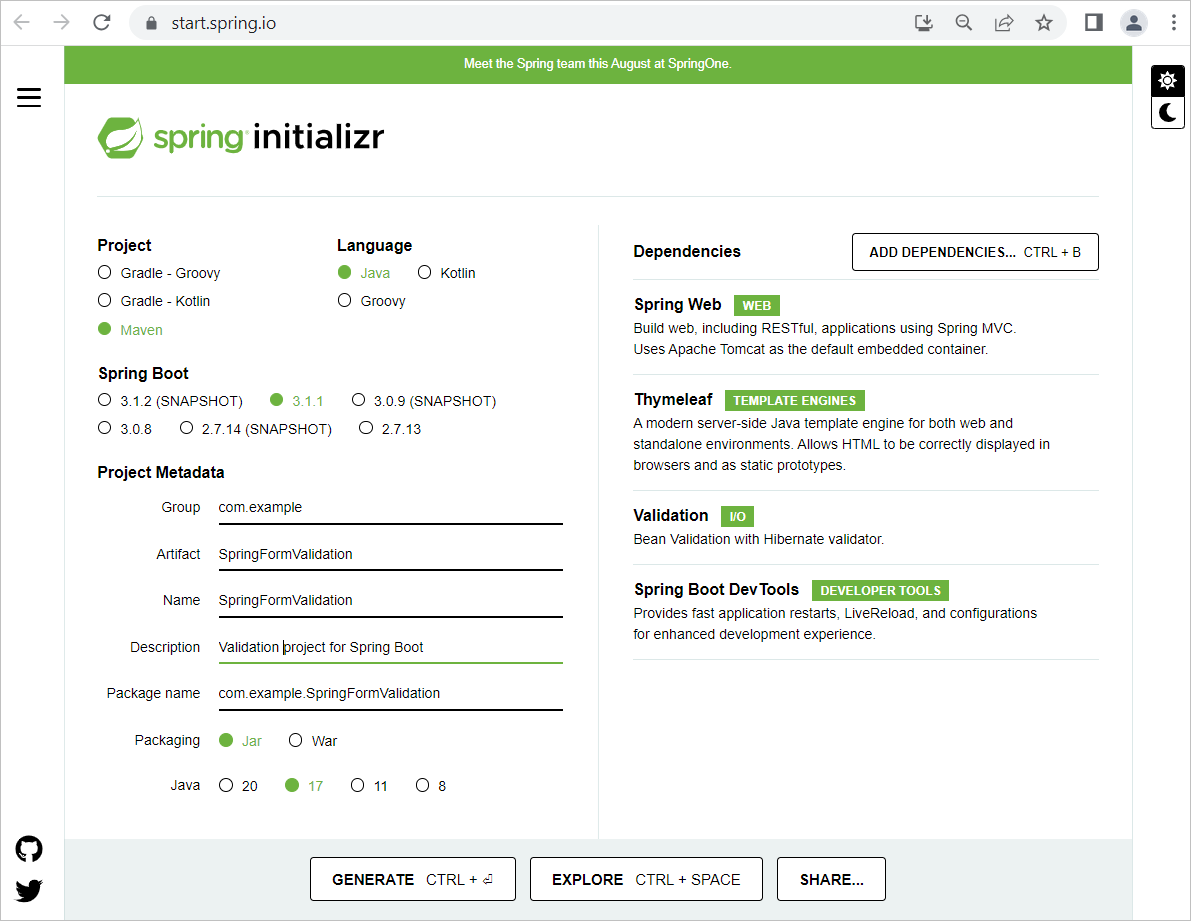
Do the same tasks that are shown in the earlier example to create a Spring Boot project named SpringFormValidation with the basic structure. But add one more dependency named “Validation” for the new project to validate the HTML form.
The values of Spring Initializr look like the following setup for this project. Click on the GENERATE button to download the zip file of the Spring Boot project.
2. Do the same tasks that are shown in steps 2 to 4 of the first example to import the newly created Spring Boot web project in the Eclipse editor.
3. Create a model file named “Client.java” inside the “/src/main/java/com/example/SpringFormValidation” folder and add the following code to the file. Four types of validations are applied in the model file. The “Max” package is imported to set the maximum value limit of the “id” field. The “Size” package is imported to set the minimum and maximum character limit of the name and contact fields. The “NotEmpty” package is imported to check if the name, addr, and contact fields are empty or not.
import jakarta.validation.constraints.Max;
import jakarta.validation.constraints.NotEmpty;
import jakarta.validation.constraints.Size;
public class Client {
@Max(value=99)
private int id;
@NotEmpty(message="Name can not be empty.")
@Size(min=3, max=25)
private String name;
@NotEmpty(message="Address can not be empty.")
private String addr;
@NotEmpty(message="Contact no can not be empty.")
@Size(min=11, max=20)
private String contact;
public int getId() {
return id;
}
public void setId(int id) {
this.id = id;
}
public String getName() {
return name;
}
public void setName(String name) {
this.name = name;
}
public String getAddr() {
return addr;
}
public void setAddr(String address) {
this.addr = address;
}
public String getContact() {
return contact;
}
public void setContact(String contact) {
this.contact = contact;
}
}
4. Create a controller file named “ClientController” in the same location with the following code like the previous example. The addViewControllers() method is used to view the “output.html” file after validating the form. The clientForm() method is used to display the content of the “client.html” file when the “/client” path arrives after the base URL. When the user presses the “Submit” button after filling up the form, the clientSubmit() method is called to check whether the submitted form data are valid or invalid. If the submitted form data are valid, the “output.html” file is displayed in the browser with the form data. Otherwise, the “client.html” file is displayed again. The script of both HTML files is given in the next steps.
import jakarta.validation.Valid;
import org.springframework.stereotype.Controller;
import org.springframework.validation.BindingResult;
import org.springframework.web.bind.annotation.GetMapping;
import org.springframework.web.bind.annotation.PostMapping;
import org.springframework.web.servlet.config.annotation.ViewControllerRegistry;
import org.springframework.web.servlet.config.annotation.WebMvcConfigurer;
@Controller
public class ClientController implements WebMvcConfigurer {
@Override
public void addViewControllers(ViewControllerRegistry registry) {
registry.addViewController("/output").setViewName("output");
}
@GetMapping("/client")
public String clientForm(Client client) {
// client.addAttribute("client", new Client());
return "client";
}
@PostMapping("/client")
public String clientSubmit(@Valid Client client, BindingResult bindingResult) {
if (bindingResult.hasErrors()) {
return "client";
}
return "output";
}
}
5. Create an HTML file named “client.html” inside the resources/template folder with the following HTML script. The “bootstrap.min.css” file is used in the script to use the bootstrap classes through the CDN link. A responsive HTML form with two buttons is displayed in the browser when the “client.html” file is loaded. The “Submit” button sends the submitted form data to the model that checks whether the form data are valid or invalid. If any field of the form contains the invalid data, the “client.html” file is displayed again with the error message.
<head>
<title>Client data entry form</title>
<link href="https://cdn.jsdelivr.net/npm/[email protected]/dist/css/bootstrap.min.css" rel="stylesheet">
<style>
.error {
color: red;
font-style: italic;
}
</style>
</head>
<body>
<div class="container">
<div class="row align-items-start">
<div class="col-md-4"></div>
<div class="col-md-8">
<h1>Client Entry Form</h1><br/><br/>
<form action="#" th:action="@{/client}" th:object="${client}" method="post">
<table >
<tbody>
<tr>
<td width="25%">ID: </td>
<td> <input type="text" th:field="*{id}" /> </td>
<td th:if="${#fields.hasErrors('id')}" th:errors="*{id}" class="error">Client ID Error</td>
</tr>
<tr>
<td>Name: </td>
<td> <input type="text" th:field="*{name}" /> </td>
<td th:if="${#fields.hasErrors('name')}" th:errors="*{name}" class="error">Client Name Error</td>
</tr>
<tr>
<td>Address: </td>
<td> <input type="text" th:field="*{addr}" /> </td>
<td th:if="${#fields.hasErrors('addr')}" th:errors="*{addr}" class="error">Client Address Error</td>
</tr>
<tr>
<td>Contact No.: </td>
<td> <input type="text" th:field="*{contact}" /> </td>
<td th:if="${#fields.hasErrors('contact')}" th:errors="*{contact}" class="error">Client Contact Error</td>
</tr>
<tr><td> <br/></td><td> </td><td> </td></tr>
<tr>
<td></td>
<td><input type="submit" value="Submit" /> <input type="reset" value="Clear" /></td>
<td></td>
</tr>
</tbody>
</table>
</form>
</div>
</div>
</div>
</body>
</html>
6. Create an HTML file named “output.html” inside the resources/template folder with the following HTML script. This file displays the valid data that is submitted by the “client.html” file.
<head>
<title>Read data from the Client Form</title>
<link href="https://cdn.jsdelivr.net/npm/[email protected]/dist/css/bootstrap.min.css" rel="stylesheet">
</head>
<body>
<div class="container">
<h1>Submitted values:</h1>
<br/>
<p th:text="'Id: ' + ${client.id}" />
<p th:text="'Name: ' + ${client.name}" />
<p th:text="'Address: ' + ${client.addr}" />
<p th:text="'Contact: ' + ${client.contact}" />
<a href="/client" class="btn btn-info" role="button">Add next client</a>
</div>
</body>
</html>
7. Now, right click on the project folder and select the Maven build menu item from the “Run As” menu option like the first example to compile the project.
8. Run the “SpringFormValidation.java” file to start the Tomcat web server at port number 8080.
9. Open a browser and run the following URL: http://localhost:8080/client
The ClientController loads the “client.html” file in the browser and the following output appears in the browser. If the user presses the “Submit” button after filling up the form, the data is submitted to the server through the ClientController for the validation task. If the user presses the “Clear” button, the form data will be cleared like in the previous example.
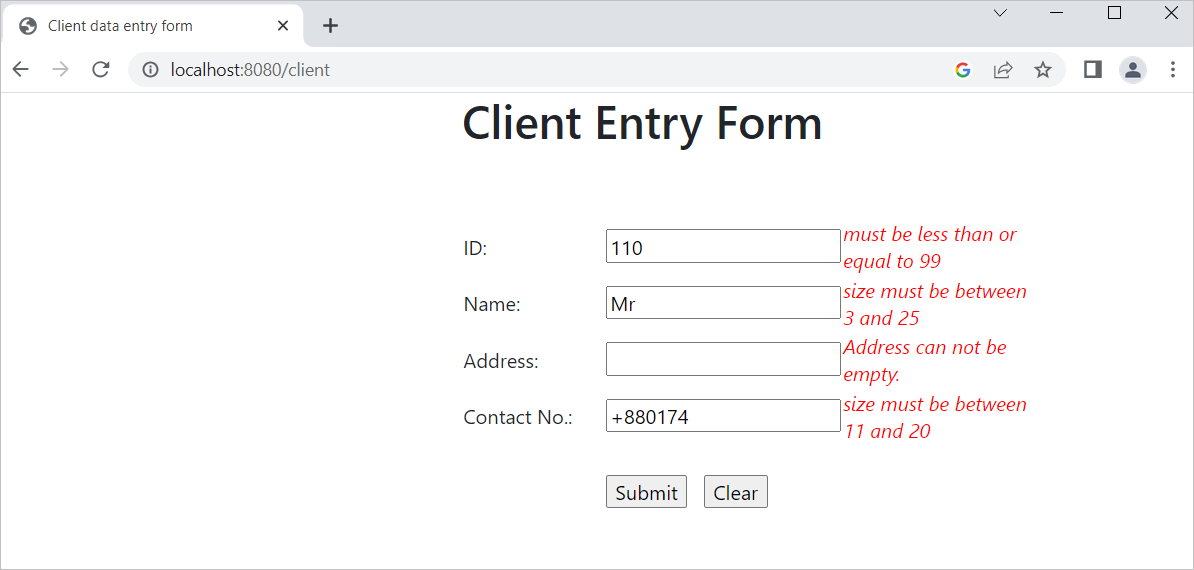
The following output appears if the user submits “110” as the “id” value, “Mr” as the name value, and “+880174” as the contact value. The “id” value of “110” is invalid because the “id” value can’t be more than 99. The name value which is “Mr” is invalid because the length of the string is less than 3. No value is given for the address and the address field can’t be empty. The contact value of “+880174” is invalid because the length of this field can’t be less than 11.
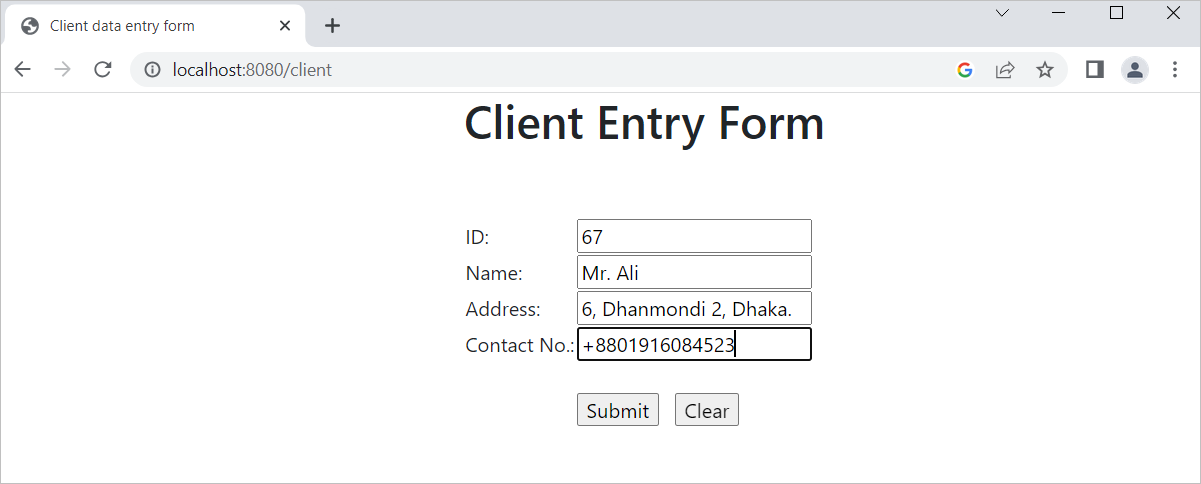
If the form submits with the values of “67” as the id, “Mr. Ali” as the name, “6, Dhanmondi 2, Dhaka” as the address, and “+8801916084523” as the contact. Then, the form data is submitted properly to the server.
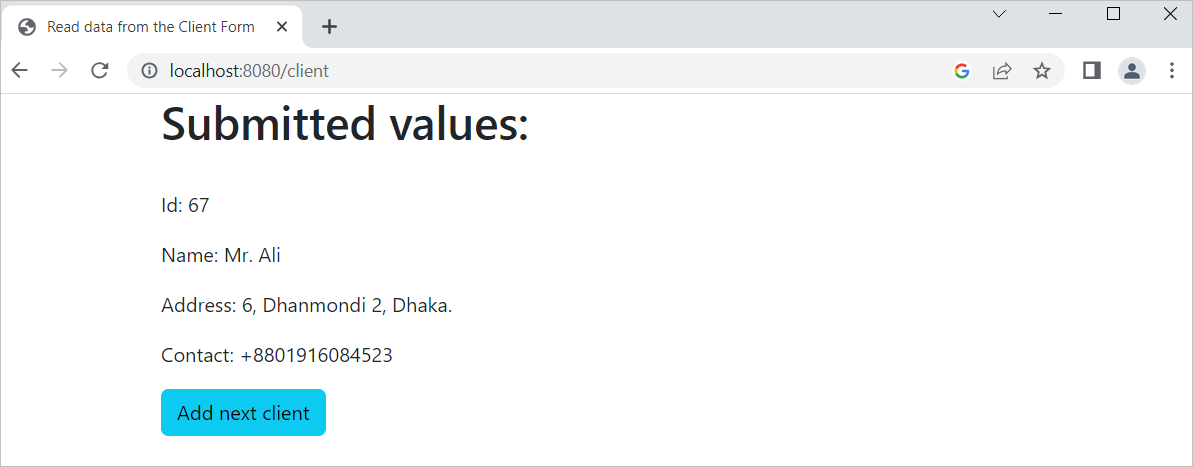
The following output appears after submitting the form with the valid data:
Example 4: Make a Connection with the MySQL Database
The method of connecting the MySQL database in the Spring Boot web application and inserting a record in the MySQL database table is shown in this example. Do the following steps to create a simple web application with the MySQL database that is displayed in the browser through the Tomcat web server.
Steps:
1. Go to the following URL address to create a web application using Spring Boot and a Java
application development tool named Maven like in the previous example:
Do the same tasks that are shown in the second example to create a Spring Boot project named SpringJDBCExample with the basic structure. But add two more dependencies named “Spring Data JPA” and “MySQL Driver” for the new web project. Here, the Spring Data JPA dependency is used to access the connected MySQL database. The MySQL Driver dependency is used to connect with the MySQL database.
The values of Spring Initializr look like the following setup for this project. Click on the GENERATE button to download the zip file of the Spring Boot project:
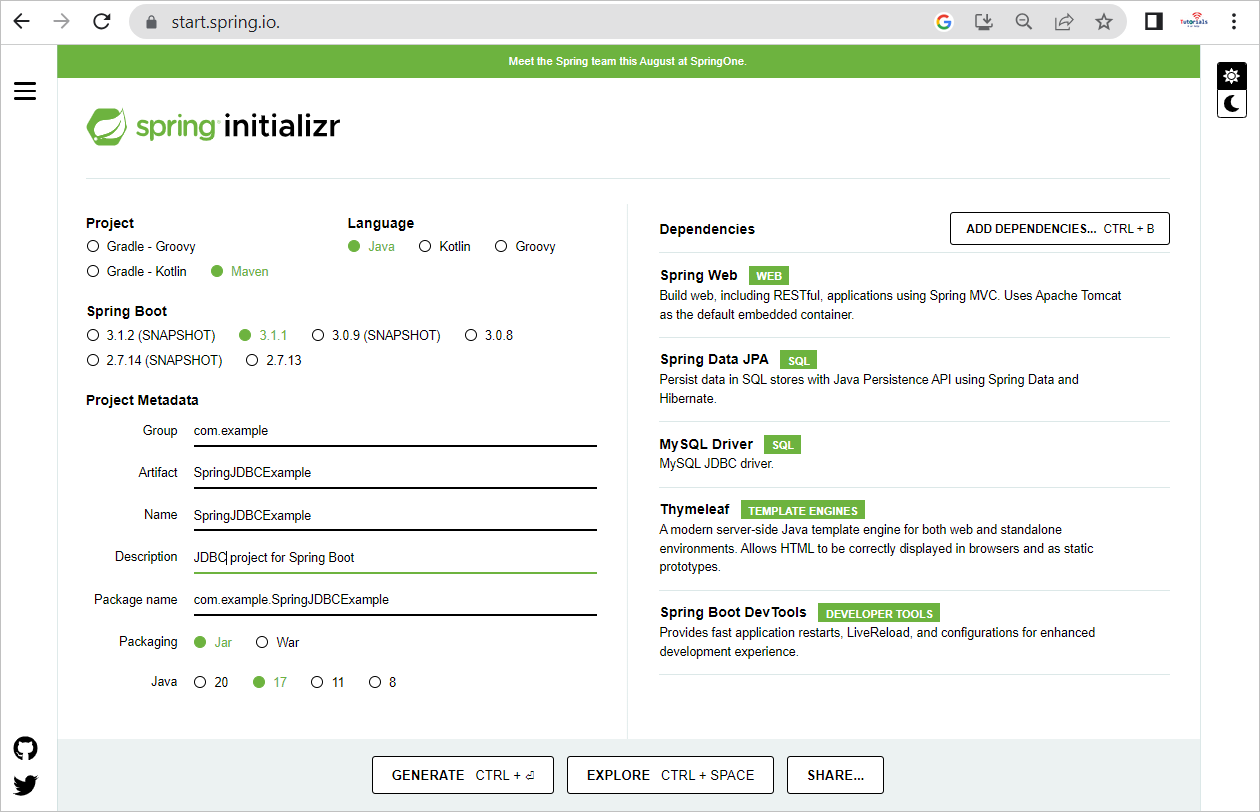
2. Do the same tasks that are shown in steps 2 to 4 of the first example to import the newly created Spring Boot web project in the Eclipse editor.
3. The MySQL database cannot be connected by the credential of the root user. So, you have to create a new MySQL user with all privileges to make a database connection with the Spring Boot project. Login to the MySQL server and run the following SQL statement to create a new user named “admin” with the 123456 password:
4. Run the following SQL statement to give all privileges to the “admin” user:
5. Create a MySQL database named “testdb” in the MySQL server by executing the following SQL statement:
6. Run the following SQL command to use the “testdb” database:
7. Run the following SQL statement to create a table named “clients”. The table contains four fields. These are “id”, “name”, “addr”, and “contact”. Here, the “id” field is the primary key with the auto_inclement feature.
id INT PRIMARY KEY AUTO_INCREMENT,
name VARCHAR(50) NOT NULL,
addr VARCHAR(200) NOT NULL,
contact VARCHAR(50) NOT NULL);
8. Run the following SQL command to insert three records in the “clients” table:
VALUES
('Mir Ali', '6, Jafrabud, Dhanmondi','+88018342387856'),
('Kamal Hossain', '56/2, Paltan, Dhaka','+88017184523489'),
('Joya hasan', '7A, jigatola, Dhaka','+8801927053523');
9. Open the application.properties file from /src/main/resources and add the following code to connect with the MySQL database. The first property is used to define the JDBC driver for the MySQL database. The second property is used to define the MySQL database connection string. The third property is used to define the username of the database. The fourth property is used to define the password of the corresponding user. The last property is used to define the schema and data initialization through the JPA module. The “none”, “create”, “create-drop”, “update”, and “validate” can be used as the value of the spring.jpa.hibernate.ddl-auto property. Here, update is used as the last property value to update the table schema when required.
spring.datasource.url=jdbc:mysql://localhost:3306/testdb
spring.datasource.username=admin
spring.datasource.password=123456
spring.jpa.hibernate.ddl-auto=update
10. Create a controller file named ClientController inside /src/main/java/com/example/SpringJDBCExample folder and add the following code to the file. The “Jdbc Template” object is used in the code to insert a new record into the “clients” table using the execute() method. If the record is inserted successfully in the table, the “New record inserted successfully” message is printed in the browser.
import org.springframework.web.bind.annotation.RequestMapping;
import org.springframework.beans.factory.annotation.Autowired;
import org.springframework.jdbc.core.JdbcTemplate;
import org.springframework.web.bind.annotation.RestController;
@RestController
public class ClientController {
@Autowired
JdbcTemplate jdbc;
@RequestMapping("/addclient")
public String index(){
jdbc.execute("insert into clients(name,addr,contact)values('Nirob Chowdhury','Dhanmondi 2A, Dhaka','+8801726874534')");
return"New record inserted successfully";
}
}
11. Run the “SpringJDBCExample.java” file to start the Tomcat web server at port number 8080.
12. Open a browser and run the following URL: http://localhost:8080/addclient
The ClientController executes the insert query and the following output appears in the browser if the record is inserted successfully in the “clients” table.

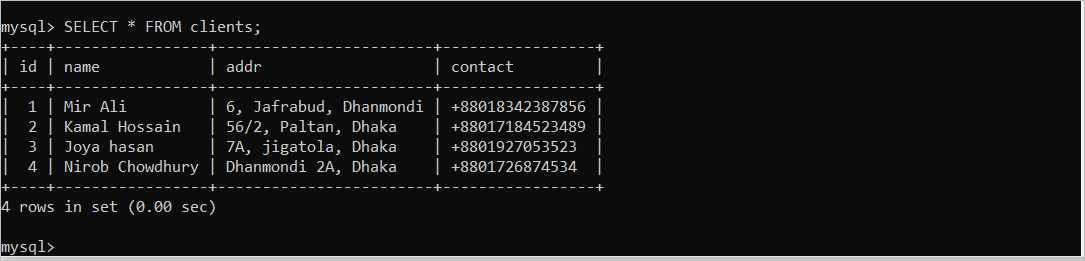
13. Login to the MySQL server again and run the following SQL command to check whether the new record is inserted into the table or not:
According to the following output, a new record is inserted into the “clients” table after executing the web application of this example:
You can execute the UPDATE, DETELE, CREATE, ALTER, DROP, and other SQL statements using the Jdbc Template object. The full task of the RestController is not covered in this tutorial.
Conclusion
The Spring Boot framework is an MVC-based framework that contains three parts. These are model, view, and controller. All database-related tasks are done by the model. The output-related tasks are done by creating the HTML file that is called “view”. The controller is used to process all the server-related tasks and make the communication between the model and view. The uses of model, view, and controller are shown in examples 2 and 3. The examples 1 and 4 contain only the controller. The most basic uses of the Java Spring Boot to develop the web applications are explained in this tutorial for the new Spring Boot users.