In this ESP32 article, we will explore how we can connect an ESP32 board with an access point and design its web server. Using that web server, we will control LEDs and AC appliances with the help of a relay module.
Contents:
- ESP32 Web Server
- How to Create ESP32 Web Server Using Arduino IDE
- ESP32 Web Server Code
- ESP32 Web Server IP Address
- Controlling LEDs Using ESP32 Web Server
- Desktop Interface
- Mobile Interface
- Controlling AC Appliances Using ESP32 Web Server
- Conclusion
1. ESP32 Web Server
The Web server has a special program that can process and send web pages to web clients. To open a website, we use a web browser. This web browser is also called a web client. The website you want to see is stored on another computer called a web server.
To talk to each other, the web server and web client use a common language called HTTP. This is how it works: the web client asks the web server for a web page using an HTTP request. The web server sends back the web page that is requested. If the web page is not present, you will see an error message.
In ESP32, we can design a Web server, as ESP32 can not only connect with other devices over a network but can also create its web server and respond to the received requests. This is all possible because the ESP32 can operate in three different modes:
- Station
- Access point
- Both Station and Access Point
You can check out this article to get an insight into all three modes of ESP32:
How to Set an ESP32 Access Point (AP) Using Arduino IDE
2. How to Create ESP32 Web Server Using Arduino IDE
To create an ESP32 web server using Arduino IDE, you can connect ESP32 to an Access point and generate an IP address for the Web server. You can apply some HTML and CSS to design your server interface.
Once you understand the ESP32 access point working, you can easily design an ESP32 web server using the Arduino IDE code. The ESP32 web server code uses the ESP32 Wi-Fi library. This makes our work easier, as this library contains all the important functions needed for connecting ESP32 to an access point.
Let’s design an ESP32 Web server using Arduino IDE code.
3. ESP32 Web Server Code
The ESP32 web server code involves the ESP32 connection with the access point and getting the IP address for the server. Once you get the IP address, you have to connect to the same network to access the ESP32 web server. From there you can control LEDs and other devices.
Open Arduino IDE and connect your ESP32 board with it:
Installing the ESP32 Board in Arduino IDE
Once the ESP32 board is connected, upload the following code to your board.
Linuxhint.com
ESP32 Web Server To Control LEDs
**************/
// Import the library for Wi-Fi connection
#include <WiFi.h>
// Enter your Wi-Fi name and password
const char* ssid = "ESP32";
const char* password = "123456789";
// Choose the port number for the web server
WiFiServer server(80);
// Create a variable to store the web request
String header;
// Create variables to store the status of the outputs
String output26State = "OFF";
String output27State = "OFF";
// Assign the output pins to the variables
const int output26 = 26;
const int output27 = 27;
unsigned long currentTime = millis();
unsigned long previousTime = 0;
// Choose the time limit for the web request in milliseconds
const long timeoutTime = 2000;
void setup() {
Serial.begin(115200);
// Set the output pins as outputs
pinMode(output26, OUTPUT);
pinMode(output27, OUTPUT);
// Turn off the outputs
digitalWrite(output26, LOW);
digitalWrite(output27, LOW);
// Connect to the Wi-Fi network
Serial.print("Connecting to ");
Serial.println(ssid);
WiFi.begin(ssid, password);
// Wait until the connection is established
while (WiFi.status() != WL_CONNECTED) {
delay(500);
Serial.print(".");
}
Serial.println("");
Serial.println("WiFi connected.");
Serial.println("IP address: ");
Serial.println(WiFi.localIP());
server.begin();
}
void loop(){
WiFiClient client = server.available(); // Check for new clients
if (client) { // If a client is connected,
currentTime = millis();
previousTime = currentTime;
Serial.println("New Client."); // Notify the serial port
String currentLine = ""; // Create a String to store the client data
while (client.connected() && currentTime - previousTime = 0) {
Serial.println("GPIO 26 on");
output26State = "ON";
digitalWrite(output26, HIGH);
} else if (header.indexOf("GET /26/off") >= 0) {
Serial.println("GPIO 26 off");
output26State = "OFF";
digitalWrite(output26, LOW);
} else if (header.indexOf("GET /27/on") >= 0) {
Serial.println("GPIO 27 on");
output27State = "ON";
digitalWrite(output27, HIGH);
} else if (header.indexOf("GET /27/off") >= 0) {
Serial.println("GPIO 27 off");
output27State = "OFF";
digitalWrite(output27, LOW);
}
client.println("<!DOCTYPE html><html>");
client.println("<head><meta name="viewport" content="width=device-width, initial-scale=1">");
client.println("<link rel="icon" href="data:,">");
// CSS to style the buttons
client.println("<style>html { font-family: Helvetica; display: inline-block; margin: 0px auto; text-align: center;}");
client.println("body { background: linear-gradient(to right, #0f0c29, #302b63, #24243e); }");
// Neon blue buttons with glow effect
client.println(".button { background-color: #08f; border: none; color: white; padding: 16px 40px;");
client.println("text-decoration: none; font-size: 30px; margin: 2px; cursor: pointer; box-shadow: 0 0 20px #08f;}");
// Dark gray buttons with glow effect
client.println(".button2 {background-color: #333; box-shadow: 0 0 20px #333;}");
// Transition effect for the buttons
client.println(".button, .button2 {transition: all 0.3s ease-in-out;}");
// Rounded buttons
client.println(".button, .button2 {border-radius: 50%;}");
// Web page title
client.println("<body><h1 style="color: white">Linuxhint ESP32 Web Server</h1>");
// Web page heading
client.println("<h1 style="color: white; text-shadow: 0 0 10px #08f;">ESP32 Web Server</h1>");
// Show the state and the buttons for GPIO 26
client.println("<p style="color: white;">GPIO 26 - State " + output26State + "</p>");
// Show the ON button if the state is OFF
if (output26State=="OFF") {
client.println("<p><a href="/26/on"><button class="button">ON</button></a></p>");
} else { // Show the OFF button if the state is ON
client.println("<p><a href="/26/off"><button class="button button2">OFF</button></a></p>");
}
// Show the state and the buttons for GPIO 27
client.println("<p style="color: white;">GPIO 27 - State " + output27State + "</p>");
// Show the ON button if the state is OFF
if (output27State=="OFF") {
client.println("<p><a href="/27/on"><button class="button">ON</button></a></p>");
} else { // Show the OFF button if the state is ON
client.println("<p><a href="/27/off"><button class="button button2">OFF</button></a></p>");
}
client.println("</body></html>");
// End the HTTP response with a blank line
client.println();
// Exit the while loop
break;
} else { // Clear the current line if it's a newline
currentLine = "";
}
} else if (c != '\r') { // Add the byte to the current line if it's not a carriage return
currentLine += c;
}
}
}
// Reset the header
header = "";
// Close the client connection
client.stop();
Serial.println("Client disconnected.");
Serial.println("");
}
}
Code Explanation
The ESP32 web server code started by setting up the Wifi connection. First, it includes the WiFi.h library. Next, this code requires you to enter the SSID and Password for the network which you want to connect your ESP32 board with. After that, we created variables to store the status of the outputs, and the output pins were assigned to these variables. Here we are using GPIO pins 26 and 27, but you can also use any other GPIO pins for connecting devices or LEDs.
In the second part of the code, serial communication is started. This will help us to check the status of the ESP32 board and the peripherals connected to it. Along with these, we have defined the serial output for different states of the two LEDs connected. You can connect LED lights and define their status as ON and OFF. This code part will also print the IP address of the ESP32 web server after uploading the code. The code part including the IP address will be only printed once, as it is inside the Setup() function.
In the third part, or inside the Loop() function, we have defined the code for handling the Web requests and controlling the GPIO pins. This code part will repeatedly execute as it is in the loop() function. It checks for new clients and reads the data from clients. After reading, it parses the HTTP requests and sends an appropriate response, like turning ON or OFF an LED. This code portion also contains the information on basic styling of the ESP32 web server. The interface includes the LED buttons and their current states.
4. ESP32 Web Server IP Address
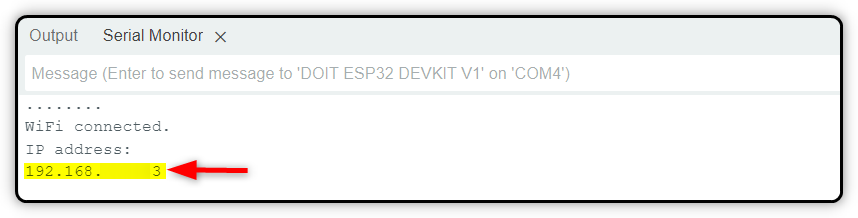
The ESP32 web server IP address is the unique identifier of the device on the network. To access the ESP32 web server, you will need this IP address. After you upload the above code, the IP address is automatically assigned by the router also known as Dynamic IP. However, you can also manually assign an IP address also known as Static IP.
To find out the IP address of your ESP32 server, you can check the serial monitor of Arduino IDE after uploading the code. Remember, this IP address will only be displayed if the ESP32 board is successfully connected with an access point.
Note: If you find it difficult to connect your ESP32 board with an access point, try changing the router (access point) SSID. Try to avoid the special characters in your SSID.
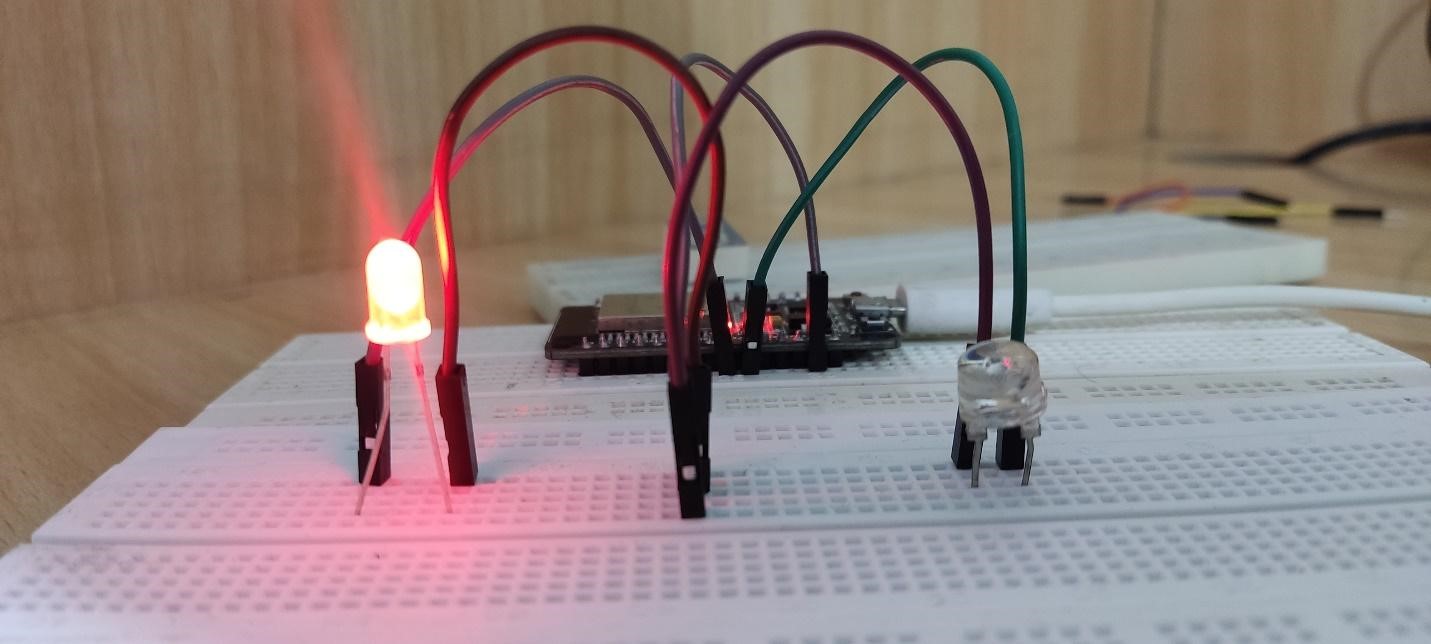
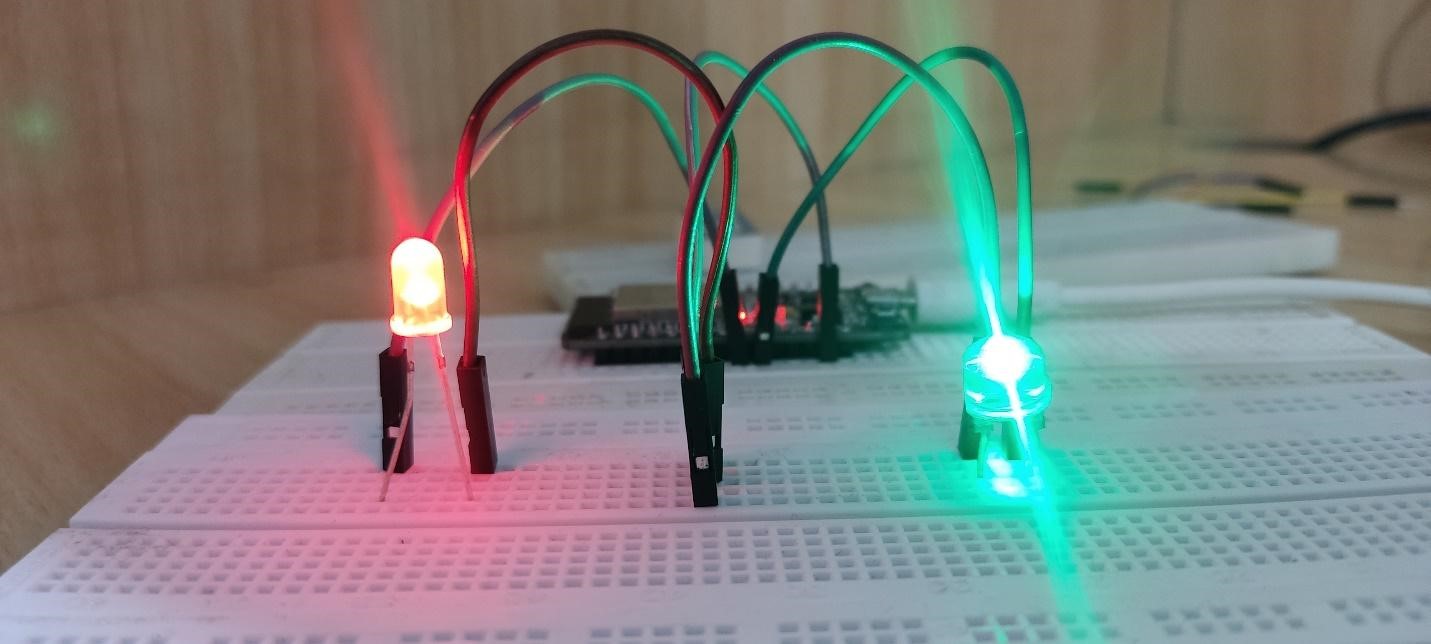
5. Controlling LEDs Using ESP32 Web Server
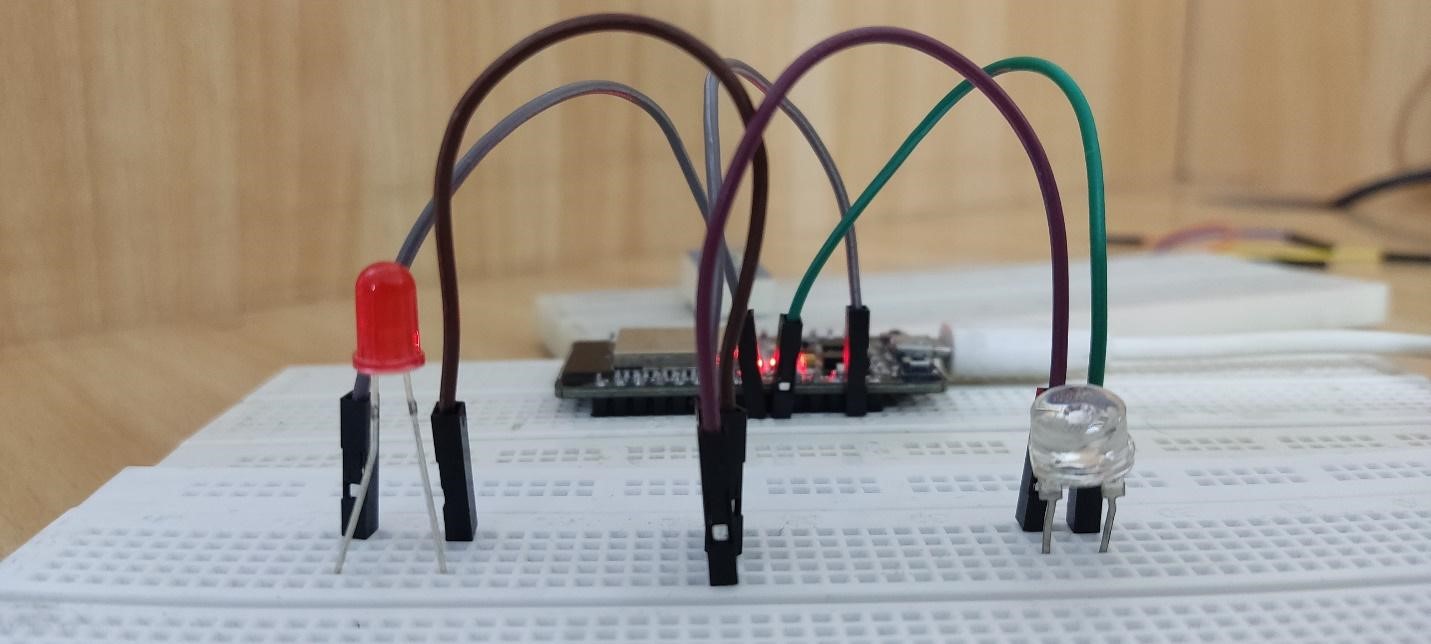
Now we will set up two LEDs with ESP32 board and control them using the ESP32 web server. You can use the same GPIO pins defined inside the code or modify the code for any other GPIO pins. Here we are going to connect one LED to GPIO 26 and the other one to GPIO 27.

Desktop Interface
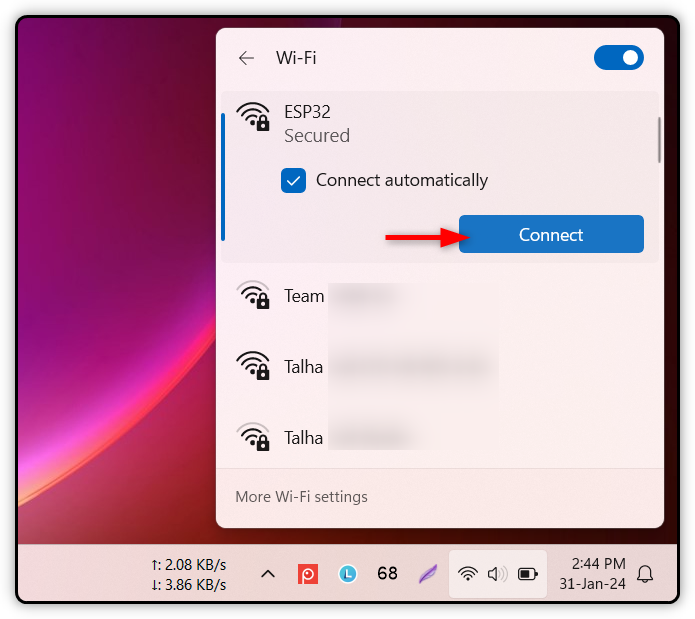
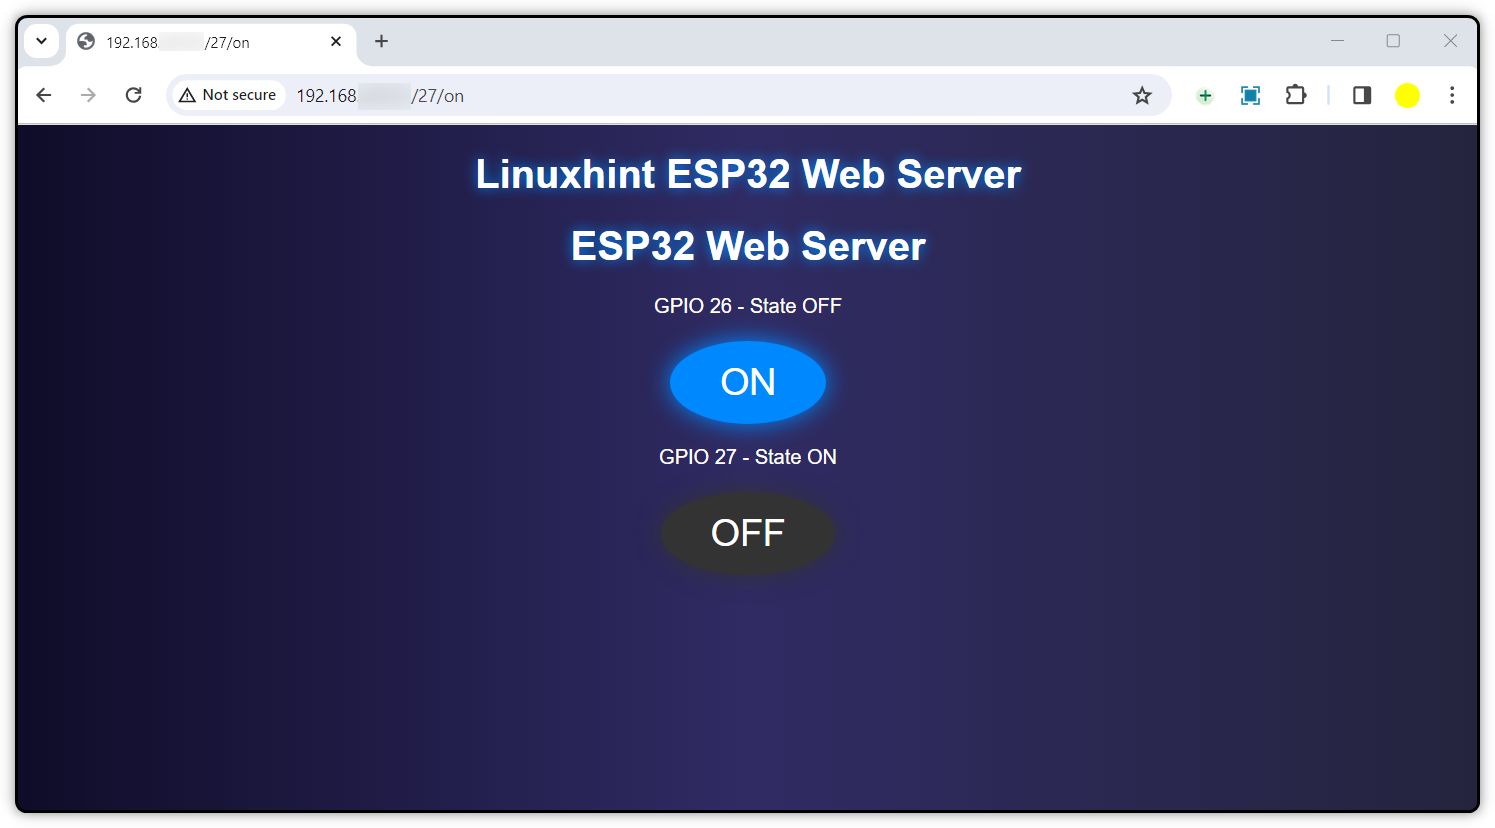
Once the hardware is ready, the next step is to access the web server using the same IP address given by the ESP32 on the Arduino IDE terminal. For that, your system must connect with the same network. On the desktop, open WiFi settings and connect with the network.
Once connected, you can access the web server using a web browser (Chrome). Type the ESP32 web server IP in the URL bar and hit Enter. Once open, you will see the following interface.
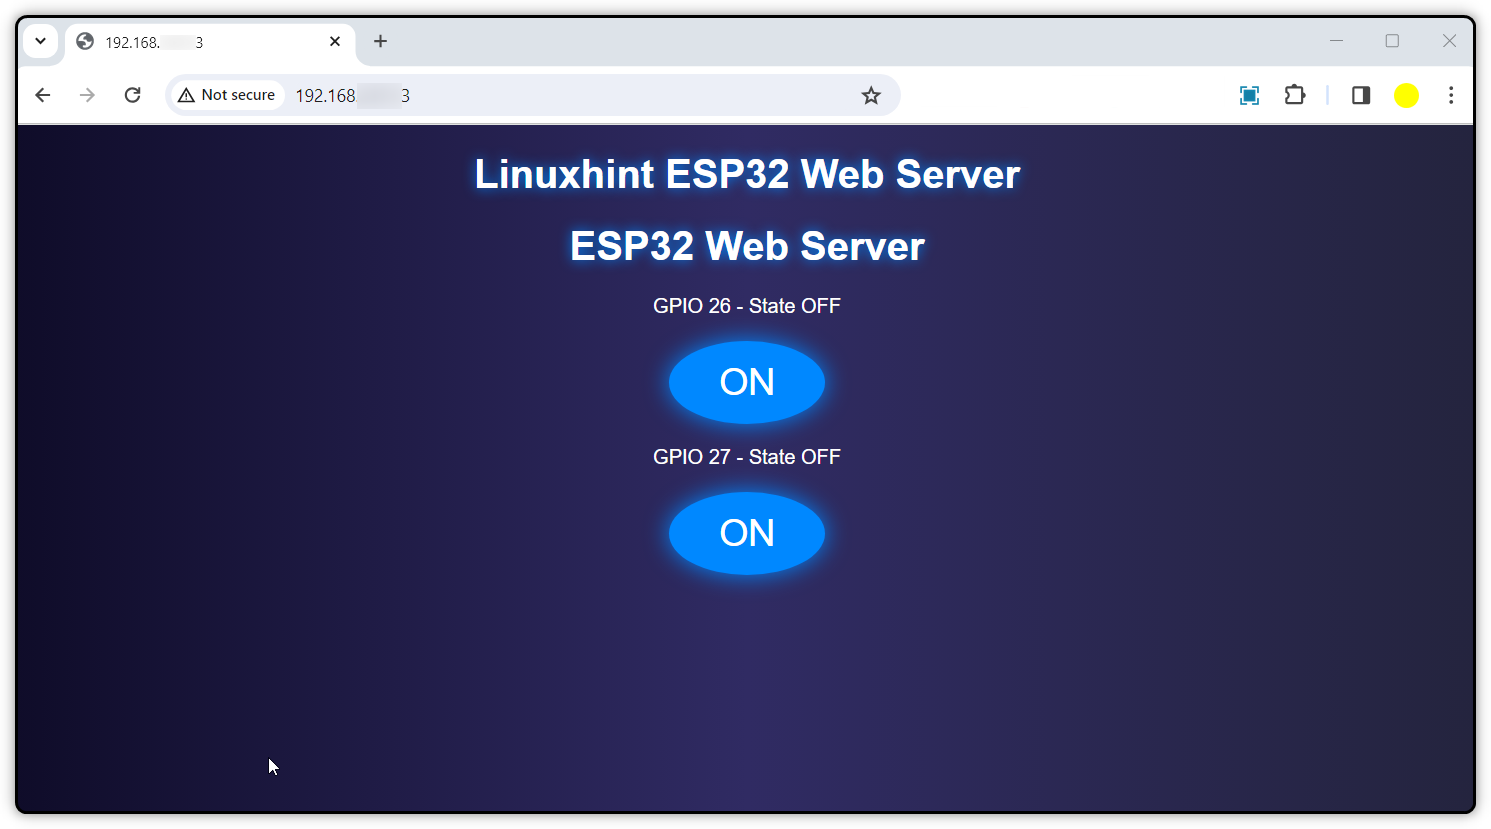
In the current state as set inside the code, both the LEDs are OFF. So after connecting the ESP32 to the PC, you will see none of the LEDs are glowing.
We will start by turning ON the LED at GPIO 26. Toggle the OFF switch and you will see the LED will glow.

The LED at GPIO 26 is ON.
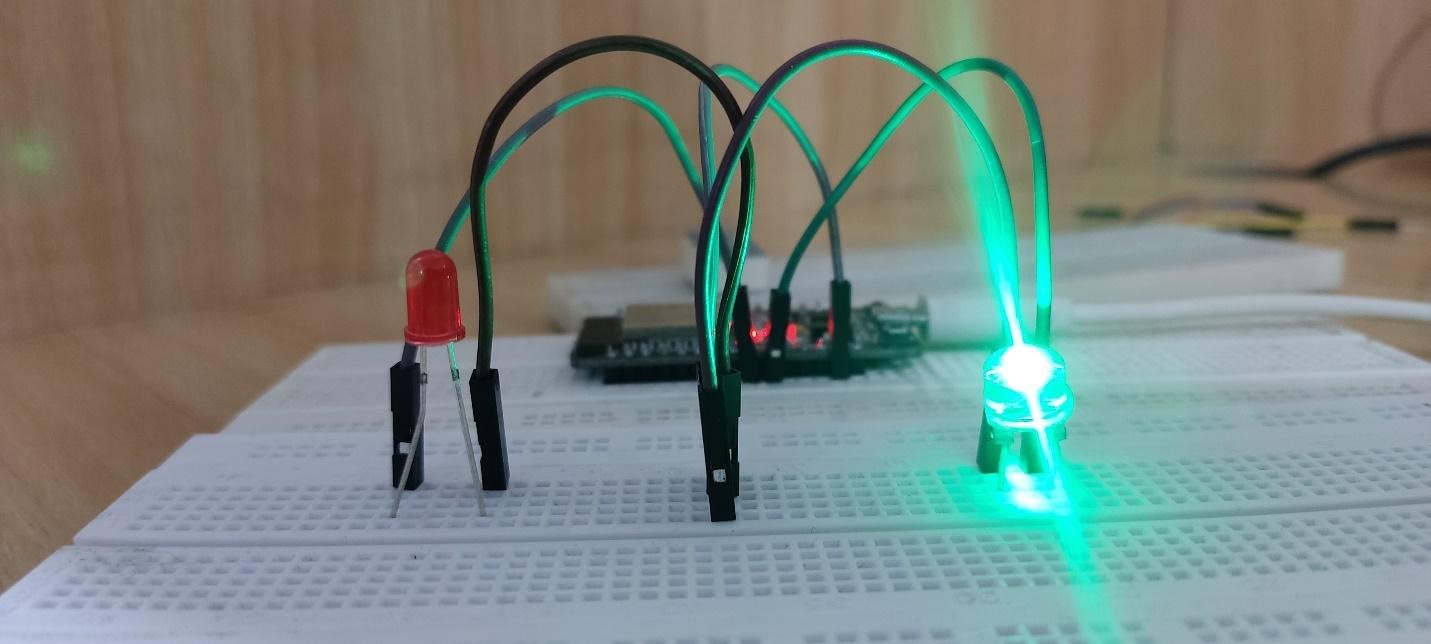
Similarly, for the LED at GPIO 27 toggle the second button.
Now you will see the second LED connected to GPIO 27 will also glow.
You can also turn ON both LEDs by toggling their buttons.
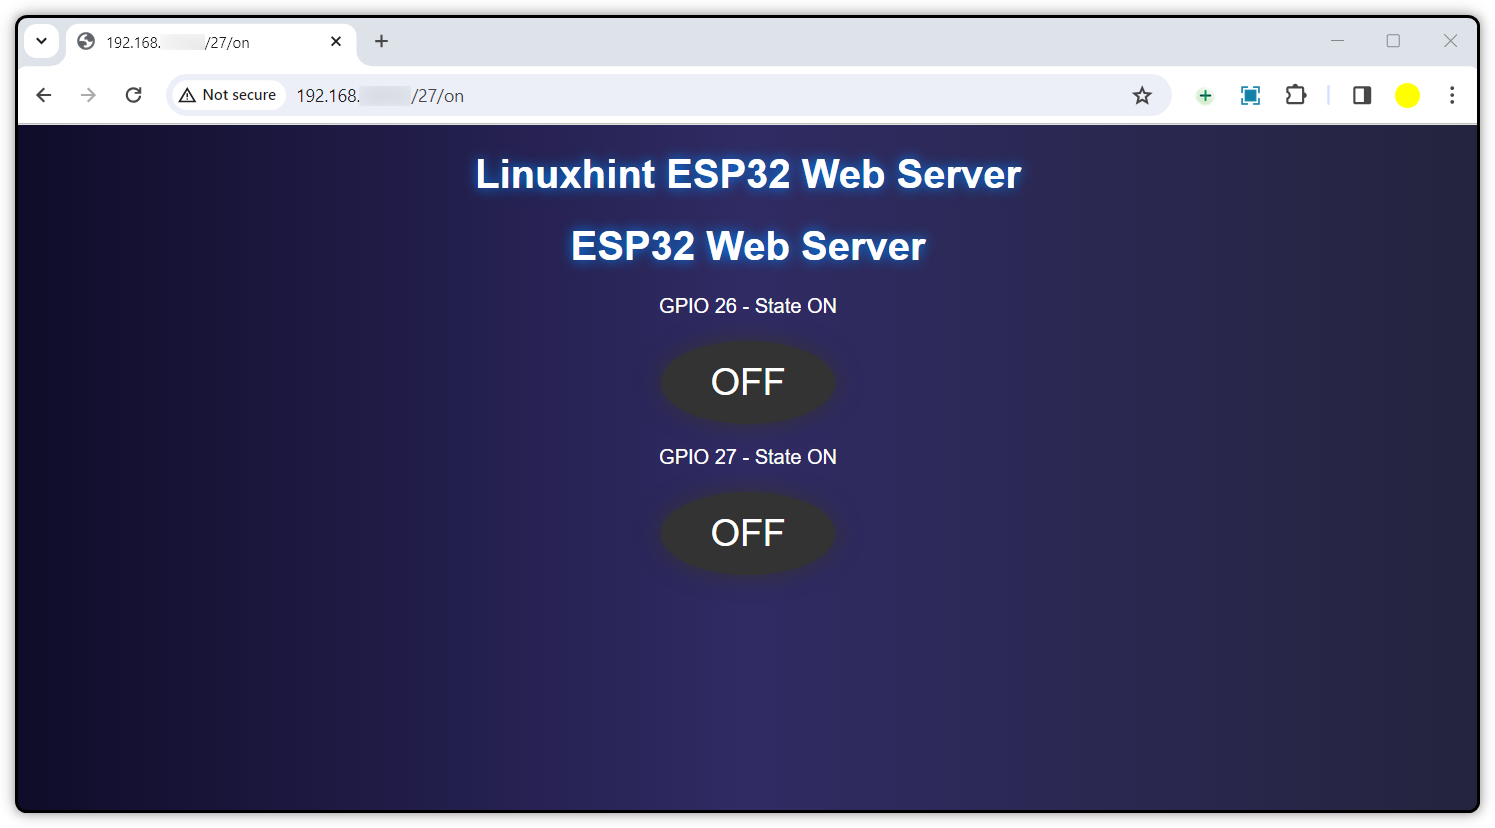
After switching both LEDs, you will see both LEDs will glow.
Mobile Interface
The ESP32 web server is not only limited to desktop browsers, you can also access it from any other device such as a smartphone or tablet. To connect with the ESP32 web server, open the WiFi network settings and search for the same SSID that you defined inside the code.
After searching for the access point, connect your smartphone with that access point.
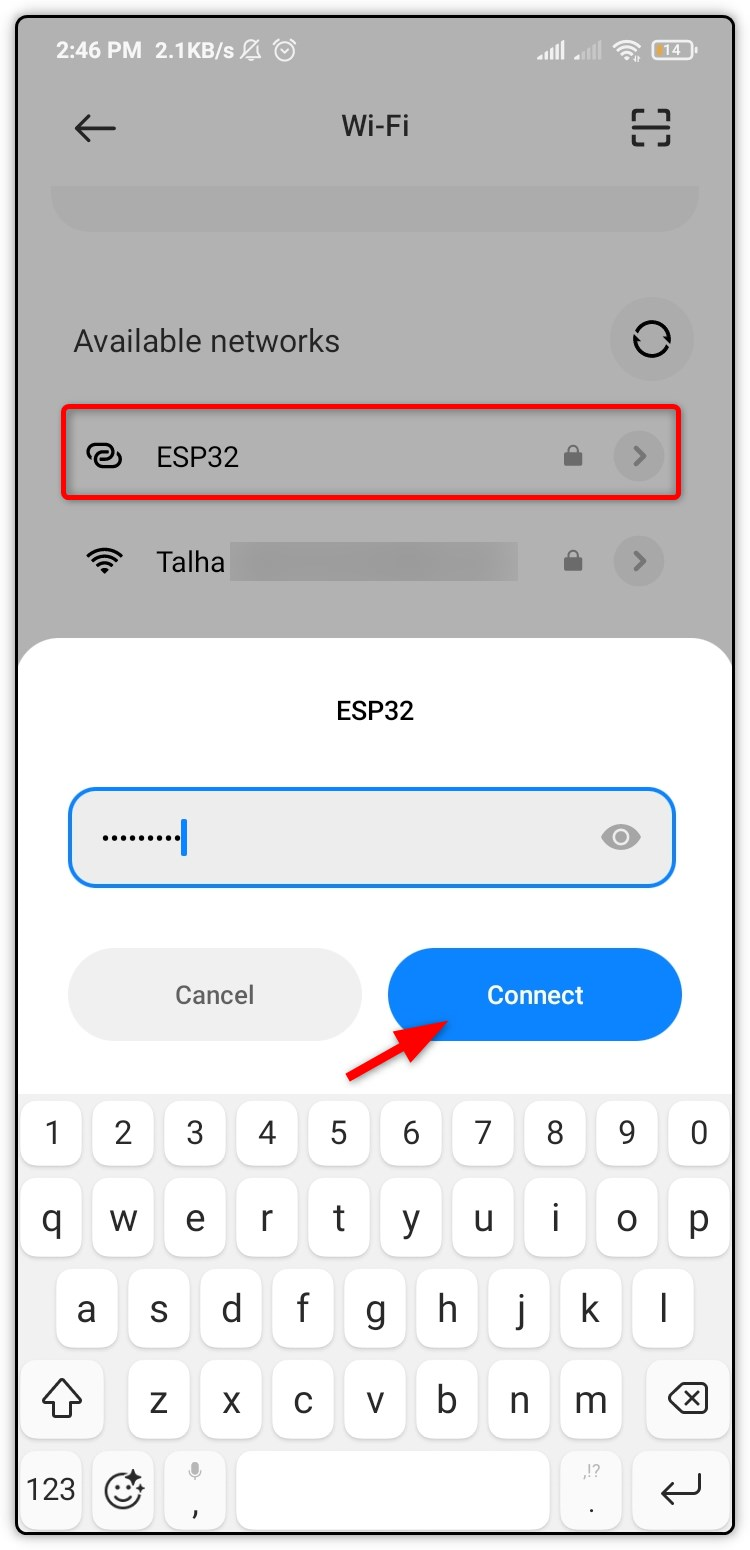
Once connected, open the browser on your smartphone and access the web server using the ESP32 IP address. The interface in the smartphone is similar to the desktop. You have full control for controlling your GPIO pins just like you do in a desktop browser.

6. Controlling AC Appliances Using ESP32 Web Server
For now, we have connected a simple LED with ESP32 and controlled them using the ESP32 web server. But that is just a simple program for the ESP32 web server. You can apply the same concept to any of the sensors or modules and generate the desired output.
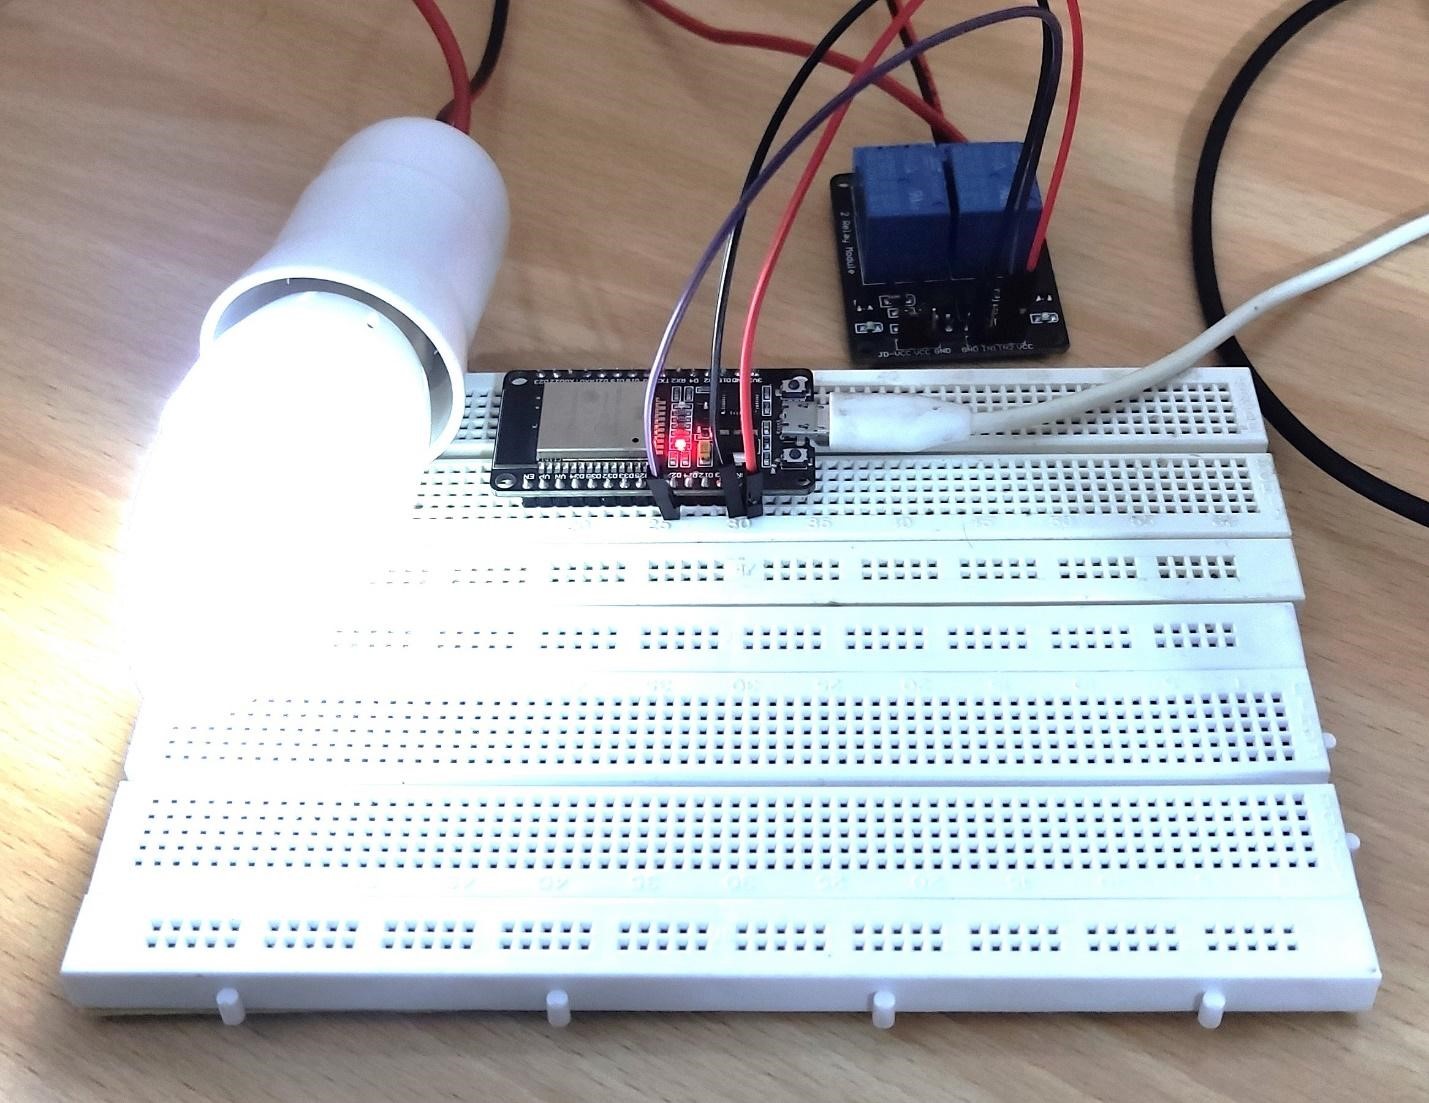
For example, you can connect a relay module with ESP32 and control any AC appliance using the same above-given web server code.
Read: Relay with ESP32 Using Arduino IDE
Now we will connect an AC bulb with ESP32 using a relay module. Here I am going to use the GPIO pin 26 for controlling the AC bulb. You can define your desired GPIO pins to control the relay.
| ESP32 Pin | Relay Module Pins |
|---|---|
| VIN/3V3 | Vcc |
| GND | GND |
| GPIO 26 or GPIO 27 | IN1 or IN2 |
Below is the schematic diagram of ESP32 with a relay module and an AC bulb.

After connecting the relay module, open the ESP32 web server and toggle the GPIO 26 switch.

You will see the bulb will turn ON.
We have successfully created an ESP32 web server and control both AC and DC devices with it. You can apply the same code for any other sensor and create your custom web servers for your project.
Conclusion
ESP32 is a microcontroller board that can connect with an Access point or can act as an access point for other devices. Using this feature of ESP32, you can design an ESP32 web server. All you need is to connect your ESP32 board with an access point and get the IP address for the web server. After that, you have to type the same IP in any of the web browsers, and you will have web server access right away. But make sure that you are connected to the same network while accessing the ESP32 web server. Further, you can modify the given code and control any sensor or module of your choice.