Prerequisites
Before getting started with this, there are some prerequisites that you must have:
- Basic knowledge of HTML, CSS, and JavaScript.
- Node.js installed on your Operating System.
Verify the Vue CLI installation
First of all, make sure that you have the latest Vue CLI installed on your system. You can verify either Vue CLI is installed or not on our system by typing the command given below:
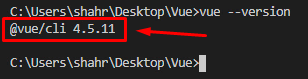
If it is installed, you will have the latest version of Vue CLI printed out in the terminal. Otherwise, if it is not installed, you can either use the NPM package manager or Yarn package manager to install the Vue CLI. In order to install it using the NPM package manager, you need to type the command given below in the terminal:
In the above command, the -g flag is used for installing Vue CLI globally on your system.

Once the Vue CLI is completely installed, you can verify it by typing the command given below:
You will have the latest version of Vue CLI in the output.
Project Creation
Now, suppose you are going to set up the whole Vue project on your own. In that case, it is not a good choice to reinvent the wheel; the Vue project can be created using the vue command in the terminal because the Vue CLI provides the already generated templates to start with the Vue project.
To create the Vue application, simply type the command given below in the terminal:
Make sure to replace the project-name with your desired project name and hit Enter.

After a couple of seconds, it will prompt selecting the default preset or selecting some features manually.
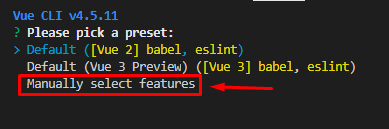
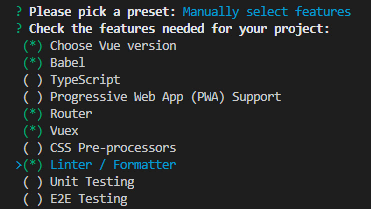
If you want to have some custom features, select “Manually select features,” hit Enter, and you will be prompted with some options like selecting the Vue version, adding Vuex, or Router. Select your desired option and hit Enter.
Answer some necessary configuration questions and save the preset for future projects.

The Vue project will be created in a while using the Vue CLI, and you can start the development in Vue.js.
Starting the Vue application
Once the Vue project is created, you can start the project by first navigating to the project’s directory using the cd command in the terminal:
In the project’s directory, start the Vue application by typing the command given below in the terminal:
After the ignition of the Vue application, visit the http://localhost:8080 in the address bar of your favorite browser:
You will have the Welcome screen of the Vue.js project.
Creation of a Component in Vue
For creating a component in the Vue project, create a .vue file in the components folder and provide it the name of your choice.
Now, in this newly created .vue file, you can write HTML, Javascript, and CSS in the <template>, <script>, and <style> tags respectively.
Open up the .vue file and write the code that you want to write. For example:
Once you are done with the HTML part, give this component a name in the <script> tag as shown in the code snippet below:
After successfully creating the component, let’s see how to import it and use it on some other page or component.
Importing of a component in Vue
The import syntax for importing a component in any other component of Vue is pretty simple and easy; you just have to import the component inside the script tag using the ES6 syntax as shown in the code snippet below:
After importing the component successfully, all you need to do is to create an object with the name of components and provide the name in the components object as shown below:
Now, you can use it anywhere inside the <template> tag of the component. For example, if we want to import it into the App.vue, the syntax would be like this:
After completing all this setup, save each and every file that you have changed and go back to the browser
You can witness in the screenshot attached that the component is imported successfully and perfectly fine on the web page.
Conclusion
Creating, importing, and using a component inside any other component of Vue.js is as easy as saying it. In this post, we walk through the whole process of creation, addition, and usage of a component in Vue.js.