This quick guide illustrates the approaches and underlying steps to configure the environment Path variable on Windows for Node.js.
How to Configure the PATH Variable on Windows for Node.js Web Development?
Configuring the PATH environment variable provides the Node.js access to the Windows terminal. It will prevent the developers from navigating to their installation directories or typing in the full paths and allow them to access Node and its modules directly from the terminal.
Node Package Manager “npm” manages and installs Node.js packages. By setting the PATH variable, it lets you install, update, and interact with the packages globally.
There are two approaches by using which the PATH variable can be configured on Windows for Node.js these are stated and explained below along with the proper steps:
Let’s proceed!
Method 1: Setting Node.js PATH Environment Variable Using GUI
To set or configure the PATH environment variable using Graphical User Interface, visit the below-described steps:
Step 1: Select Directory
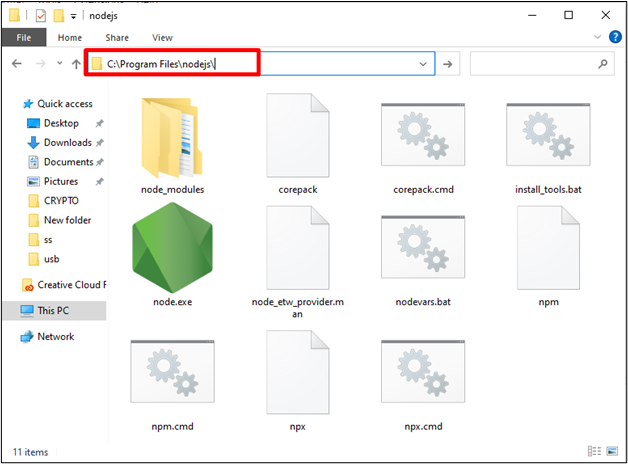
Find the directory of “nodejs” inside the “Program Files” folder if the installed Node.js is “64-bit” or inside the “Program Files(x86)” folder if the installed Node.js is in “32-bit”. Now, open the “nodejs” directory and copy the path of the directory where the “node.exe” file exists. In our case, the path for the “nodejs” directory is “C:\Program Files\nodejs\” as shown below:
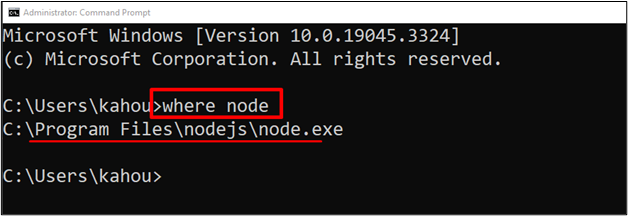
Note: If the required “node.exe” file is not found on both above-stated places then execute the “where node” command on the command prompt or terminal. This command retrieves the location of the file on the system:
Step 2: Opening the Environment Variable
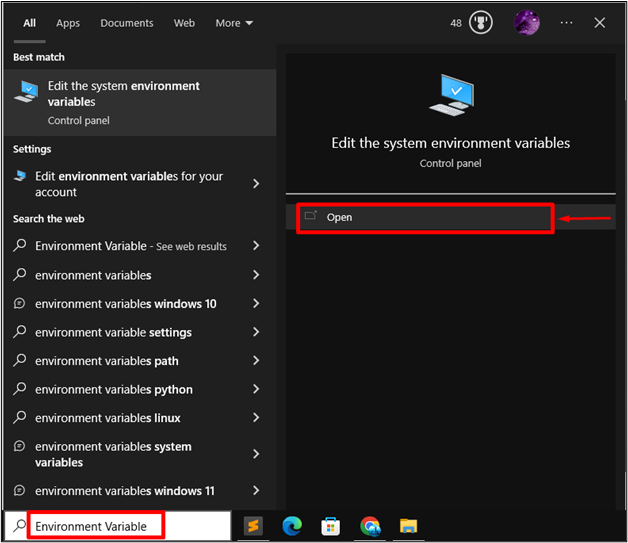
Press the “Window + S” key from the keyboard to open the Start menu and then type the “Environment Variable”. Now, select and open the appeared “Edit the system environment variables” Control Panel settings:
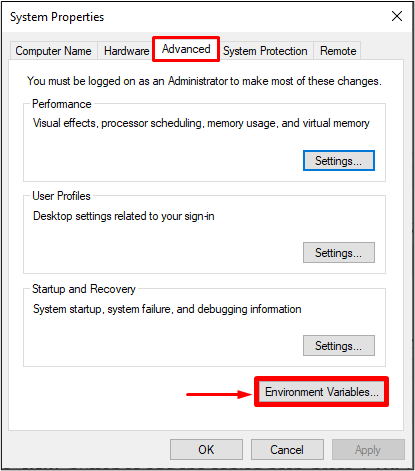
After selecting the “Edit the system environment variables” settings, a new window named “System Properties” appears. Click on the “Environment Variables” button residing at the bottom right corner on the “Advanced” menu tab:
Step 3: Selecting the Path Variable
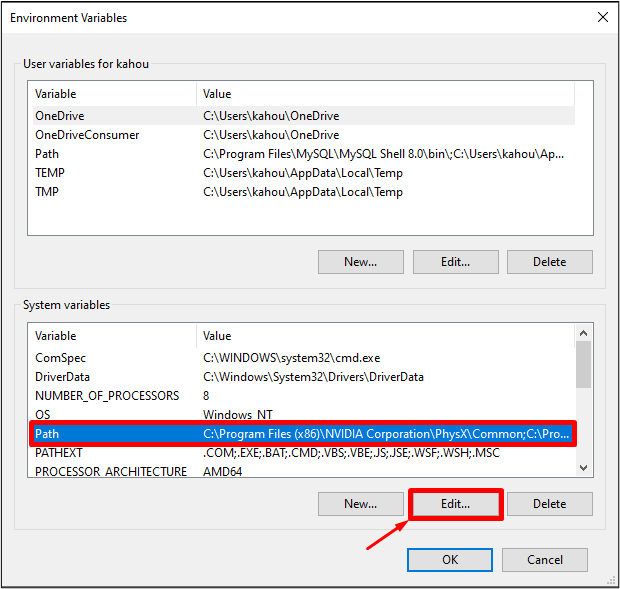
Next, select the “PATH” variable residing inside the “System variables” sections and click on the “Edit” button:
Step 4: Adding the Node.js PATH Variable
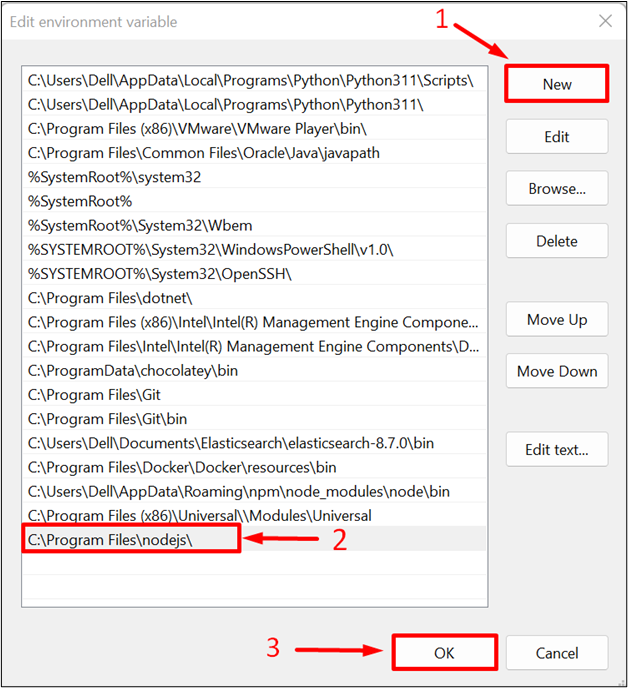
From the “Edit environment variable” window, first, hit the “New” button to add a new path. After that, paste the copied path and press the “OK” to save the changes:
The above figure shows that the PATH environment variable has been configured.
Method 2: Setting Node.js PATH Environment Variable Using CLI
To set or configure the PATH environment variable for Node.js utilize the Command Prompt CLI terminal and visit the below steps:
Step 1: Open the Command Prompt
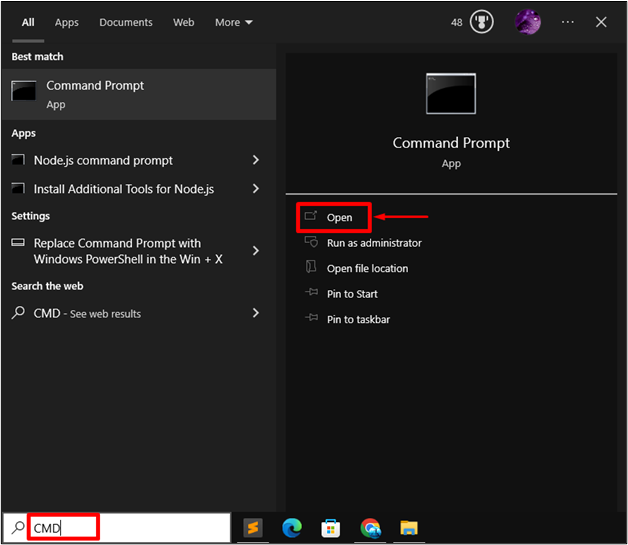
First, launch the Command Prompt via the “Startup” menu:
Step 2: Setting up the Path Variable For Node.js
Now, execute the below command to provide the value for PATH environment variable temporarily:
Where “C:\Program Files\nodejs” is the path of our “nodejs” directory:
Step 3: Setting up the Path Variable For Node.js Permanently
To set the PATH variable for the Node.js package permanently, the below command gets executed:
After executing the above code, the “SUCCESS” message will appear showing the value of the “PATH” variable has been set:
That’s all the procedure for configuring the PATH environment variable for Node.js.
Conclusion
To set the PATH variable for Node.js on Windows, two approaches “GUI” or “CLI” can be used. For GUI, open the “Environment Variables” control panel setting and select the “PATH” variable. Then, paste the Node.js installation directory path and hit the “OK” button. In the case of CLI, the command “setx path “%PATH%;directorypath” is used to permanently set the PATH variable. This guide has explained the procedure to configure the PATH variable on Windows for Node.js.

