You can configure the IP subnet and assignable IP ranges for each of the NAT and Host-only network interfaces of VMware Workstation Pro 16. You can also configure the DHCP server to assign specific IP addresses to specific VMware Workstation Pro 16 virtual machines.
In this article, I am going to show how to configure the DHCP server of VMware Workstation Pro 16’s NAT and Host-only network interfaces to change its IP subnet and the assignable IP ranges. I will also show you how to configure the DHCP server to assign specific IP addresses to specific VMware Workstation Pro 16 virtual machines. So, let’s get started.
Table of Contents
- Changing DHCP IP Subnet of VMware Workstation Pro 16 Network Interfaces
- Creating a New Network Interface and Configure DHCP IP Subnet
- DHCP Lease IP Range
- Changing DHCP Lease IP Range on Windows
- Changing DHCP Lease IP Range on Linux
- Assigning Static IP Addresses to Virtual Machines via DHCP on Windows
- Assigning Static IP Addresses to Virtual Machines via DHCP on Linux
- Conclusion
- References
Changing DHCP IP Subnet of VMware Workstation Pro 16 Network Interfaces
In this section, I am going to show you how to configure the DHCP IP subnet of an existing network interface of VMware Workstation Pro 16.
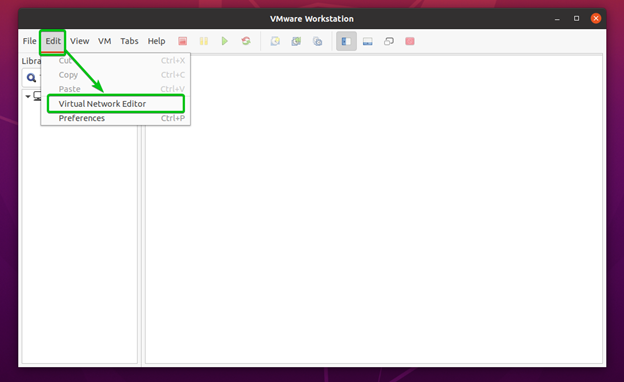
First, open the VMware Workstation Pro 16 app and click on Edit > Virtual Network Editor as marked in the screenshot below.
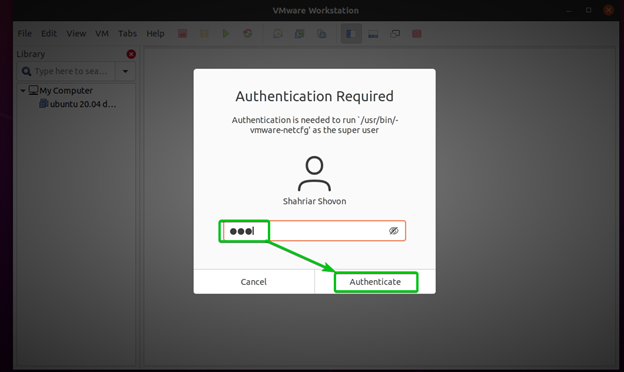
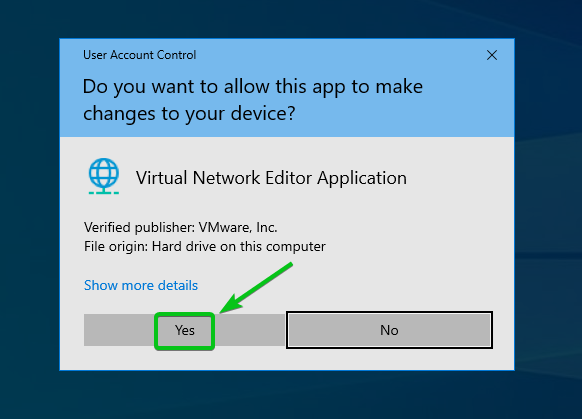
Type in your login password and click on Authenticate.
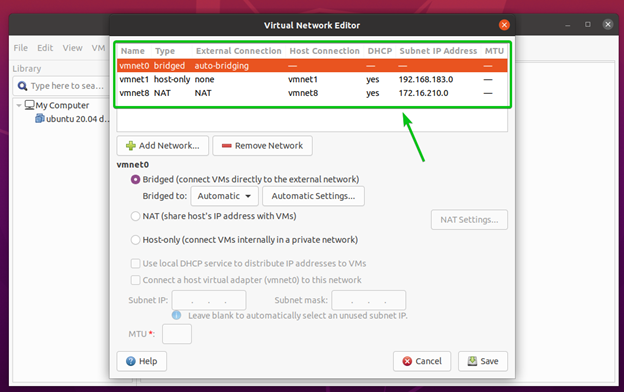
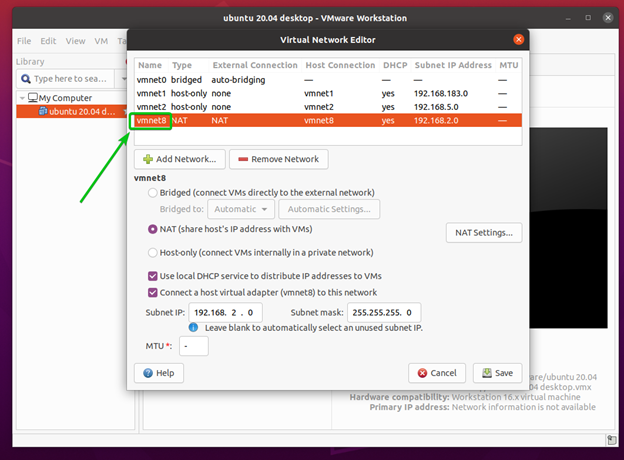
All the existing VMware Workstation Pro 16 network interfaces should be listed in the Virtual Network Editor window as you can see in the screenshot below.
Here,
vmnet0 is the default Bridge network interface.
vmnet1 is the default Host-only network interface.
vmnet8 is the default NAT network interface.
You can change the DHCP IP Subnet of only the host-only and NAT network interfaces.
To change the DHCP IP subnet of a network interface (vmnet8 let’s say), select it and the default Subnet IP and Subnet mask should be displayed as marked in the screenshot below.
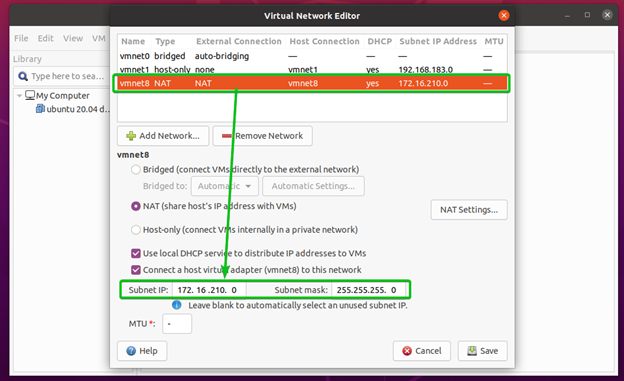
If you want to change the subnet IP to 192.168.2.0/24, then type in 192.168.2.0 in the Subnet IP section and type in 255.255.255.0 in the Subnet mask section as marked in the screenshot below.
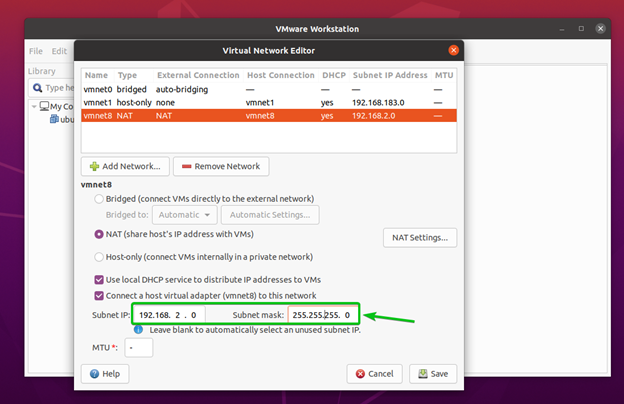
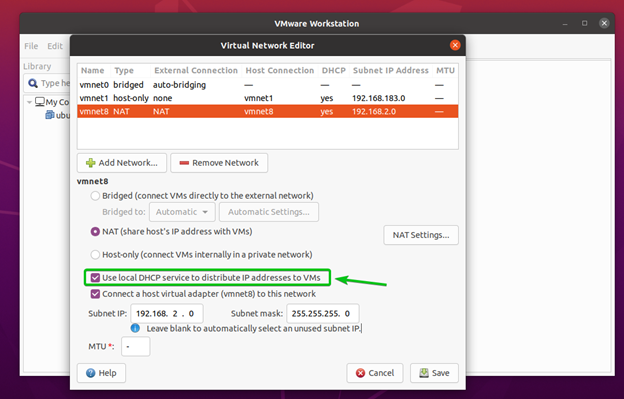
Make sure that the Use local DHCP service to distribute IP addresses to VMs checkbox is checked.
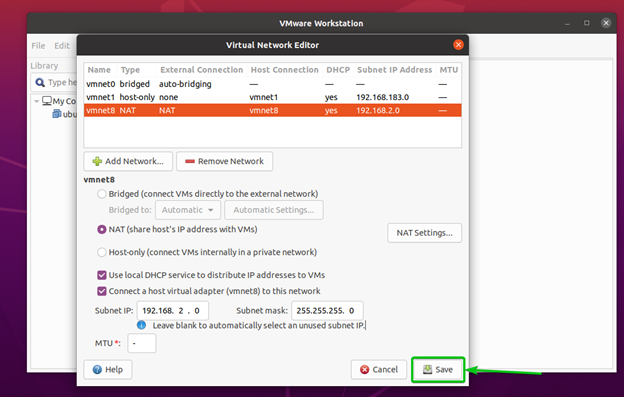
Once you’re done, click on Save.
Now, open a virtual machine and make sure that it is using the network interface that you’ve just configured.
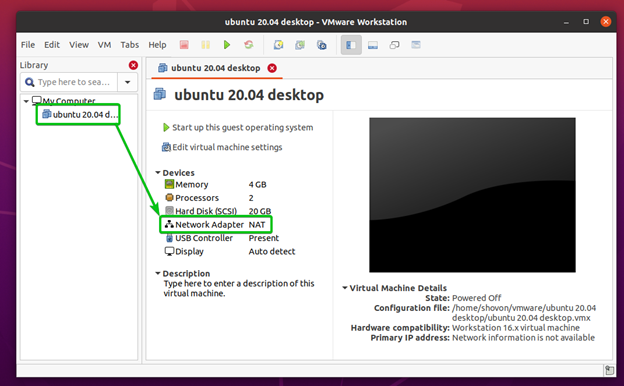
If not, click on Edit virtual machine settings.

Go to Hardware > Network Adapter from the Virtual Machine Settings window, select your desired network interface from here, and click on Save.
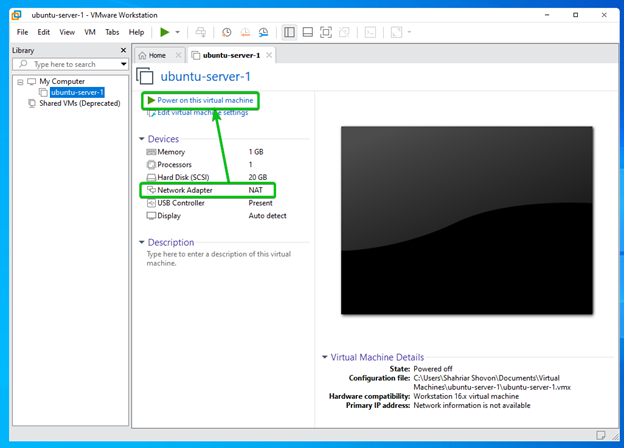
Once you’re done, click on Start up this guest operating system to start the virtual machine.

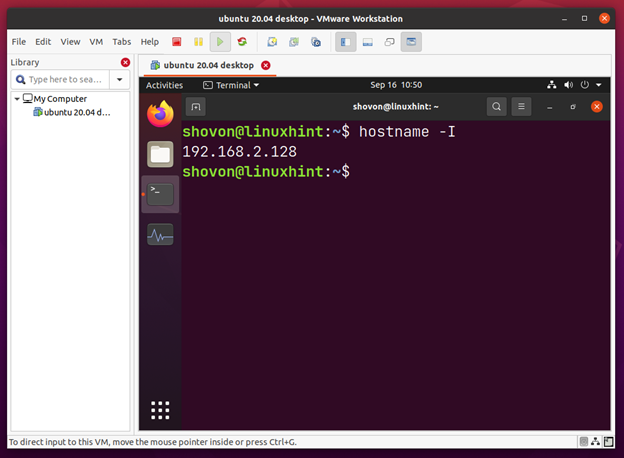
Once the virtual machine starts, check the IP address and you should see that it’s an IP address from the network subnet 192.168.2.0/24.
Creating a New Network Interface and Configure DHCP IP Subnet
You can also create a new Host-only or NAT network interface and configure DHCP on it.
NOTE: You can create multiple NAT network interfaces on Linux only. On Windows, you can only have 1 NAT network interface. But on Windows and Linux, you can create multiple Host-only network interfaces.
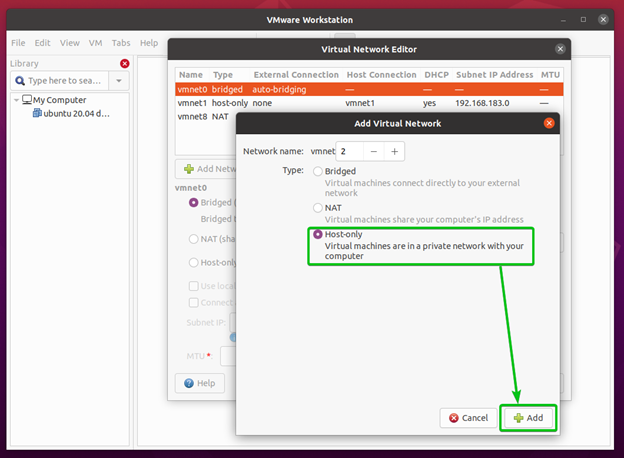
To create a new network interface, click on Add Network… from the Virtual Network Editor window.
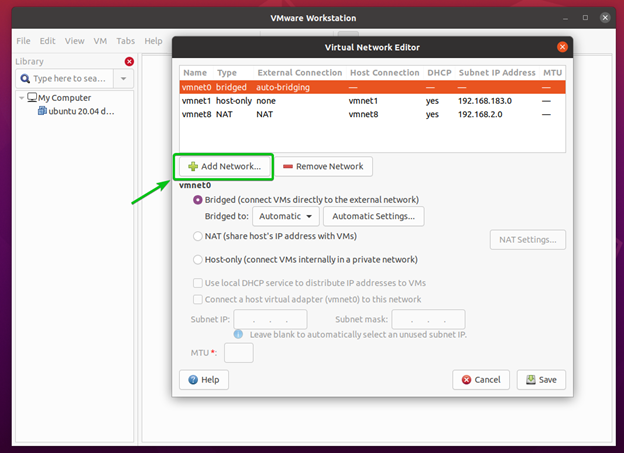
To create a NAT network, select NAT.
To create a Host-only network, select Host-only.
I will create a Host-only network interface in this article for the demonstration.
Once you’ve selected a network interface, click on Add.
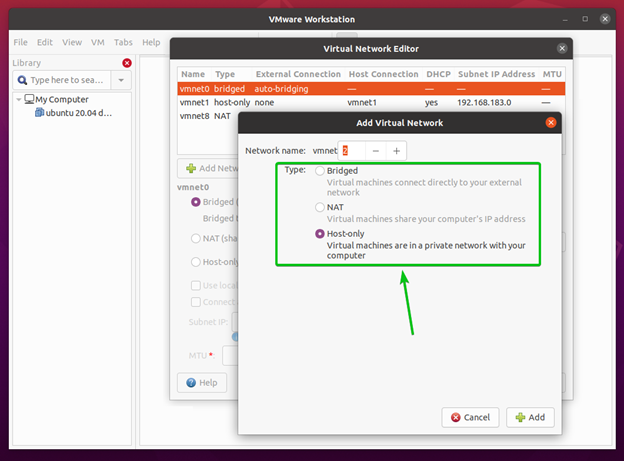
A new Host-only network interface vmnet2 should be created as you can see in the screenshot below.

To enable DHCP for the network interface, make sure that the Use Local DHCP service to distribute IP addresses to VMs checkbox is checked.
Also, make sure that the Connect a host virtual adapter (vmnet*) to this network checkbox is checked. Otherwise, you won’t be able to access the virtual machines from the host computer.

To change the subnet IP address of the network interface to 192.168.5.0/24 (let’s say), set Subnet IP to 192.168.5.0 and Subnet mask to 255.255.255.0 as marked in the screenshot below.
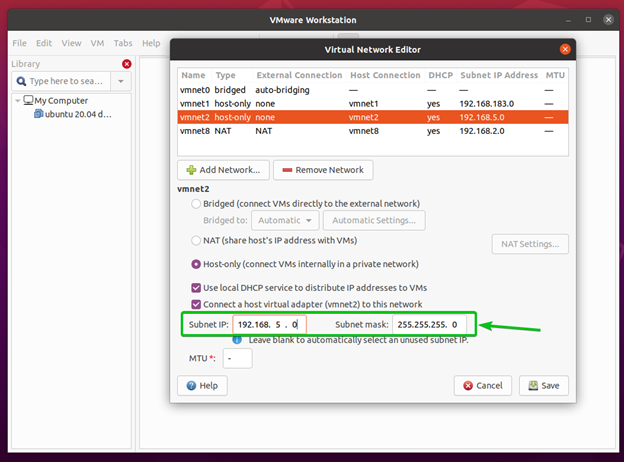
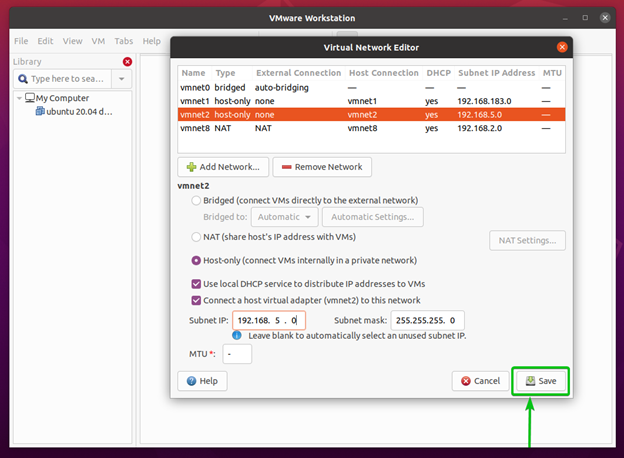
Once you’re done, click on Save.
Now, change the Network Adapter of your desired virtual machine to the newly created network adapter ( vmnet2 in my case).
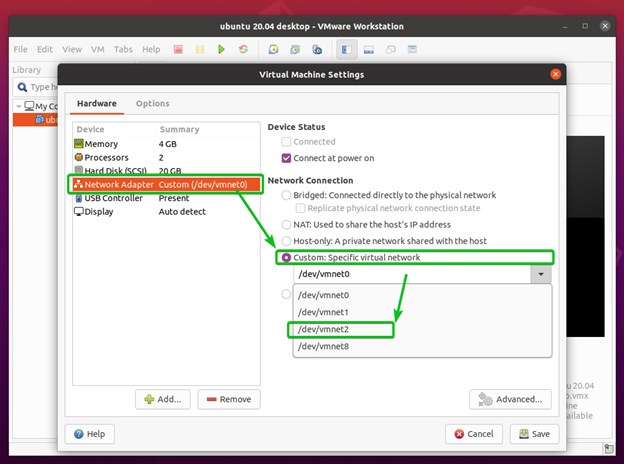
Once you’re done, click on Save.

Click on Start up this guest operating system to start the virtual machine.
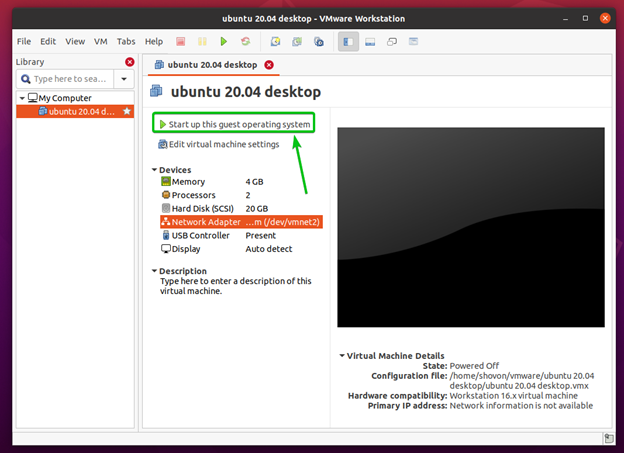
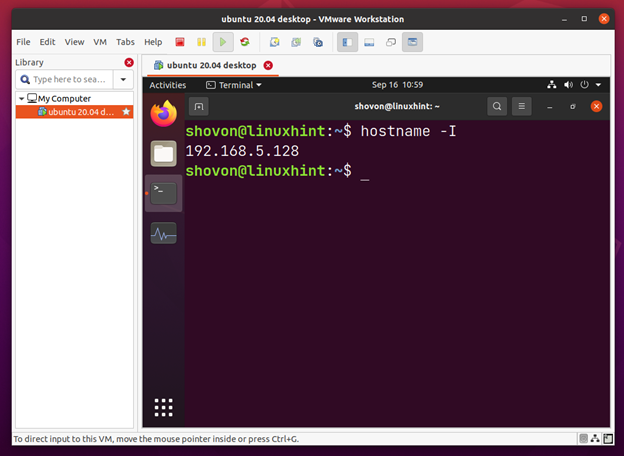
Once the virtual machine starts, you should see that the IP address of the virtual machine is one from the IP subnet 192.168.5.0/24.
DHCP Lease IP Range
DHCP Lease IP range is the set of IP addresses that the DHCP server is configured to assign to the virtual machines via DHCP. The DHCP server won’t assign IP addresses out of this range.
Changing DHCP Lease IP Range on Windows
On Windows operating system, you can change the DHCP IP range of any VMware Workstation Pro 16 network interface from the Virtual Network Editor window.
You can click on Edit > Virtual Network Editor… from the VMware Workstation Pro 16 app to open the Virtual Network Editor window.

Click on Change Settings as marked in the screenshot below.

Click on Yes.
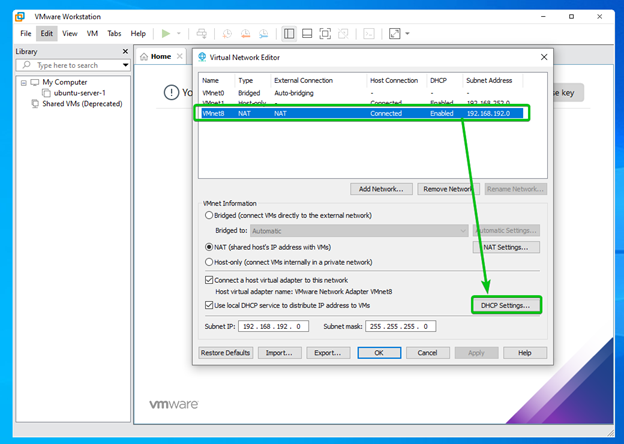
Select a Host-only or NAT network interface for which you want to change the DHCP IP range and click on DHCP Settings… as marked in the screenshot below.
Set your desired Starting IP address and Ending IP address to change the DHCP IP range and click on OK.
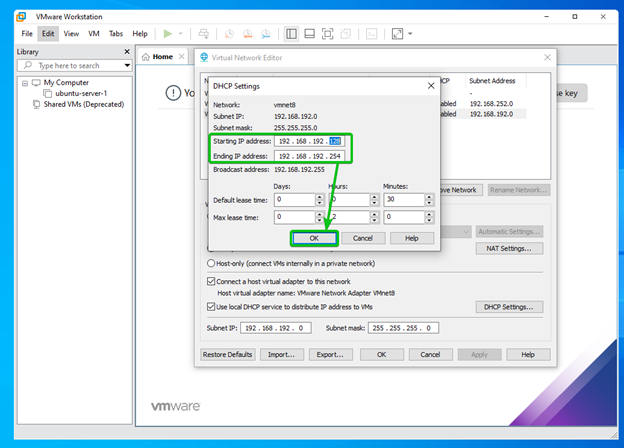
I will set the Starting IP address to x.x.x.155 as you can see in the screenshot below.
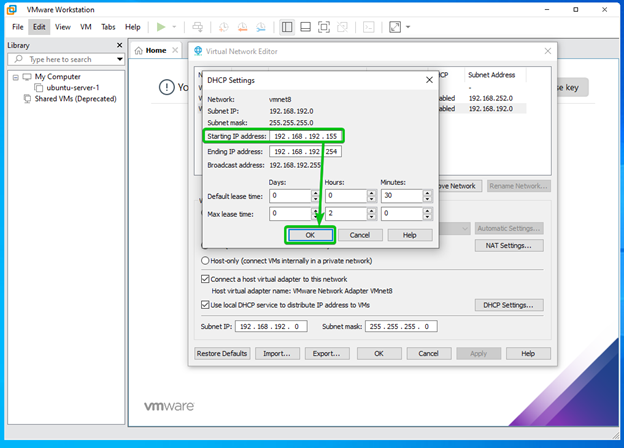
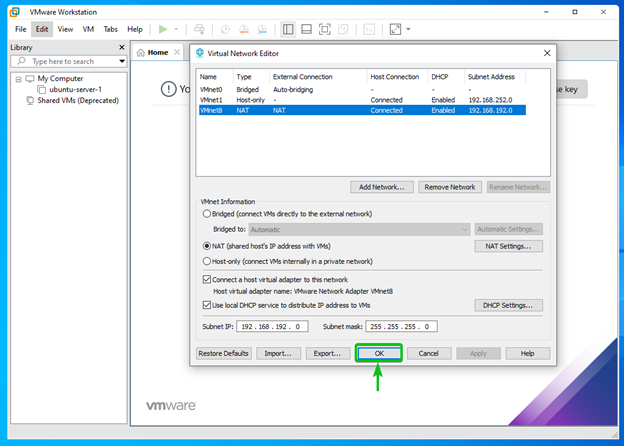
Once you’re done, click on Apply.
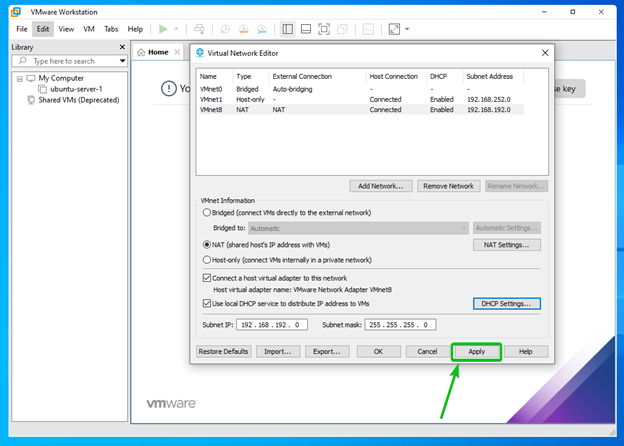
Click on OK.
Now, change the network interface of a virtual machine to the one that you’ve just changed the DHCP IP range and start the virtual machine.
An IP address from the DHCP IP range should be assigned to the virtual machine as you can see in the screenshot below.
Changing DHCP Lease IP Range on Linux
On Linux operating system, you can’t change the DHCP IP range of your desired network interface from the VMware Workstation Pro 16’s Virtual Network Editor window. You will have to edit the VMware DHCP configuration files to do the same thing.
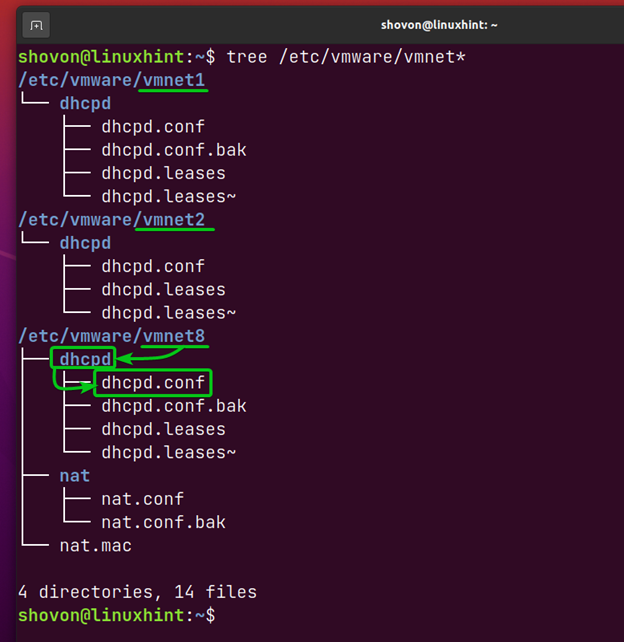
On Linux, each of the VMware Workstation Pro 16’s network interfaces has its own separate configuration files. So, you will have to know the name of the network interface for which you want to change the DHCP IP range.
You can find the name of your desired network interface from the Virtual Network Editor window of VMware Workstation Pro 16.
In this article, I will change the DHCP IP range of the network interface vmnet8. vmnet8 is the default NAT network interface of VMware Workstation Pro 16.
As you can see, each of the network interfaces of VMware Workstation Pro 16 is in its own directory (i.e. /etc/vmware/vmnet1, /etc/vmware/vmnet8). In each of the directories, you have a dhcpd/ directory, and in the dhcpd/ directory, a dhcpd.conf file.
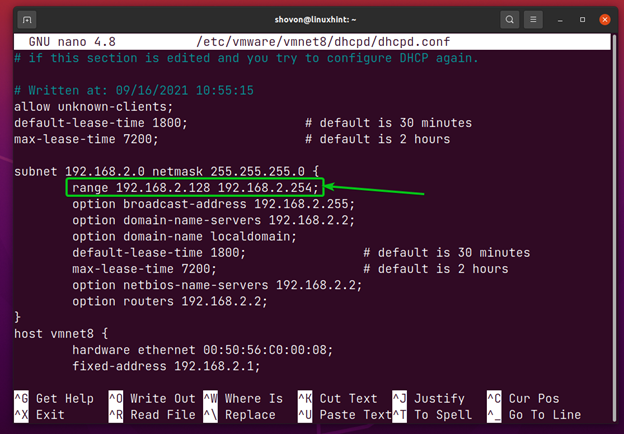
If you want to change the DHCP IP range of the network interface vmnet8, open the DHCP configuration file /etc/vmware/vmnet8/dhcpd/dhcpd.conf with the nano text editor as follows:

In the /etc/vmware/vmnet8/dhcpd/dhcpd.conf file, you should find a line starting with the keyword range as marked in the screenshot below. This is the line that you should modify to change the DHCP IP range of that network interface.
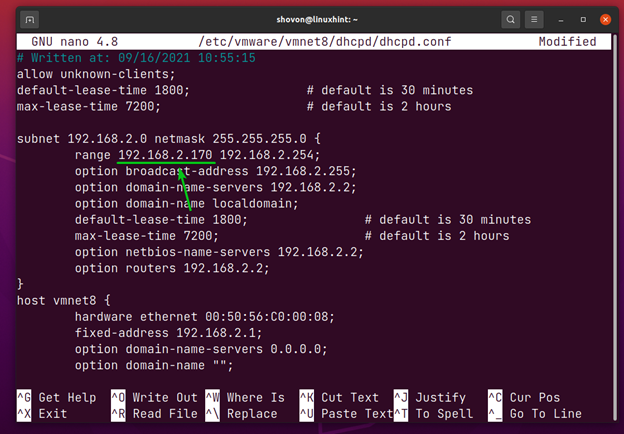
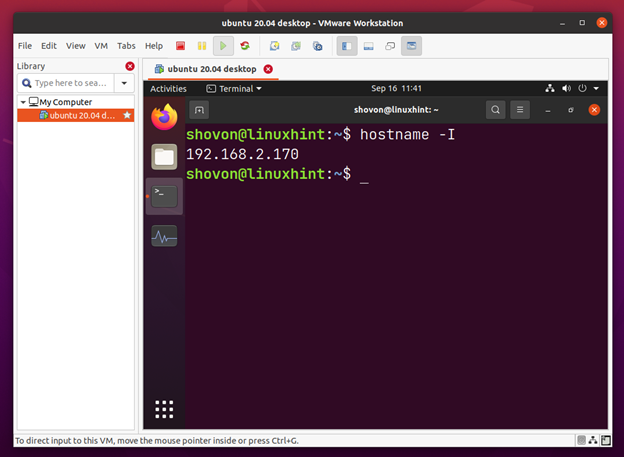
I will set the starting DHCP IP address to 192.168.2.170 as marked in the screenshot below.
Once you’ve made the necessary changes, press <Ctrl> + X followed by Y and <Enter> to save the changes.
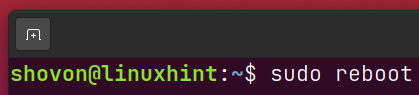
For the changes to take effect, reboot your computer as follows:
Once your computer boots, open the VMware Workstation Pro 16 app. Change the network interface of a virtual machine to the one that you’ve just changed the DHCP IP range and start the virtual machine.
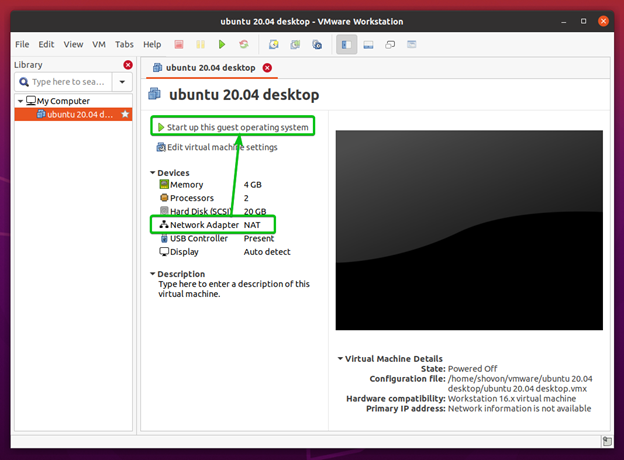
An IP address from the DHCP IP range should be assigned to the virtual machine as you can see in the screenshot below.
Assigning Static IP Addresses to Virtual Machines via DHCP on Windows
You can assign static IP addresses to the VMware Workstation Pro 16 virtual machines via DHCP.
To do that on Windows operating system, you will have to edit the VMware Workstation Pro 16’s DHCP configuration file manually and you will also need to know the MAC address of the virtual machine for which you want to configure a static IP address via DHCP.
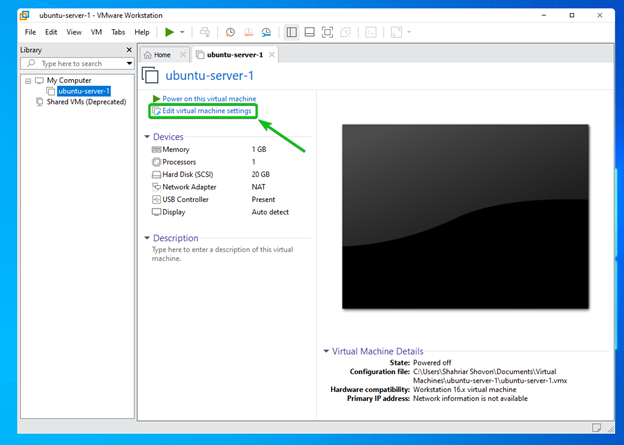
To find the MAC address of a virtual machine, open the virtual machine on the VMware Workstation Pro 16 app and click on Edit virtual machine settings as marked in the screenshot below.
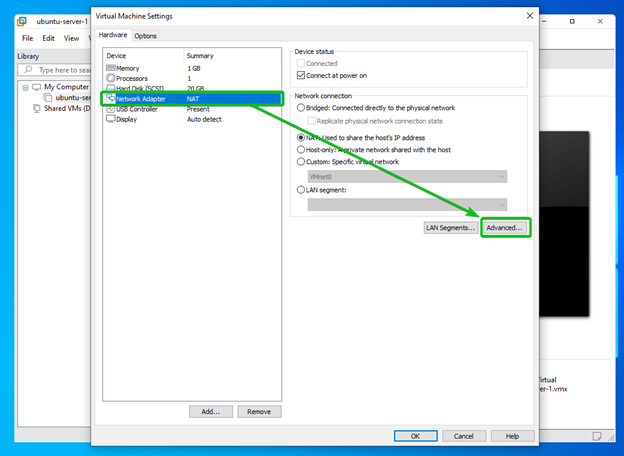
Click on Hardware > Network Adapter from the Virtual Machine Settings window and click on Advanced… as marked in the screenshot below.
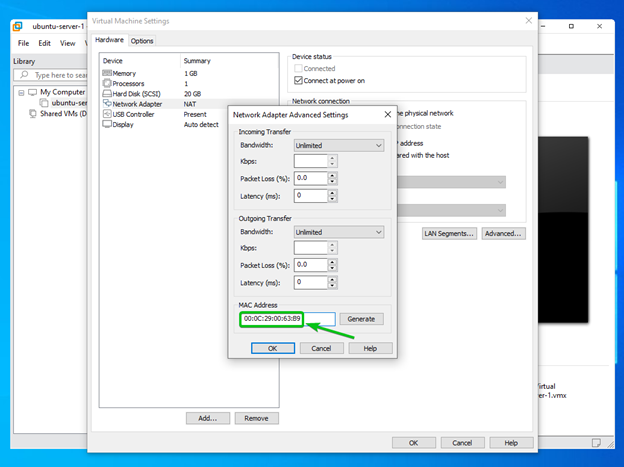
You should find the MAC address of the virtual machine in the MAC Address section as marked in the screenshot below.
In my case, the MAC address is 00:0C:29:00:63:B9.
Copy the MAC address of the virtual machine.
Now, search for the Notepad app, right-click (RMB) on it and click on Run as administrator as marked in the screenshot below.
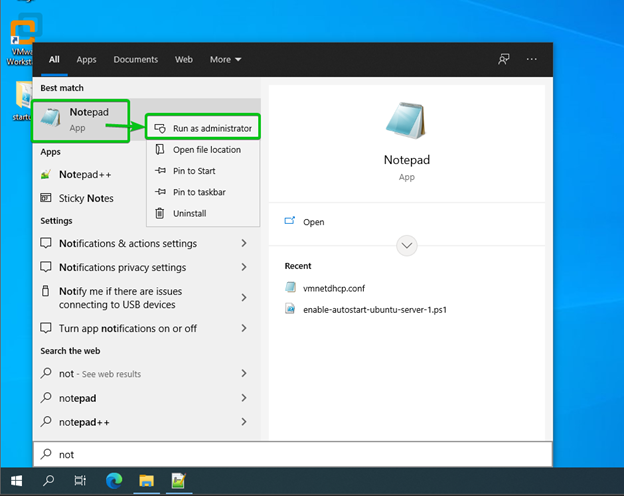
Click on Yes.

The Notepad app should be opened. Click on File > Open.

Navigate to the directory C:\ProgramData\VMware, select All Files (*.*) from the dropdown menu, select the file vmnetdhcp.conf, and click on Open as marked in the screenshot below.
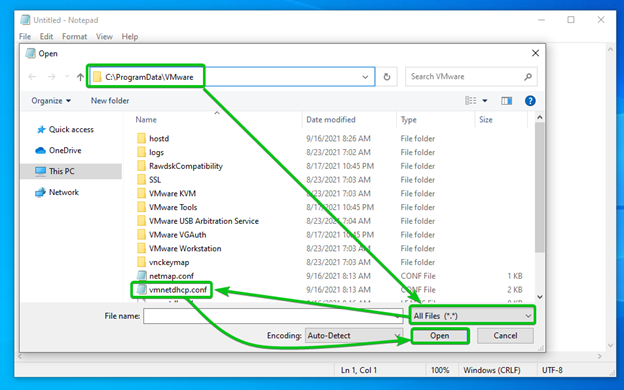
The VMware Workstation Pro 16’s DHCP configuration file vmnetdhcp.conf should be opened with the Notepad app.
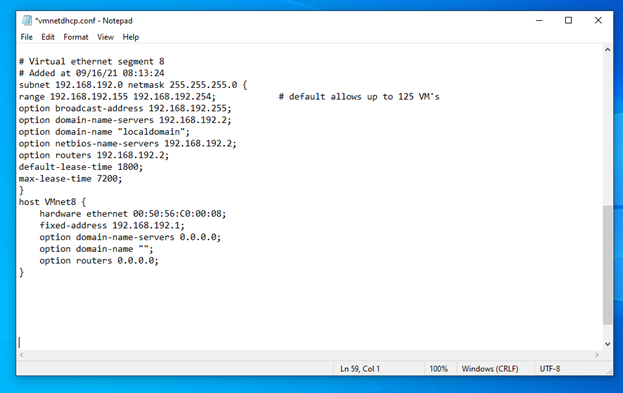
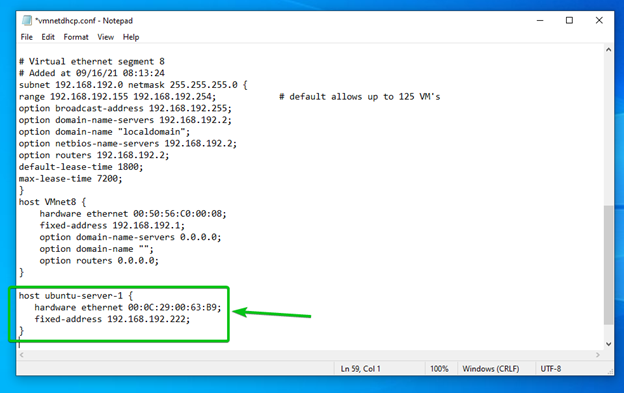
To assign the IP address 192.168.192.222 for the virtual machine with the MAC address 00:0C:29:00:63:B9, type in the following lines of codes in the vmnetdhcp.conf file.
Here, the hostname is ubuntu-server-1. You can use any hostname as you like.
Once you’re done, press <Ctrl> + S to save the changes.
For the changes to take effect, restart your computer.
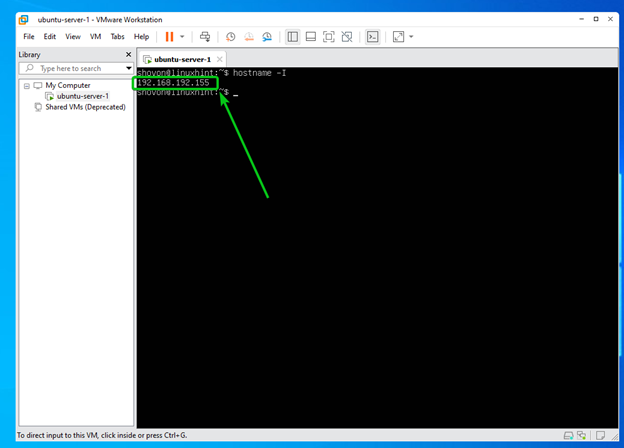
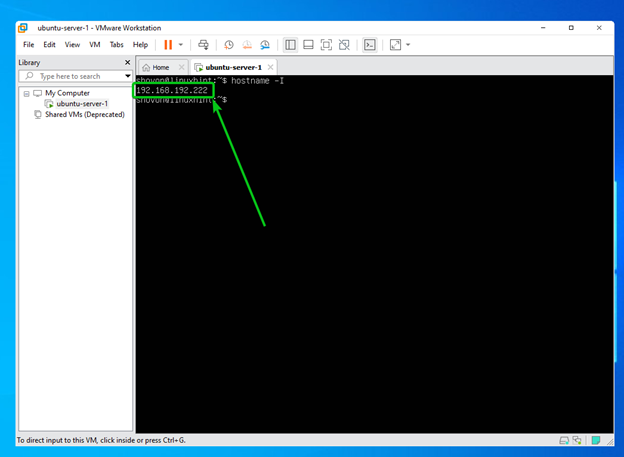
Once your computer boots, start the virtual machine with the MAC address that you’ve just configured (00:0C:29:00:63:B9 in my case). The IP address that you’ve configured for the MAC address of the virtual machine should be assigned to the virtual machine as you can see in the screenshot below.
In my case, the IP address is 192.168.192.222.
Assigning Static IP Addresses to Virtual Machines via DHCP on Linux
You can assign static IP addresses to the VMware Workstation Pro 16 virtual machines via DHCP.
To do that on Linux, you will have to manually edit the respective DHCP configuration file of the network interface that the VMware Workstation Pro 16 virtual machine is using. You will also need to know the MAC address of the virtual machine for which you want to configure a static IP address via DHCP.
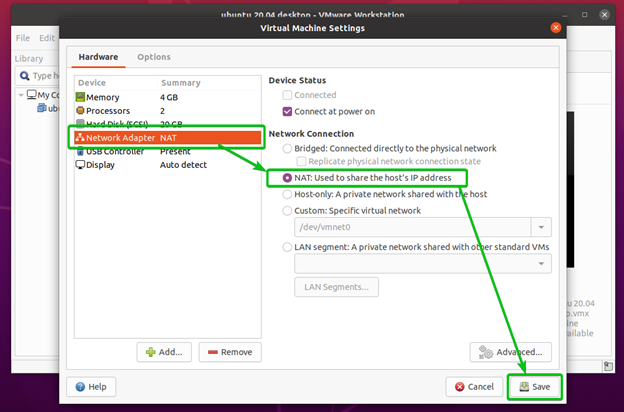
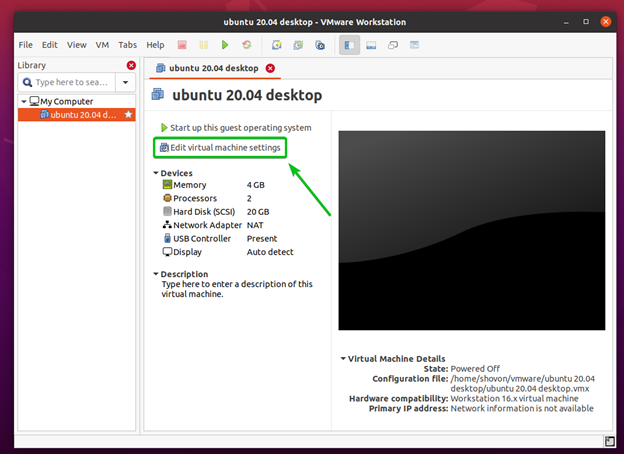
To find the MAC address and the name of the network interface of the virtual machine, open it with the VMware Workstation Pro 16 app and click on Edit virtual machine settings as marked in the screenshot below.
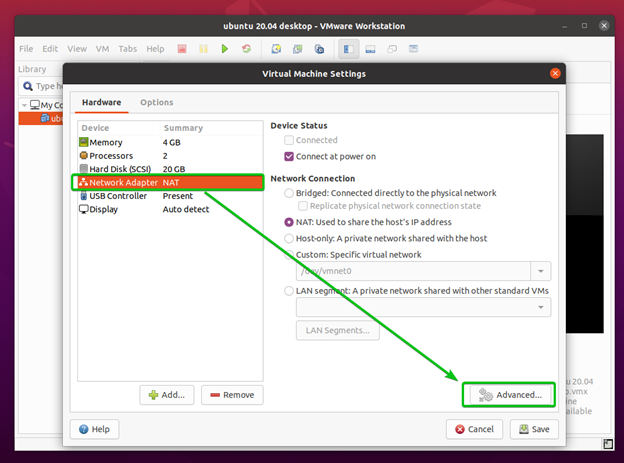
Click on Hardware > Network Adapter from the Virtual Machine Settings window. The virtual machine is using the default NAT network interface. The default NAT network interface is called vmnet8 on Linux.
To find the MAC address of this network interface, click on Advanced… as marked in the screenshot below.
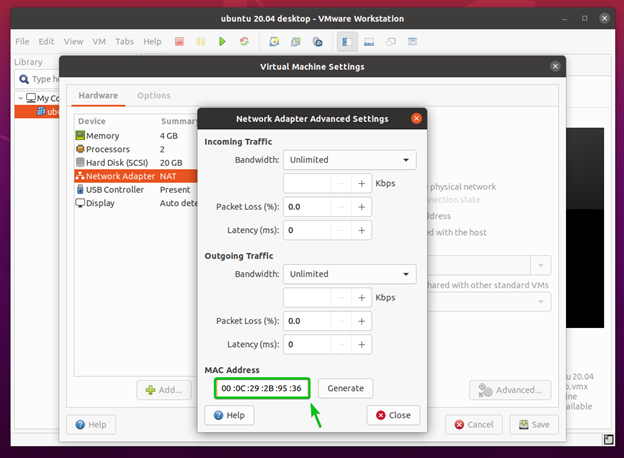
You should find the MAC address of the virtual machine in the MAC Address section as marked in the screenshot below.
In my case, the MAC address is 00:0C:29:2B:95:36.
Copy the MAC address of the virtual machine.
As the virtual machine is using the default NAT network interface vmnet8, the configuration file to edit is /etc/vmware/vmnet8/dhcpd/dhcpd.conf.
Open the configuration file /etc/vmware/vmnet8/dhcpd/dhcpd.conf with the nano text editor as follows:

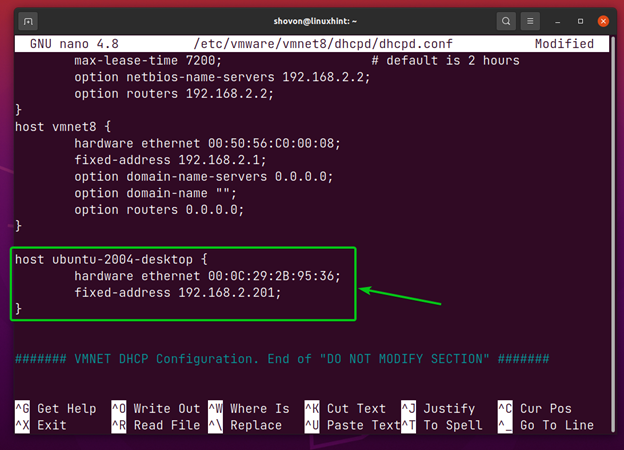
To assign the IP address 192.168.2.201 for the virtual machine with the MAC address 00:0C:29:2B:95:36, type in the following lines of codes in the /etc/vmware/vmnet8/dhcpd/dhcpd.conf file.
Here, the hostname is ubuntu-2004-desktop. You can use any hostname as you like.
Once you’re done, press <Ctrl> + X followed by Y and <Enter> to save the changes.
For the changes to take effect, reboot your computer as follows:
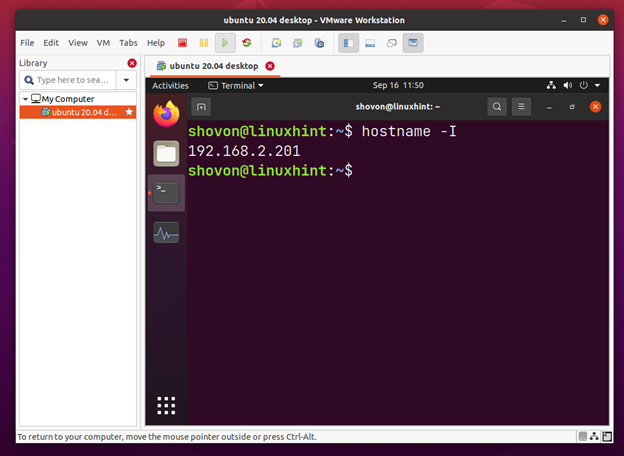
Once your computer boots, start the virtual machine with the MAC address that you’ve just configured (00:0C:29:2B:95:36 in my case). The IP address that you’ve configured for the MAC address of the virtual machine should be assigned to the virtual machine as you can see in the screenshot below.
In my case, the IP address is 192.168.2.201.
Conclusion
In this article, I have shown you how to change the DHCP IP subnet and DHCP IP ranges of the NAT and Host-only network interfaces of VMware Workstation Pro 16. I have also shown you how to configure the DHCP server of VMware Workstation Pro 16 to assign specific IP addresses to specific virtual machines via DHCP.