In this guide, you will learn:
What are the Signs of Disk Corruption
What are the Factors that Lead to Disk Corruption
How to Check Disk Corruption on Raspberry Pi
- How to Check Disk Corruption on Raspberry Pi Using fsck Command
- How to Forcefully Run Check Disk Corruption on Raspberry Pi
- How to Check Disk Corruption on Raspberry Pi Using badblocks
Bonus Method: How to Prevent Disk Corruption on Raspberry Pi
What are the Signs of Disk Corruption
Before moving towards checking disk corruption, you must be aware about the signs that can lead towards disk corruption on Raspberry Pi. These include:
- Frequent Application Crashes: If your applications run and suddenly closes automatically or throws an onscreen error. This will be the sign of disk corruption on Raspberry Pi.
- Data Loss: If you are experiencing data loss, such as your file disappearing suddenly from the system, this might be the reason that your disk is corrupted.
What are the Factors that Lead to Disk Corruption
There are several factors that results in corrupting your Raspberry Pi disk, these are given below:
- Improper Shutdown
- Overclocking
- Using Low Quality SD Card
- Virus or Malware Infection
- Sudden Power Spikes
1: Improper Shutdown
Shutting down your Raspberry Pi device without using the proper shutdown process will eventually damage your Raspberry Pi disk.
2: Overclocking
Overclocking is a useful phenomenon where you increase the clock rate of your Raspberry Pi device to improve its performance. However, overclocking your device too much can lead to disk corruption on Raspberry Pi.
3: Using Low Quality SD Card
An SD Card is the backbone of your Raspberry Pi device and using a low-quality SD Card will not only slow down the Raspberry Pi performance but it also leads to disk corruption.
4: Virus or Malware Infection
Although Linux systems are designed to be virus free, the case may occur when a strong virus or malware infected your system. This virus can enter through USB devices or online and as a result it can lead to disk corruption on Raspberry Pi.
5: Sudden Power Spikes
A sudden power spike can also be the reason that can lead to disk corruption on Raspberry Pi.
How to Check Disk Corruption on Raspberry Pi
You can check disk corruption on Raspberry Pi using:
- fsck Command
- badblocks Command
How to Check Disk Corruption on Raspberry Pi Using fsck Command
The fsck command is a widely used command that allows you to check the file system for corruption. It is a command-line utility that checks your filesystem for errors and attempts to recover it. It is preinstalled in all Linux systems including Raspberry Pi as well. If you have an old Raspberry Pi SD Card that is corrupted, you can fix it by using the following steps:
Step 1: Insert an SD Card or Attach Disk
You have to choose your disk or storage for a Raspberry Pi device that is corrupted. As an example, I have used an old SD Card and attached it with my Raspberry Pi device using the SD Card reader.
Step 2: Check the SD Card or Attached Disk File System
You have to check the attached SD Card or disk file system, since this will be used later on in the process of checking the disk corruption on Raspberry Pi. You can check it by running the following command:
Step 3: Unmount the SD Card
Before performing the check disk operation, you have to unmount the SD Card or disk, this can be done by opening the terminal and using the following command:
Note: You must replace /dev/sda2 with the file system for a disk that you’re going to check on your Raspberry Pi device.
Step 3: Perform Check Disk Operation on Raspberry Pi
To check the Raspberry Pi disk for corruption, you should login to the terminal as a root, this can be done from the following command:
Once you are in root mode, you can use the following fsck command to check Raspberry Pi disk corruption:
Reply with 1 since you are going to repair the disk by removing the dirty bit:

Write changes to disk by replying with 1 again:
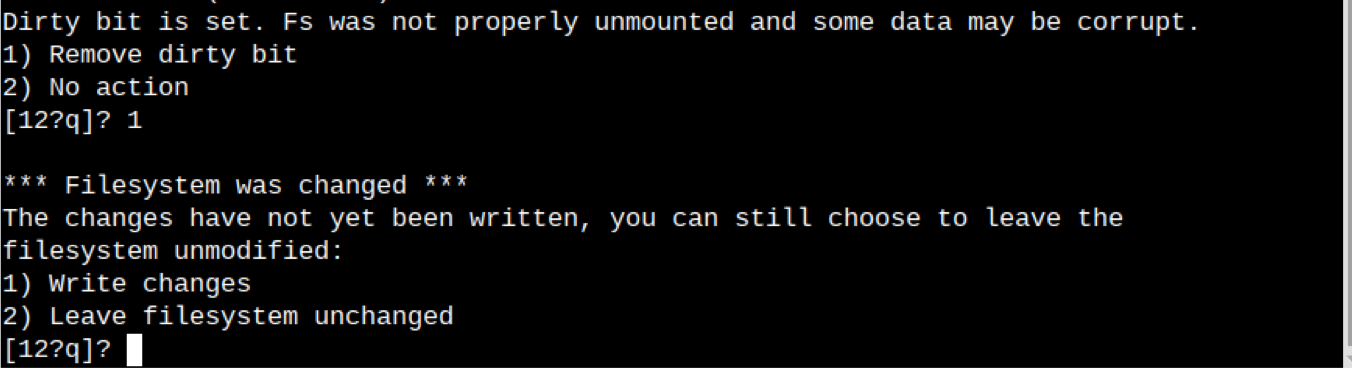
This will complete the check disk operation on Raspberry Pi and it will repair your disk if it is corrupted.
How to Forcefully Run Check Disk Corruption on Raspberry Pi
If you want to forcefully run the check disk corruption on Raspberry Pi at the system boot time, you can apply the following steps:
Step 1: Create a File
First, create an empty file with the name /forcefsck using the following command:
Step 2: Reboot the Device
After creating the file, you must reboot the device and before loading the Raspberry Pi system, it will first perform the check disk operation. If the check disk operation is successful, the file will be removed from your system, which you can ensure it using the following command:

The above output ensures that the file is successfully removed from the system. If you want to perform the operation again, repeat the above-given steps again.
How to Check Disk Corruption on Raspberry Pi Using badblocks Command
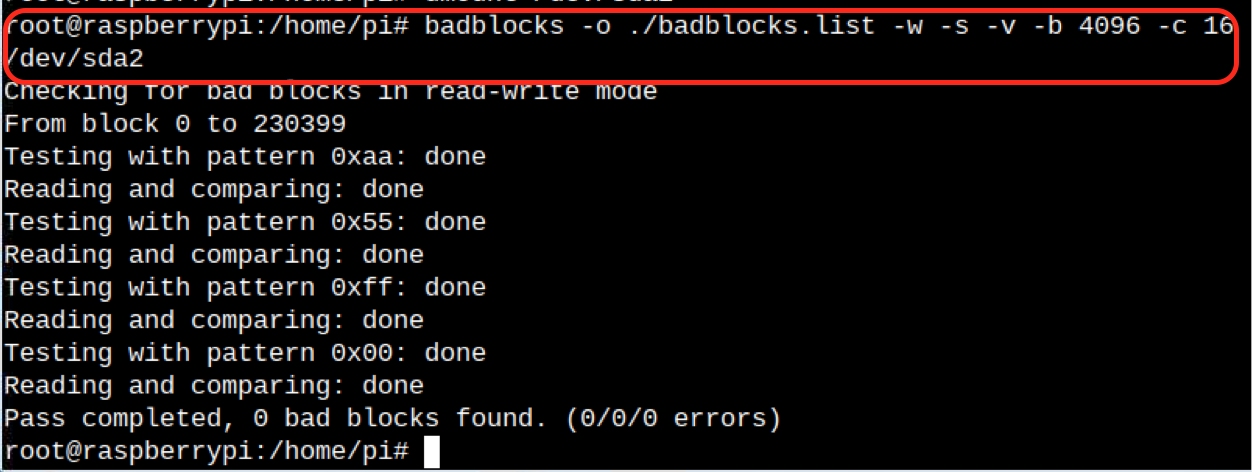
You can also use the badblocks command on your Raspberry Pi system to check for any bad blocks on the disk causing the system to crash. You can use the following badblocks command to check disk corruption on Raspberry Pi:

The above command will take time checking the bad blocks in different modes and once done, it will return you the bad blocks if the test is not successfully passed. Different flags are used in the above command, and their description is provided below:
- -o option specifies the output file.
- -w option enables the write operation.
- -s option enables the non-destructive scan mode.
- -v option provides detailed information about the scan process.
- -b 4096 option specifies the block size to use for scanning.
- –c 16 option specifies 16 requests will be issued per pass.
In my case, there are no bad blocks and the test is passed, which means my SD Card is not corrupted:
Bonus Method: How to Prevent Disk Corruption on Raspberry Pi
While using fsck or badblocks command is a good approach to check for disk corruption on Raspberry Pi, it is always better to do some precautionary measures to prevent disk corruption. Here are some precautionary measures you have to do at first place to prevent Raspberry Pi disk corruption:
- Avoid Improper Shutdown
- Keep your System Up to Date
- Use a Good Quality SD Card
- Backup Raspberry Pi Data Regularly
- Don’t Overclock Raspberry Pi Too Much
- Use Official Raspberry Pi Power Supply
1: Avoid Improper Shutdown
One of the main reasons that results in Raspberry Pi disk corruption is the improper shutdown. All Raspberry Pi models except Raspberry Pi 5 don’t have any built-in power off button. Thus, most users go with powering off the device by unplugging the power cable instead of using the shutdown command or doing it from the GUI. An improper shutdown will increase the risk of affecting your file system.
2: Keep your System Up to Date
Updating your Raspberry Pi system is crucial for increasing the device security and fixing the previous bugs that occur in your system. Thus, it is always a good approach to update your system regularly using the following command:
3: Use a Good Quality SD Card
Since Raspberry Pi system is mostly operated through SD Card, thus a good quality SD Card with a good read and write speed is a must to prolong your working with your Raspberry Pi device. You can follow here to find out the best micro-SD Cards for Raspberry Pi. You can also check your SD Card speed to ensure it is a good fit for your Raspberry Pi device. Read here to find how to test the speed of a Raspberry Pi SD Card.
4: Backup Raspberry Pi Data Regularly
You must also ensure backing up your data regularly on an external hard drive or cloud storage device. This is necessary because if your Raspberry Pi system is corrupted you can recover it back from the back up option. For a detailed guide on how to back up a Raspberry Pi SD Card, read here.
5: Don’t Overclock Raspberry Pi Too Much
There is a threshold defined for overclocking which you can set to speed up your device performance. However, exceeding that threshold could lead to disk corruption. So, if you need speed for a limited time, try to overclock your device at a specific threshold and then revert the changes back to default to keep your disk safe from corruption. For a detailed guide on how to overclock Raspberry Pi, read here.
6: Use Official Power Supply
It is recommended to use official Power Supply for Raspberry Pi devices to ensure it will get the adequate power needed to run the system. You can purchase official Power Supply for Raspberry Pi devices from here.
Conclusion
Checking Raspberry Pi disk corruption is useful since it saves your important data and avoids purchasing a new SD Card. The fsck command line utility is an ideal option for checking the Raspberry Pi disk for corruption and it automatically fixes the error that occurs in the disk. You can also use the badblocks command on your Raspberry Pi system to check for an error in your Raspberry Pi disk. By following these methods and precautionary measures provided in the above section of this guide, you will be able to prolong your journey with the Raspberry Pi system.