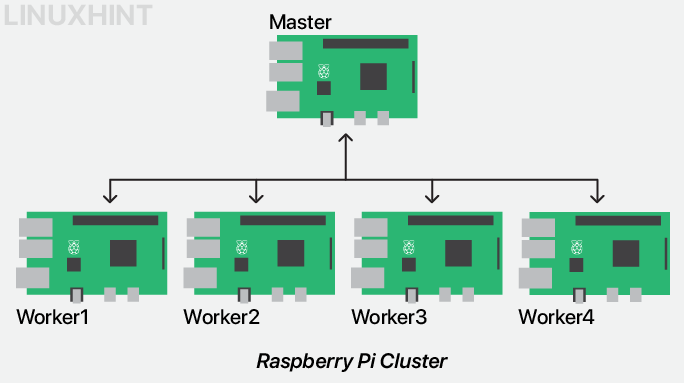
This article will guide you in building your first Raspberry Pi cluster. However, before going into the details, let’s first discuss the Raspberry Pi cluster.

What is Raspberry Pi Cluster
The Raspberry Pi cluster is a series of Raspberry Pi devices connected to share their tasks. A Raspberry Pi cluster includes a central node that takes charge of all the processes and is thus more powerful than other devices.
To find more detail about the Raspberry Pi cluster, you can read our article.
How to build your first Raspberry Pi cluster
To create a Raspberry Pi cluster, you will need the following components:
- Raspberry Pi 4 devices (4-8 depends on your budget)
- Raspberry Pi POE HAT devices (One POE for each Raspberry Pi device)
- Gigabit POE enabled switch (The number of ports in the POE must not be less than the number of Raspberry Pi devices)
- Ethernet Adaptor to power on the POE enabled switch
- Cluster Case
- SSD Drive
- SD cards (Minimum 32GB) (One for each Raspberry Pi device)
- Ethernet Cables
After preparing the above components, you are good to start building your first Raspberry Pi cluster using the following steps:
Step 1: Prepare a place for your Raspberry Pi cluster, which must be clean. It’s better to place the Raspberry Pi cluster with a good ventilation system.
Step 2: Now, setup your Raspberry Pi devices by first installing POE HAT as this enables you to power your Raspberry Pi devices through Ethernet enabled networks.
Step 3: After the POE HAT setup, now place each Raspberry Pi device in a cluster carefully one by one.
Step 4: Prepare your Raspberry Pi SD cards and install Raspberry Pi operating system on each card by following the published article guideline.
Step 5: Now insert the SD cards into the Raspberry Pi devices.
Step 6: Power on Raspberry Pi devices.
Step 7: Connect one end of the Ethernet cable with a Raspberry Pi device and the other with the Gigabit POE enabled switch. Power on the switch using an Ethernet adapter. Repeat the same step for all Raspberry Pi devices.
Step 8: Choose a head device that will control all the clustering processes and for that, you have to connect all other devices with it using its Ethernet connection. All other devices will connect to the head device internet connection through the ethernet cable. You can even boost the head device performance by installing an SSD drive.
Step 9: For better performance, you can even install a Fan for each Raspberry Pi device to keep the devices cool.
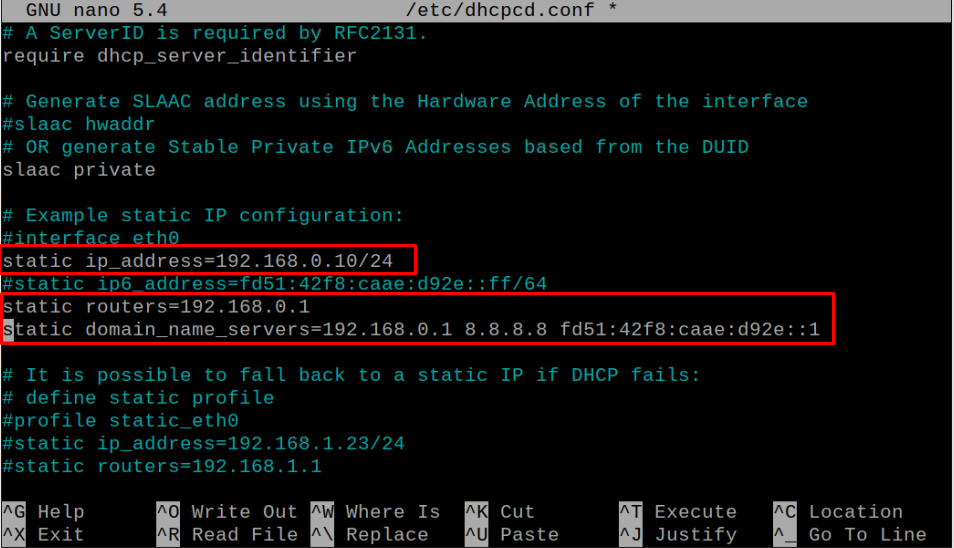
Step 10: Once the setup is completed, use the following command to open the dhcpcd configuring file on your head device where you will require to set static IP for your host.
Uncomment the following lines:
Save the file and reboot your device.
Repeat the same process for all the devices to complete the process of building a Raspberry Pi cluster. In case, if any error occurs, you can get help from the Raspberry Pi tutorial.
Conclusion
Building a Raspberry Pi cluster enhances the performance as multiple Raspberry Pi devices perform their duties simultaneously. The above guidelines will assist you in building your first Raspberry Pi cluster so that you can execute various high computational tasks within no time. You should also carefully select the head node. This performance depends upon the Raspberry Pi devices you buy (Raspberry Pi with 8GB RAM) and storage devices (SSD to boost functionality).

