This blog covers the below-stated content areas:
- How to Build a Basic CLI App using Node.js readline and Async/Await?
- What is Node.js readline?
- What is async/await?
- Prerequisites for Building a Basic CLI App
- Building a Basic CLI Application Using Node.js Readline and Async/Await
- Building a Basic CLI Application Using Node.js Readline and Async/Await with Timeout
How to Build a Basic CLI App using Node.js readline and Async/Await?
A basic CLI app can be built with the help of node.js “readline” and “async/await” by awaiting a promise within the “async()” function and handling its rejection cause based on user input.
What is Node.js readline?
The node.js “readline” module enables the users to read the input stream individually. Some of its methods include “clearLine()”, “clearScreenDown()”, “cursorTo()” etc.
Syntax
This syntax incorporates the “readline” module in the application.
What is async/await?
The “async” keyword/functionality makes the function retrieve the promise. However, the “await” keyword directs the function to halt the execution and wait for the promise to be resolved before it resumes.
Syntax(“async” Keyword)
return "Success";
}
Syntax (“await” Keyword)
Prerequisites for Building a Basic CLI App
Below are the prerequisites required to create a basic CLI application utilizing node.js readline and async/await:
- A node.js version later than 17.0.
- Basic understanding of JavaScript promises and async/await concepts.
- Prior knowledge of creating a basic CLI application.
Example 1: Building a Basic CLI Application Using Node.js Readline and Async/Await
The following code example builds a basic CLI application by including the “readline/promises” packages and asks the user to answer a mathematical query with the help of the “async” and “await” keywords:
const { stdin: input, stdout: output } = require('process');
(async () => {
const io = packs.createInterface({ input, output });
try {
const answer = await io.question('What Does 6x3 Equals? ');
const result = answer.trim() === '18' ? 'Correct! Good to go' : 'Incorrect. Please try again!';
console.log(`${answer.trim()} is ${result}`);
} catch(error) {
console.log(`Faced Error -> `, error);
} finally {
io.close();
}
process.exit(1);
})();
In this block of code:
- First of all, include the “readline/promises” package which is a part of the node.js “readline” module.
- In the next step, use the “stdin” and “stdout” streams to enable the input and output operations, respectively.
- After that, utilize an async “Immediately Invoked Function Expression(IIFE)” to invoke await conveniently. The IIFE basically executes once it is declared.
- Within “IIFE”, define a readline interface that takes input from the user via “stdin” and displays outputs on “stdout”.
- Now, in the “try” block, declare the constant “answer” that uses the “await” functionality to wait for the user response based on the specified query i.e., “What Does 6×3 Equals?” till the answer is retrieved.
- It is such that the provided answer is contained in the “answer” variable.
- The answer is fetched with the help of the ternary operator in such a way that if a user inputs the correct answer, the former expression returns before the colon. In the other case, i.e., unsatisfied condition, the latter expression is executed.
- Lastly, if there is any faced limitation, it is coped with in the “catch” block.
- Lastly, the readline interface is ended/closed in the “finally” block and the process is exited via “process.exit(1)”.
Output
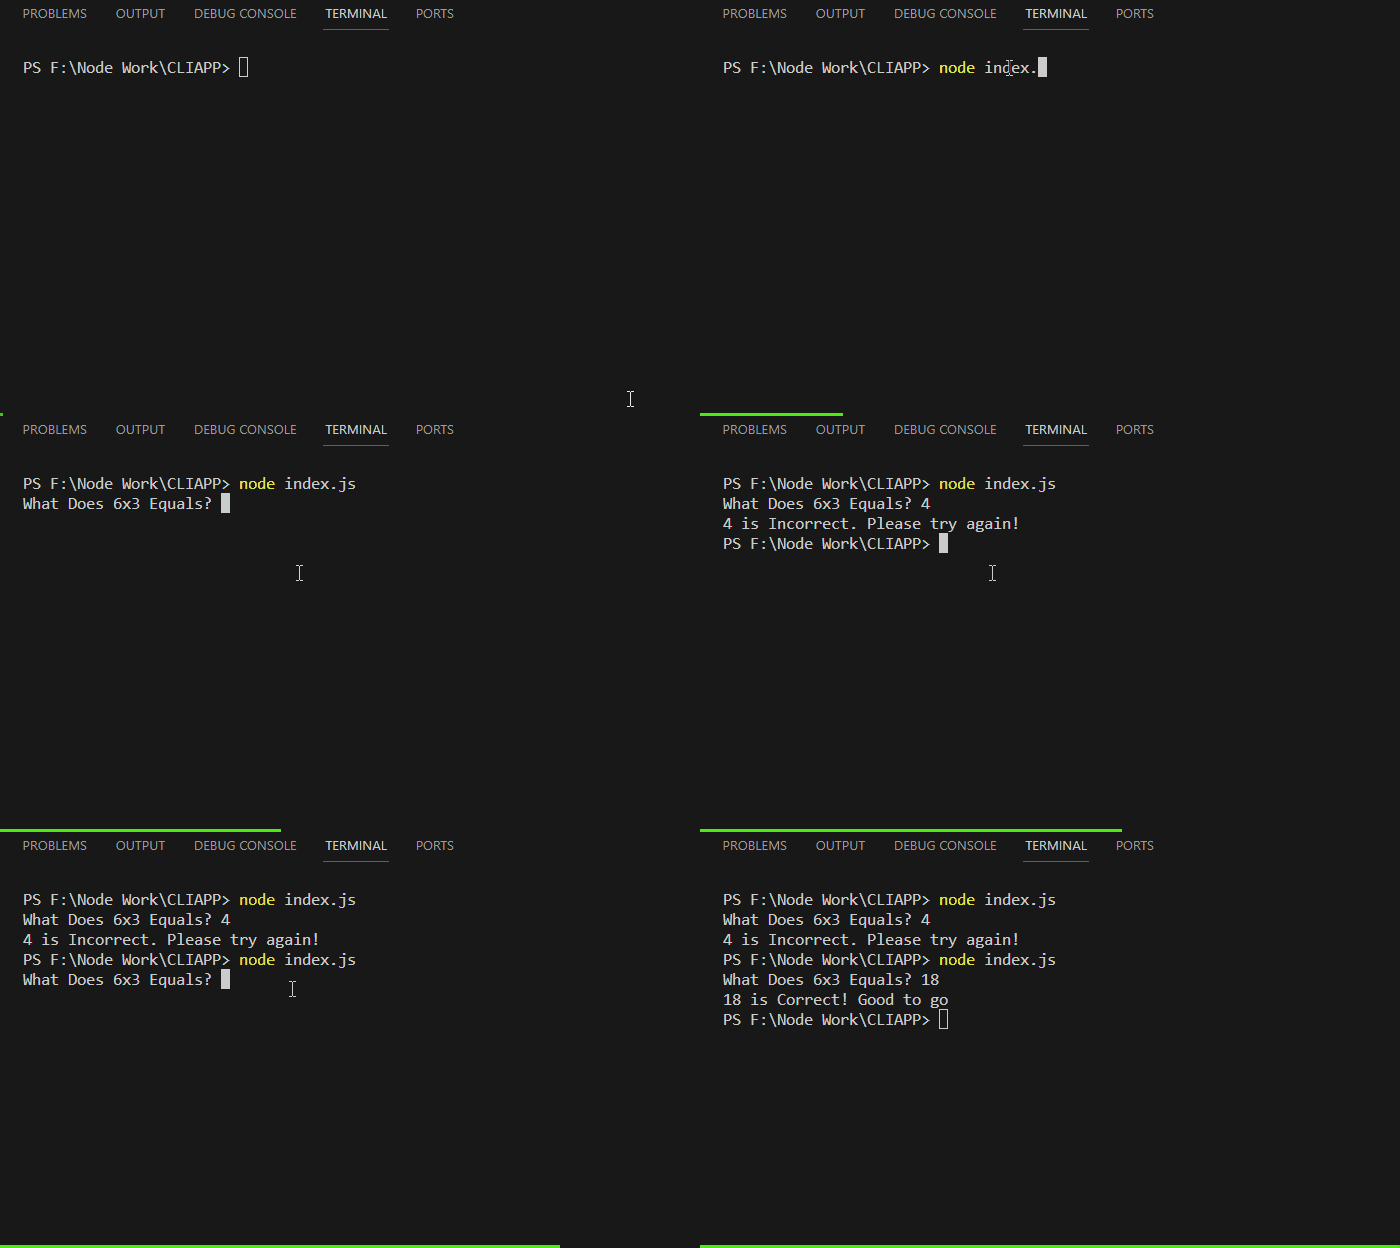
In this output demonstration, it can be analyzed that the user input values are dealt with accordingly and the CLI application works fine.
Example 2: Building a Basic CLI Application Using Node.js Readline and Async/Await with Timeout
In this example, a basic CLI application can be created such that if a user does not respond to the input till a set time, the timeout is applied such that the user can’t respond after this time. This can be achieved via the “AbortController” interface.
This interface refers to a controller object that enables aborting one or more Web requests as and when needed.
Below is a demonstration of the discussed scenario:
const { stdin: input, stdout: output } = require('process');
const x = new AbortController();
const signal = x.signal;
(async () => {
const io = packs.createInterface({ input, output });
const interval = 5;
setTimeout(() => x.abort(), interval * 1000);
try {
const answer = await io.question('What Does 6x3 Equals? ', { signal });
const result = answer.trim() === '18' ? 'Correct! Good to go' : 'Incorrect. Please try again!';
console.log(`${answer.trim()} is ${result}`);
} catch(error) {
let message = 'Faced Error: ';
if(error.code === 'ABORT_ERR') {
message = `You took so long. Try again within ${interval} seconds.`;
}
console.log(message, error.code !== 'ABORT_ERR' ? error : '');
} finally {
io.close();
}
process.exit(1);
})();
According to this block of code:
- Repeat the steps for incorporating the “readline/promises” package and enabling “input/output” operations.
- After that, instantiate the “AbortController” and use the “signal” property which is a part of the native AbortController.
- Now, within the “async” functionality, include the input and output streams as the “createInterface()” method’s parameters.
- Also, set the time interval after which the user can’t respond.
- In the next step, apply the combined “setInterval()” and “abort()” methods such that after 5 seconds of inactivity from the user, the input no longer takes responses.
- Similarly, in the “try” block, specify the “await()” functionality such that if the user does not respond to the asked mathematical query for 5 seconds, the input is no longer functional.
- In the “catch” block, analyze if the error code is “ABOUT_ERR” i.e., no response from the user.
- In such a scenario, the message in the “if” statement is displayed.
- Finally, close the readline interface in the “finally” block.
Output
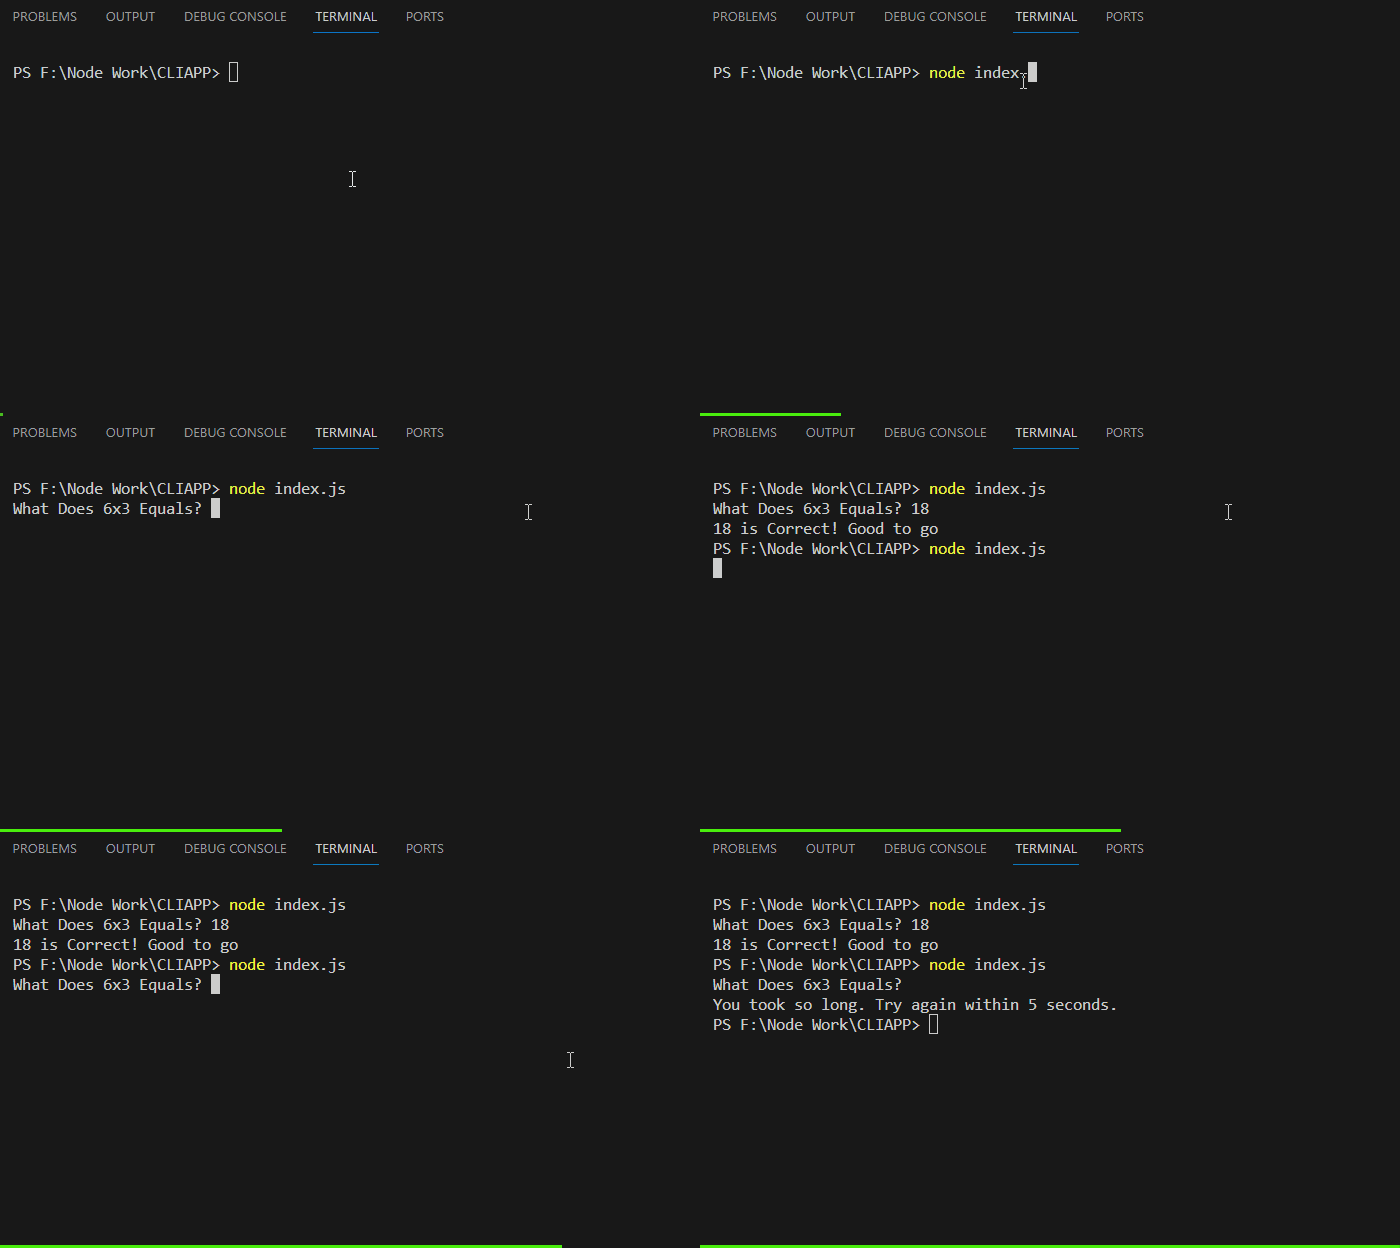
From this outcome, it is evident that in the first case, the user input within the set time interval is dealt with appropriately. However, in the second scenario, the message in the “catch” block is invoked since the user did not respond in the specified time frame.
Conclusion
A basic CLI app can be built with the help of node.js readline and async/await by awaiting a promise within the “async()” function and handling its rejection cause based on user input. Also, an interactive website can be built that no longer takes responses from the user after a specific time span.


