Contents Overview
- What is the “parentElement” Property in JavaScript?
- How to Access/Invoke the Parent Element Via the HTML DOM parentElement Property?
- Utilized Common Methods and Properties
- Example 1: Accessing the Parent Element via the “parentElement” Property in JavaScript
- Example 2: Accessing Both the Parent and Child Elements via the “parentElement” and “children” Properties in JavaScript
- Example 3: Accessing the Parent Element Using the “parentNode” Property
- Conclusion
What is the “parentElement” Property in JavaScript?
The “parentElement” property in JavaScript retrieves the element that is the parent of the target element.
How to Access/Invoke the Parent Element Via the HTML DOM parentElement Property?
The parent element can be accessed using the HTML DOM “parentElement” property with the “nodeName” property or retrieving the parent element’s node instead via the “parentNode” property.
Syntax
Return Value
This property retrieves an element object that represents the parent element node of a node and gives “null” if the node does not comprise a parent.
Utilized Common Methods and Properties
document.querySelector(): This method gets the first element matching the CSS selector.
Syntax
In this syntax, “sel” refers to one or more CSS selectors.
document.getElementById(): It returns the element having the specified id.
Syntax
Here, “id” indicates the target element’s id to be fetched.
selectedIndex: This property retrieves the selected option’s index from the drop-down list. The “-1” option deselects all the options.
nodeName: This property retrieves the node’s name.
children: This property returns the element’s child elements as a collection.
outerHTML: This property allocates or retrieves the HTML element as well as its attributes and start and end tags.
parentNode: This particular property fetches the parent node of an element or a node.
Note: The difference between the “parentElement” and “parentNode” property is that the former property i.e., “parentElement” gives “null” if the parent node does not reflect an element node.
Example 1: Accessing the Parent Element via the “parentElement” Property in JavaScript
This example invokes the parent element of an element and displays its(parent) node name upon the button click.
HTML Code
<html>
<body>
<h1>parentElement Property in JavaScript</h1>
<h2>Select the Language:</h2>
<select class='elem'>
<option>Python</option>
<option>Java</option>
<option>JavaScript</option>
</select>
<button onclick="displayParent()" class="button">Display the Parent Element of the "option" Element</button>
<div class="temp"></div></body>
<html>
In this code:
- Specify the given “<h1>” and “<h2>” elements that comprise the level-one and level-two headings, respectively.
- After that, create a “<select>” element represented by the given class that contains the further child elements i.e., “<option>”.
- Now, create a button associated with an “onclick” event that redirects to the “displayParent()” function upon the button click.
- Lastly, specify the “<div>” element in which the result i.e., accessed parent element is to be displayed.
CSS Code
body{
text-align:center;
color:#fff;
background-color: gray;
height:100%;
}
.button{
height:2rem;
border-radius:2px;
width:35%;
margin:2rem auto;
display:block;
color:#ba0b0b;
cursor:pointer;
}
.temp{
font-size:1.5rem;
font-weight:bold;
}
</style>
In the above CSS code:
- Style the overall web page with the applied “text-align”, “background-color” etc properties.
- Likewise, apply the styling to the created button via its class by adjusting its height, width, display, color, etc.
- Finally, style the “div” by referring to its class name in which the accessed parent element is to be displayed.
JavaScript Code
function displayParent() {
var get = document.querySelector(".elem");
var sel=get.options[get.selectedIndex];
var append = document.querySelector(".temp");
append.innerHTML="Parent Element of option Element is -> " + sel.parentElement.nodeName;
}
</script>
According to these code lines:
- Define the function “displayParent()” that accesses the “<select>” element by referring to its class via the “document.querySelector()” method.
- The “options” collection gets the collection of all the “<option>” elements in the drop-down list and the “selectedIndex” property retrieves the selected option’s index for the drop-down list.
- Finally, use the “document.querySelector()” method again to access the “<div>” element and append it with the “<option>” element’s parent element via the applied “parentElement” and “nodeName” (displays the parent node’s name) properties.
Entire Code
<html>
<body>
<h1>parentElement Property in JavaScript</h1>
<h2>Select the Language:</h2>
<select class='elem'>
<option>Python</option>
<option>Java</option>
<option>JavaScript</option>
</select>
<button onclick="displayParent()" class="button">Display the Parent Element of the "option" Element</button>
<div class="temp"></div></body>
<style>
body{
text-align:center;
color:#fff;
background-color: gray;
height:100%;
}
.button{
height:2rem;
border-radius:2px;
width:35%;
margin:2rem auto;
display:block;
color:#ba0b0b;
cursor:pointer;
}
.temp{
font-size:1.5rem;
font-weight:bold;
}
</style>
<script>
function displayParent() {
var get = document.querySelector(".elem");
var sel=get.options[get.selectedIndex];
var append = document.querySelector(".temp");
append.innerHTML="Parent Element of option Element is -> " + sel.parentElement.nodeName;
}
</script>
Output
Here, it can be seen that the parent element of all the child nodes i.e., selected option from the dropdown in the “<option>” element is returned i.e., “SELECT”.
Example 2: Accessing Both the Parent and Child Elements via the “parentElement” and “children” Properties in JavaScript
The following code example accesses both the parent and child elements of a particular element.
HTML Code
In this code block, create two “<div>” elements, and the two “<h1>” elements referring to the child elements of the latter “<div>” element.
JavaScript Code
let get = document.getElementById('child');
let parent = get.parentElement;
console.log("Parent Element -> ", parent.outerHTML);
console.log("Parent Element Node Name -> ", parent.nodeName);
let children = get.children;
for(let i =0; i < children.length; i++ ){
console.log(`Child Element ${i}: `, children[i].outerHTML);
}
for(let i =0; i < children.length; i++ ){
console.log(`Child Element Node Name ${i}: `, children[i].nodeName);
}
</script>
The explanation of the above code is as follows:
- Access the latter “<div>” element by its “id” using the “document.getElementById()” method and fetch its parent element via the “parentElement” property.
- Now, display the parent element with attributes, and start and end tags via the applied “outerHTML” property.
- Also, return the parent element’s name i.e., node name using the “nodeName” property.
- After that, access the element’s children utilizing the “children” property.
- Apply the “for” loop to iterate all the child elements and return them with the tags via the discussed “outerHTML” property.
- Likewise, use the “for” loop again to return the node names of the child elements as well.
Entire Code
<body>
<div id="parent">
<div id="child">
<h1>First Child Element</h1>
<h1>Second Child Element</h1>
</div>
</div>
</body>
</html>
<script>
let get = document.getElementById('child');
let parent = get.parentElement;
console.log("Parent Element -> ", parent.outerHTML);
console.log("Parent Element Node Name -> ", parent.nodeName);
let children = get.children;
for(let i =0; i < children.length; i++ ){
console.log(`Child Element ${i}: `, children[i].outerHTML);
}
for(let i =0; i < children.length; i++ ){
console.log(`Child Element Node Name ${i}: `, children[i].nodeName);
}
</script>
Output
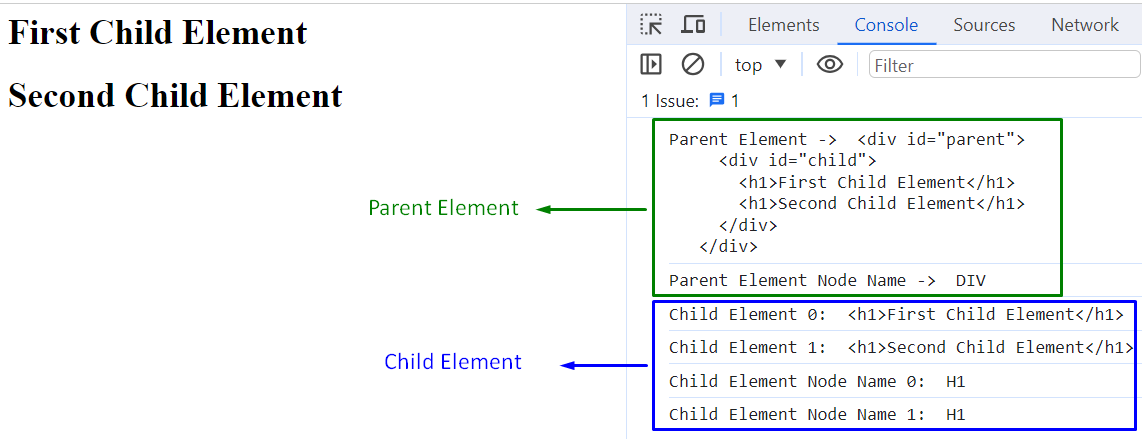
This outcome implies that the parent and child elements of the target element are displayed in detail(along with the node names) accordingly.
Example 3: Accessing the Parent Element Using the “parentNode” Property
In this demonstration, the parent element of a particular element can be invoked and then this particular element’s parent element will also be fetched thereby resulting in a nested behavior. This can be achieved via the “parentNode” property instead that fetches the element’s parent node.
HTML Code
Here, create a “<div>” element that further comprises the “<ol>(ordered list)” and “<li>(list items)” elements having the given ids.
JavaScript Code
let get = document.getElementById('tempchild');
let parent = get.parentNode;
console.log("Parent Element Node of 'li'-> ", parent);
let get2 = document.getElementById('temp');
let parent2 = get2.parentNode;
console.log("Parent Element Node of 'ol'-> ", parent2);
</script>
Based on this snippet of code, perform the below-provided steps:
- Invoke the “<li>” element via the “getElementById()” method, access its parent element’s node using the “parentNode” property, and display the parent node.
- Likewise, now invoke the displayed parent node’s i.e., “<ol>” parent by repeating the same methodology.
Entire Code
<body>
<div id="parent">
<ol id = "temp">
<li id="tempchild">Python</li>
<li>Java</li>
<li>JavaScript</li>
</ol>
</div>
<script>
let get = document.getElementById('tempchild');
let parent = get.parentNode;
console.log("Parent Element Node of 'li'-> ", parent);
let get2 = document.getElementById('temp');
let parent2 = get2.parentNode;
console.log("Parent Element Node of 'ol'-> ", parent2);
</script>
</body>
</html>
Output

This outcome signifies that the parent nodes in both cases are displayed accordingly.
Conclusion
The parent element can be accessed by using the HTML DOM “parentElement” property combined with the “nodeName” property or retrieving the parent node via the “parentNode” property. However, to access the child element instead, use the “child” property.