Potentiometer with Arduino
Potentiometers are extensively used in Arduino projects because they can adjust circuit resistance and voltage in an easy way. They can be used to adjust music volume, voltage level or adjust LCD display screen brightness in short, they are everywhere.
As potentiometer is an analog device, to read value from it we use Arduino analog pins; generally, all Arduino boards come with analog pins. In Arduino Uno there are 6 analog pins starting from A0 to A5. To read analog data from potentiometer analogRead() function is used. This function takes one argument that is the pin number where we want to read analog data or alternatively where the potentiometer is connected. analogRead takes all reading from analog pins and using 10-bit ADC converts that voltage value between 0V to 5V and maps them to a discrete integer number between 0 to 1023.

How to Wire Potentiometer with Arduino
Potentiometers come in different sizes and shapes but all they do is the same thing: adjust circuit resistance value when we rotate their dial or wiper. Most potentiometer have three pins:
- Pin1: +V
- Pin2: Vout/tap
- Pin3: GND

Pins 1 and 3 are connected to some resistive material inside the potentiometer while central pin 2 is the tap or wiper that rotates when we turn the outer knob. Normally among two outer pins one is connected to Arduino 5V while the second one is connected to GND of Arduino. Central pin or Vout pin gives variable voltage between 0V to 5V. It is connected to the analog pin of the Arduino board.
To understand potentiometer working with Arduino let’s take an example.
Control LED Brightness Using Potentiometer
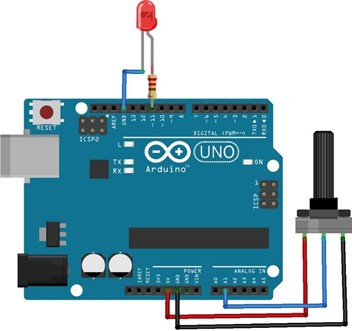
Now we will control LED brightness using potentiometer. Connect one leg of LED at digital pin 11 and second terminal with GND of Arduino. In between LED and Arduino connect 220ohm resistor. Take a potentiometer and connect the outer two pins to 5V and GND of Arduino while the central pin of Arduino with analog pin A1. Following are the required components:
- Arduino Uno
- LED
- 220 Ohm Resistor
- Potentiometer
- Jumper Wires
- Breadboard
Schematics
Code
const int LEDoutput = 11;
int potvalue = 0;
void setup() {
pinMode (LEDoutput, OUTPUT);
}
void loop() {
potvalue = analogRead(analogInput);
analogWrite (LEDoutput, potvalue/4);
delay(100);
}
Here in the above code, we initialize three variables analogInput, LEDoutput and potvalue. A1 is set as analog input pin for potentiometer while digital pin 11 is set for output of LED. Initially potentiometer value is set to 0 but as we rotate potentiometer knob values will change.
In the loop section of code analogWrite function is used to map the analog input value from potentiometer to digital output pin, by doing this we can control LED brightness. Here the potvalue is divided by 4 because if we divide 1023/255, we got approx. 4.001176 value. Here each PWM is almost equal to 4 analog readings. As we know analogRead() takes reading between 0-1023 while the digital pin at which LED is connected can only give a value between 0-255.

Output
Below image shows LED brightness controlled using potentiometer.

Conclusion
Arduino can be interfaced with multiple devices which can either act as input or read output from Arduino. Potentiometer is also one of those that can provide variable voltage and can serve multiple purposes. To interface potentiometer with Arduino three pins are required 5V, GND and any analog pin where Arduino will take inputs from potentiometer.