In this article, you will see the method of using a real-time clock to keep track of time on Raspberry Pi.
How to use a Real Time Clock (RTC) With the Raspberry Pi
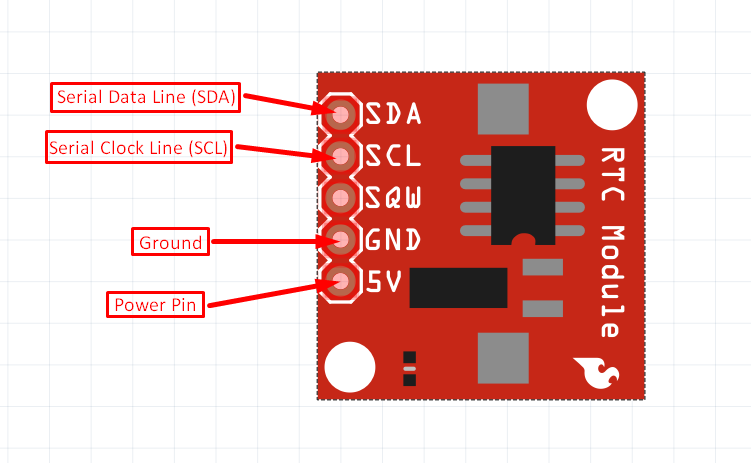
RTC is a small hardware module that is used to keep the accurate date and time tracking. An RTC module consists of an I2C interface due to which it can be connected to Raspberry Pi. Usually, an RTC module consists of 4 pins but there could be more pins. The four basic pins of RTC that are used to connect RTC with Raspberry Pi are:
- SDA Pin
- SCL Pin
- GND Pin
- 5 V or Vcc Pin
All these pins are labeled in the image below, the color of the RTC module may vary it could be blue, green or red:
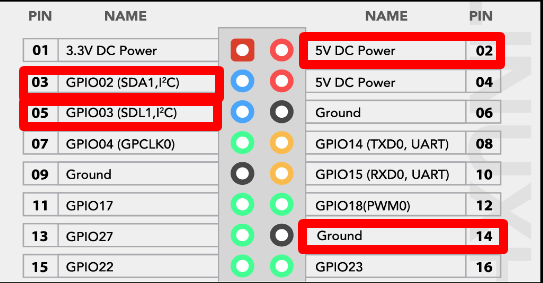
The Raspberry Pi also has an I2C protocol pins SDA and SDL at pin number 3 and 5 to connect it to the RTC module. To connect the Raspberry Pi with RTC module we will use 4 Raspberry Pi pins which are highlighted in the image below:
Follow the below-given steps to use RTC with Raspberry Pi:
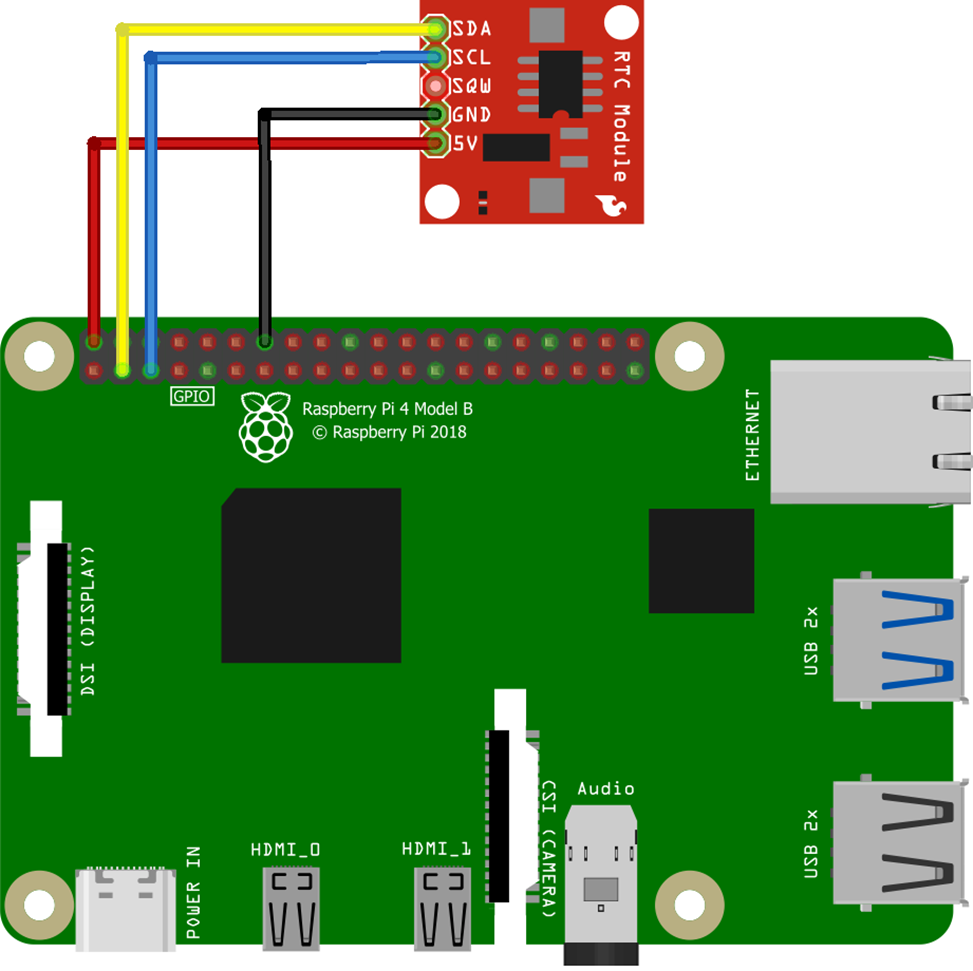
Step 1: Hardware Configuration
To build the hardware circuit of Raspberry Pi and RTC, use the below circuit diagram;
- SDA of RTC to Pin 3 of Raspberry Pi
- SCL of RTC to Pin 5 of Raspberry Pi
- GND of RTC to Pin 14 (GND) of Raspberry Pi
- 5V or Vcc to Pin 2 of Raspberry Pi
Step 2: Enable I2C on Raspberry Pi
You have to enable I2C interface on Raspberry Pi by opening the Raspberry Pi configuration tool using the following command:

Go to the Interface Options and hit Enter:
Then further Enter the I2C option to enable I2C protocol on Raspberry Pi:
After which it will ask you for a permission to enable I2C protocol, choose Yes here:
A prompt will appear to inform that the I2C is enabled; click Ok here:
Then click the Finish button to complete the process.
Step 3: Ensure RTC Module Connection to Raspberry Pi
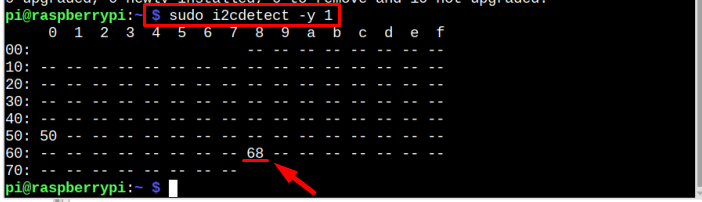
After enabling I2C, make sure your RTC hardware module is connected correctly with Raspberry Pi and that can be confirmed by running the below-written command:
If the output of the command has displayed the ID# 68 then it means the board is connected correctly:
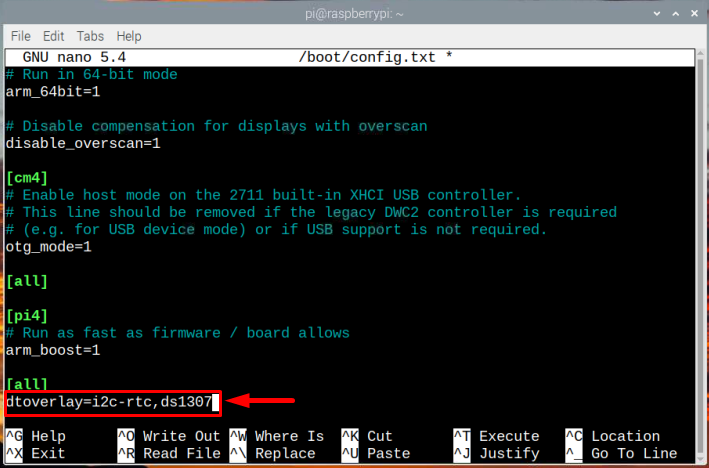
Now we will edit the boot/config file to setup the Raspberry Pi RTC time:
After opening the file go to the bottom of the file and depending upon the RTC module which you are using alter the below-mentioned line and write it at the bottom of boot/config file:
Syntax
The three commonly used RTC modules are ds1307, ds3231 and pcf8523 you can check which one you are using and can alter the text according to that.
Example
I am using the ds1307 module so I have used this below-written command:
Then save the file by using the keys Ctrl+X and Y.
Now reboot the system by using the below-written command so that the RTC kernel can be loaded:

Now after a reboot, run the I2C detect command again and you should see a UU (means device or resource is busy) instead of number 68. The UU confirms that the kernel is loaded successfully and RTC module is finally communicating with Raspberry Pi:

Since the RTC started communicating with Raspberry Pi so it is time to remove the old fake clock in Raspberry Pi and for that purpose run the below-written command:
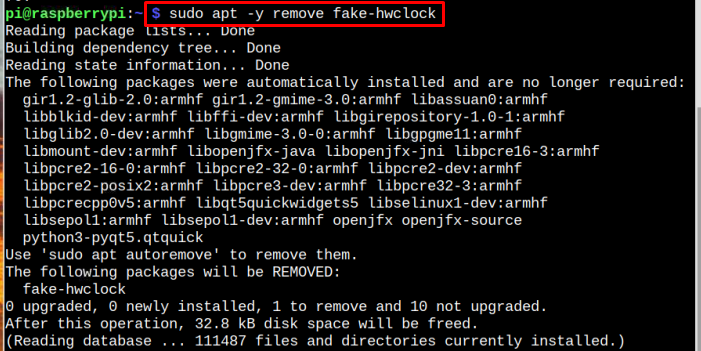
And run the below-written command to completely remove fake clock even from the startup scripts in Raspberry Pi:

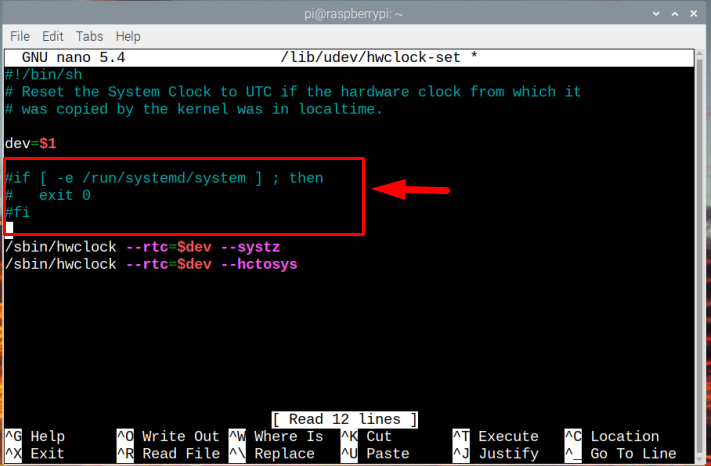
Now it is time to edit the RTC hardware script using nano editor, and for that run the below-mentioned command:

In the file find the text which is highlighted in the image below:
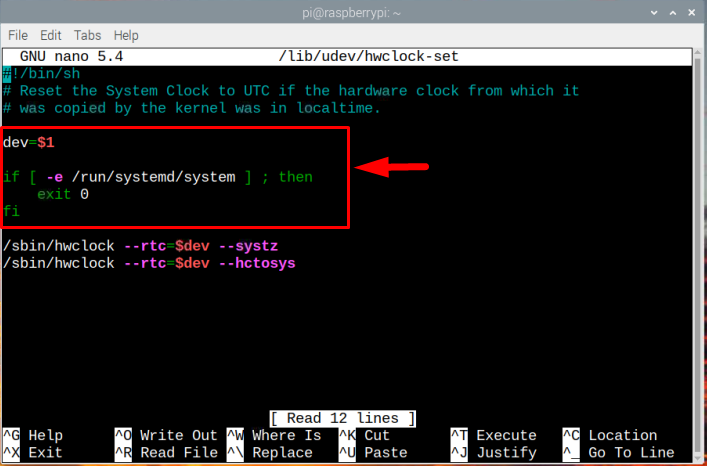
Comment all the three lines by adding # in front of them:
Now to read the time directly from the RTC module, run the below-written command:

Then run the below command to find out the system’s date make sure at this point your Raspberry Pi is connected to Wi-Fi or ethernet to get the correct date:

Now run the below-written command to write the correct date (that you have just seen above by date command) onto RTC module:
![]()
And now to verify that the date has been written correctly to RTC module, run the date command to find the system’s date and hwclock -r command to find RTC module time and both should be same:
$ sudo hwclock -r

Conclusion
The RTC module can be connected with Raspberry Pi using I2C synchronous protocol. The hardware and software configuration to use RTC with Raspberry Pi is discussed in detail in the article. Once the RTC is correctly configured with Raspberry Pi then even if you are not connected to the network, your system will still show the accurate time due to the RTC (Real Clock Time) module.