
Arduino is an electronic board built for designing projects. While building Arduino projects communication plays a major role. Arduino have multiple communication protocols such as Serial USART, SPI and I2C. These protocols enhance Arduino functionality and usage over a great range of products. If our device does not support a specific protocol, then we have an advantage of using the other two. Among all these I2C is one of the most advanced protocols used in Arduino boards. Let’s discuss how to configure I2C protocol for multiple devices.
I2C with Arduino
I2C also known as Inter Integrated Circuit is a communication protocol used in Arduino boards. It only uses two lines for communication and one of the most complex protocols to implement with an Arduino board. Using I2C we can connect up to 128 devices with an Arduino board over a single data line.
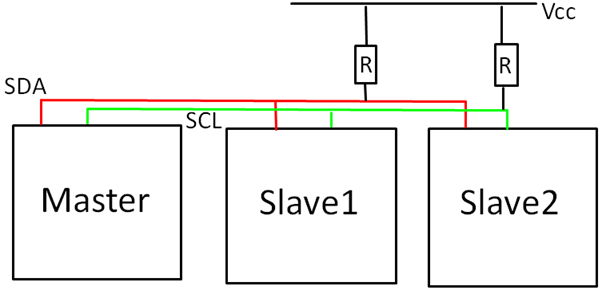
I2C uses two lines which are SDA and SCL. Along with these two lines a pull up resistor is used to maintain both SDA and SCL line high.
I2C protocols support multiple master slave configuration, which means using single Master Arduino we can control multiple slave devices.
How to Use Multiple I2C with Arduino
As I2C have Master-Slave configuration support so we can control multiple devices at once. In some projects we use different modules, sensors and hardware that support I2C communication, all of these can be connected on a single I2C bus if they have a unique I2C address. But if we have more than one device that shares the same I2C address it can cause problems for both devices and we cannot control them using the same I2C bus. However, this issue can be solved using a TCA9548A I2C Multiplexer, this MUX uses a single I2C bus from Arduino and converts into 8 different channels with all having separate addresses.
All I2C addresses are mainly of two types either 7 bits or 10 bits. Most of the time devices use 7 bits I2C however 10-bit I2C is rarely used in devices. So, it means using a 7-bit address Arduino can connect 128 devices.
Now we will connect two different devices having unique I2C protocols with Arduino Uno I2C lines.
Circuit Diagram
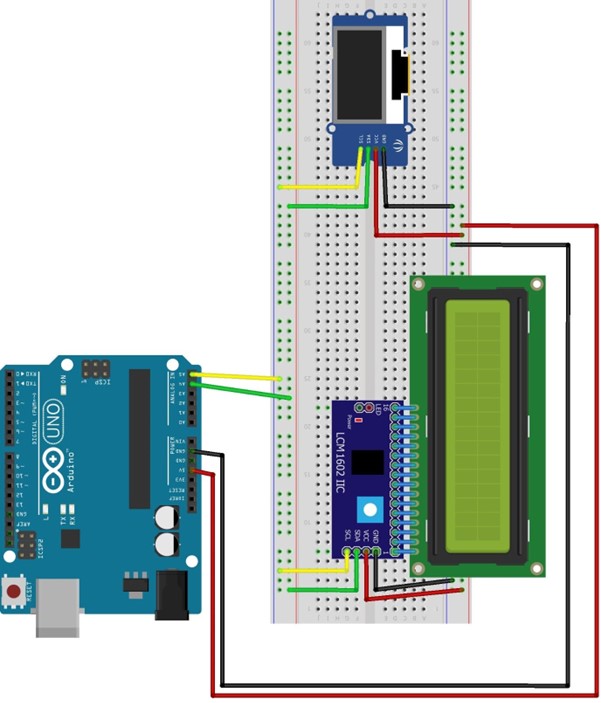
The figure below shows an OLED screen attached to Arduino using I2C lines SDA and SCL. While a 16X2 LCD screen is also connected using the same I2C bus in parallel with the OLED screen. One important thing to note here is that the 16X2 LCD uses only 4 I2C wires instead of 8 wires for its control. Along with LCD we used an I2C module with Arduino which needs only 4 pins for LCD display: VCC, GND, SDA, SCL. Using the I2C module with LCD we have saved 4 digital pins on Arduino, which will reduce over all wiring and improve Arduino functionality.
How to Check Addresses of I2C Devices
Before we connect any I2C device with Arduino it’s important to note at which address that specific device is connected. Some modules have default I2C addresses written on while some of them have no instructions to check I2C addresses. To solve this problem, we have a wire library code that checks for all I2C devices connected and at what address they are connected to Arduino. This will help in debugging and improving the Arduino circuit.
Code
void setup()
{
Wire.begin(); /*Wire I2C communication START*/
Serial.begin(9600); /*baud rate set for Serial Communication*/
while (!Serial); /*Waiting for Serial output on Serial Monitor*/
Serial.println("\nI2C Scanner");
}
void loop()
{
byte err, adr; /*variable error is defined with address of I2C*/
int number_of_devices;
Serial.println("Scanning.");
number_of_devices = 0;
for (adr = 1; adr < 127; adr++ )
{
Wire.beginTransmission(adr);
err = Wire.endTransmission();
if (err == 0)
{
Serial.print("I2C device at address 0x");
if (adr < 16)
Serial.print("0");
Serial.print(adr, HEX);
Serial.println(" !");
number_of_devices++;
}
else if (err == 4)
{
Serial.print("Unknown error at address 0x");
if (adr < 16)
Serial.print("0");
Serial.println(adr, HEX);
}
}
if (number_of_devices == 0)
Serial.println("No I2C devices attached\n");
else
Serial.println("done\n");
delay(5000); /*wait 5 seconds for the next I2C scan*/
}
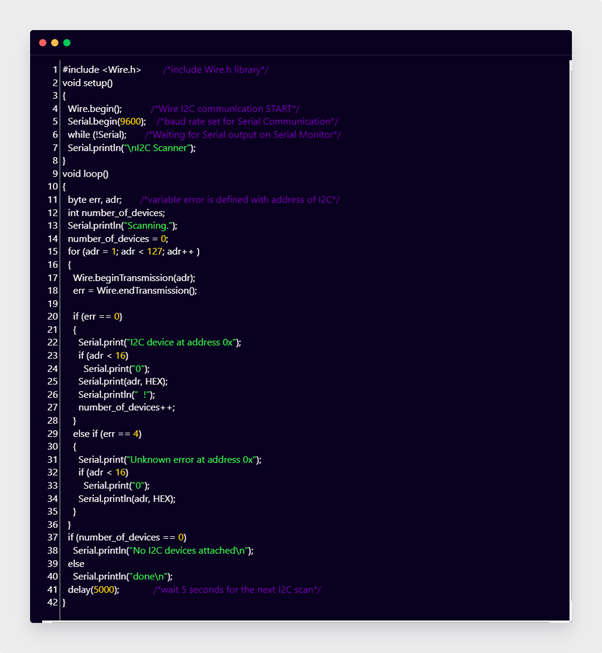
This code will help to find the number of I2C devices and their address at which they are connected. This code is commonly referred to as I2C Scanner code.
First, we included a “Wire.h” library. Then in the setup part of code we have begun this library. After that we initialize serial communication by defining baud rate 9600. This will help to see output over the serial monitor.
In the loop section, we defined two variables “err” and “adr”. Then we defined another variable “Devices” and set it to zero. After that a for loop is initialized with values between 0 and 127.
Next, we input the address to the wire using wire.beginTransmission(), the I2C scanner will look for the acknowledgment of devices and their address. The value read will be stored in the variable “error”. Return value will be equal to 0 if the device acknowledges the address otherwise value will become 4. Next, we have used an if condition which will print the I2C device address if the value is <16. Final address of the device is printed in Hexadecimal form.
Circuit

Output
Output of devices attached to Arduino over I2C protocols will look like as shown in diagram below. Here 0x3C is the address of the I2C LCD while 0X27 is the address of the OLED screen.

Conclusion
Connecting devices using I2C in Arduino can save a number of pins. Multiple devices can be connected using I2C in Master-Slave configuration but the main thing to consider is that all devices must have a unique I2C address, no two devices having the same address cannot be operated using a single I2C bus. So, we suggest a solution to this problem is using a TCA9548A I2C Multiplexer, it can convert a single I2C bus into 8 different channels.