Arduino has a flexible way of transferring data between devices and PCs. Arduino uses a serial protocol known as USART to communicate between these devices. Using USART Arduino can receive input and outputs from sensors like GPS, GSM, RFID, and other sensors. All devices which support serial communication can be connected to Arduino which improves Arduino overall compatibility and extensive usage in electronics projects.
USART in Arduino Uno
USART is also known as Universal Synchronous/Asynchronous Receiver-Transmitter; USART is a serial communication protocol used in AVR ATmega microcontrollers. Arduino uses this protocol to transmit and receive data from devices, sensors, and PCs. UART transmits and receives data in the form of bits with reference to clock pulse. It can transfer one bit at a time on a single wire.
Arduino USART Pins
Most Arduino boards have two pins Tx and Rx which are used for serial communication devices.
- Tx pin for Transmitting data
- Rx pin for Receiving data

Some of the major technical specification of USART pins are highlighted in below mentioned points:
- In the above image two LEDs are marked as Tx and Rx. These two LEDs start blinking when the Arduino transmits or receives data using USART serial communication.
- When Arduino receives data from PC Rx LED glow which indicates data is received by Arduino similarly when Arduino transmit data to PC Tx LED glow which indicates transmission of data to PC using USB cable.
- LED status of Tx and Rx blink oppositely when Arduino establishes serial communication with external hardware, devices or modules USING Tx at D1 and Rx at D0 pins.
- Arduino does not support simultaneous communication over USB and Tx and Rx pins. If Tx and Rx pins used by any other device Arduino cannot communicate with PC over USB.
- Tx and Rx pins use TTL logic. Serial communication among Arduino and other serial devices like PC occurs at the same baud rate.
USART Features on ATmega328
Universal Synchronous and Asynchronous receiver and transmitter is a highly compatible and flexible way of serial communication among different devices. Main features of USART are:
- USART is full duplex operation
- Both Synchronous and Asynchronous operation is possible
- Master or Slave clocked Synchronous operation
- Can generate High resolution Baud rate
- High speed communication
- Multi-processor communication protocol
- Double speed Asynchronous mode
|
ATmega328P Chip |
Arduino Uno Pin Name |
Arduino Description |
Functions |
| PD0 | Rx/D0 | Digital IO Pin 0 | Serial Rx Pin |
| PD1 | Tx/D1 | Digital IO Pin 1 | Serial Tx Pin |
| PD4 | D4 | Digital IO Pin 4 | Timer (T0/XCK) |
Modes of Operation
Arduino AVR microcontroller operates in three modes:
- Asynchronous Normal Mode
- Asynchronous Double Speed Mode
- Synchronous Mode
Asynchronous Normal Mode
During this mode Arduino uses predefined baud rate to receive and transmit data without clock pulses in the form of bit by bit.
Asynchronous Double Speed Mode
During this mode data transferring speed becomes double the baud rate. This baud rate is set inside the UBBR register. This is high speed communication used where accurate and quick data transmitting and receiving is required.
Synchronous Mode
As the name shows Synchronous which means data is synchronized with clock pulses. During this mode data is transmitted or received with the clock pulses defined in the UCSRC register.
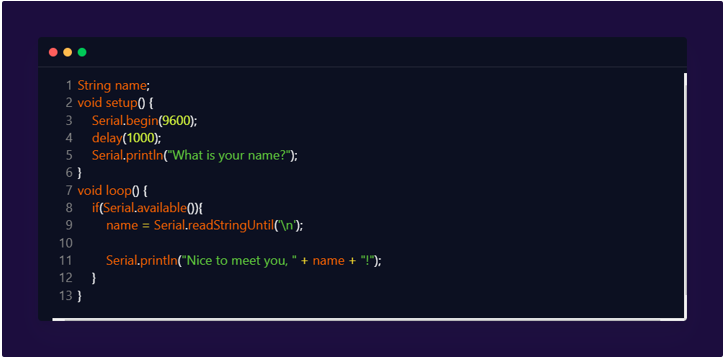
Transmit Data Using USART
void setup() {
Serial.begin(9600);
delay(1000);
Serial.println("What is your name?");
}
void loop() {
if(Serial.available()){
name = Serial.readStringUntil('\n');
Serial.println("Nice to meet you, " + name + "!");
}
}
In above code we have initialized a string “name” that will store user input and show it on serial monitor.
Serial.begin(9600) will initialize USART communication with a defined baud rate. Two important functions Serial.available() and Serial.readStringUntil() are used in the above program.
Serial.available will return several characters in the form of bytes that have been read. The Serial.readStringUntil function will make it possible to combine all the input characters from the user and output will be displayed in a more prominent way.
Serial Monitor Output

Controlling LED Using USART
Now using serial communication, we will control a LED through a serial monitor. Connect Arduino board with PC using USB B cable and upload the below code to Arduino board.
void setup() {
Serial.begin(9600);
pinMode(13, OUTPUT);
}
void loop() {
if(Serial.available()>0){
inputState = (char)Serial.read(); //Read serial data
if(inputState=='1'){ //Check for received INPUT
digitalWrite(13, HIGH); //If INPUT is 1 LED will ON
Serial.print("Received input data is: ");
Serial.println(inputState);
}
else if(inputState=='0'){
digitalWrite(13, LOW); //If INPUT is 0 LED will OFF
Serial.print("Received input data is: ");
Serial.println(inputState);
}
}
}
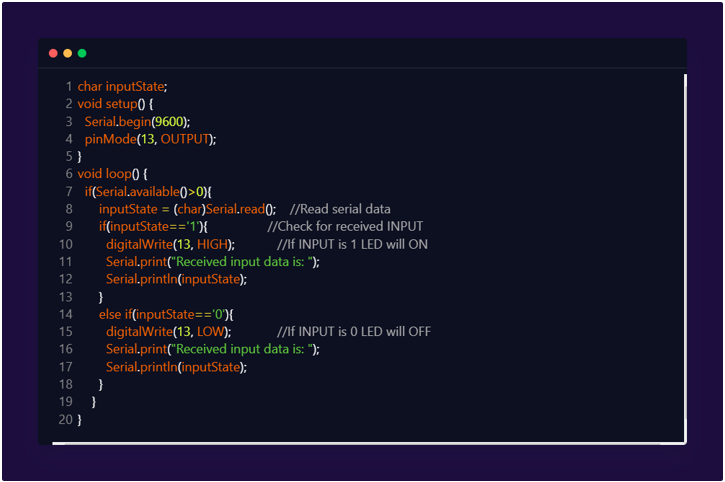
At the start of the code, we have initiated a char variable input state that will store input from the serial monitor.
This function will initialize serial communication between Arduino board and PC.
The Serial.available() function will look for the number of bytes available to read. We have used an if-condition here which will check for the input serial data if the input serial data is 1 Arduino will set LED at pin 13 as HIGH and LED will turn on. If the Input is 0 Arduino will set LED at pin 13 as LOW and LED will turn off.
Serial Monitor Output

LED Output
Led will turn on at input 1 and turn off at input 0.
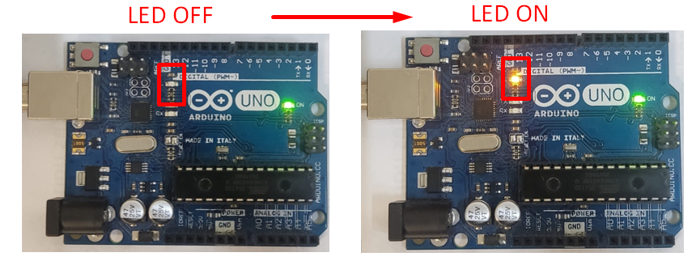
Hence, we have controlled LED using USART communication between Arduino and PC.
Conclusion
USART can be very useful in Arduino projects. It allows Arduino to interface multiple devices. Knowing about USART will help in communication among Arduino and multiple devices. In this article we completed two Arduino codes. First, we have sent a string to the Arduino and displayed it over the serial monitor and in second code we have control LED using USART serial communication.