The Arduino platform enables people to create different projects. Arduino is a user-friendly platform with support for a wide range of libraries, including the SoftwareSerial library. The SoftwareSerial library allows you to create a serial port on any of the digital pins on your Arduino board.
In this article, we will dive deeper into the SoftwareSerial library and explore how it works.
Introduction to SoftwareSerial Library
The SoftwareSerial library is a standard Arduino library that allows serial communication on digital pins other than TX and RX. The library enables the creation of a software serial port, which can be used to communicate with other devices, such as other microcontrollers, computers, or even Bluetooth modules. The SoftwareSerial library is included with the Arduino IDE and can be used with any Arduino board.
Note: Generally, TX and RX pins are used for serial communication but using this library we can enable the Arduino board to use any of the digital pins to replace the TX and RX pins.
Understanding the SoftwareSerial Library Functions
The SoftwareSerial library has several functions that enable you to set up and control the software serial port. Here are some of the main functions you should know:
SoftwareSerial()
This function creates a new instance of the SoftwareSerial class. This function has two arguments, the RX pin and the TX pin. For example, if you want to create a software serial port on pins 2 and 3, you would use the following code:
The SoftwareSerial() method is used to create a new instance of a SoftwareSerial object. It allows for the creation of multiple instances however at a time only one can be active.
Syntax
The syntax for the SoftwareSerial() method is as follows:
Parameters
The parameters for the SoftwareSerial() are
rxPin: This parameter specifies the pin that will be used to receive serial data.
txPin: This parameter specifies the pin that will be used to transmit serial data.
inverse_logic: This parameter is optional, and it inverts incoming bits sense. The default value is false, meaning that a LOW on the RX pin is interpreted as a 0-bit and a HIGH as a 1-bit. If set to true, the LOW on the RX pin will now take as 1-bit and HIGH as 0-bit.
Return
The SoftwareSerial() does not return anything.
Arduino SoftwareSerial() Library Functions
Arduino SoftwareSerial() has a list of functions for serial communication between devices. Some of the main functions are discussed here:
begin()
The begin() function initializes the software serial port with a baud rate. The baud rate is the data transmission speed over the serial port. For example, to set 9600 as the baud rate for serial communication, you would use the following code:
available()
The available() function returns bytes available for reading at the software serial port. For example, to check if there is any data available to be read, you would use the following code:
// read input data
char incomingByte = mySerial.read();
}
read()
The read() function reads the next byte of data from the software serial port. For example, to read a byte of data and print it to the serial monitor, you would use the following code:
Serial.println(incomingByte);
write()
The write() function writes a byte of data to the software serial port. For example, to send the letter “A” over the software serial port, you would use the following code:
Arduino SoftwareSerial() Library Example Code
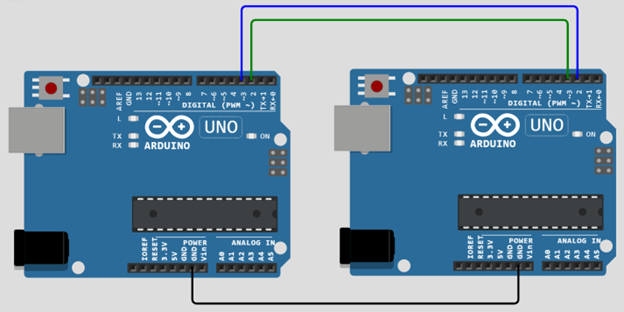
Now we will communicate between two Arduino boards over serial communication using this library. Take two Arduino boards and connect them as shown in the image below.
Connect D2 of the Master Arduino board with D3 of the Slave Arduino board, similarly connect D3 of Master Arduino with D2 of the Slave Arduino.
Note: For serial communication, the TX pin is always connected to the RX pin of the opposite Arduino and the RX pin of the Master is always connected to the TX pin of the other Arduino.
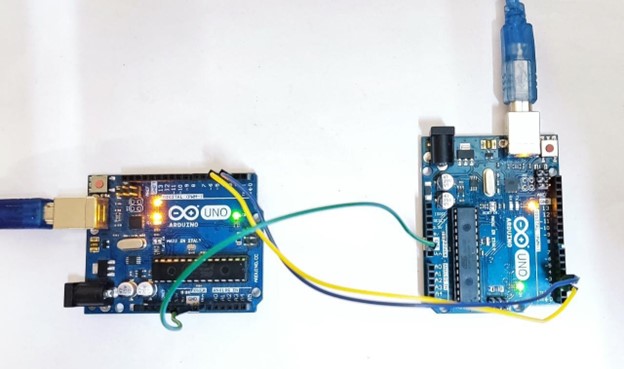
Following is the hardware of both Arduino boards.
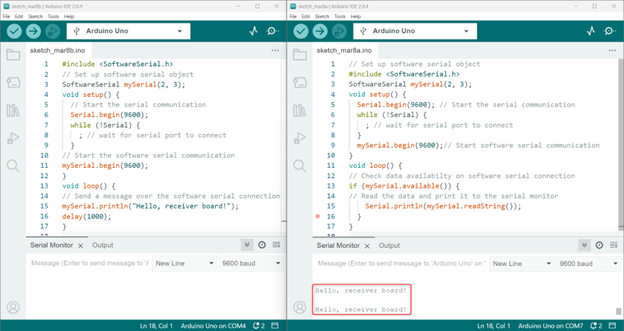
Here is an example Arduino code that demonstrates how to use the SoftwareSerial library to establish communication between two Arduino boards:
Sender Board Code
The below code is for the sender Arduino which will write a string to the receiver Arduino board.
// Set up software serial object
SoftwareSerial mySerial(2, 3);
void setup() {
// Start the serial communication
Serial.begin(9600);
while (!Serial) {
; // wait for serial port to connect
}
// Start the software serial communication
mySerial.begin(9600);
}
void loop() {
// Send a message over the software serial connection
mySerial.println("Hello, receiver board!");
delay(1000);
}
Receiver Board Code
The below code is for the Receiver board. Using this code Arduino will receive the string from another board over serial communication established between two Arduino boards.
// Set up software serial object
SoftwareSerial mySerial(2, 3);
void setup() {
// Start the serial communication
Serial.begin(9600);
while (!Serial) {
; // wait for serial port to connect
}
// Start the software serial communication
mySerial.begin(9600);
}
void loop() {
// Check if data is available on the software serial connection
if (mySerial.available()) {
// Read the data and print it to the serial monitor
Serial.println(mySerial.readString());
}
}
In this example, we first include the SoftwareSerial library at the beginning of the code. Then, we create a SoftwareSerial object called “mySerial” with pins 2 and 3 specified as the RX and TX pins, respectively.
In the setup() function, we start both the hardware serial and the software serial communication with a baud rate of 9600. In the loop() function of the sender board, we send a message over the software serial connection using mySerial.println() method, and wait for a second before sending the next message.
In the loop() function of the receiver board, the code will check for serial data availability on the software serial connection using mySerial.available() method. If there is data available, we read the data using mySerial.readString() method and print it to the serial monitor using the Serial.println() method.
Limitations of SoftwareSerial() Library
The SoftwareSerial library has several different advantages but also has some limitations that users should be aware of. These limitations include
- Inability to transmit and receive data simultaneously.
- When using multiple software serial ports, only one port can receive data at once.
- The software-based serial ports created using this library operates at lower baud rates and are not as reliable as hardware-based serial ports.
- Some pins on the Mega and Mega 2560 boards do not support change interrupts for RX, limiting which pins can be used.
- Similarly, on the Leonardo and Micro boards, only certain pins can be used for RX due to a lack of change interrupts.
- The maximum RX speed on Arduino or Genuino 101 boards is 57600 bps.
- RX does not work on digital pin 13 of Arduino or Genuino 101 boards.
| Board | RX Pins |
| Mega & Mega 2560 | 10, 11, 12, 13, 14, 15, 50, 51, 52, 53, A8 (62), A9 (63), A10 (64), A11 (65), A12 (66), A13 (67), A14 (68), A15 (69).
|
| Leonardo & Micro | 8, 9, 10, 11, 14 (MISO), 15 (SCK), 16 (MOSI). |
Conclusion
The SoftwareSerial library in Arduino is a useful tool for communicating with devices using serial communication protocols. It allows developers to create software-based serial ports that can be used in conjunction with hardware-based serial ports. This library does have some limitations as it doesn’t allow simultaneous data transfer. For more details read the article above.


