This article covers the following subjects:
- Getting a Snort free key for automatic updates
- Installing Snort on Pfsense
- Configuring Snort on Pfsense
After reading this document, you will get your Snort installation on Pfsense to start protecting your network, increasing considerably the security level Pfsense brings by default.
All steps described in this Snort/Pfsense tutorial include screenshots, making it easy for any user to follow them.
Getting your Snort free key for automatic updates:
Before adding Snort to Pfsense, let’s get a free key to enable automatic updates keeping your network safe, so you won’t need to update Snort manually.
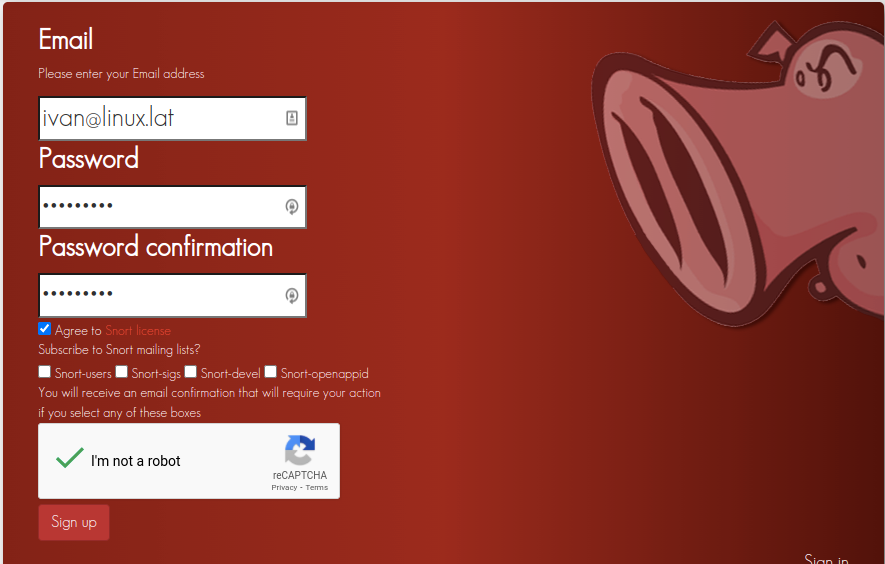
To get the free key, access this link https://www.snort.org/users/sign_up and fill the fields with your email address and password, agree on the condition terms, complete the reCAPTCHA and press the Sign up button.
You will receive a confirmation email; press the Confirm my account link as shown below.

After pressing the confirmation link, you will be redirected to the login page. Fill in your email address and password and press the Sign in button.
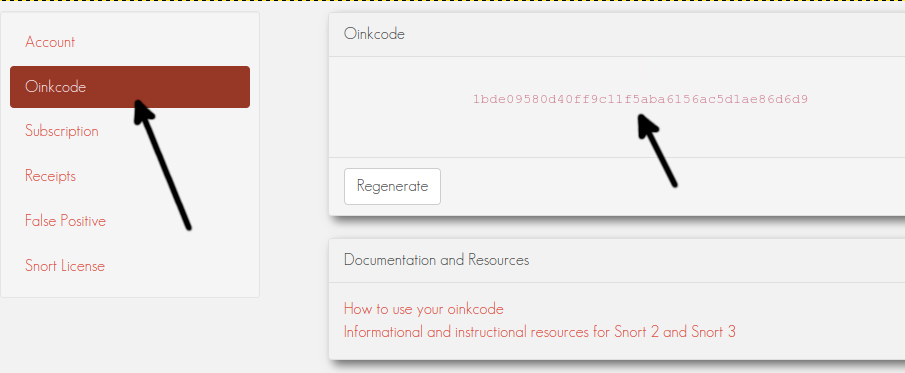
Once logged in, on the left menu, press Oinkcode and copy the code shown in the screenshot below; save this code to use later.
Installing Snort on Pfsense:
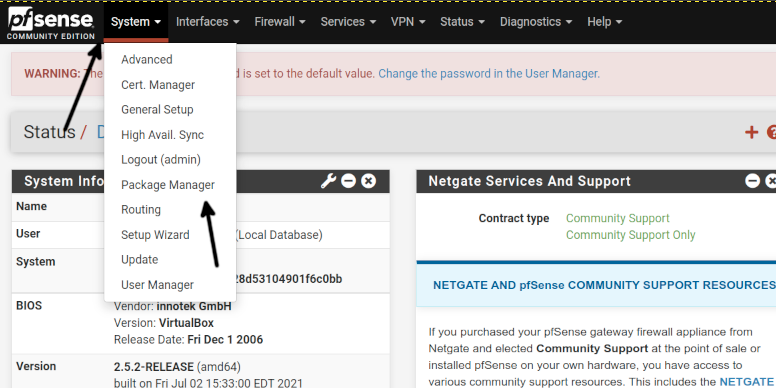
To begin installing Snort on Pfsense, login to your Pfsense web interface and the top menu, press System, then press Package Manager, as shown in the following image.
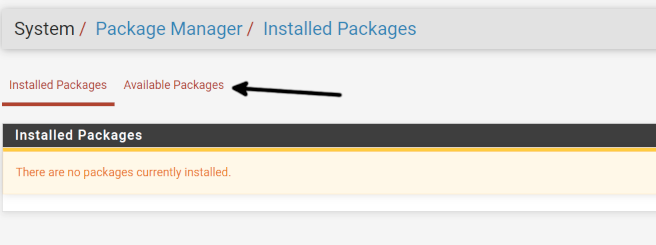
Once on the Package Manager page, press the Available Packages link as shown below.
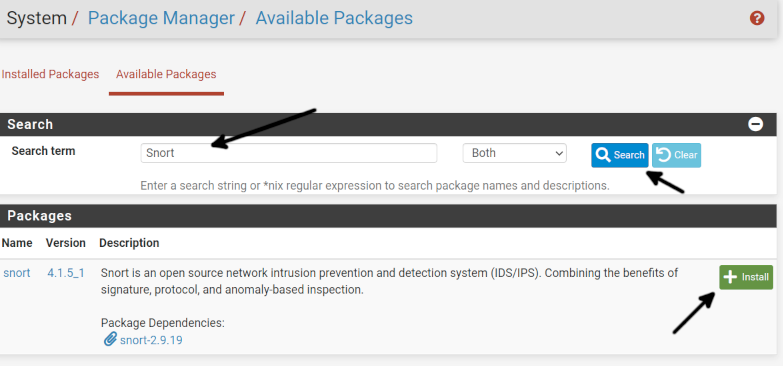
Once in the Available Packages screen, in the Search term field, type “Snort” and press the Search button; when the Snort package shows up, press the +Install button.
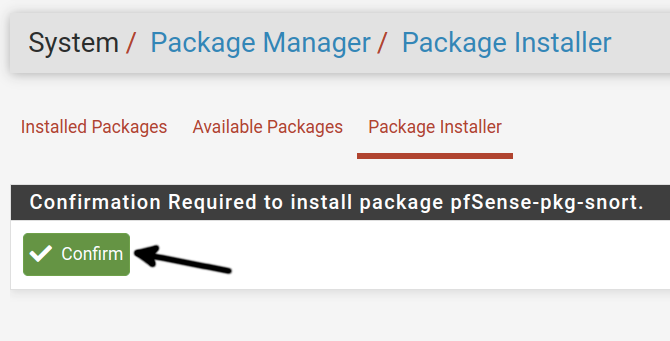
You will be required to confirm the installation; press the Confirm button as shown below.
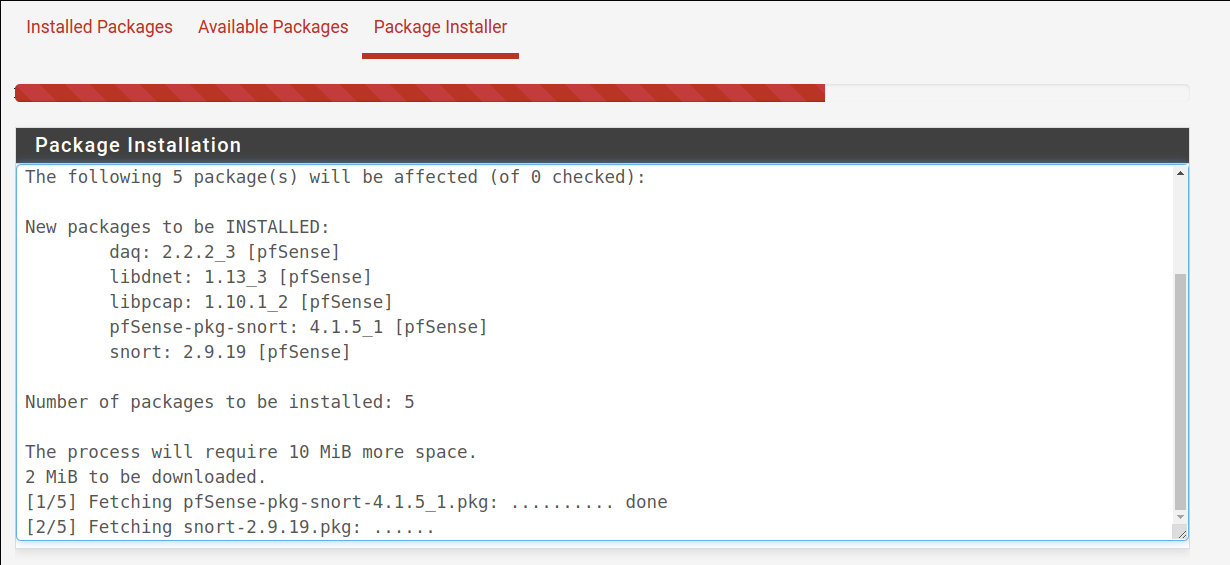
The installation process may take a few minutes, as shown below.
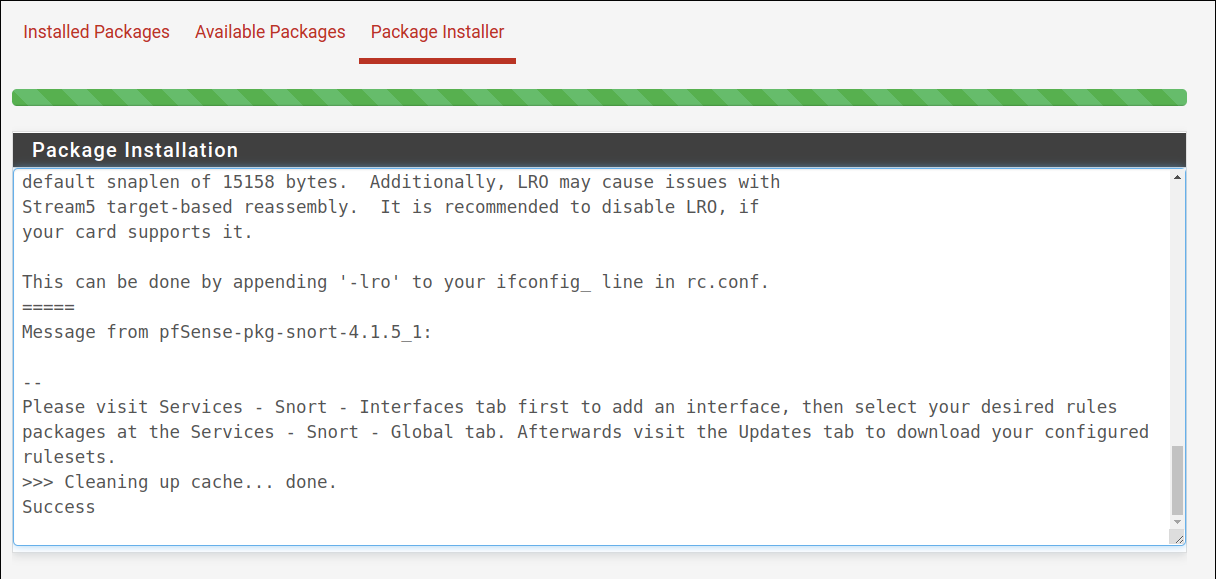
After the installation is done, you will see a success message, as shown in the image below.
Now that Snort is properly installed on Pfsense let’s see how to configure it in the following sections.
Configuring the Snort interface under Pfsense:
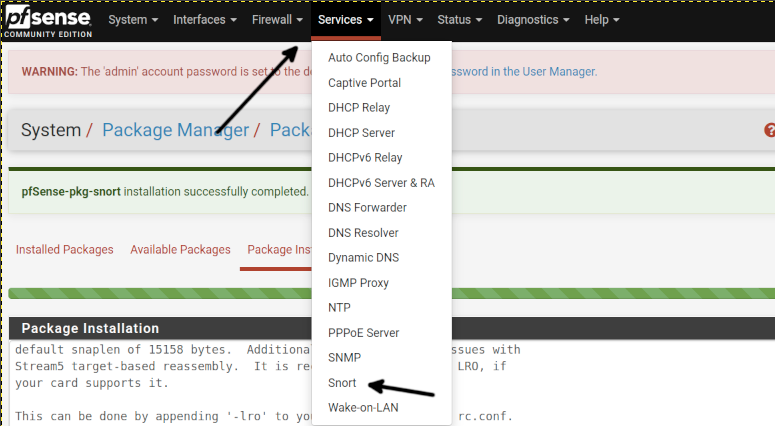
Press the Services button on the Pfsense top menu; you will see the Snort option was added; press it.
This is how the Snort main screen seems; by default, it opens the first tab named Snort Interfaces. In this screen, press the +Add button.
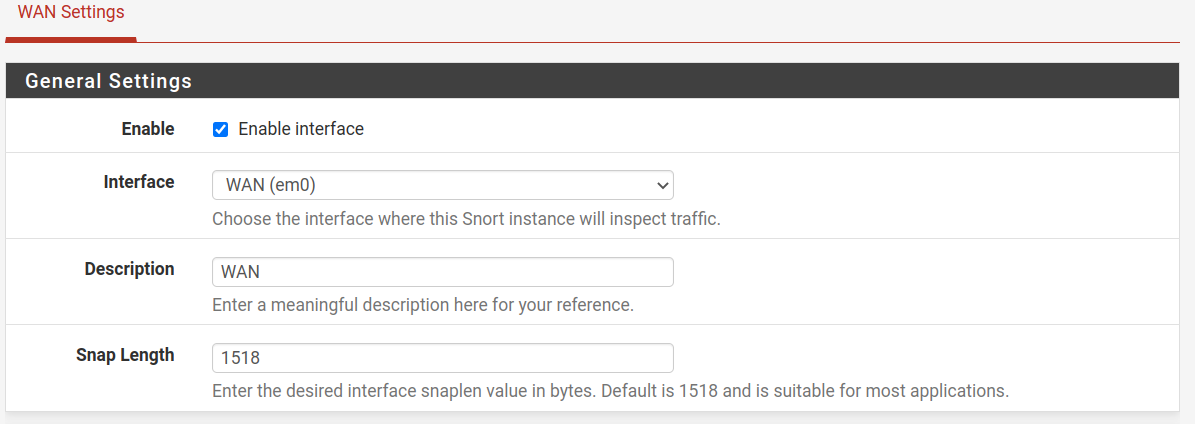
By default, the network interface is enabled; if not, ensure it’s enabled and select the proper one. In my specific case, the interface is WAN. All policies we will define below will apply to this interface.
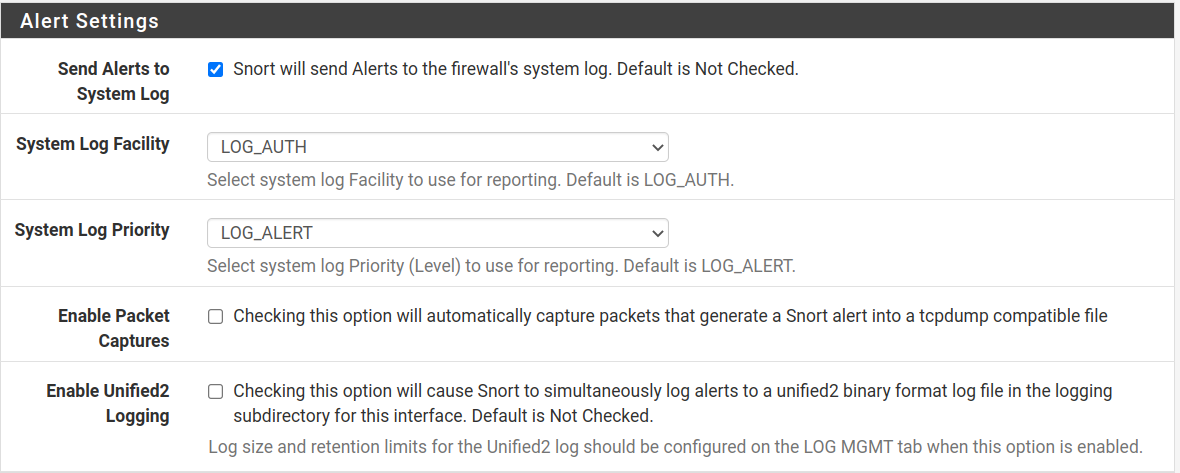
In my case, I enabled logs for alerts, an option that by default is disabled. I recommend you enable it so you can follow Snort behavior.
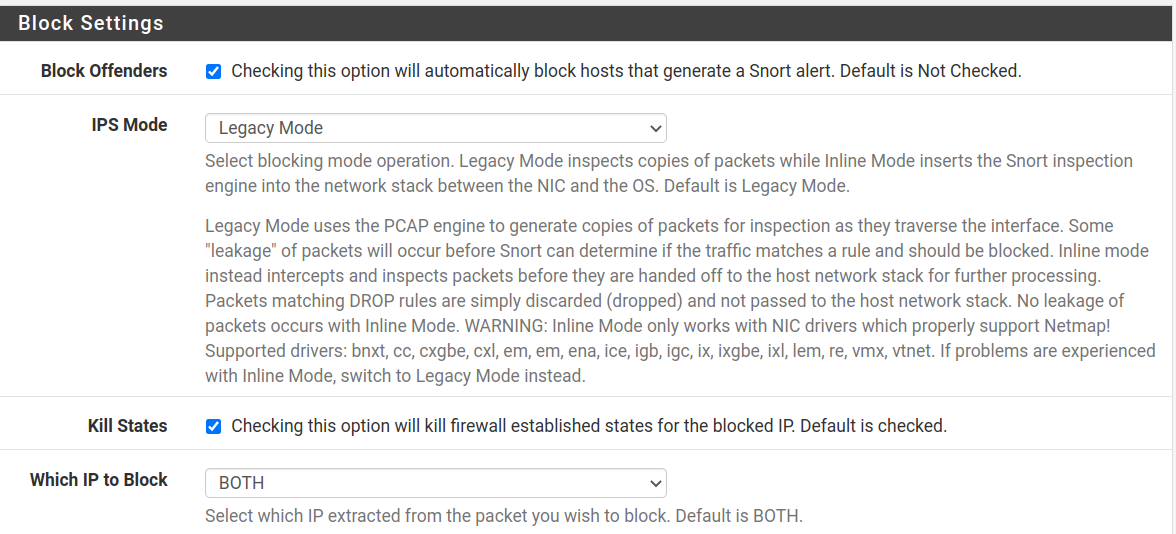
If a connection or traffic seems suspicious and triggers an alert, here, you can choose to block it with the Block Offenders rule automatically. By default, this option is unselected. Keep in mind that sometimes, a false positive may trigger an alert.
After the screenshot below, you can see the additional options if you enable the Block Offenders option.
You will see the three additional options shown below if you enable the Block Offenders option.
The IPS Mode allows two modes:
- Legacy Mode: To explain it easily, this mode creates a clone of the packet to be analyzed while allowing the original packet to pass through Pfsense. According to the rules, future packets will be blocked if the packet is malicious.
- Inline Mode: In this mode, the packet is retained until the analysis ends. This mode does not work with all network cards.
Kill States: If selected, when an established connection is blocked by Snort or the firewall, then the connection is terminated.
Which IP to Block: This option allows you to block the source address, the destination address or both.
Detection Performance Settings has the following options described below:
- Search Method: The default option (AC-BNFA) and LOWMEN are good options for low resource devices. The AC option is good for computers with good performance, and AC-STD is good for devices with moderate hardware.
- Search: This option is recommended for AC, AC-SPLIT or AC-BNFA search methods since combined, it can improve performance.
- Stream Inserts: Optimize: If selected, stream inserted packets will not be evaluated.
- Checksum Check Disabled: This disables the checksum check, even though the firewall already does it; therefore, this option is almost irrelevant.
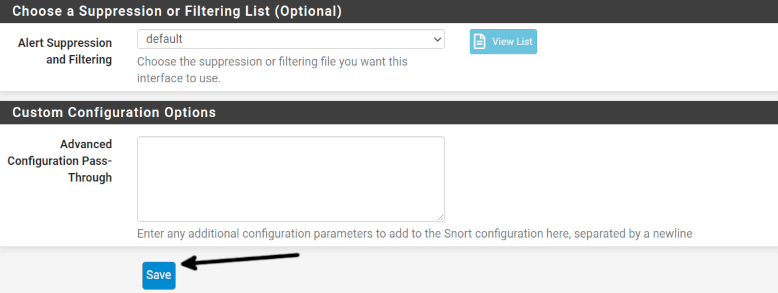
The next section allows you to define home and external networks. You can leave it as default since you have not added devices yet.
Finally, press the Save button to apply your changes.
After saving your changes, the Interfaces top menu will be similar to the one shown in the image below.
Configuring Snort Global Settings in Pfsense:
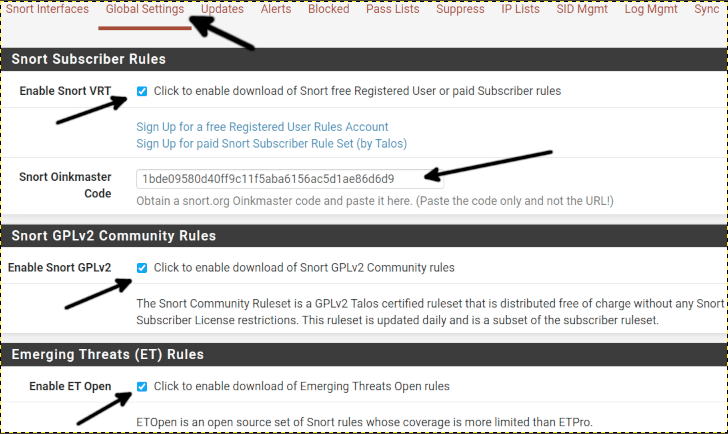
Now let’s configure Snort Global Settings and press Global Settings on the top menu.
Tick the Enable Snort VRT option and paste the Oinkcode (The free Snort key) you got in the first section of this tutorial. If you don’t do that step, you will need to update Snort manually, which is not recommended.
Also, tick Enable Snort GPLv2 and Enable ET Open options.
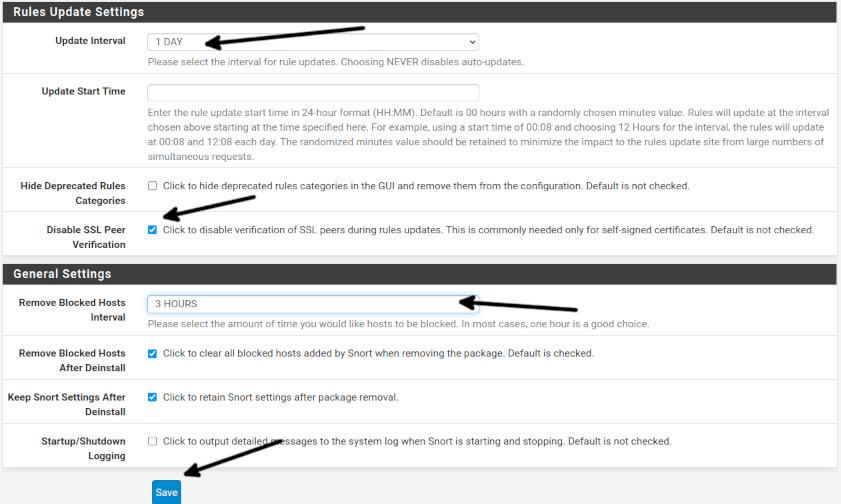
Select an Update Interval; in my case, I selected 1 day, but you can choose any other option you want.
If your Pfsense has a self-signed SSL like in my case, tick the Disable SSL Peer Verification option.
In General, Settings define an interval to remove blocked hosts, keep other options as default and press the Save button.
Now your Snort global settings are ready.
Manually updating Snort Rules:
To update Snort manually, press Updates and press the Updates Rules button on the top menu.
This process will last some minutes, be patient.
After finishing, your Snort rules will be updated.
Downloading or removing Snort alert logs:
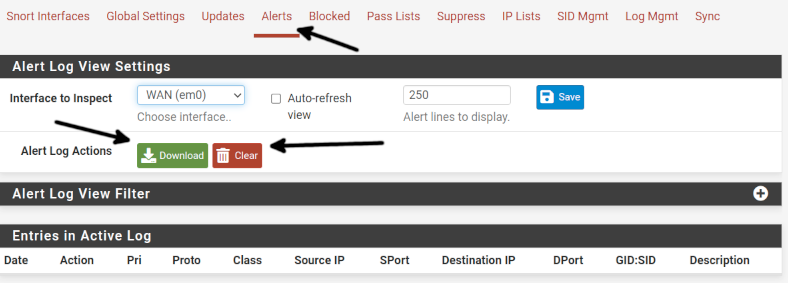
To download or remove alert logs, press the Alerts tab and press the Download button or the Clear button to remove the alerts. Removing logs after downloading is a good decision to prevent logs from taking over your disk space.
Summary:
Now your Snort is configured on Pfsense. You can get information on blocked hosts in the Blocked tab, and whitelisted hosts can be found in the Pass Lists tab. The Suppress tab allows you to see suppressed alerts. You can manage IP reputations from the IP Lists tab. You can automate the management of rules and manage logs from the Log Mgmt tab from the SID Mgmt.
Conclusion:
Adding Snort on Pfsense is a great way to increase your network security. Including an IDS in your network will complement your firewall configuration by analyzing traffic and deciding on the configuration to define. Pfsense itself is excellent to manage both home and commercial networks. The community widely supports both Pfsense and Snort. They have optional commercial support, making it easy for all users to use them and great security and network management for businesses. Both Snort and Pfsense have free versions and are open source solutions.
Thank you for reading this Snort and Pfsense article. I hope it was useful for you. Keep reading our blog for more professional tutorials.


