The lighttpd is an open-source secure and efficient web server well optimized for providing high-speed performance to users. It has far better performance than Apache web server in terms of speed and memory utilization since it’s lightweight and doesn’t consume much memory resources. It’s an ideal alternative to most used web servers like Apache and NGINX and can easily be set up on any system.
If you are a Raspberry Pi user and want to create websites, the lighttpd web server is an excellent choice and you can set up this server using the guidelines provided in this article.
Setup lighttpd Server on Raspberry Pi
Setting up a lighttpd server on Raspberry Pi is as easy as you like and you can do it on your Raspberry Pi system using the following steps:
Step 1: Remove Apache Web server From Raspberry Pi
Before moving towards the lighttpd server installation, ensure that you don’t have Apache installed on your system. In case if it’s installed, you can remove Apache from your Raspberry Pi system by executing the following command:

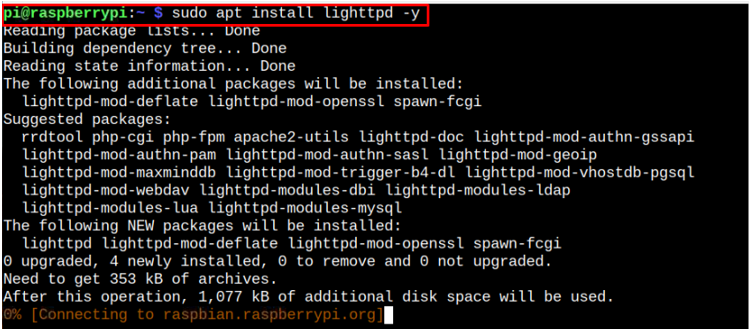
Step 2: Install lighttpd on Raspberry Pi System
After making sure that no Apache server is installed, you are good to use the following command to install lighttpd server on your Raspberry Pi system:
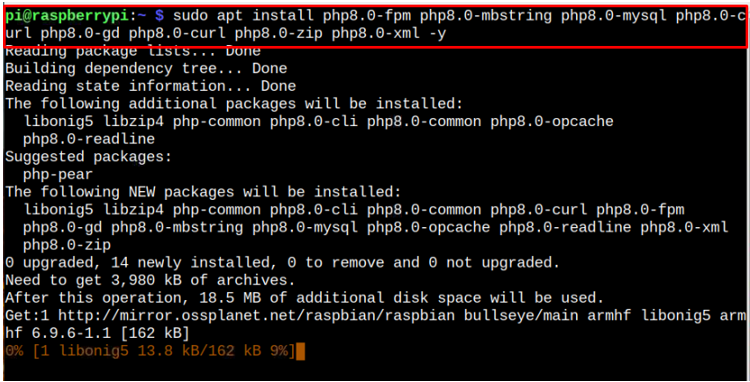
Step 3: Install PHP with Dependencies on Raspberry Pi System
You will also be required to use the below-mentioned command to install the PHP module with required dependencies on your Raspberry Pi system.
Step 4: Enable PHP-FPM Service
You should also require to enable Fast CGI Process Manager (PHP-FPM) service with lighttpd server. This will add further advantages to increase the uploading time and handle high traffic on the website adn you can learn about it in detail here.
To enable the FastCGI service on Raspberry Pi, you should hit the following command:

You should also apply the following command to enable FastCGI service for lighttpd setup with PHP.

Step 5: Configure FastCGI PHP File on Raspberry Pi
By default, the lighttpd service is configured to work with PHP-CGI instead of FastCGI. To enhance the performance of the lighttpd service through FastCGI, you should need to make changes in the configuration file, which you can open using the following command:
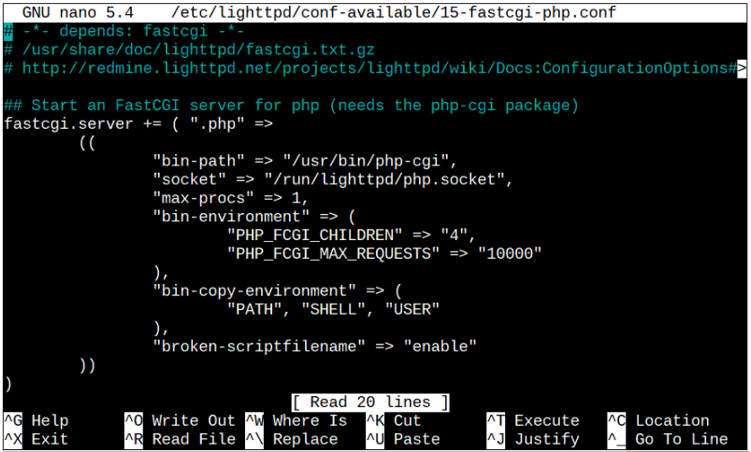
You should make changes to the file by removing other options and leave behind those that are needed to complete the FastCGI configuration. The changes should be done so that the final file will look like the one shown below:

Step 6: Reload lighttpd Service on Raspberry Pi System
You should reload the lighttpd service on your Raspberry Pi system using the following command after completing the above changes:

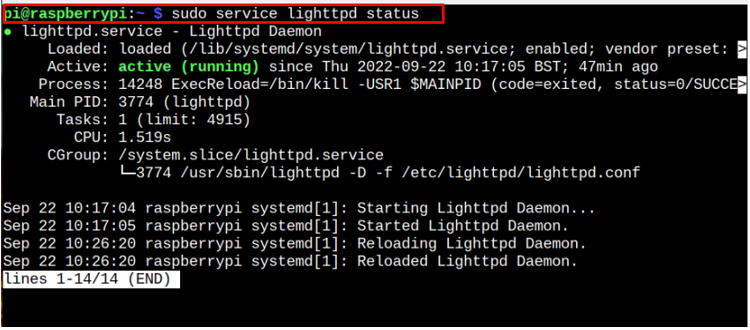
You can also check the status of lighttpd through the following command to ensure the service is successfully running.
Step 7: Create a PHP File on Raspberry Pi System
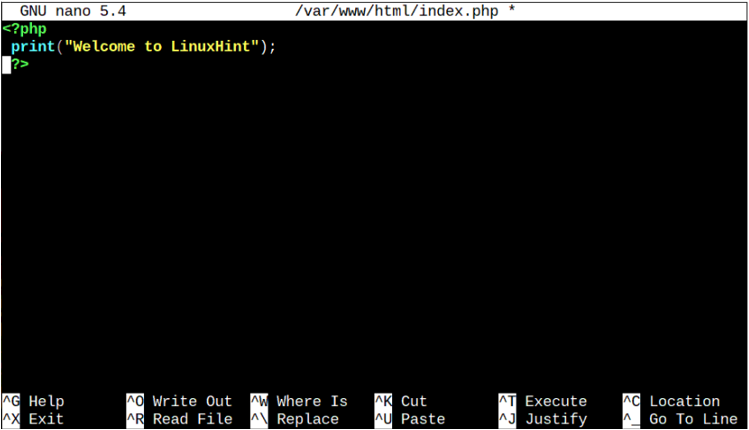
Now, to test the service, you should need to create a php file that allows you to display anything on the web page using the device IP address. The PHP file should be placed inside the directory “/var/www/html” and you can create this file using the following command:
Within this file, you can add a PHP code and for generation, we are using a simple PHP code for displaying a Welcome message on the web page.
print (“My Message”);
?>
Save this file using CTRL+X and then go to your browser and enter the IP address of the Raspberry Pi system, which you can be found via the “hostname -I” command.
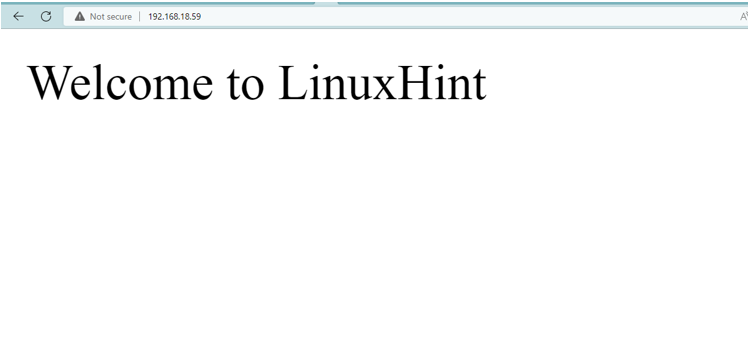
With the above output message displayed on the web page, it ensures that the lighttpd service is successfully set up on Raspberry Pi and you can begin creating your own website by adding the code inside the PHP file.
Conclusion
lighttpd is a robust and memory-efficient web server that you can easily set up on your Raspberry Pi system. However, before setup, you must remove Apache from your system and once the removal is done, you can begin installing lighttpd service on Raspberry Pi through the apt installation command. You should also enable FastCGI service to enhance the lighttpd server’s performance. After it’s done, make some changes in the configuration file to operate the server on the system successfully. Finally, you can add a code inside the PHP file and display the result on the webpage using the IP address of Raspberry Pi.