ESP32 is an electronic prototyping diverse platform that can control multiple hardware and executes code according to given instructions. ESP32 is famous for its application in IoT based projects. ESP32 comes with pre-installed WiFi drivers and a dual Bluetooth module to provide it with wireless connectivity. Let’s see how to scan ESP32 WiFi for available networks.
How to Scan a WiFi Network in ESP32 Using Arduino IDE
To scan for nearby Wi-Fi connections, we will be using an ESP32 Wi-Fi scan example to make sure the ESP32 board is installed in Arduino IDE. Learn more about the installation of ESP32 with Arduino IDE by clicking here.
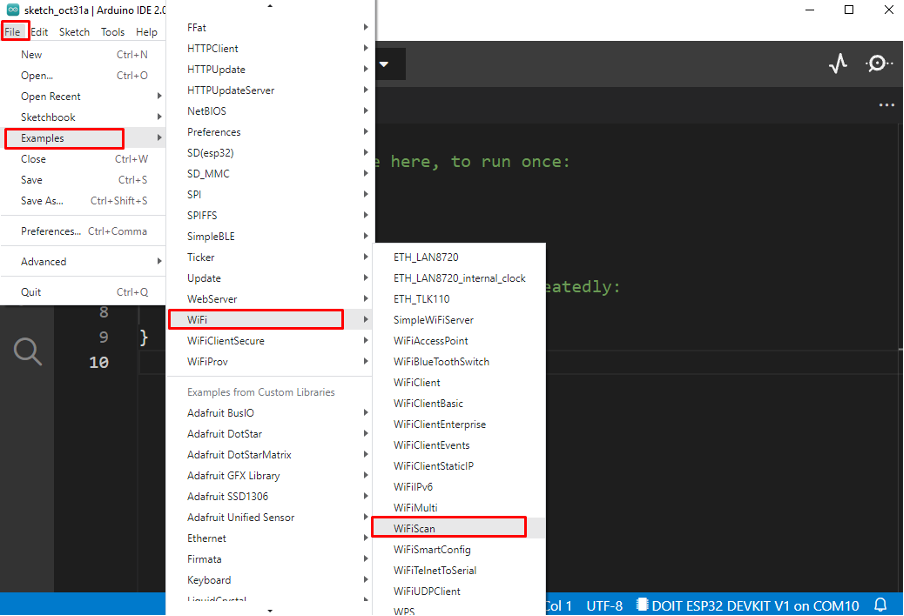
Go to: Files>Examples>WiFi>WiFi Scan:
Following code will open in a new window. Select the COM port of ESP32 and upload the code:
void setup()
{
Serial.begin(115200);
// Set ESP32 wifi to station mode
WiFi.mode(WIFI_STA);
WiFi.disconnect();
delay(100);
Serial.println("Setup done");
}
void loop()
{
Serial.println("scan start");
// WiFi.scanNetworks will give total found wifi networks
int n = WiFi.scanNetworks();
Serial.println("scan done");
if (n == 0) {
Serial.println("no networks found");
} else {
Serial.print(n);
Serial.println(" networks found");
for (int i = 0; i < n; ++i) {
// Print SSID and signal strength
Serial.print(i + 1);
Serial.print(": ");
Serial.print(WiFi.SSID(i));
Serial.print(" (");
Serial.print(WiFi.RSSI(i));
Serial.print(")");
Serial.println((WiFi.encryptionType(i) == WIFI_AUTH_OPEN)?" ":"*");
delay(10);
}
}
Serial.println("");
// delay of 5 sec
delay(5000);
}
Here in above code WiFi.scanNetworks() will return the total available network inside the range of ESP32 boards.
Once all the networks are scanned, we can access their SSID using the below command:
The WiFi.RSSI() function will give us the RSSI (Received Signal Strength Indicator) of a network. It is an estimated power level or signal strength which ESP32 is getting from the router.
Output
Following output is printed on the serial monitor displaying us all available networks that the ESP32 board scanned:
Connect to a WiFi Network
To connect ESP32 with a WiFi network we must know the SSID and its password. Additionally, the network which needs to be connected must come inside the range of ESP32. To see if a certain WiFi comes under ESP32 range or not run the example scan given above.
Upload the below code to connect the ESP32 board to the WiFi network:
const char* ssid = "Your SSID NAME";
const char* password = "SSID PASSWORD";
void setup(){
Serial.begin(115200);
delay(1000);
WiFi.mode(WIFI_STA);
WiFi.begin(ssid, password);
Serial.println("\nConnecting");
while(WiFi.status() != WL_CONNECTED){
Serial.print(".");
delay(100);
}
Serial.println("\nConnected to the WiFi network");
Serial.print("Local ESP32 IP: ");
Serial.println(WiFi.localIP());
}
void loop(){}
The code starts by including the WiFi.h library. Then we enter the network SSID and password to which we want to connect. Next ESP32 is put in station mode which is optional one can ignore because ESP32 by default comes in station mode.
Next using the WiFi.begin(ssid, password); function ESP32 will search for the defined network and try to connect. Once the ESP32 is connected, the IP address of the network will be displayed on the serial monitor:
FAQ
Q1: How many WiFi devices can connect to ESP32?
By default, ESP32 supports 4 WiFi devices but it can go up to 10 devices in AP mode.
Q2: Does ESP32 have a hotspot?
Yes, ESP32 can connect to any WiFi network as well as it can also be an Access point for others.
Q3: Can ESP32 act as a router?
Yes, ESP32 in Access point mode will itself work as a router. ESP32 WiFi supports station mode, access point mode or can work in both.
Conclusion
ESP32 is a microcontroller board that comes with WiFi and dual Bluetooth support. This article highlights the function used for scanning available WiFi networks near ESP32. The ESP32 board can be connected with any network while knowing the SSID and password of the network. This write up will assist you in finding the network you want to connect with ESP32 WiFi using Arduino IDE.


