About RealVNC
So, what exactly is RealVNC? RealVNC is a software company that offers VNC Server and VNC Viewer (client application) to remotely control another computer. VNC stands for Virtual Network Computing. This is a securely authenticated and encrypted way to create and view remote desktops.
Once you sign in to the desktop through RealVNC’s VNC Viewer app, you can open a terminal and then SSH to other machines. Connections built via VNC Viewer remain as it is even if there’s no actual client viewing it.
VNC server gets included with Raspberry Pi if you’re using a Raspberry Pi OS. It only needs to be enabled. If it’s not included, follow the instructions given below to run RealVNC on your Pi.
Prerequisites
To get RealVNC running on your Pi, you need
- Network and internet connection
- VNC Server and VNC Viewer
Setting Up Raspberry Pi
Run the following code to get VNC Server on Raspberry Pi.
$ sudo apt-get install realvnc-vnc-server
If you have an older VNC version, restart it now. If you don’t and have booted into the graphical desktop, go to Menu -> Preferences -> Raspberry Pi Configuration -> Interfaces. Make sure VNC is Enabled.
Then, configure the settings by typing:
Then go to Interfacing Options > VNC and click Yes.
From this point, the VNC server will auto-start each time you boot Raspberry Pi and you can remotely access a graphical desktop.
Note: In case you have a headless Pi that means it isn’t plugged into the monitor or it doesn’t run a graphical desktop, the VNC server is still able to provide graphical remote access with a virtual desktop.
To control a computer or another Raspberry Pi remotely, you can install VNC Viewer on Pi. For this purpose, use the VNC Viewer application, or you can run the following command.
Now, there are two methods to connect to the Raspberry Pi – 1) Establish a direct connection and/or 2) Establish a cloud connection. Before getting into either of the methods, make sure to download the VNC Viewer app into the devices you need to control the Raspberry Pi from.
Establish a Direct Connection
If you’re connected to the same private network as your Pi’s, such as Wi-Fi at home, workplace, or school, direct connections would be quick and simple to establish. To establish a direct connection, follow the steps below.
Step 1: On your Raspberry Pi, double-click the VNC Server icon given on the taskbar. Then find your private IP address by examining the status dialog.
Step 2: After that, on the device to be controlled, run the VNC Viewer application and enter your IP address in the search area.
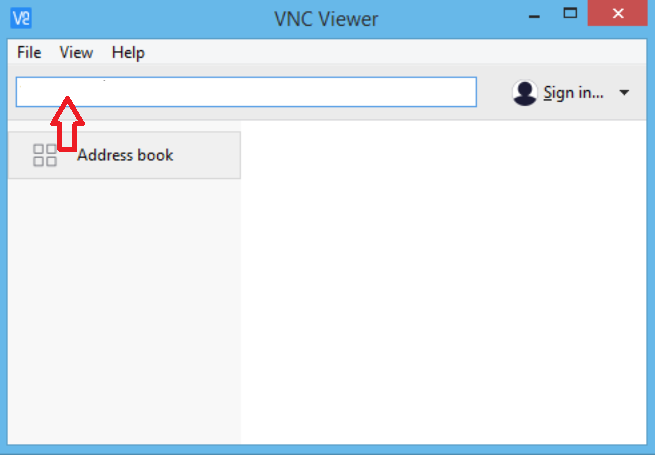
Image source: www.realvnc.com
And a direct connection will be established.
Establish a Cloud Connection
Cloud connections are easy to access and have end-to-end encryption. If you aim to establish a connection over the internet, then Cloud is recommended. You don’t have to reconfigure a router or firewall, and your Raspberry Pi’s IP address is also not required. All you need is a RealVNC account. So, follow the steps mentioned below.
Step 1: Enter your email in the box given on their official site’s page. Then follow the instructions that appear on your screen.
Step 2: On the Raspberry Pi, click “Licensing” given in the VNC Server status. Select “Sign in to your RealVNC account”. Type your RealVNC account email and the password.

Image source: www.realvnc.com
Step 3: On the device to be controlled, open the VNC Viewer. Log in with the same credentials.
Step 4: A connection to your Pi will automatically appear in the VNC Viewer.
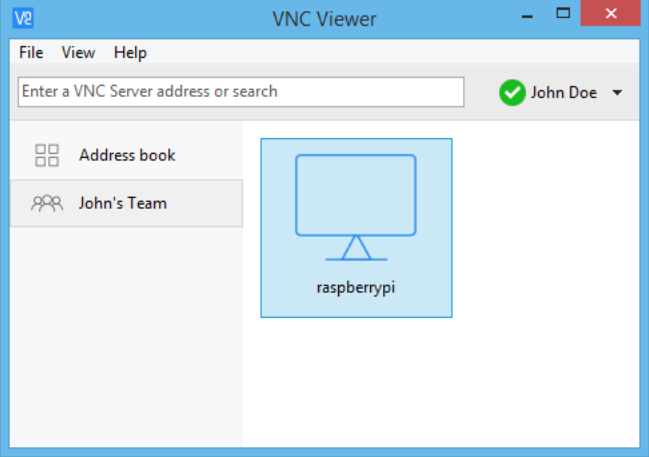
Image source: www.realvnc.com
Just double-click on the Raspberry Pi connection seen to connect.
Authenticate to the VNC Server
The final step to complete either a cloud or a direct connection is you need to authenticate to VNC Server. For this, type your username and password used to sign in to your Raspberry Pi user account.
By default, these credentials would be “pi” and “raspberry” respectively. At any time, you can change them to more secure ones.
The Summary
Today you have learned how to run RealVNC on Raspberry Pi. Now, you know more about RealVNC and how it works. This article explained the procedures of setting up Raspberry Pi using the terminal, establishing a direct and cloud connection between RealVNC and your Raspberry Pi.
With RealVNC, you can also transfer files from and to your Raspberry Pi, print to a printer in case there’s no printer setup for the Pi, create a virtual desktop, run your Raspberry Pi apps, such as Minecraft, the Pi camera, remotely, and much more. We hope this article has provided good knowledge on running RealVNC on Raspberry Pi and its benefits.