If you are new to the Raspberry Pi device, you should need help regarding the Raspi-Config tool. This article will let you understand some of the important options used in the device configuration tool.
What is Raspi-Config Tool
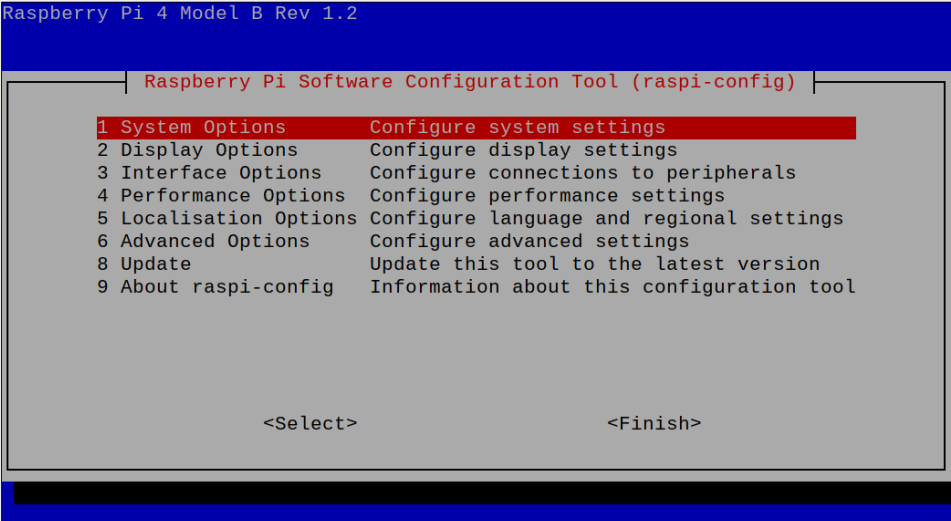
A Raspi-Config is a command-line configuration tool used to configure various settings on Raspberry Pi. With Raspi-Config tool, you will be able to find several options which are as following:
- System Options
- Display Options
- Interface Options
- Performance Options
- Localisation Options
- Advanced Options
- Update
- About Raspi-Config
Each of these options includes several other options except for the “About Raspi-Config” that provides you the information about the tool.
A complete guide of Raspi-Config tool
Configuring your Raspberry Pi settings through Raspi-Config tool is pretty straightforward and every individual can easily do it on their Raspberry Pi terminal.
How to access Raspi-Config Tool on Raspberry Pi
To open the configuration, you will first need to run Raspberry Pi terminal using “CTRL+ALT+T” from keyboard or directly open it from your Raspberry Pi desktop:
Once the terminal is opened, you can execute the following command to run the RaspiConfig on your terminal.
In the RaspiConfig, you will be able to see several options and we will guide you what each option will do for you.
1: System Options
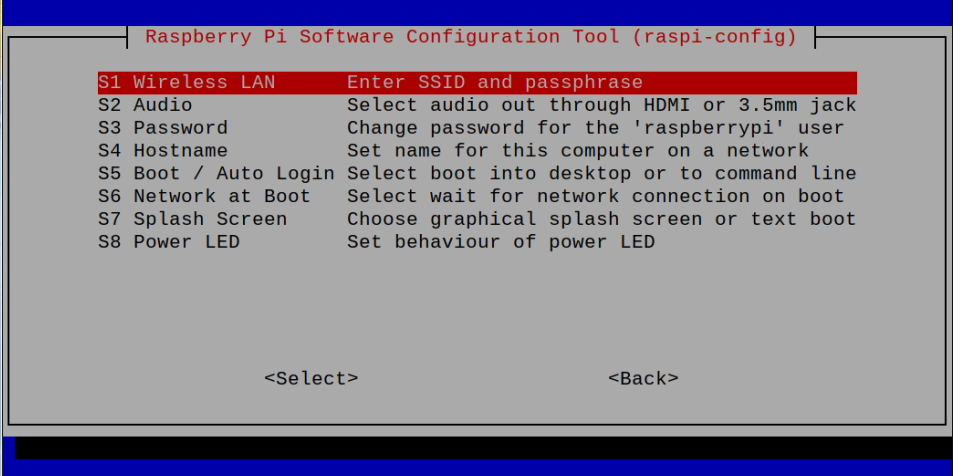
In the ”System Options” of RaspiConfig, you will find several other options that will let you change the system settings on your Raspberry Pi. Let’s discuss each option so that it will help you change these settings when you need them.
Wireless LAN: The Wireless LAN option will let you connect to your WiFi network on your Raspberry Pi device by providing your WiFi name and password.
Audio: The Audio option will let you decide the audio output for your Raspberry Pi device as this option enables you to listen to audio via headphones or HDMI.
Password: This option enables you to change the default Raspberry Pi password to make our device more secure.
Hostname: This option will allow you to change your device hostname.
Boot/Auto login: Using this option, you will be able to select the boot settings for your Raspberry Pi device.
Network at Boot: Enabling this option will boot your Raspberry Pi device after the internet connection is successfully established.
Splash Screen: This option will enable the splash screen on your device at boot.
Power LED: Skip this option as it won’t work on Raspberry Pi.
2: Display Options
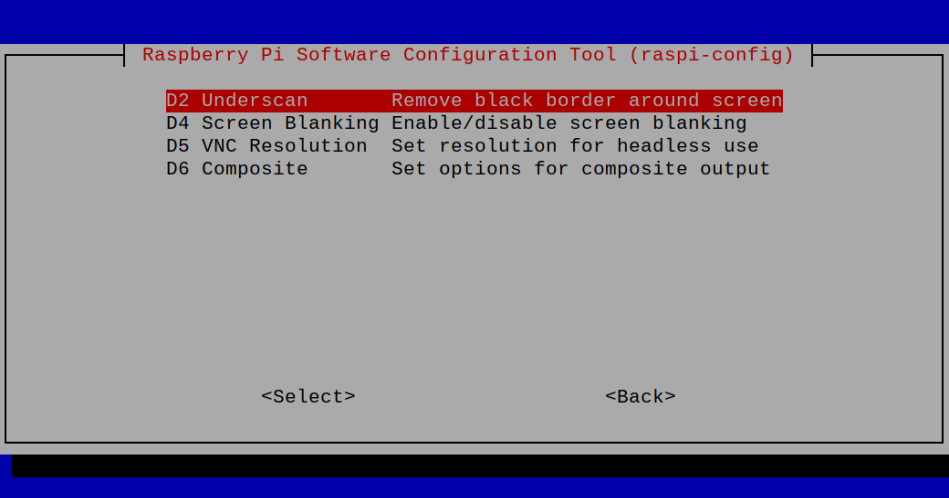
This “Display Options” in Raspi-Config tool will help you change your device display settings as it includes several options like Underscan, screen blanking, VNC resolution and Composite.
Underscan: Enabling this option will remove black border around the screen.
Screen Blanking: You can use this option when you want to use your device for a longer time as disabling the screen blanking on your device will remove the screen saver to appear on your screen.
VNC resolution: This option is valuable if you are using VNC viewer for accessing Raspberry Pi screen as it lets you adjust the screen resolution for Raspberry Pi display.
Composite: This option decides whether you want a 4K resolution or not. Enabling this option will make the Raspberry Pi video output in 4K display.
3: Interface Options
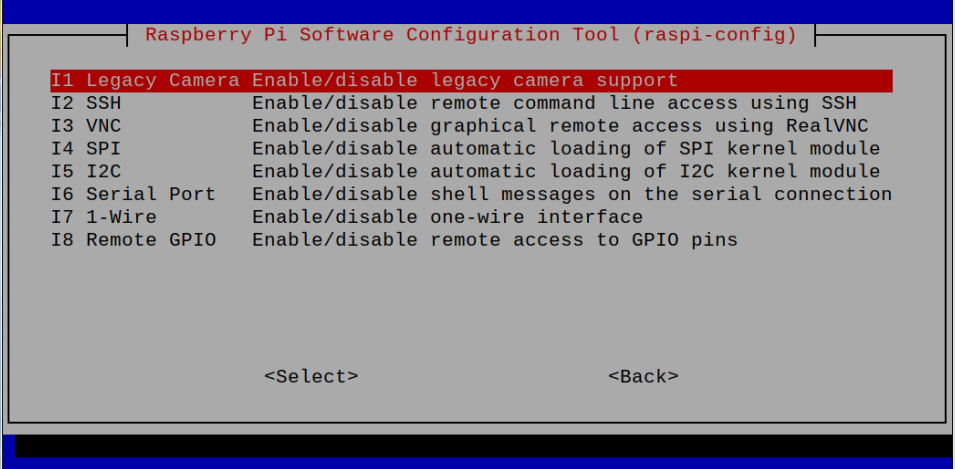
In the “Interface Options”, you will be able to enable/disable various interfaces such as camera module, SSH, VNC, SPI, I2C, Serial Port, 1-Wire and Remote GPIO.
Camera Module: You will need to enable this option once you find a compatible camera module for your Raspberry Pi device.
SSH: Enabling this option will allow you to remotely access your Raspberry Pi device.
VNC: You can enable this option if you want to view your Raspberry Pi display on your laptop or mobile phone.
SPI: Enable this option if you have attached a four-wire serial link with your Raspberry Pi.
I2C: You can enable this option once you connect an I2C device with your Raspberry Pi.
Serial Port: This option is helpful if you want to exchange messages through serial connection as you have to enable in this case.
1-Wire: Enable this option if you connect a sensor that uses 1-wire protocol.
Remote GPIO: Enabling this option allows you to remotely access your device GPIO pins.
4: Performance Options
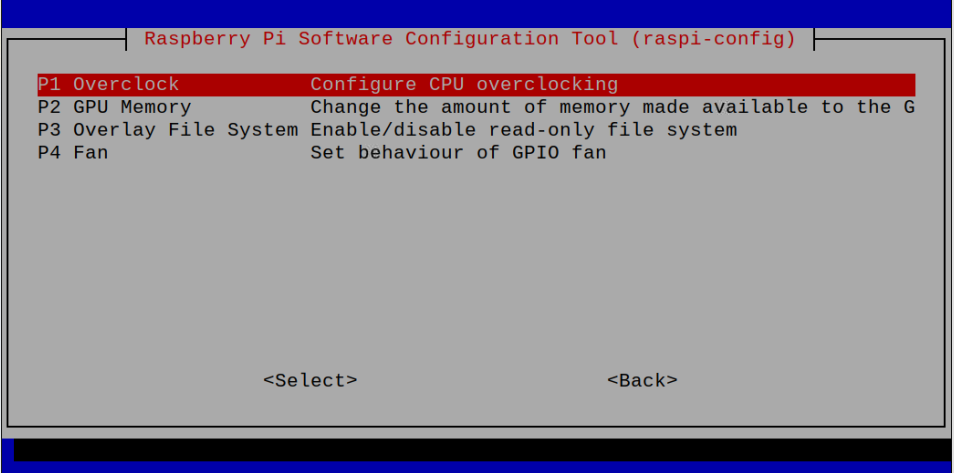
The “Performance Options” in RaspiConfig is crucial to boost your device performance. There you will find several options like overclock, GPU memory, overlay file system and fan settings.
Overclock: You can use this option if your device overheats too much as you have to set the CPU overclocking speed to enhance the device performance.
GPU Memory: This option lets you decide the GPU memory for your device as increasing the GPU memory may boost your device performance.
Overlay File System: Enabling this option will increase your device’s SD card performance as it avoids useless write options on your device.
Fan: This option will let you decide the fan setting for your GPIO Fan.
5: Localization Options
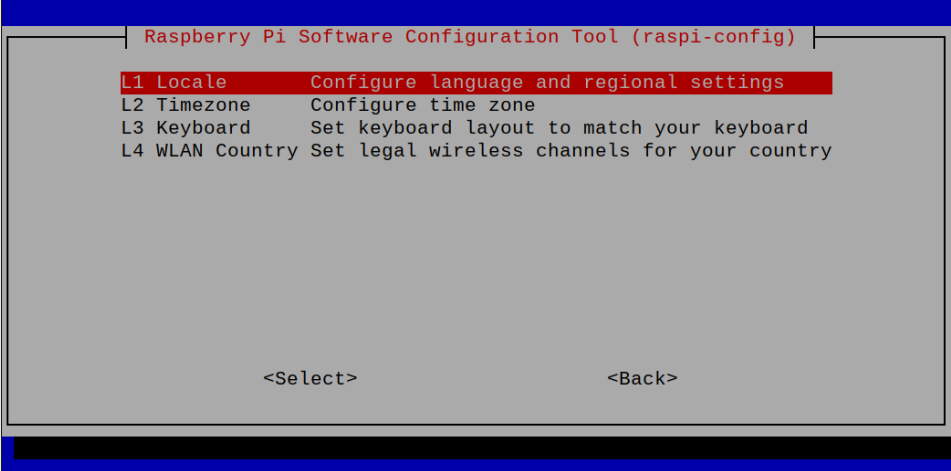
With “Localization Options”, you can change the language settings, country time zone, keyboard layout or Wireless LAN location.
6: Advanced Options
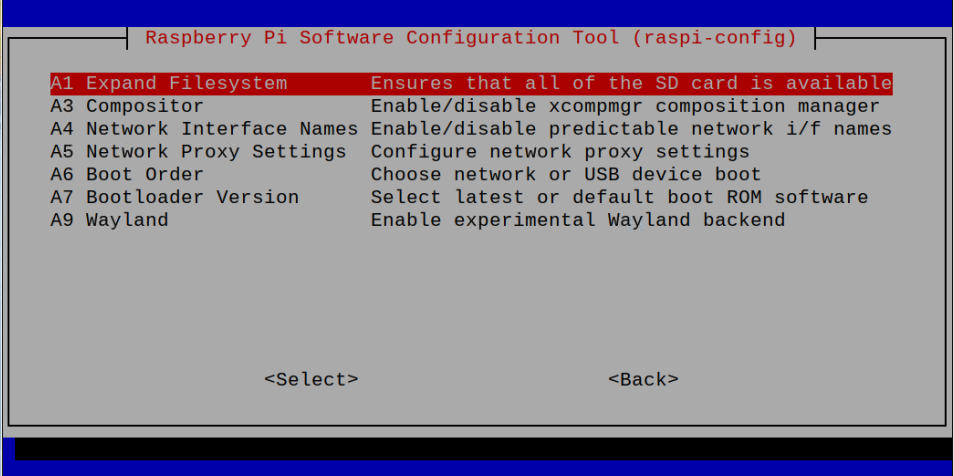
In the “Advanced Options”, you will be able to find several options like Expand File System, Compositor, Network Interface Names, Proxy Settings, Boot Order, Bootloader Version and Wayland.
Expand File System: This option allows you to expand your Raspberry Pi storage and it’s better to use this option when you need additional storage for your Raspberry Pi device.
Compositor: This option helps you to enable or disable the composite manager on your device. It is capable of rendering drop shadow and is mostly utilized for display purposes.
Network Interface Names: You can enable and disable predictable network interface names through this option and it’s generally disable on your device.
Network Proxy Settings: This option is used to set up proxy settings on your Raspberry Pi device.
Boot Order: You can use this option to select your boot order which can only be utilized if you successfully perform SD card, network and USB device boot.
Bootloader Version: This option is used to update the Bootloader version of your Raspberry Pi device.
Wayland: Wayland is a communication protocol used in the device for performing communication between display server and clients. You can enable this option if you need it otherwise you can leave it disabled.
7: Update
You can use this option to update the Raspi-Config tool to the latest version.
Conclusion
RaspiConfig tool is extremely important for the Raspberry Pi users, allowing them to perform configuration settings on their device. If you are a Raspberry Pi user and don’t have knowledge about this tool, follow the above guidelines. You can select any option and perform required changes to configure several settings on your Raspberry Pi device.


