Using button in Arduino
To explain the use of buttons in Arduino a small project of turning on and off the LED using push button is made. For assigning the states to the LED same as the state of the push button a digital read and digital write function is used. Similarly, for assigning the states of the led based on the state of the switch the digital read – and write functions are used by using an if loop. In this project the following are the components used:
- Arduino uno
- One LED bulb
- Two 220-ohm resistor
- One push button
- Connecting wires
- Breadboard
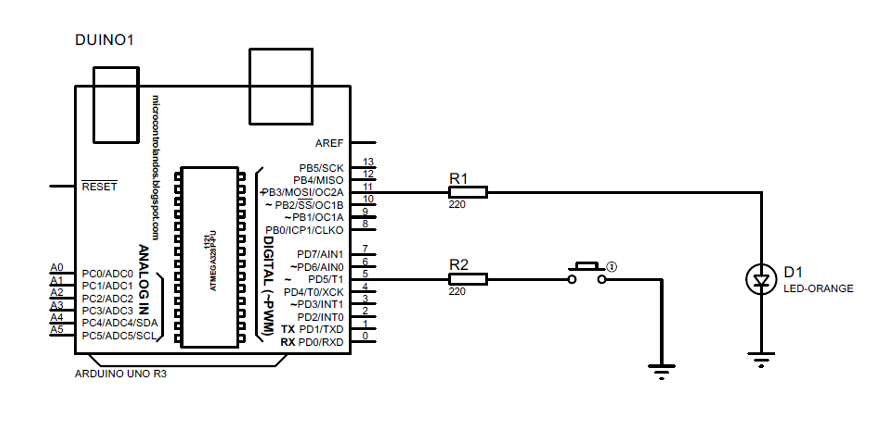
The circuit diagram for the project is given as:
In this project the LED is connected at the digital pin number 7 of the Arduino and a resistor od 220 ohms is used with the LED. The push button is connected to Arduino using its pin 5 by connecting it with the 220 ohm resistance. Moreover, the resistor and the switch are commonly grounded, and the other pin of the push button is connected to the 5-volt supply of the Arduino.
Arduino Code
After constructing a circuit diagram an Arduino code is written which is given as:
const int LED = 11;
int BUTTONstate = 0;
void setup ()
{
pinMode(BUTTON, INPUT_PULLUP);
pinMode(LED, OUTPUT);
}
void loop ()
{
BUTTONstate = digitalRead(BUTTON);
if (BUTTONstate == HIGH)
{
digitalWrite(LED, HIGH);
}
else {
digitalWrite(LED, LOW);
}
}
For connecting the button to Arduino, first the pin of Arduino is declared to the push button and then the pin for LED is declared. Similarly, the button state is declared by using the integer variable. Then in the setup function the pins and their modes are initialized using the PinMode function. After that in the loop function the state of the button is found out by using the digitalRead function and based on the state of the button the state of the LED is assigned using the digitalwrite function.
The button is initialized with the INPUT_PULLUP mode by which the states of the button will be inverted. So, when the button is pressed the state of the button will be LOW and the LED will also be given the HGH state and if the state of the button is HIGH that is when the button is pressed then the state of the LED will also be low.
The idea behind the INPUT_PULLUP is that it stabilizes the states of the button as in the normal INPUT state there is some voltage even in the LOW state of the button. This is how we can use buttons in the Arduino.
Conclusion
To interface a button with Arduino there are two functions that are used, one is the digitalRead function and the other is the digitalwrite function. The push buttons are mostly used to connect devices from the electricity supply. In this write-up how to use the button in Arduino is explained briefly by demonstrating the small project of turning the LED on and off using the push button.


