We all know that Raspberry Pi does not own any internal storage and all its data including the OS is stored on the SD card. While using an SD card storage, users have to be vigilant as you never know when your SD card gets corrupted. So, it is always recommended to store your rootfs data which is your main Raspberry Pi data to another drive. This will help you to be in a safer space if your Raspberry Pi has some very important data stored in it.
The complete process to move Raspberry Pi Rootfs to another drive is given in this writeup.
How to Move Raspberry Pi Rootfs to Another Drive/Partition
You will need an external drive to be connected to your Raspberry Pi to move the Raspberry Pi Rootfs to it. So before starting the process ensure that you have at least an 8GB external drive connected to your Raspberry Pi.
Once you have connected the external drive then open your Raspberry Pi’s terminal and follow the below-written steps:
Step 1: First run the below-written command to display all connected storage devices and disk partitions along with -p flags which will ensure that the full name of each device is displayed on the terminal:

In the output of the above command, you will see all the partitions with mmcblk0 (p1 for partition 1 and p2 for partition 2) and the externally connected drive will also display at the top, mine is highlighted in the image below. Your drive name could vary but most probably it will start with dev/sda:

Step 2: After finding out the name of the externally connected device, now run the below-written command to unmount it:

Step 3: Then unmount the Raspberry Pi disk partitions by running the below-mentioned command:
$ sudo umount /dev/mmcblk0p2

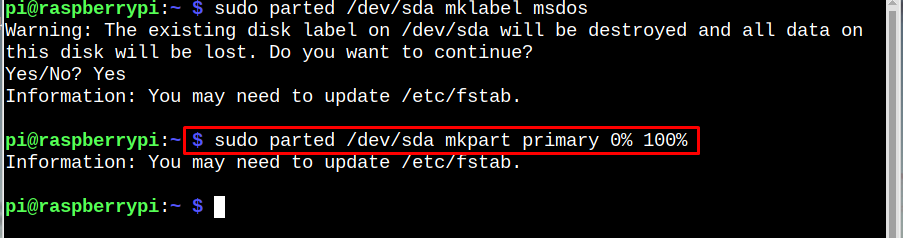
Step 4: We have to create a large partition on our external drive where we will copy all the rootfs data. But before creating the partition, it is important to format the disk, so run the below-mentioned command to format the external drive.
Enter Yes when prompted.

Note: Remember that formatting will erase all the previously stored data on the external drive, so make sure you have nothing important stored in your external drive.
Step 5: After formatting the external drive, now create a large partition (sda1) on it by running the below-written command:
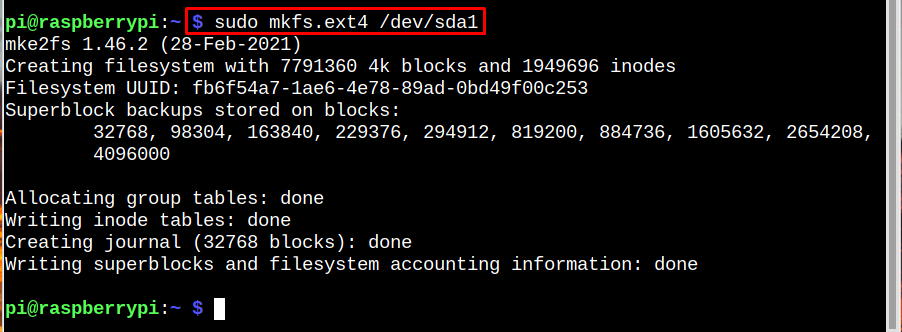
Step 6: Now it is time to format our newly created sda1 partition to EXT4 and for that run the below-mentioned command:
Step 7: Now let’s create separate mount points for each of the partitions one by one:
i: For Drive Partition

ii: For Boot Partition

iii: For Rootfs

Step 8: Now mount all the partitions by using the below-mentioned commands:
i: Mounting sda1 (external drive partition)

ii: Mounting mmcblk0p1 (system partition 1)

iii: Mounting mmcblk0p2 (System partition 2)

Step 10: Then to verify that all partitions are mounted successfully, run the below-written command:
In the output, you can see that external drive partition sda1, which we have created is mounted successfully as a usbdrive mount point. Similarly, the other partitions are also mounted perfectly:

Step 11: Now finally you can copy all the rootfs data to the external drive/partition by running the below-written command:

As soon as the above command is run the process of copying the entire root filesystem will start, and it is going to take some time which could vary for each user depending upon how much data a user has stored in rootfs:
Step 12: Once all the rootfs data is copied to external drive now it is time to remap our root partition so the operating system would get informed to use this newly created partition from now onwards. For that, we need to update the PARTUUID (Universally Unique Partition Identifier) in the command line and file system table (fstab). To find the PARTUUID of your partition run the below-written command:
Note: Remember that PARTUUID is different for each device, that is why it is named as a unique identifier.

Step 13: Before changing the PARTUUID in cmdline.txt file which contain all these kernel parameters, let’s create a backup for our original file just to be on the safer side:

Step 14: After the backup, now we can edit the cmdline.txt file by using the nano editor, and for that run the below-given command:

In the cmdline.txt file change the PARTUUID number with a new PARTUUID which you have found in step 12.
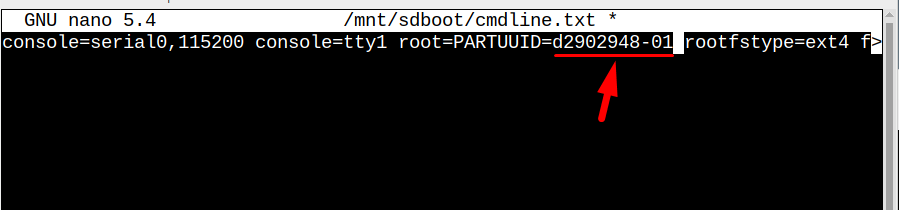
Once you are done save the new modified file by Ctrl+X and Y keys.
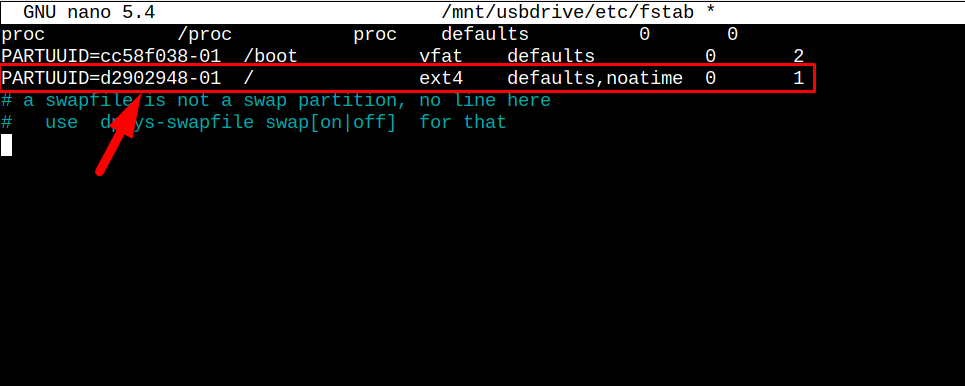
Step 15: Like cmdline.txt file, let’s quickly create a copy of fstab too:

Then open fstab by using nano editor:

And just modify the PARTUUID same as you did in the previous step and save.
Step 16: Once the remapping process is completed then all the created partition mount points can be deleted one by one, as they are no longer needed. Run the below-commands to delete them one by one:
i: Unmounting USB drive mount point

ii: Unmounting sdboot mount point

iii: Unmounting sdrootfs mount point

Step 17: After unmounting all the partitions mount points, remove/delete those mount points by using the below-mentioned command:
i: Removing USB drive mount point

ii: Removing boot mount point

iii: Removing rootfs mount point

Step 18: Last step is to boot the system so that our Raspberry Pi system boot with all rootfs being moved to the drive.

In case you want to go back to the initial changes, recover the cmdline backup file from Step 13.
Conclusion
To move Raspberry Pi Rootfs to another drive/partition simply connect an external drive to your Raspberry Pi system, and create a large partition in this external drive after formatting. Then mount the partitions of the drive as well as the SD card partitions. Finally, copy all the rootfs data to the drive partition and do the remapping of the data by using PARTUUID. Then apply all the changes by rebooting the system.