What is the millis() function in Arduino?
This function gives the total time starting from the running of the Arduino code and will continue to run till the program is running. Similarly, this function gives the elapsed time in milliseconds and has a capacity to run for 50 days after that this function will reset its value to zero and start from again.
The significance of this function is that it can be used in the Arduino program if an instruction is to run only at a specific time only. For further illustration we have explained the working of the millis function by the example.
suppose we have to execute an instruction after every 5 seconds so first we have defined the time in milliseconds after which the specific instruction will execute.
So, we define the constant variable named executiontime having a value of 5000 milliseconds then to check the current time of the program we will use the millis function and will store its value in the presenttime variable.
presenttime = millis();
Next, we have to make the condition for time at which the instruction will be executed. So, we create an if condition which will be true when the difference of present and past time reaches 5000 milliseconds and the instruction inside the if condition will execute. For such conditions we also have to declare another variable which will save the previous time or the past time.
We can design this condition in such a way that when the difference of the current and the previous time is greater than equal to execution time then execute the following instruction. After the respective instruction is executed save that current time in the pastime variable.
if (presenttime-pasttime >= executiontime){
//Run the instruction
pasttime= currenttime;
}
Here one thing is to be remembered that we have used the long data type because of the millis() function as it has considerably large values.
Arduino code for the working of millis() function
The complete code for understanding the working of millis function is given as:
unsigned long pasttime = 0;//variable for strong the past time
unsigned long presenttime = 0;// variable for storing the present time
void setup() {
Serial.begin(9600);// initializing the serial communication
}
void loop() {
presenttime = millis(); //Updating the value of presenttime
/* This is the event */
if (presenttime - pasttime >= executiontime) { /*condition of time on which the instruction will be executed */
Serial.print("The present time is:");
Serial.println(presenttime);// displaying the present time
Serial.print("");// including space
Serial.print("Instruction to be executed:");
Serial.println(" Welcome to linuxhint"); // instruction to be executed
pasttime = presenttime; // updating the past time value
}
}
The Arduino code will be working in such a way that for example at first iteration the value of the pastime is zero and let’s say current time is 400 milliseconds. According to the if condition the answer will be 400 which is less than 5000 milliseconds so the if condition will be false.
Similarly, in the third or fourth iteration the “presenttime” is 5000 milliseconds then the difference will be 5000 milliseconds as the value of the “pasttime” is still zero. So, the instruction will be executed and the value for the pastime will be updated.
In this way we can use the millis function to run a specific instruction at a specific time.
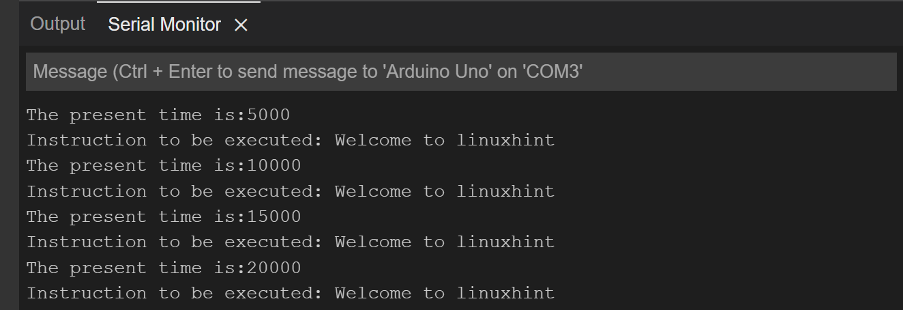
Output of the Arduino code for millis() function
In the serial monitor it can be clearly seen that when there is a difference of “presenttime” and “pasttime” is 5000 then the condition will be true. The image posted below shows the values of the “presenttime” at which the if condition is true and the instruction that is to be executed.
If we simply print the value of the millis() function that is stored in the variable name “presenttime” will look like this as in the image given below:

What is a delay() function in Arduino
The delay() function is mainly used for pausing the Arduino code for some time. In other words, this function creates a delay of sometime specified by the user in the functioning of the Arduino code.
This function can be used on the program where the value of any variable is to be updated frequently. So, by giving the pause to the Arduino program it will give the time for the sensor to update its value.
Similarly, we can use the delay function to give a pause between the execution of multiple instructions. The delay function takes the time in milliseconds as its input and the syntax for the delay function is given below:
Arduino code for the using the delay function
To demonstrate the functionality of the delay() function we have compiled an Arduino code that is given as:
Serial.begin(9600);// initializing the serial communication
}
void loop() {
Serial.print(" Hello and Welcome ");// instruction before delay
delay(5000); // creating a pause of 5000 milliseconds
Serial.println("\n To linuxhint.com ");// instruction after delay
}
In the Arduino code we have given two instructions that will print the data on the serial monitor. Both the instructions are executed with a delay of 5000 milliseconds. In other words, after the execution of the first instruction we have used a delay function that will pause the Arduino code for 5000 milliseconds. After 5000 milliseconds the program will be started from where it was stopped, and the second instruction will be executed.
Output of Arduino code for using delay() function
The image posted below is the first instruction given before the delay() function is used.

After this instruction the program is paused for 5000 milliseconds and then the execution of the second instruction takes place. The figure below shows the program has run the second instruction.

Comparing the millis() function and delay() function
The differences between the millis() and the delay function are given in the table below:
| millis() function | delay() function |
|---|---|
| It can be used to run a specific instruction at specific time | This function just creates a pause in the flow of Arduino code |
| This function gives the time in milliseconds from when the Arduino code is started and can go up to time for 50 days | This function takes time in milliseconds as user input and runs for that specific time |
| This function doesn’t pause or stops the code | This function stops the whole code for some time |
How Can I use millis() instead of delay()
We use millis function instead of delay by simply using the if condition for the specific time at which we want to run each instruction. Doing this will automatically give a delay between the execution of two or more instructions and the purpose of delay can be served. The main advantage for using the millis instead of delay is that the whole Arduino program does not stop; only the execution of some certain instruction is put to halt. However the delay function stops the whole program and using delay function can somewhat miss the external inputs to the program because the whole program is stopped.
To further illustrate we have provided arduino code of how we can use the millis function instead of delay function:
const unsigned long executiontime1 =2000; /*time on which the second instruction will execute*/
unsigned long pasttime = 0;//variable for strong the first instruction's past time
unsigned long presenttime = 0;// variable for storing present time
unsigned long pasttime1 = 0;//variable for strong the second instruction's past time
void setup() {
Serial.begin(9600);// initializing the serial communication
}
void loop() {
presenttime = millis(); //Updating the value of presenttime
/* This is the event */
if (presenttime - pasttime >= executiontime) { /*condition of time on which the instruction will be executed */
Serial.print("The present time is:");
Serial.println(presenttime);// displaying the present time
Serial.print("");// including space
Serial.print("Instruction to be executed:");
Serial.println("Keep the lights off"); // instruction to be executed
pasttime = presenttime; // updating the past time value
}
if (presenttime - pasttime1 >= executiontime1) { /* condition of time on which the instruction will be executed */
Serial.print("The present time ");
Serial.println(presenttime);// displaying the present time
Serial.print("");// including the space
Serial.print("Instruction to be executed:");
Serial.println(" Turn on the lights");// instrcution to be executed
pasttime1=presenttime;// updating the present time of scodn instruction
}
}
Here in the code we have used the millis function for executing the two instructions with a delay of almost 4 seconds. We have posted an image of the output of the Arduino code compiled to explain how millis function can be used by replacing it with delay function.
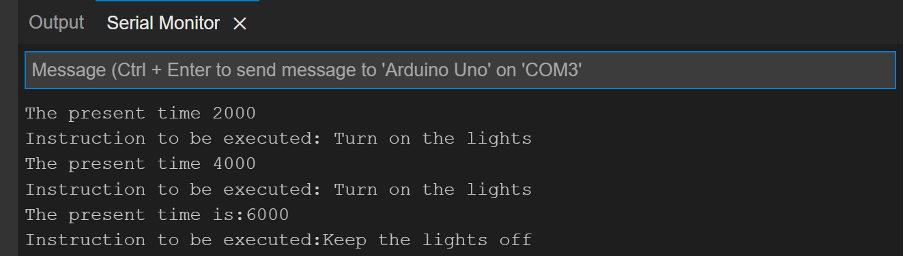
In the output we can see that when the time is 2 seconds the second instruction is executed till the time reaches 6 seconds. When the time reaches 6 seconds the first instruction is executed.
Conclusion
To create a logic of any task that has to be performed using Arduino there are multiple functions that can be used. These functions make the functionality of the Arduino code efficient and easy to implement the created logic.There are two functions that we have discussed in detail, one is the millis function and the other is the delay function. The millis function executes a specific instruction at a specific time whereas the delay function halts the Arduino code for some time.