Making a Simple Arduino Uno Calculator
To make calculator using Arduino board there are some items required that are:
- Arduino Uno
- 4×4 membrane Keypad
- Connecting wires
- Breadboard
- 16×2 LCD
- Potentiometer
- Breadboard
The schematic to follow to implement calculator using Arduino Uno is given below:
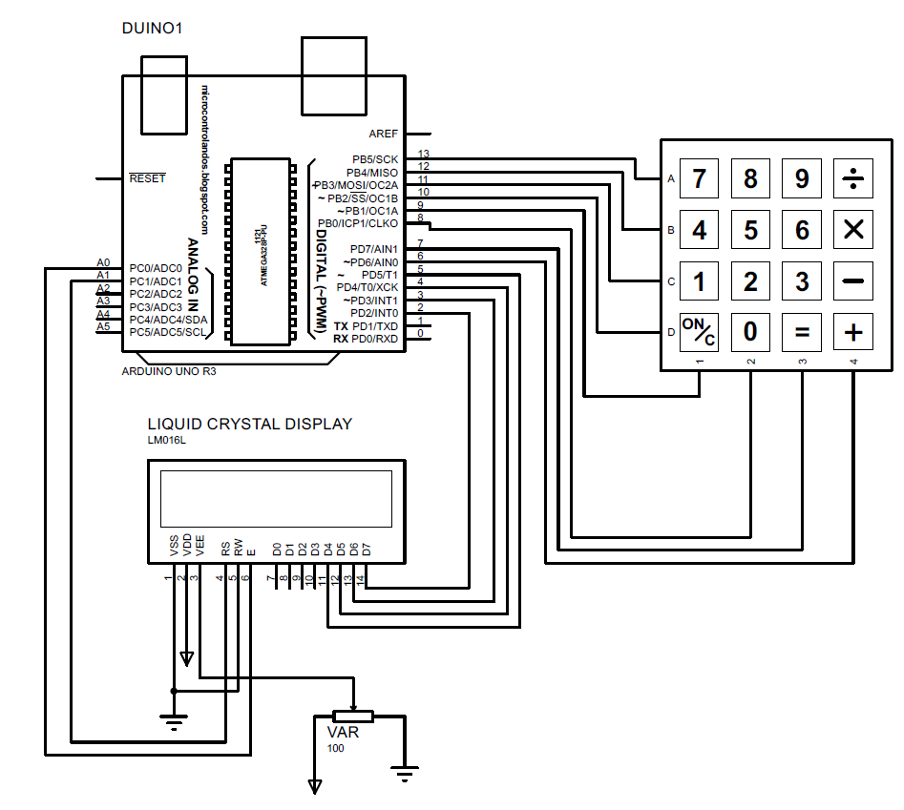
Hardware assembly for Simple Arduino Uno Calculator
We have implemented the circuit design on the hardware in such a way that first we have placed each component on the bread board except the Arduino Uno. Next we have interfaced each component with Arduino using the connecting wires. There is an image posted below for better understanding the hardware implementation of this project.

Simple Arduino Uno Calculator Sketch
The Arduino code compiled for design a calculator using Arduino IDE is given as
#include <LiquidCrystal.h>// library for LCD
LiquidCrystal lcd(A1, A0, 5, 4, 3, 2);// Arduino pins for LCD
const byte ROWS = 4; //initializing the rows of keypad
const byte COLS = 4;//initializing the columns of keypad
char keys [ROWS] [COLS] = { // giving values to each key of the keypad
{'7', '8', '9', '/'},
{'4', '5', '6', '*'},
{'1', '2', '3', '-'},
{'C', '0', '=', '+'}
};
byte rowPins[ROWS] = {13,12,11,10}; //Arduino pins for rows of keypad
byte colPins[COLS] = {9,8,7,6}; // Arduino pins for columns of keypad
Keypad myKeypad = Keypad( makeKeymap(keys), rowPins, colPins, ROWS, COLS ); /* function for mapping the values on the keys*/
// assigning boolean data type to the variables and initializing them with zero
boolean present = false; //
boolean next = false;
boolean final = false;
String num1, num2; // variables to display the keypad integer input
float ans;// for division operator the float data type is used for answer of the operation
char op;// assigning character data types to the arithmetic operators
void setup()
{
lcd.begin(16,2); // initializing the LCD
lcd.setCursor(3,0); // setting the place for displaying the first data line
lcd.print("LinuxHint");
lcd.setCursor(3,1);//setting the place for displaying the second data line
lcd.print("Calculator");
delay(2000);
lcd.clear();
}
void loop(){
// using the getkey function to get the value of the key pressed
char key = myKeypad.getKey();
if (key != NO_KEY && (key=='1'||key=='2'||key=='3'||key=='4'||key=='5'||key=='6'||key=='7'||key=='8'||key=='9'||key=='0'))
{
if (present != true)
{
num1 = num1 + key; // storing the value of key pressed in num1
float numLength = num1.length();
lcd.setCursor(0, 0); //to adjust one whitespace for operator
lcd.print(num1); // printing the first number entered
}
else
{
num2 = num2 + key;//storing the value of second key pressed in num2
float numLength = num2.length();
lcd.setCursor(2, 0);
lcd.print(num2); //printing the second number entered
final = true;
}
}
// condition for the if the key having arithmetic operator as its value is pressed
else if (present == false && key != NO_KEY && (key == '/' || key == '*' || key == '-' || key == '+'))
{
if (present == false)
{
present = true;
op = key; // saving the Arithmetic operator in the op variable
lcd.setCursor(1,0);
lcd.print(op);
}
}
// conditions for working of the Arithmetic operators
else if (final == true && key != NO_KEY && key == '='){
if (op == '+'){
ans = num1.toFloat() + num2.toFloat();
}
The Arduino code is compiled in such a way that first the libraries for keypad and LCD are defined. Then the size and key bindings of the keypad are declared, and the Arduino pins allotted to the LCD are also declared.
Similarly, the key bindings assigned to each key are mapped on the keypad using the mykeypad function. After that the variables having Boolean data type are declared for making the decisions in the code.
In the code there is one main if condition for recognizing the key binding having the integer value and there is one main else if condition for recognizing the arithmetic operators.
In a nutshell if a key with integer value is pressed it is stored in the variable num1 and num2. Similarly, if the key binding has an arithmetic operator as its value, it will be stored in the character variable op and based on the operator selected a specific loop for that operator is executed and the result is displayed in the LCD.
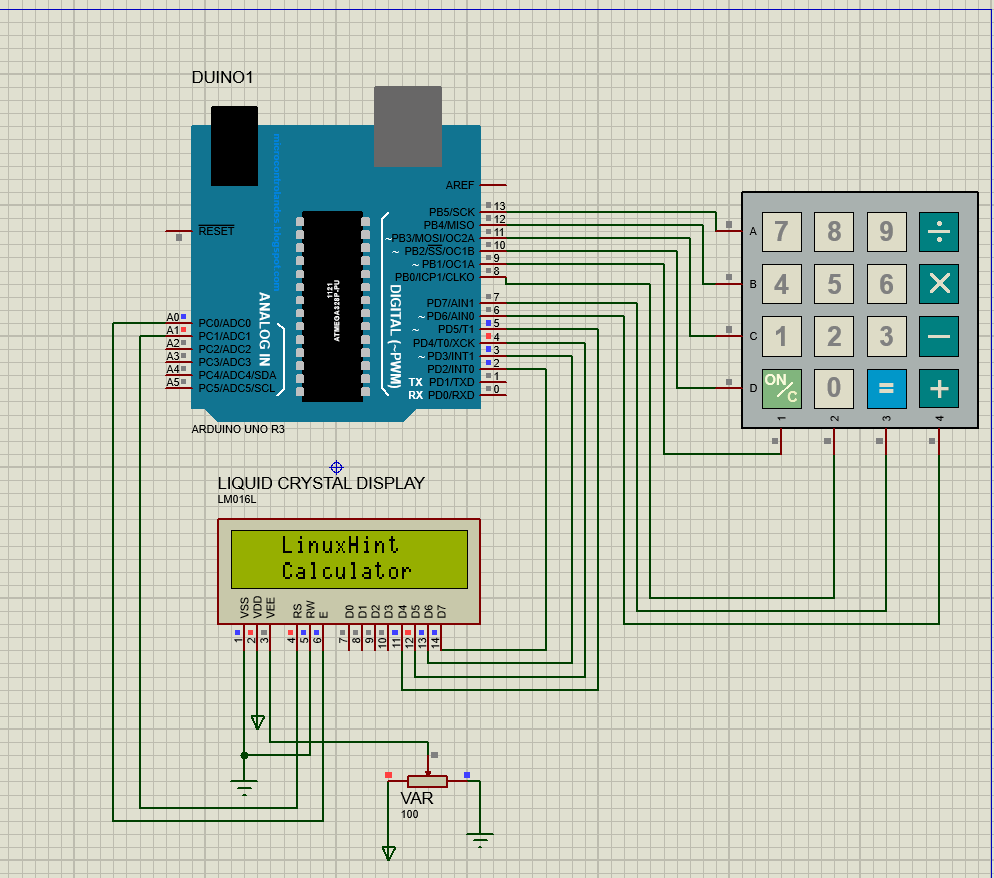
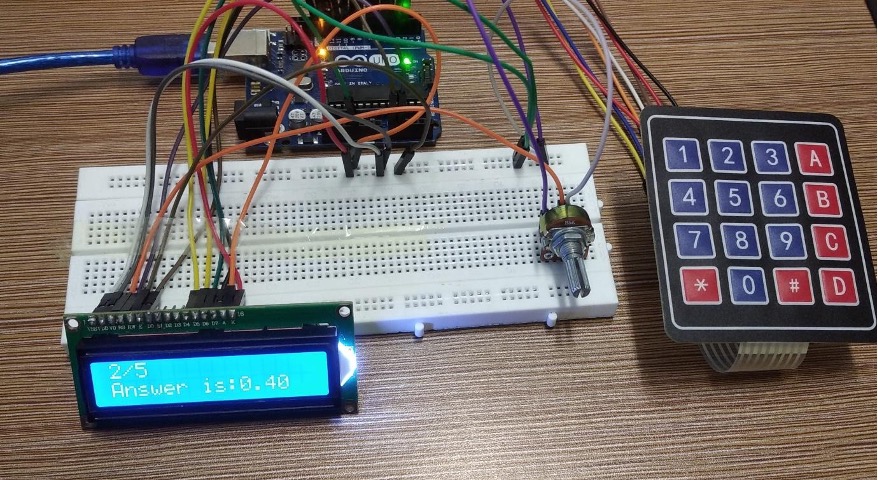
Simulation and hardware demonstration of Simple Arduino Uno Calculator
To give a clearer concept of creating a calculator using Arduino we have given the output of hardware followed by the simulation we carried out in proteus software. The image posted below shows the simulation of the making calculator using Arduino Uno.
The next image given is the demonstration of the working of the Arduino code compiled for the creating the calculator using Arduino Uno:
Conclusion
For making projects on the beginner as well as on the advanced level the Arduino family provides a variety of boards depending on the nature of the project. The platform provided by the Arduino can be effectively used for university and high school students to learn about circuits. A small project of making a calculator is made using the Arduino Uno board in this write-up.