How to create digital counter using 7-segment with Arduino Uno
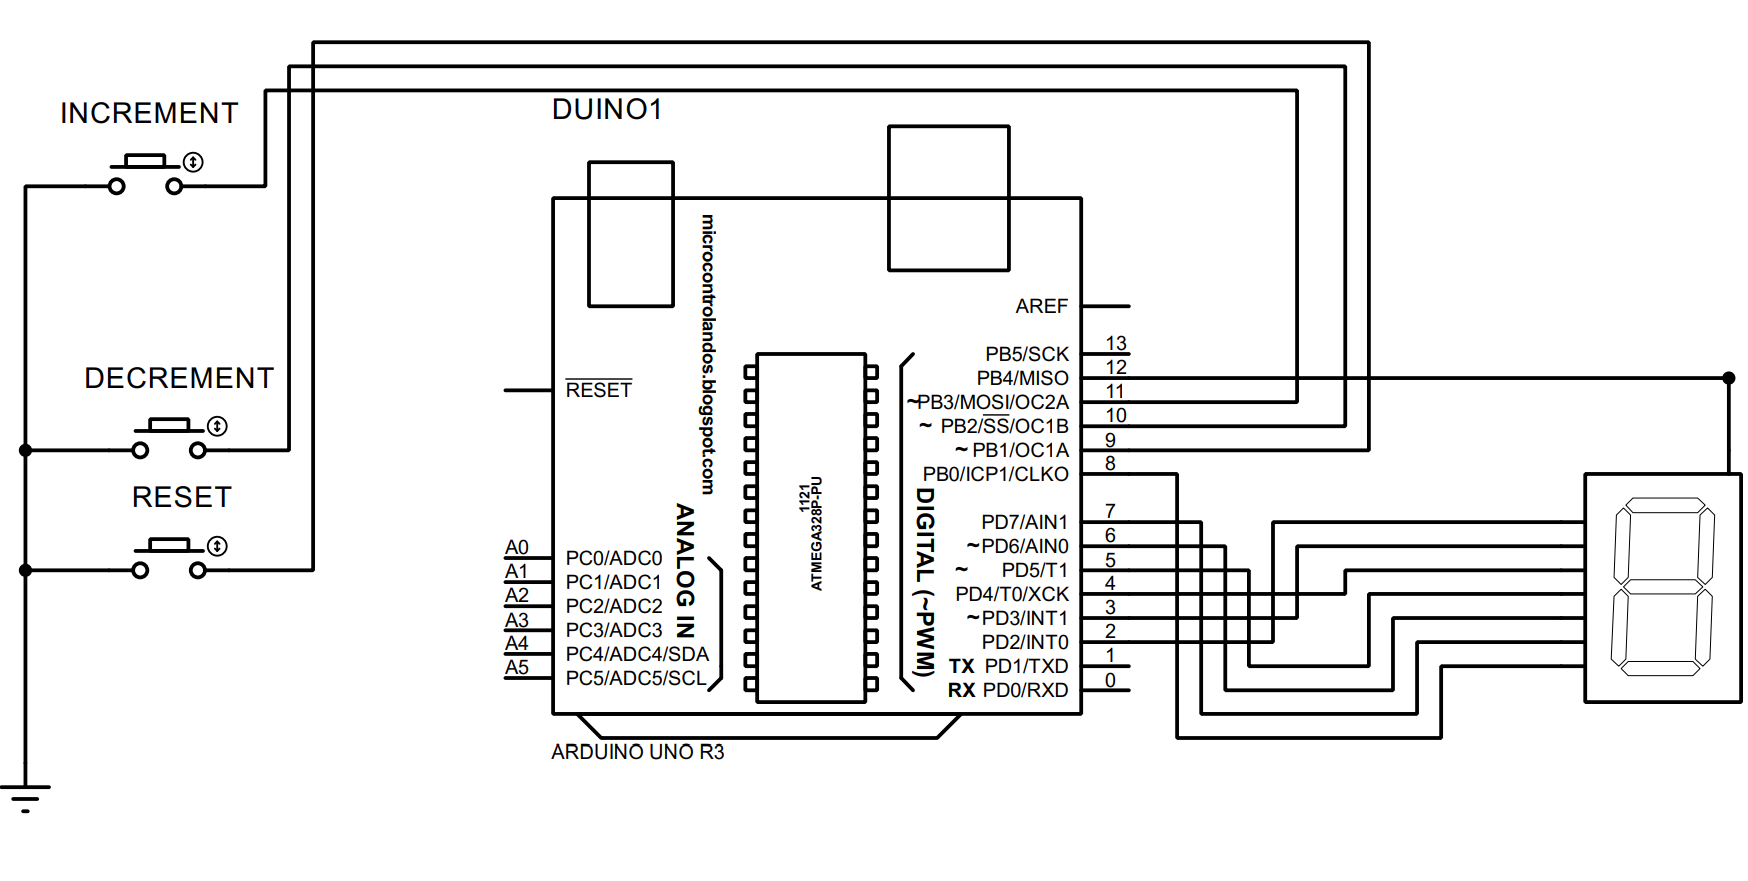
To design a digital counter first we have to create a circuit and before that we need the components that are required for creating the circuit. we have given the schematic of the circuit designed for digital counter following by the list of necessary components used to create the digital counter:
- Arduino Uno
- Connecting cables
- Breadboard
- 7-segment display
- 3 push buttons
Hardware assembly for creating the digital dice using the 7-segment with Arduino
The image below shows the hardware assembly for the circuit designed to create a digital counter. From the image you can clearly understand how we have connected the components.
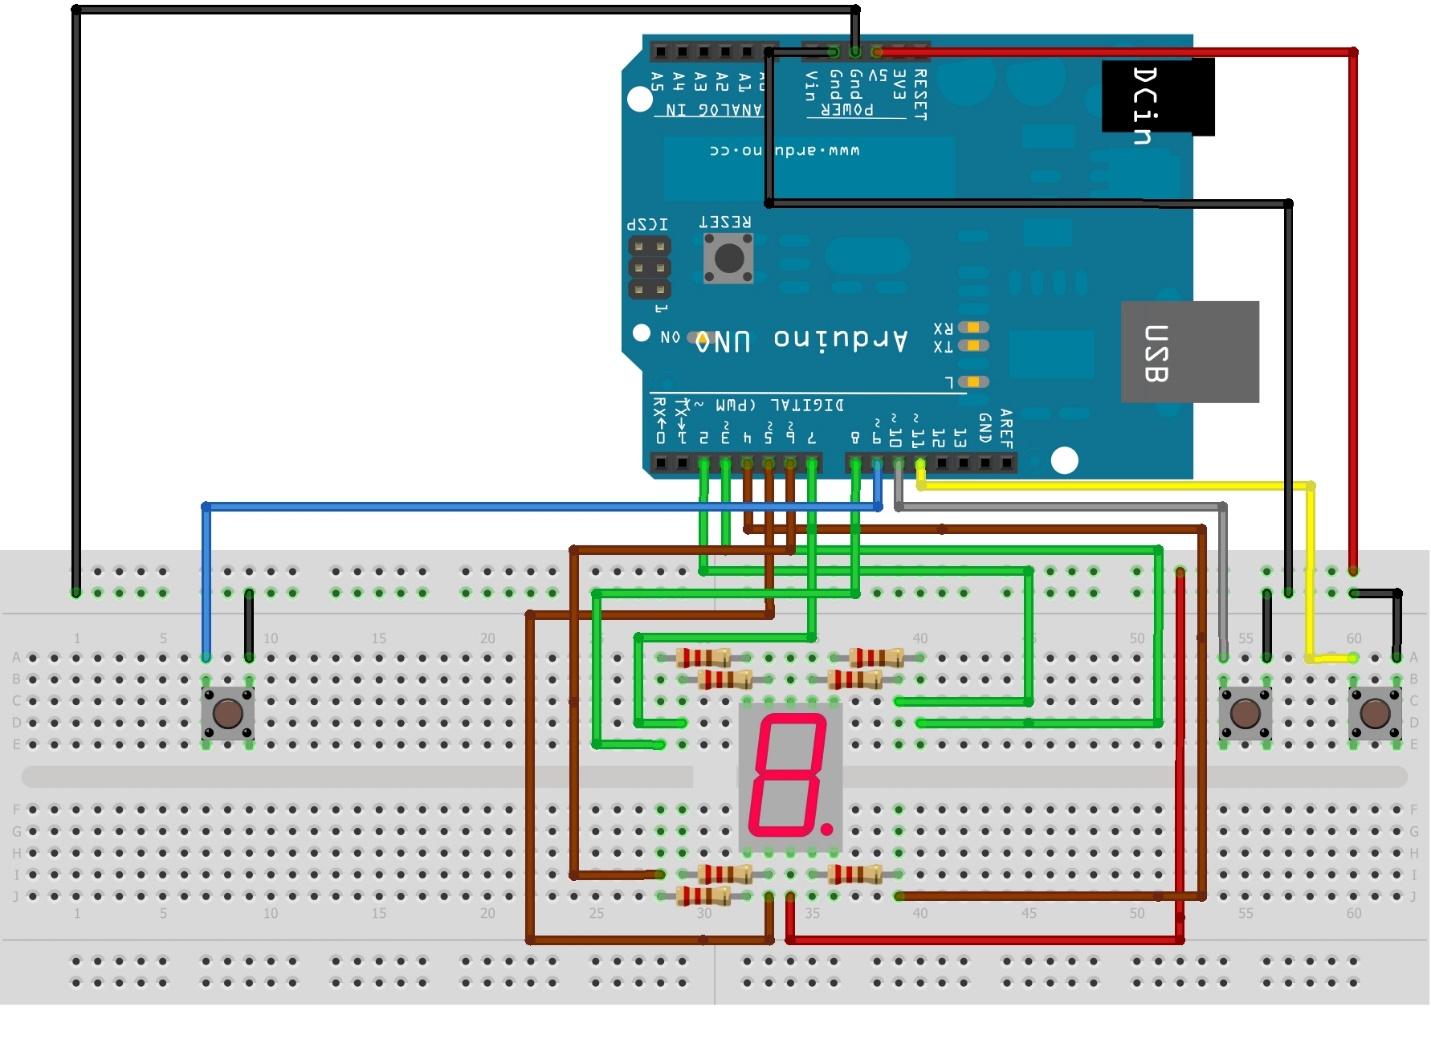
To make a digital counter we have used three push buttons, one for increment, one for decrement and the third one for resetting the 7-segment. To connect the push buttons with Arduino Uno we have used pins 11, 10 and 9 and in the image these connections can be identified by yellow, gray and blue color wires.
To connect the 7-segment display with Arduino we have used 220-ohm resistor for each pin of the display and the pins of the display are connected to Arduino starting from a to g following the alphabetic order using Arduino pins from 2 to 8. The connections of the upper pins are represented by the green color wire and the connections for the lower pins are represented by the brown color wire.
Arduino code for creating digital counter using 7 segment with Arduino Uno
To program the Arduino code for creating the digital counter using 7-segment is given below
SevSegsevseg;// initializing the variable for seven-segment
int state1;/* variable for storing the state of the increment button*/
int state2;/* variable for storing the state of the decrement button*/
int state3;/* variable for storing the state of the RESET button*/
int count=0;/* variable for storing the counter value*/
#define button1 11/* Assigning the Arduino pin for increment button */
#define button2 10/* Assigning the Arduino pin for decrement button */
#define button3 9/* Assigning the Arduino pin for RESET button */
void setup()
{
/* assigning pin modes to the push buttons*/
pinMode(button1,INPUT_PULLUP);
pinMode(button2,INPUT_PULLUP);
pinMode(button3,INPUT_PULLUP);
/* defining the configuration of the 7-segment*/
byte sevenSegments = 1;/*defining the number of seven- segments here we are using only one seven-segment */
byte CommonPins[] = {12};/* defining the common pins for the seven-segment*/
byte LEDsegmentPins[] = {2, 3, 4, 5, 6, 7, 8 };/* assigning the Arduino pins for each segment from a to g */
bool resistorsOnSegments = true; /*assigning Boolean type to the registers of the seven=segment*/
sevseg.begin(COMMON_ANODE, sevenSegments, CommonPins, LEDsegmentPins, resistorsOnSegments);/* initializing the configuration of the seven-segment */
sevseg.setBrightness(80);// giving the brightness to the seven-segment
}
void loop()
{
/* reading the states of the push buttons*/
state1=digitalRead(button1);
state2=digitalRead(button2);
state3=digitalRead(button3);
if (state1== LOW){ /* if the increment button is pressed */
count++; /*increment of one in the value */
sevseg.setNumber(count);/*display the count value*/
sevseg.refreshDisplay();/* refreshing the 7-segment */
delay(200);
}
else if(state1==HIGH){ /* if the increment button is not pressed */
sevseg.setNumber(count);/*display the count value*/
sevseg.refreshDisplay();/* refreshing the 7-segment */
}
delay(200);
if (state2==LOW){/* if the decrement button is not pressed */
count--;/*decrement of one in the value */
sevseg.setNumber(count);/*display the count value*/
sevseg.refreshDisplay(); /* refreshing the 7-segment */
delay(200);
}
else if(state2==HIGH){ /* if the decrement button is not pressed */
sevseg.setNumber(count);/*display the count value*/
sevseg.refreshDisplay();/* refreshing the 7-segment */
}
if (state3==LOW){/* if the RESET button is not pressed */
count=0;/* update the count to zero */
sevseg.setNumber(count);/*display the count value*/
sevseg.refreshDisplay(); /* refreshing the 7-segment */
delay(200);
}
}
For creating a digital counter using a 7-segment we have to program the microcontroller first. For that we have first defined the library for the display and some necessary variables for push buttons and storing the counter values. In the setup section we have defined the configuration of the 7-segment display and we have used three push buttons in the digital counter. To configure the push buttons, we have used if else conditions that are used for incrementing, decrementing and resetting the counter values.
In order to summarize the working of the Arduino program we can say that the counter works on the basis of three push buttons. Using the push buttons, we can change the values of the counter.
Hardware implementation of digital counter using 7-segment with Arduino Uno
The image below shows the hardware created according to the hardware assembly described above:

To display the working of the Arduino code used for the microcontroller we have added an animation below:
Conclusion
The 7-segment display is mostly used in the applications where we have to display a limited amount of information either in numeric or using the alphabets. So, in this guide we have also used a 7-segment display to create a digital counter using three push buttons. For the assistance of the reader, we have provided the respective Arduino code and hardware simulation as well.