This article covers:
- 1: Introduction to IR Sensor
- 2: Working of IR Sensor
- 3: IR Sensor Pinout
- 4: Interfacing IR Sensor As Pushbutton with Arduino Uno
- 4.1: Schematic
- 4.2: Code
- 4.3: Output
1: Introduction to IR Sensor
An IR or Infrared sensor is a device that measures the infrared radiations around its surrounding by emitting the IR rays and then receiving the reflected ray back. It outputs a digital signal once reflected rays are received back.
The Arduino Uno board allows users to program and control the IR sensor using a simple set of instructions. With the ability to sense infrared radiation, the IR sensor can be used to detect the presence of objects, measure temperature, and even control other devices.
2: Working of IR Sensor
An IR sensor works by emitting a beam of infrared radiation and detecting when the beam is reflected back to the sensor. When the beam is interrupted, the sensor will output a digital signal. This signal can be used to trigger an action or event, such as turning on a light or activating a motor.

IR sensor feature two main components:
- IR Transmitter: An infrared LED as a transmitter.
- IR Receiver: A photodiode is used as a receiver which after receiving reflected rays generates output.
Once the voltage is applied to Infrared Light Emitting Diode it emits an infrared light ray. Light travels through the air and after hitting the object it reflects to the receiving sensor that is a photodiode.
If the object is closer to the IR sensor a strong light will be reflected. As the object moves away the reflected signal received is weaker.
Note: When the IR sensor is active it outputs a LOW signal at its output pin that can be read by any microcontroller board.
Another interesting thing about this board is that it has two on board LEDs, one for the power and second for the output signal when the sensor is triggered by any object.
3: IR Sensor Pinout
An IR sensor typically has three pins:
- VCC: The VCC pin is the power supply pin, which is used to provide power to the sensor.
- GND: The GND pin is the ground pin, which is used to ground the sensor.
- OUT: The OUT pin is used to send the sensor’s output signal to a microcontroller or other device.
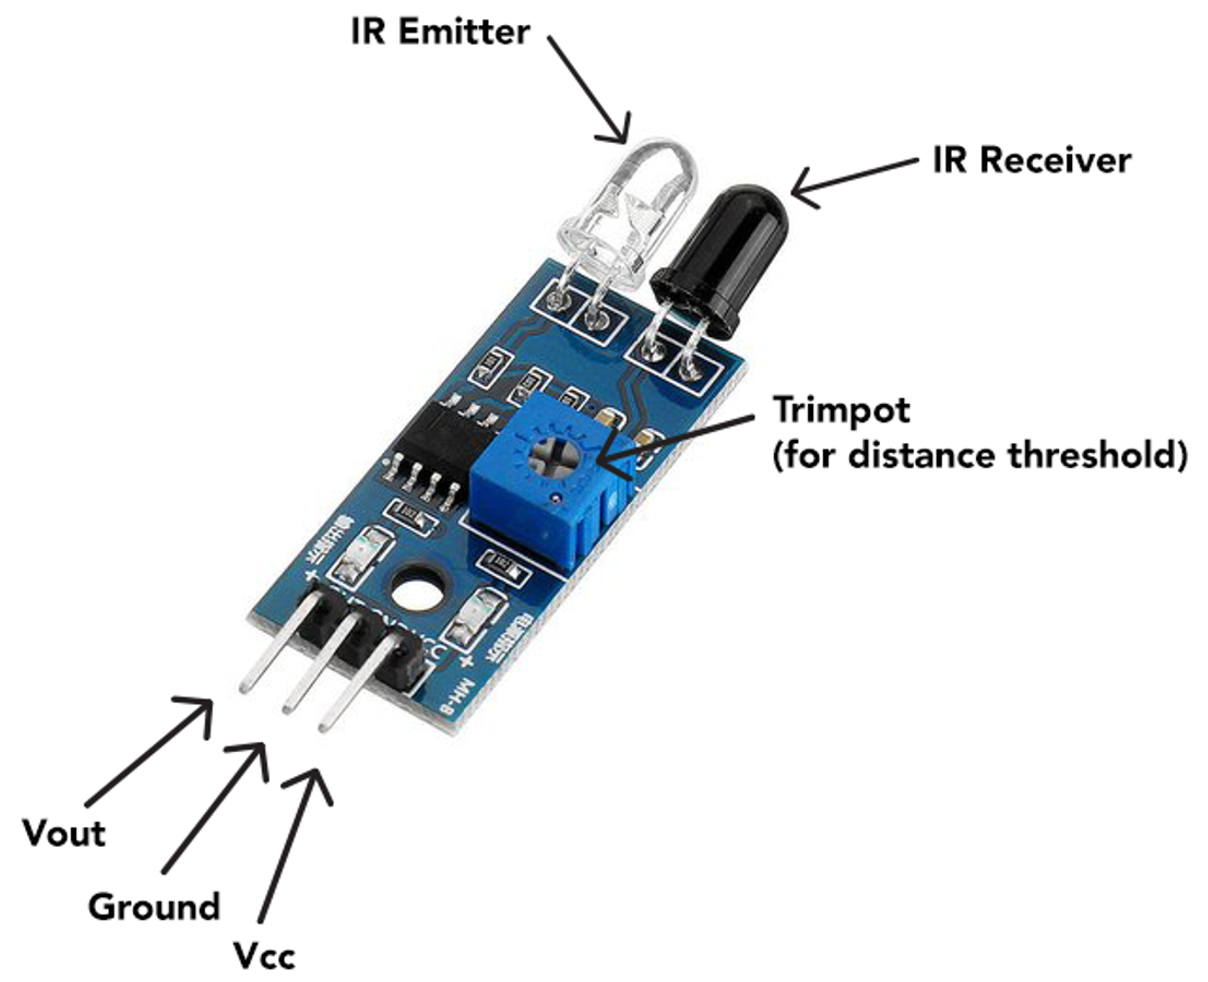
In addition, IR sensor also has:
- IR Emitter: Sends the IR ray.
- IR Receiver: Receives the reflected ray.
- Potentiometer: Set the distance threshold by setting the sensor sensitivity.
4: Interfacing IR Sensor As Pushbutton with Arduino Uno
An infrared (IR) sensor can be used as a push button with an Arduino Uno microcontroller by connecting the sensor to the board and programming it to detect changes in the amount of IR light it receives.
To set this up, first connect the VCC and GND pins of the IR sensor to the corresponding power pins on the Arduino board. Next, connect the signal pin of the IR to Arduino digital pins.
In your Arduino code, you can then use the digitalRead() function to detect changes in the state of the input pin and trigger a response, such as activating an LED or sending a signal to another device.
4.1: Schematic
Given table explains the pin diagram of IR sensor with an Arduino Uno:
| IR Sensor Pin | Arduino Uno Pin |
| VCC | VIN/5V/3.3V |
| GND | GND |
| OUT | D8 |
The LED at D3 is connected which normally glows and if the IR sensor detects any movement LED will turn OFF.

4.2: Code
Connect Arduino Uno with PC and upload below code.
const int LED = 3; /*D3 for LED*/
int Button_State = 0;
void setup() {
Serial.begin(9600);
pinMode(IR_Push_Button, INPUT); /*GPIO D8 set as Input*/
pinMode(LED, OUTPUT); /*GPIO D3 set as Output*/
}
void loop() {
Button_State = digitalRead(IR_Push_Button); /*Check IR Sensor State*/
Serial.println(Button_State);
if (Button_State == HIGH) { /*if condition to check IR sensor Input*/
digitalWrite(LED, LOW); /*HIGH stat - LED ON*/
} else {
digitalWrite(LED, HIGH); /*Else LED OFF*/
}
}
In above given code first we initialized the digital pins for IR sensor and LED. D8 and D3 pins of IR sensor are defined for IR sensor and LED respectively.
Next using pinMode() function IR sensor pin is set as input and LED pin is set as output. If condition is used for IR sensor. If the input received from IR is HIGH LED will turn OFF similarly if the IR button state is LOW means an object comes In Front of IR sensor the LED will turn ON.
Note: When the IR sensor is active it outputs a LOW signal (means if the object motion is detected) at its output pin that can be read by any microcontroller board.

4.3: Output
After uploading code to the Arduino Uno board, we can test the circuit by using any object which comes in front of the infrared sensor.
Below given image shows LED is OFF. This explains that a pushbutton is not pressed and a HIGH signal is output by IR sensor.
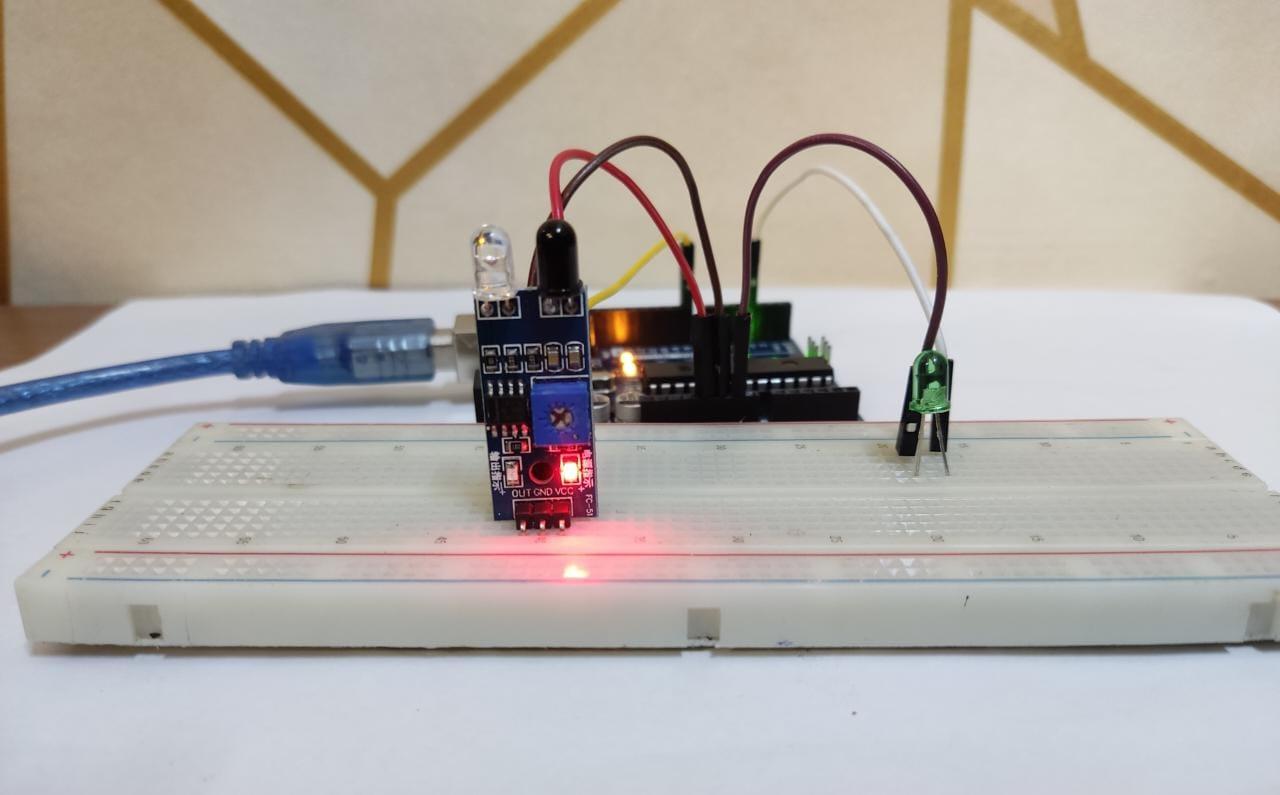
Now as the object is in front of the IR sensor, radiation gets reflected and received by the photodiode on the IR sensor, so the LED is turned ON. This explains that a pushbutton is pressed, and an active LOW signal is sent to Arduino.

Conclusion
IR or infrared sensors can detect objects’ presence and availability. Using Arduino Uno digital pins, we can receive signals from IR sensor output and can trigger response according to need. Using an IR sensor, we can create a wireless infrared radiation-based pushbutton. This article covers complete steps and code required to program an IR sensor as a pushbutton with Arduino Uno.