What is a PIR sensor or motion detection sensor
To detect the presence of any moving body we use the PIR sensor and this sensor can be named as the motion detection sensor as well. This sensor does not emit any infrared radiation, but it detects the infrared radiation in the form of heat and generates the electrical signal. As we know that every moving body emits infrared radiation in the form of heat and whenever such heat signature comes in the range of this sensor it outputs HIGH. Below we have provided figure that shows the motion detection sensor:
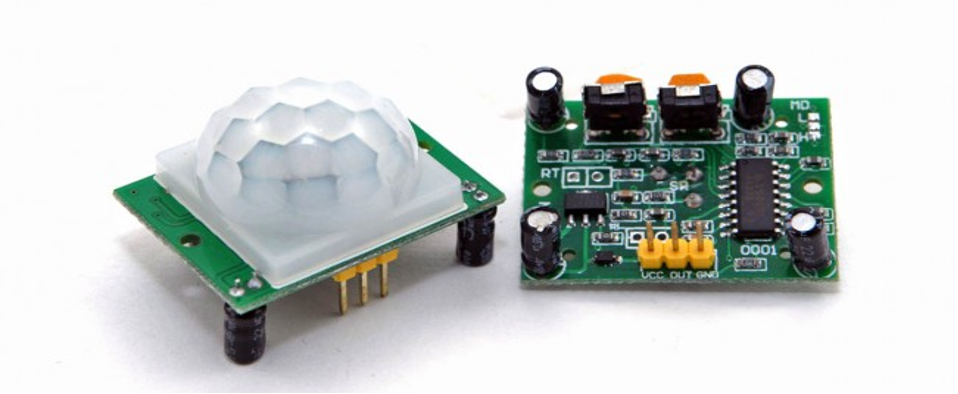
This sensor comes with three pins in total: one for Vcc, one for ground (GND) and the middle one for the output of the sensor. Similarly, this sensor comes with two potentiometers one for adjusting the delay and one for adjusting sensitivity of the sensor.
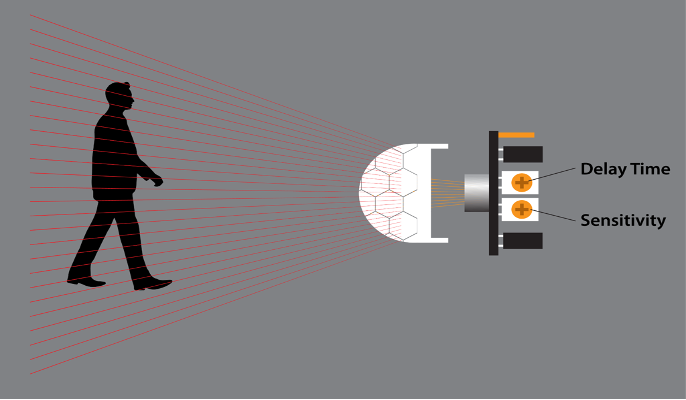
From the above picture we can see that there are two potentiometers with yellow knobs: the one on the right is for sensitivity adjustment of the sensor and the left one is used to adjust the delay time of the sensor.
The maximum range of the sensor for detecting the motion is six meters and by rotating the potentiometer clockwise we can increase the sensitivity of the sensor. Now coming to the delay time it is the time after which the output of the sensor will change to zero when any moving body has crossed the detection range of the sensor:
| Pin | Name | Description |
|---|---|---|
| 1 | Vcc | Pin used to connect the motion sensor with 5-volt supply |
| 2 | OUT | Pin used to check the output of the motion sensor |
| 3 | GND | Pin used for grounding the motion sensor |
Interfacing the motion detection sensor using the Arduino Uno
To interface the motion detection sensor with Arduino Uno we have created a circuit whose schematic is given below:

Hardware assembly of interfacing motion detection sensor with Arduino Uno
We have provided the list of necessary components that are required for assembling the hardware for interfacing the motion detection sensor
- Arduino Uno
- Connecting wires
- Breadboard
- RGB LED
- 1 motion detection sensor (HC-SR501)
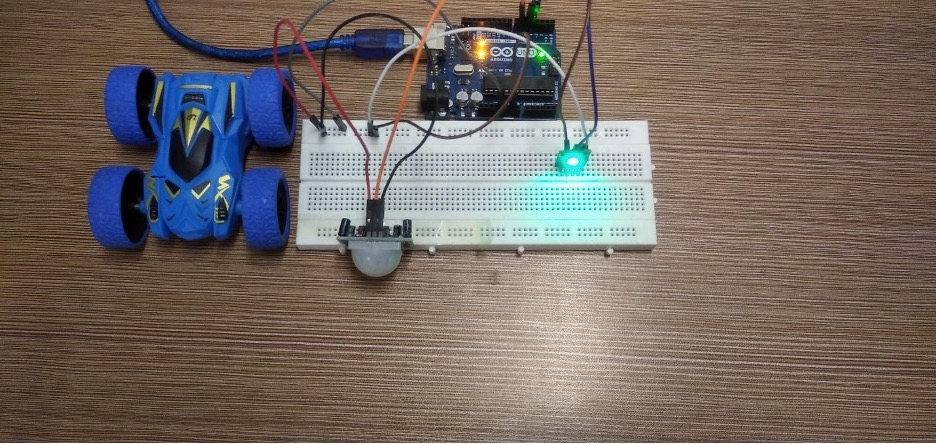
The circuit designed for interfacing the motion detection sensor with Arduino Uno is implemented on the hardware and for that we have provided the hardware assembly in the figure below:
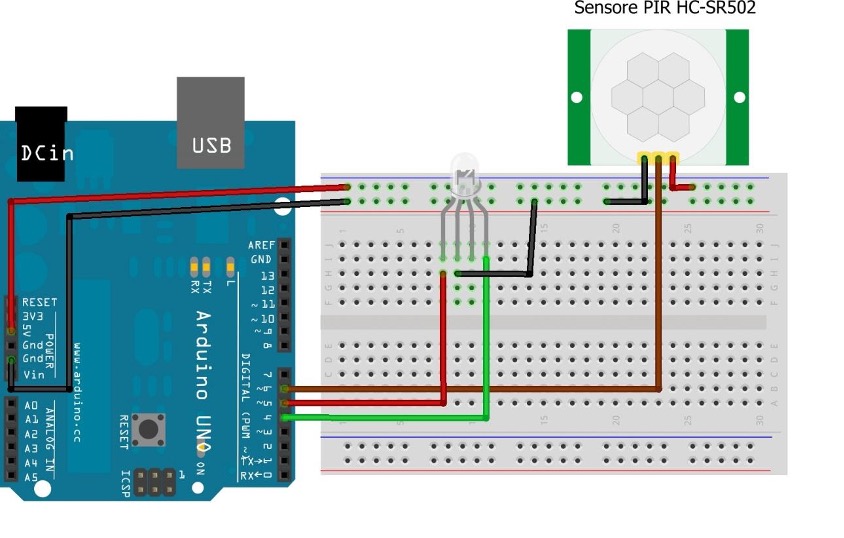
To connect the output of the motion detection sensor we have used the brown wire and connected it to pin 6 of the Arduino. Whereas we have connected the RGB LED for indication of the motion, or we can say that to indicate the HIGH and LOW output of the sensor we have used the RGB LED. So, by using the pin 4 of the Arduino using the green wire we have connected the green LED. Whereas we have used the red wire to connect the red LED on the Arduino on its pin 5. However, we have used the 5 volts and the ground pins of Arduino for supplying the voltage to the circuit.
Arduino code for interfacing the motion detection sensor (PIR) with Arduino Uno
We have provided the code compiled for interfacing the motion detection sensor with Arduino Uno below:
int greenPin = 4;/* assigning the Arduino pin for green LED*/
int sensorPin = 6; /* assigning the Arduino pin for motion detection sensor*/
int val = 0; /*assigning the variables for string the output of the sensor */
void setup() {
/* assigning pin modes for the LEDs and sensor */
pinMode(redPin, OUTPUT);
pinMode(greenPin, OUTPUT);
pinMode(sensorPin, INPUT);
Serial.begin(9600); /* initializing the serial communication */
digitalWrite(greenPin,HIGH); /* giving the LED a HIGH state */
}
void loop(){
val = digitalRead(sensorPin); /* reading the output of the motion sensor*/
if (val == HIGH) /* if the value is HIGH then */
{
digitalWrite(redPin, HIGH); /* turn on the RED led */
digitalWrite(greenPin,LOW);/* turn off the green led */
}
if (val == LOW)/* if the output of the sensor is low then */
{
digitalWrite(redPin, LOW); /* turn the red led off */
digitalWrite(greenPin,HIGH);/* turn on the green led*/
}
}
The code for interfacing the motion detection sensor is quite simple. We just have to read the output of the sensor using the digitalRead() function. We have interfaced an RGB LED that will indicate when the output of the sensor is HIGH or LOW.
The green led shows that the output of the sensor is LOW which means there is no moving body present in its vicinity. As soon as there is a moving object sensed by the sensor its output will be HIGH and the red LED will turn on.
To control the LEDs for indication we have used if conditions that are based on the output of the sensor.
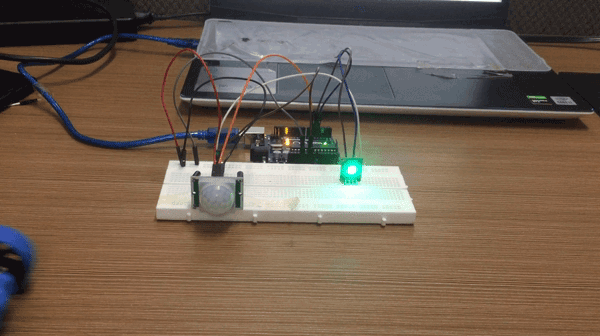
Hardware implementation for interfacing the motion sensor with Arduino Uno
We have given the figure below which shows the implementation of the hardware assembly we described above:
For demonstrating the working of the motion detection sensor we have provided an animation below. When the green led is on it means there is no moving object whereas when the red led is on it means that there is a moving object in the area:
Conclusions
The motion detection sensor also known as PIR sensor is primarily used in the projects where detection of any moving object is required. To use the motion detection sensor, we have to interface it with the microcontroller and for this purpose we used the Arduino platform. To demonstrate how we can interface the motion detection sensor with Arduino Uno we have designed a circuit and implemented it on the hardware in this guide.