Bluetooth module (HC-05)
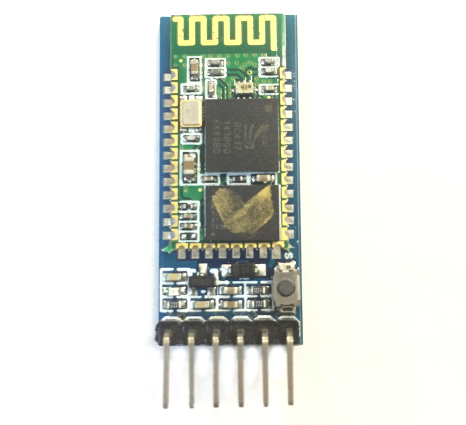
The Bluetooth module is a device which is used for short range wireless communication to the respective connected device. This module uses serial port protocol for the wireless communication and comes with two configurations that are master and slave. In the master mode the module searches for the other devices to connect and can connect to the other devices. However in the slave mode the module cannot connect to the devices by itself. In short the master more the device control other devices and in slave mode the device is being controlled by some other device.
To change the master slave configuration, we can use the AT commands of the Bluetooth module. Moreover, to use the AT mode we have to set the baud rate of 38400 and for serial communication we have to use the baud rate of 9600.
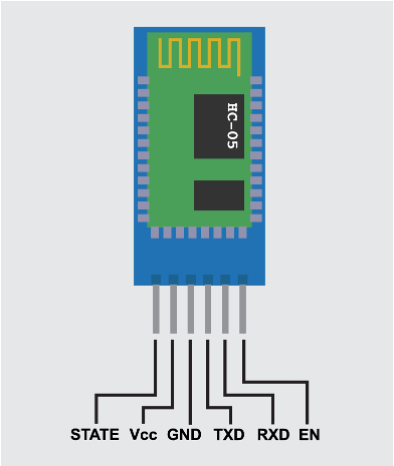
This module can connect the devices in the range of 10 meters of the Bluetooth and it works on the 2.4GHz frequency band. The Bluetooth module operates on the voltage ranging from 3.3 volts to 5 volts and has 6 pins in total and the description of each pin of the Bluetooth module is in the table below:
| Pin | Description |
|---|---|
| 1-(EN) | Pin for using the Bluetooth in command mode by setting the baud rate 38400 and giving this pin HIGH state. By default, the module is in the data mode, so this pin has a LOW state. |
| 2-(Vcc) | Pin for giving supply to the Bluetooth module that is 5 or 3.3 volts |
| 3-(GND) | Pin used to ground the Bluetooth module |
| 4-(TXD) | Pin used for transferring the data through Serial communication on the serial monitor of Arduino IDE |
| 5-(RXD) | Pin used for receiving the data through serial communication |
| 6-(STATE) | To check whether the module is connected or not this pin is mainly used |
Interfacing Bluetooth module with Arduino Uno
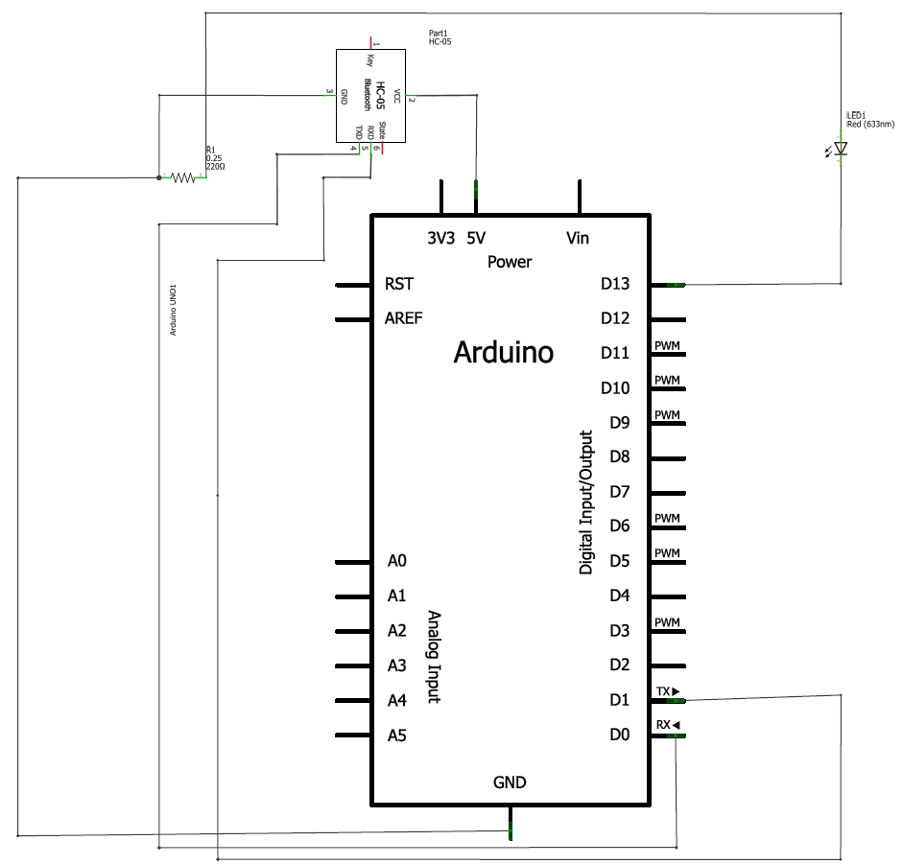
The Arduino code for interfacing the Bluetooth module with Arduino Uno board is given followed by the schematic of the circuit designed for interfacing the Bluetooth module with Arduino Uno . We have used the following list of components for interfacing the Bluetooth module with Arduino Uno.
- Arduino Uno
- Connecting wires
- Bluetooth module(HC-05)
- One LED
- One 220 ohm resistor
Hardware assembly for interfacing Bluetooth with Arduino Uno
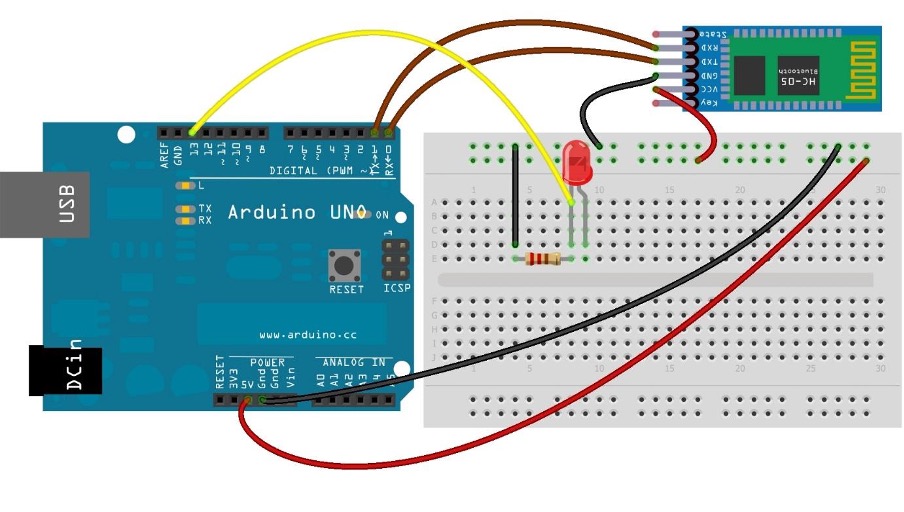
To demonstrate the connections of the Bluetooth module with Arduino we have posted an image of the hardware assembly of the circuit.
In the circuit the yellow wire connects the LED with Arduino Uno and the brown color wires are connecting the data pins of the Bluetooth module.
We have connected the Bluetooth module with the supply using the 5 volts and ground pin of Arduino.
How to connect Arduino Bluetooth module (HC-05) with computer
To connect this module with the computer follow the steps given below:
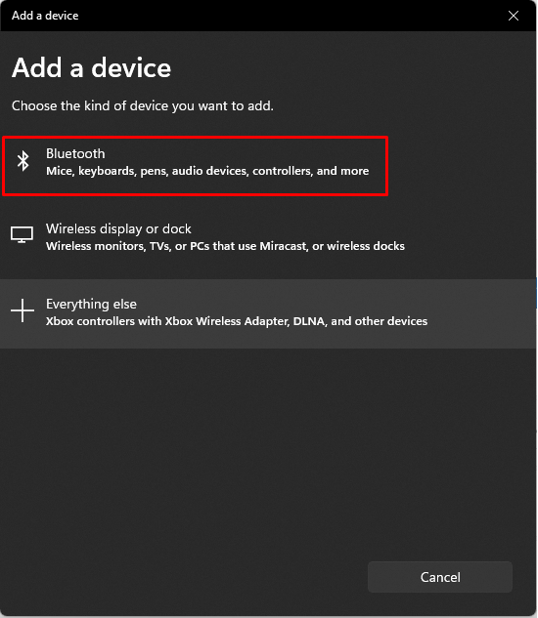
First go to the settings option of the Windows and then click on the Bluetooth devices from there you can turn on the Bluetooth of your computer. To connect the device by paring it with your computer click on the “Add device” button.
After clicking a dialog box named “Add a device” is appeared, click on the first option that is Bluetooth:
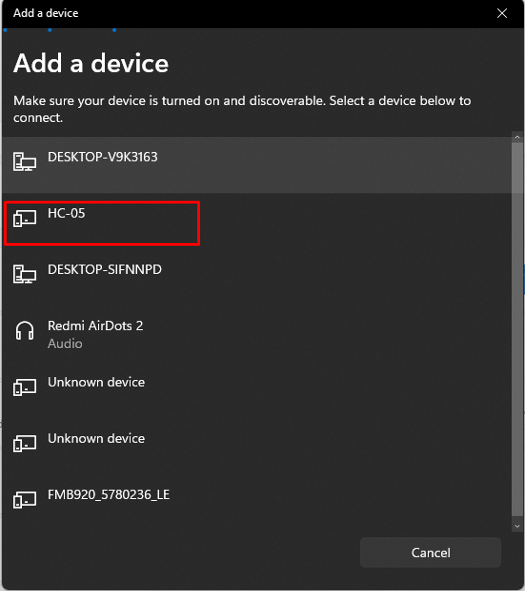
Then you will see that the Bluetooth module (HC-05) will appear when your computer starts searching for the devices:
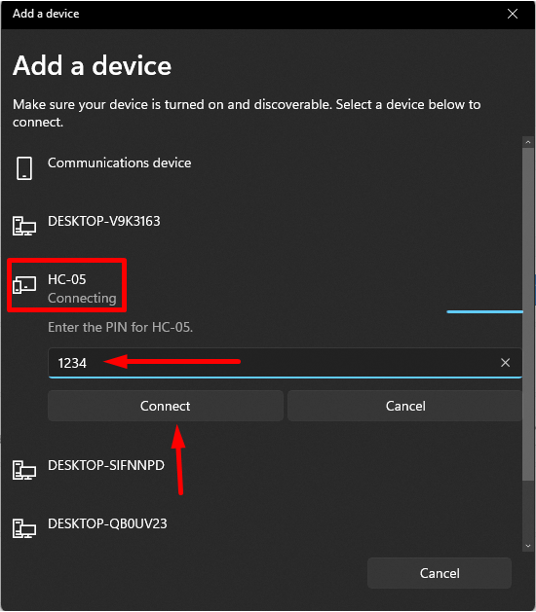
Click on the Bluetooth module that is “HC-05” and it will ask the password for pairing your computer with it. The passcode for pairing is “1234” by default.
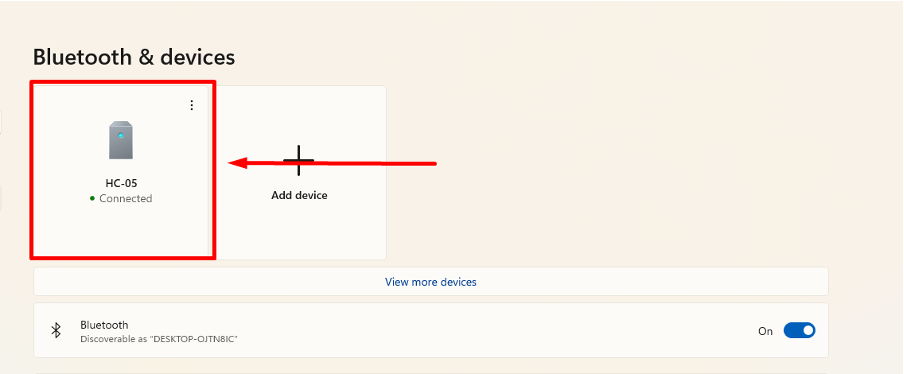
Now we can see that the device is paired with the computer and is connected with it. You can see it in the bluetooth and devices menu in the setting of your computer.
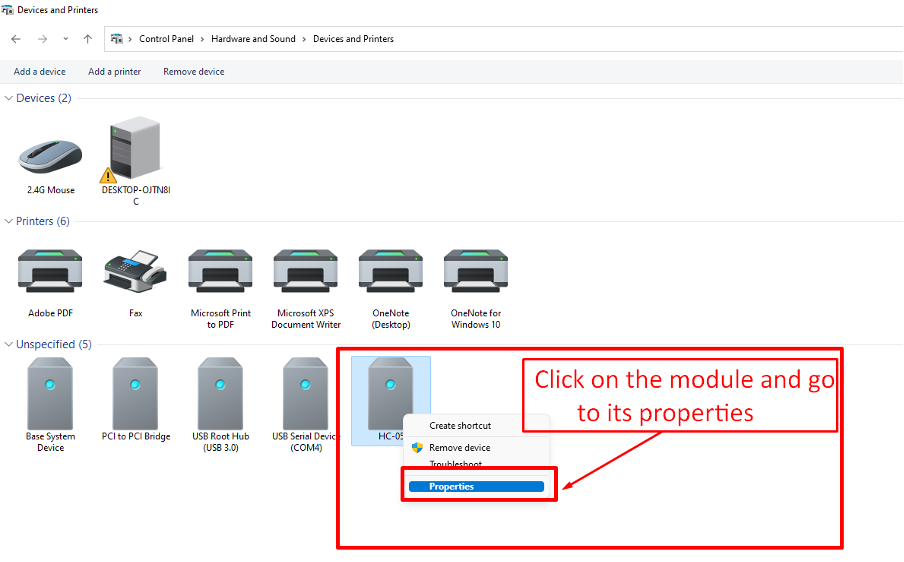
To check on which COM the Bluetooth is connected to the computer we open the control panel and select the hardware and sound option is the control panel menu.
After that we go to the devices and printers option to see the devices connected with the computer. Here we have the Bluetooth module “HC-05” connected to our computer.
To check on which pin the module is connected we have to go to the properties of the Bluetooth module:
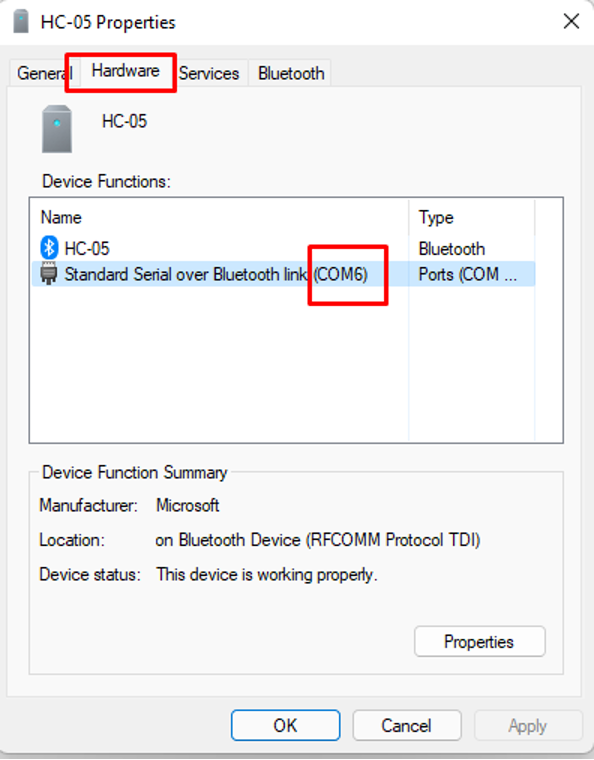
After that go to its hardware properties of the HC-05 and you will see in the device properties on which COM the Bluetooth is connected. Here on the COM 6 the Bluetooth is connected.
Arduino code to interface Bluetooth module (HC-05)
The Arduino code for interfacing the Bluetooth module is:
void setup() {
Serial.begin(9600); // baud rate for serial data transmission
pinMode(13, OUTPUT); /*assigning digital pin 13 to LED and giving it an output mode */
}
void loop(){
if(Serial.available() > 0) // checks if any data is received
{
data = Serial.read(); */Reading any receiving data and storing it into variable named data*/
Serial.print(data); //displaying the data
Serial.print("\n"); //adding space by giving a New line
if(data == '1') // when the value is equal to 1
digitalWrite(13, HIGH); // turn the LED
else if(data == '0') // when the value is equal to 0
digitalWrite(13, LOW);// turn off the LED
}
}
In this code we have changed the state of the LED by sending data to the Bluetooth module. The code for interfacing the Bluetooth is compiled in such a way that first we have declared the variable in which the data will be stored. After that in the setup function, we have given the baud rate for the serial communication and assigned mode and pin to the LED.
In the loop function we have used the function Serial.available() to check if any data is entered using the serial monitor. After that to read the data if received we have used the function Serial.read() and then this data is printed in the serial monitor using the function Serial.print().
Next, we have used the if conditions using the digitalWrite() function. If 1 is entered in the serial monitor of COM6 on which the Bluetooth is connected then turn on the LED and if 0 is entered in the serial monitor of COM6 the LED will turn off.
Note: There might be different ports for each computer on which the Bluetooth module is connected. Here in our case it is COM6.
Hardware implementation of interfacing Bluetooth module (HC-05) with Arduino Uno
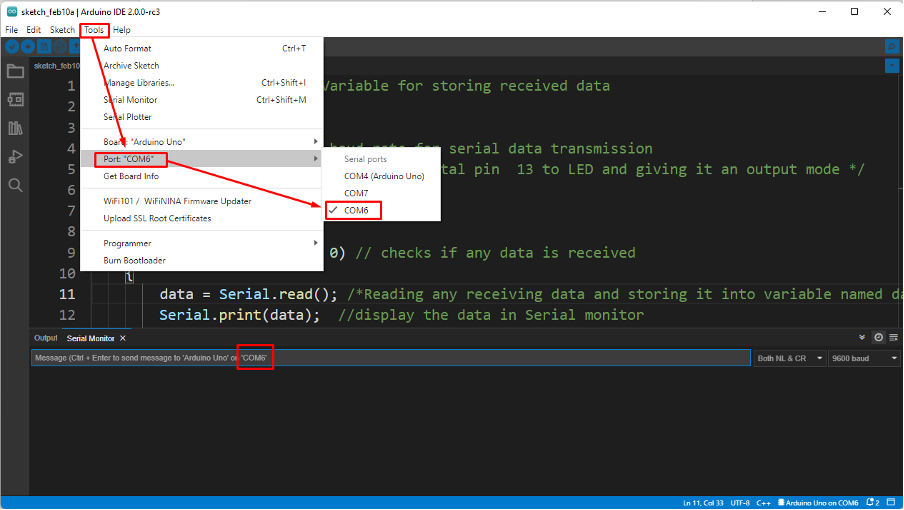
To give the input to the Bluetooth we have to select the port on which the Bluetooth is connected. We can do this by going into the tool menu in the Arduino IDE and then clicking on port option and then selecting the port of the Bluetooth.
Here in our case, it is connected at COM6 so we will select COM6 and below on the serial monitor we can see that in the gray tab the COM is changed from COM4 to COM6:
When we give the input of 1 using the serial monitor by writing 1 in the gray bar and pressing ctrl+Enter:
The LED will turn on:
Now if we enter 0 in the serial monitor the LED will turn off:
Conclusion
The Bluetooth module is a small range wireless communication device that can be used for various purposes like sending of data or controlling of devices connected with it. Furthermore, it can be interfaced with Arduino Uno and can be used in multiple projects where wireless communication is required for a small range. In this write up we have interfaced the Bluetooth module with Arduino Uno and controlling the LED by sending data through the Bluetooth module.

