In this article, we will show you how to install Fail2Ban on Raspberry Pi and set up the limit for wring password guessing to secure your system.
Install Fail2Ban on Raspberry Pi
Step 1: The Fail2Ban software can be installed using the official repository of Raspberry Pi. However, before the installation, it’s better to update the repository from the following command:

Step 2: To install Fail2Ban through apt repository, follow the below-given command:

Step 3: During the installation process of Fail2Ban, a “jail.conf” file is generated which we need to update according to our choice. However, before performing any configuration, it’s better to create a local copy of this file into the Fail2ban folder so that you can utilize this file if an error occurs during the configuration.

Step 4: Now we will open up our jail.local file through nano text editor from the following command:

Step 5: Within the file, search for “sshd” section using “Ctrl+W” keys.

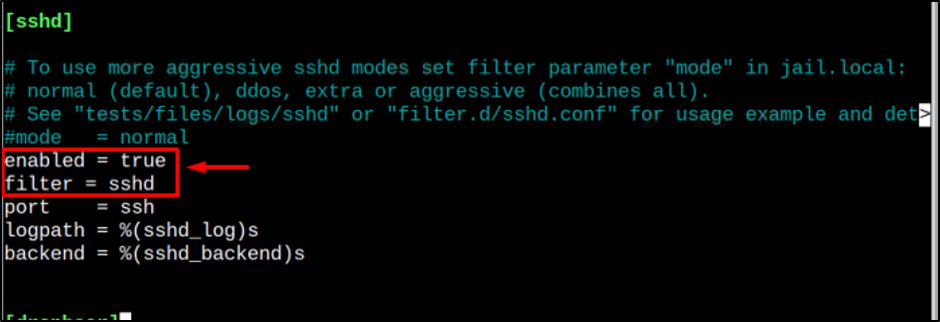
Step 6: Now below the [sshd] section, we will add two more lines to enable Fail2Ban and filter the sshd connection using the SSH port.
filter = sshd
You can also change the number of max tries and ban time according to your choice but remember that ban will always be in seconds so you can use this below formula to calculate seconds for your required ban time:
Like for 10 minutes ban time you can use it as 10 x 60 = 600 seconds, so you will use 600 in front of ban time:

After making the changes, press the keys “Ctrl + X” then “Y” to save the file and finally press “Enter” to go back to the terminal.
Step 8: Now to load up the changes into the Raspberry Pi system, type the below-mentioned command in the terminal:

Remove Fail2Ban on Raspberry Pi
To remove Fail2Ban from Raspberry Pi, type below-mentioned command:

Conclusion
Fail2Ban is a useful software for securing your Raspberry Pi system. The good thing about Fail2Ban is that it can directly be installed from the official repository of Raspberry Pi. The only thing you have to do after the installation is to configure the settings withing the generated jail.conf file that you must edit to make the changes to your system. The file can easily be opened through nano text editor and within this file, you have to choose the number of passwords tries and bantime for securing your Raspberry Pi system.