Mainly, Raspberry Pi SD cards can be cloned using two different methods. You can clone a Raspberry Pi SD card using the Raspberry Pi copier app or by creating a disk image. Both the methods are pretty simple to implement.
Now, let us discuss the methods for backing up a Raspberry Pi SD card.
Different Methods to Clone a Raspberry Pi SD Card
The two methods that can help you clone your SD card are:
- Using the SD card copier app from Raspberry Pi
- By Creating a Disk Image
Method 1- Cloning a Raspberry Pi Card Using SD Card Copier
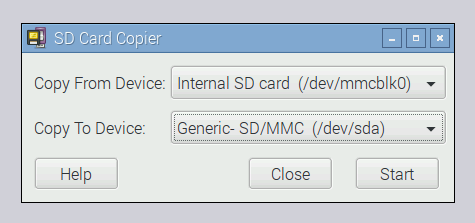
Earlier, Raspberry.org used to recommend the hectic process of backing up SD cards using the command-line tool. However, the current process is quite simpler and easy using the Copier app. You can find this tool in the menu by exploring the accessories. This application helps you in copying your entire Raspbian to another card. And all you need is a USB card writer.
You’ll find it in the menu >>”Accessories”.
Go through the following steps for cloning your Raspberry Pi SD card:
Insert an empty SD in your SD card writer and plug it into your Pi board. Once your Raspberry Pi is booted up, open the SD card copier app from the settings or start menu. Select “Internal SD card” in the “Copy from device” box and select the external SD card in the “Copy to device box”.
Click on the start button and wait. This would take approximately fifteen minutes. As of now, you will be having a backup of your SD card. You can check it by running a new card in place of an older SD card.
Method 2 – Cloning a Raspberry Pi SD Card by Creating a Disk Image
What if you need your backup as a file and want to store it on your PC or share it with your friends over the cloud? Well, we have got you covered. This can be easily done by creating a disk image of the backup. Let’s start,
I won’t suggest you use an SD card in this process as you will need an SD card of exactly the same or larger size compared to the card you are backing up. Furthermore, there is a difference in the sectors on an SD card depending upon the model and brand.
To begin with, make sure you have a USB flash or hard driver greater than the size of the Raspberry Pi SD card.
Formatting the Destination USB Flash
If you are using a Windows PC, t you will need to format your Flash drive as NTFS and EXT4 for Linux. After formatting the drive, connect it to the Pi and boot it. Now, install pishrink.sh on your Pi board and copy it to /usr/local/bin. You can copy it by the following commands:
sudo chmod +x pishrink.sh
sudo mv pishrink.sh /usr/local/bin
Next, you have to check the mount path by the command lsblk.
By this, you will be shown a list of all the drives connected to your Pi board along with the mount name. Use the dd command to copy the data. Move towards the root directory of the USB drive using the following command:
Now, make use of pishrink with parameter -z to zip up your image.
Wait for 10-15 minutes for the process to be completed. Once completed, you will be left with an image file, namely myimg.img.gz. Now, you can share this image file with your friend, upload it on the cloud or share it with your friend.
How to Restore the Diskimage on Raspberry Pi
Once you are done creating an image file, then you can restore it on an SD card similar to any other img. You can do it using RPi imager software.
Download the RPi imager and run it on your PC. Select the “Use Custom” option as the operating system and choose your backup .img file as the next step. Now, select the desired SD card and click on write.
You are good to go now.
Wait, there is still an issue. What if you don’t have adequately sized USB drives to create a disk image? This also has a solution. You just need to shrink the on RPi.
Here’s how to do it:
How to Shrink the rootfs Partition on RPi SD Card
When we give dd command for copying the SD card files for backup, it makes an image of all the storage of the SD card, even the space that is not utilized. For example, if you have a 128 GB card with a used space of just 8 GB, the command will create an image of the entire 128 GB storage. This is where it becomes important to shrink the rootfs partition on the RPi SD card.
For the partition shrinking process, you will require an SD card reader and another SD card with RPi installed on it.
Insert your Sd card reader with the root SD card into the Raspberry Pi. Boot up your Raspberry Pi with another SD card. Now, install the GParted on your Pi board using the command
Navigate to the system tools in your Raspberry Pi and launch Gparted. Choose the external SD card from the drop-down menu of the Gparted window. Next, unmount the external SD card by right-clicking and choosing the option unmount. Hit right-click on the rootfs and select the Resize/move option. Then, enter the size for the partition. You have to enter the minimum size, and it should be slightly larger than the space used. Click on the resize button.
Check on the green tick-mark given in the toolbar area to proceed. Turn off the Raspberry Pi
And remove the SD card.
Since the partition has been created, you need to create the disk image. As we shrunk a partition in the source SD card, we will require to use the count attribute to tell the command to copy only the utilized MBs in the space.
The command is:
In the command above, you have to replace? with the count of MBs, you desire to copy.
You can follow the steps provided above.
How to Clone Raspberry Pi SD Card in Windows PC?
If you want to clone your Raspberry Pi SD card using Windows PC, you need to follow merely 3-4 steps. Let’s start:
Download and install the Win32 Diskimager application. Remove your SD card from the Raspberry Pi board and insert it into Windows PC using a card reader. Run the downloaded application. Select the destination of the image by clicking on the blue folder button.
Now, you have to select your Pi. Click on the read button to proceed further. This creates an image of the card and saves it to the location chosen by you. Depending upon the size of the SD card, it may take several minutes.
Conclusion
It is very important to backup your Raspberry projects as Raspberry Pi is prone to outages and making SD cards corrupt. This article discussed everything you need to know about cloning SD cards. If you want a separate SD card with a clone file, you can try the Copier app from Raspberry Pi and create a Diskimage if you need a transferable file.
Do share this article with your friends if you found it useful.