Usually, Raspberry Pi comes with an SD card to boot the OS, but you can also use your own SD card on the PI board. But the alternative card needs to be of the required format and size. To avoid any irregularities, you need to format the SD card before writing the Raspberry Pi image.
This article is all about formatting SD cards for Raspberry Pi.
Different Formats For Raspberry Pi SD Card
There are 3 major SD card formats for Raspberry Pi. These are FAT16, FAT32, and exFAT. The SD Association has assigned the specifications to these formats. To begin with, the FAT16 format of SD cards has capacities ranging from 128MB to 2GB of data. The FAT32 format of SD cards can deal with data in a range of 4Gb to 32Gb. This format is seen in high-capacity cards(SDHC).
Furthermore, the exFAT format of SD cards can take data from 64Gb to 2 Tb. The exFAT format is for extended capacity SD cards(SDXC). FAT in all the SD card formats stands for File Allocation Table and is used due to its relative simplicity.
The SD card formats supported by the Raspberry Pi bootloader are FAT16 and FAT32 only. So, it is quite obvious that using the SD cards with higher capacities(SDXC) won’t work. In order to make SDXC cards compatible with Raspberry Pi, you will require to format the card into FAT32.
Before discussing the methods to reformat SD cards, let us briefly overview suitable SD card sizes for Raspberry Pi.
Compatible SD Card Sizes For Raspberry Pi
Having no internal storage, Raspberry Pi relies on removable SSDs cards as primary boot storage. Yes, you can use SSDs or flash drives, but micro sd cards are a cheaper medium.
An 8Gb micro SD card for Raspberry Pi will be enough if you only use it for normal purposes. However, you may get “low storage” warnings soon if you are a constant user. A Micro SD card with a storage capacity of 32 GB will be more than enough for most of the users. You can also go for SD cards with higher storage, provided it is properly formatted and doesn’t have any previous partitions.
Now let’s move towards formatting of SD card for Raspberry Pi. Take care of the instructions mentioned below before starting the process.
- Ensure that you have a constant and reliable power source through the formatting process.
- Don’t rush while formatting the card, as the process runs at its own pace.
- Back up your existing files on an SD card to another storage medium.
How To Format Raspberry Pi SD Card?
There are different methods that you use to format an SD card for Raspberry Pi. These methods include using different operating systems.
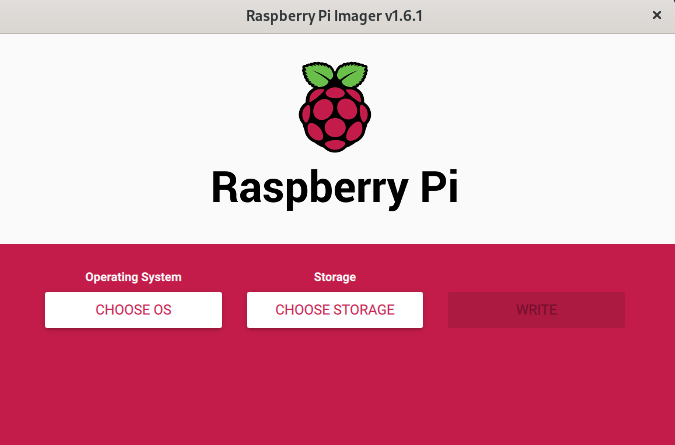
Format SD Card For Raspberry Pi Using Raspberry Pi Imager
To begin with, we will be formatting SD cards using Raspberry Pi Imager.
Download and install Raspberry Pi Imager on your device.
You can also do this by typing sudo apt install rpi-imager in a Terminal window.
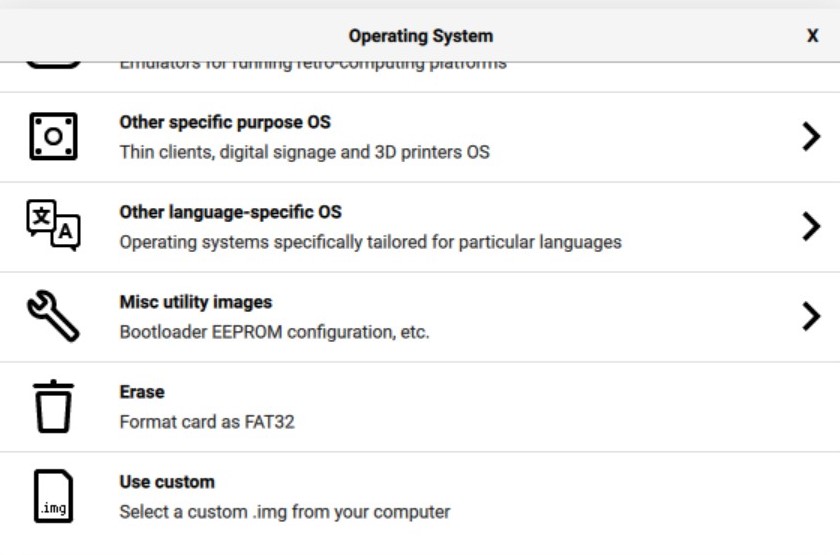
After you are done with the installation, run the Pi Image application and Click on choose OS. You will be shown a drop-daown menu with the option of Erase with description format card as FAT32. Click on the Erase option.
Select the SD card to format by clicking on Choose SD Card. Now click on “Write” and wait till the process finishes.0

Your card is now formatted, and you can use it on Raspberry Pi.
Format Your SD Card For Raspberry Pi Using Linux
You can manually format your SD card for Raspberry Pi using Gparted to create a partition.
Download and install Gparted on your system and open it. Select your SD card from the drop-down menu given in the right-hand corner.
If you have multiple partitions delete them and create a new one by clicking on the “New” button. Select FAT32 as your file system and click on Add. Confirm the changes after pressing Apply.
The SD is now formatted as FAT32 and is ready to use for Raspberry Pi.
Using Windows PC
Method 1-Disk Management
Windows PC has a Disk Management tool that allows users to perform advanced tasks with storage devices and drives present within the PC.
Open the RUN dialog box and search “diskmgmt.msc”. This will open a window with all storage devices connected to your PC.

Locate the SD card you wish to format and right-click on it. Now select the Format option from the list to proceed.
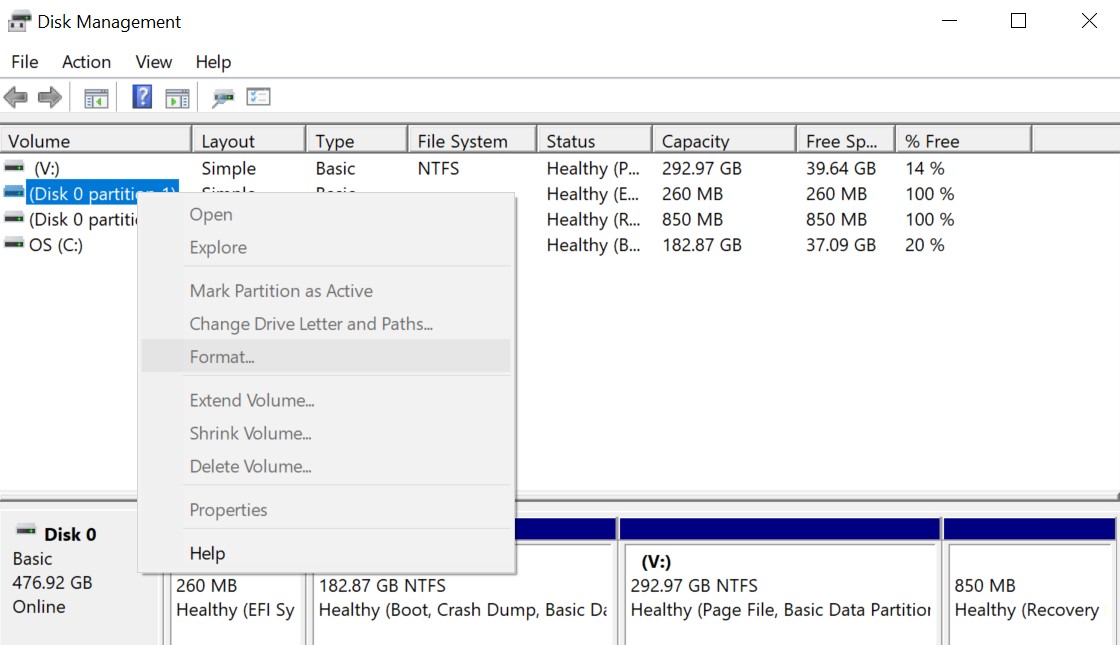
Corresponding to the File system, select FAT32 from the drop-down. Bypass the warning message by clicking on OK and proceed.
Your card has been formatted successfully and is ready to use on Raspberry Pi.
Method 2-Windows Explorer
You can format your SD card using windows explorer. Open the file explorer on your PC and right-click on the SD card you wish to format for Raspberry Pi.
Explore the drop-down menu under File System, click on the FAT32(default) option, and proceed further by clicking on the start button. Go through the warning message and click Ok if you are ready to format your card.
You are good to go now.
Method 3- Windows Powershell
You can use Windows PowerShell to format an SD card with 64GB and 128 GB storage capacity. However, this method is a bit time-consuming.
Open Powershell as admin using the run dialog box. In the PowerShell windows, paste the command format /FS:FAT32 X and hit the enter key. This will start the formatting process and take approximately one hour to complete. After the process is completed, you can use your SD card on Raspberry Pi.
Using MAC
Your MAC setup has an inbuilt tool known as “diskutil”. Similar to Diskpart in windows, “diskutil” is a system utility for performing disk-related advanced tasks.
To format your SD for Raspberry Pi, Insert your SD card and launch the terminal application. Paste the command diskutil list.This will list all the storage media connected to the system.
Type the command sudo diskutil eraseDisk FAT32 YOURNAME MBRFormat /dev/diskX to format your SD card. The “X” in this command is the number corresponding to your disk in the previous step.
The system will run the program. Wait for the process to complete, and your SD card will be compatible for use in Raspberry Pi.
Format Your Sd Card For Raspberry Pi Using SD Card Formatter
You can also use the tool SD card formatter to format your SD card. This tool is available for both Windows And MAC.

Download and Install the SD card Formatter application. Plugin your SD into the system and launch the application. Click on the “option” button corresponding to the format. Turn “format adjust” to ON and press the Ok button. Click on the “Format” button to start the process and Ok to proceed. This process will take few seconds, and your card will be formatted.
Why Is My Raspberry Pi Not Reading The SD Card?
Raspberry Pi Sd cards are prone to issues if not handled or used properly. Many times the SD cards get corrupt due to power failures or improper shutdowns. So it is quite important to use SD cards from reliable manufacturers. While booting your Raspberry Pi, if Red light is constantly blinking with the green light not illuminating, it is a clear indication that your SD card is having issues. Also, it is advisable not to write data on an SD card as it causes regular wear in the utility.
Some of the fixes that you can try are:
- Create a read-only copy of the SD card
- Format the card clearing previous partitions
- Install a new OS image
Conclusion
These were several ways of formatting an SD for Raspberry PI. You can choose any method depending upon the operating system. Always remember to backup your data when formatting your SD cards. If not done, this leads to a corrupt system and data loss.