All the Arduino boards are provided with the built-in reset button which comes in handy when either the Arduino board is required to be reset or to re-run the Arduino code from the start. Similarly, all the Arduino boards are provided with a dedicated reset pin for creating an external reset button to re-run the Arduino code. We will explain how we can use a push button as an external reset using the reset pin of the Arduino.
What is a reset button and why is it needed in Arduino?
From the word reset we can assume that it is used to start the process again from the beginning. It could be anything for instance like turning off the appliance and then turning that appliance back on immediately. If we take Arduino Uno as a device and press the reset button then the Arduino board will start again. Similarly, the Arduino code saved in the memory of the microcontroller the respective code will also run from the start.
The reset button is mostly used when we have to restart the Arduino code from the beginning. However, using a separate push button for the reset is used because sometimes the reset button on the Arduino boards is inaccessible due to circuit wiring. The other reason for this is when we have to enclose the Arduino board to make the project more compact or cleaner then there is a need for an external reset button.
Moreover, the use of the reset button also depends on the functionality of the Arduino program. For instance, if we have to make a digital dice then there is need to use the reset button similarly there are a whole bunch of projects that require the reset button
The reset button can also be used when debugging the Arduino code and it also comes in handy if there is an error in the code which can be removed after resetting the Arduino.
How to use external reset button in Arduino
To demonstrate how we can create and use the external reset button we have created a project which generates the random number using the reset button. Below we have provided the image for the schematic of the circuit
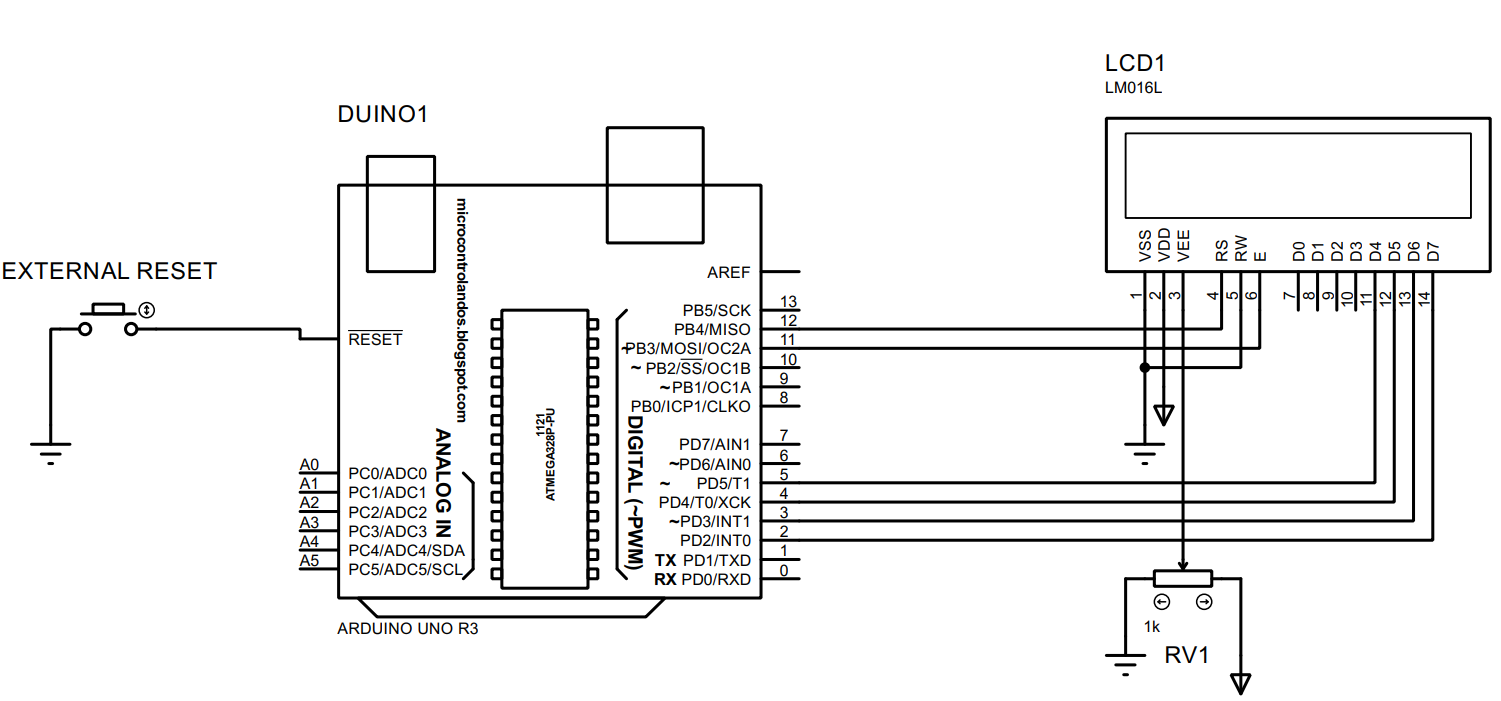
Assembling components for external reset button
To create an external reset button, we have used the following list of components:
- Arduino Uno
- Connecting wires
- Push button
- Potentiometer
- LCD
To give a clear understanding of the connections we have posted an image below:

We have assembled the components in such a way that first all the components have been connected to the breadboard and then we have interfaced them with Arduino.
The purple wires connect the data pins of the LCD with Arduino whereas the RS and E pins are connected with Arduino using the gray wire. Similarly, to control the brightness of the LCD we have connected the potentiometer with LCD using the yellow wire.
To interface the push button with the Arduino we have connected one pin of the button with the reset pin of Arduino Uno while the other pin is grounded by connecting it with the common ground pins of breadboard
We have used the 5 volts and ground pin of the Arduino to connect the components to the supply voltage.
Arduino code for using external reset button
The Arduino compiler generates a random number every time the Arduino is reset using the push button. The compiled Arduino code for creating an external reset button is given as:
LiquidCrystal lcd(12,11,5,4,3,2);/*assigning Arduino pins for LCD*/
int rnd;/*variable to store random number generated*/
void setup() {
Serial.begin(9600);/*initializing the Serial communication*/
lcd.begin(16,2);/*initializing the dimensions of LCD*/
lcd.setCursor(0,0);/*defining the position for displaying the data*/
lcd.print(" Welcome to "); /* data to be displayed on LCD*/
lcd.setCursor(0,1);/*defining the position for displaying the data*/
lcd.print(" linuxhint ");/* data to be displayed on LCD*/
delay(1000);/*time for which the data will be displayed on LCD*/
lcd.clear();// clearing the LCD
randomSeed(analogRead(0));/*to shuffle the sequence of generation*/
rnd=random(1,9);// generating a random number
lcd.setCursor(0,0);/*defining the position for displaying the data*/
lcd.print("Number Generated");/* data to be displayed on LCD*/
lcd.setCursor(1,2);/*defining the position for displaying the data*/
lcd.print(rnd);/*displaying the random number*/
}
void loop() {
}
The code is compiled in such a way that first we have defined the library of LCD and assigned some pins of Arduino to LCD.
Next we have used the randomseed() function to shuffle the sequence of the random number generation every time the number Is generated. After that we have used the random() function to generate the random number between the range of 1 to 9.
In short, whenever we press the reset button the program restarts itself because the Arduino is restarted, and it generates a different random number every time.
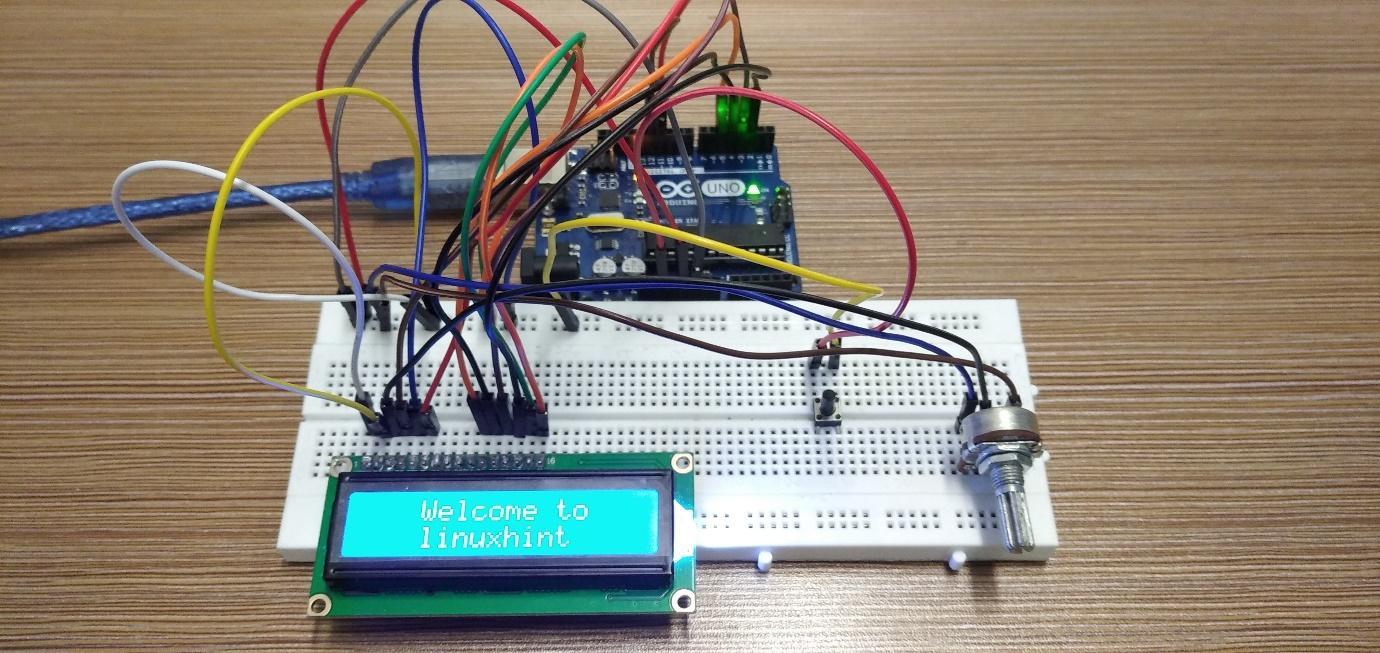
Hardware implementation of using the Arduino external reset button
The image posted below is the hardware assembled to demonstrate the use of external reset button:
To demonstrate the working of the reset button we have posted the animation below:

As we can see in the animation before pressing the reset button we can see the number generated was four and when we press the reset button the code runs from the start and it can be seen that the number generated this time is seven. Similarly the orange light also blinks as the reset button is pressed.
Conclusion
Reset button is a necessary part of every device as it is the only solution in some situations especially when the device freezes. The reset button restarts the device and keeps the device running again normally. Coming to the Arduino boards, every board is provided with the reset switch, but this switch sometimes becomes inaccessible due to either a large number of connecting wires or if the board is enclosed in a box. So sometimes there is a need for an external reset button and for that the Arduino board has a dedicated reset pin. The reset button as explained earlier restarts the Arduino board and as a result the Arduino code save in the microcontroller of the Arduino also restarts. We have described the functionality of the reset button by demonstrating it in Hardware.