
ESP32 supports dual Bluetooth containing Bluetooth Classic and the Bluetooth Low Energy (BLE). In this article we will be discussing the working of both these Bluetooth.
Here is a brief comparison of Bluetooth Classic with Bluetooth Low Energy:
| Specification | Bluetooth Classic | Bluetooth Low Energy/BLE |
| Data Transfer Rate | 2-3Mbps | 1Mbps |
| Range | ~10-100m | ~50m |
| Operating Frequency | 79 RF | 40 RF |
| Peak Current Consumption | ~30mA | <15mA |
| Power Consumption | 1W | 0.01-0.5W |
| Total Time to Send data | 100ms | 3ms |
| Applications | Audio, music streaming | Sensor, wearables |
For a more detailed comparison click here to visit the official Bluetooth site.
Following are the two Bluetooth modes available in ESP32 board:
1: ESP32 Bluetooth Classic with Arduino IDE
The ESP32 board comes with dual Bluetooth support one is Bluetooth Classic and the second one is BLE (Bluetooth Low Energy). Today we will be discussing Bluetooth Classic only. Only difference which exists between both of them is that Bluetooth Classic can handle a lot of data transfer but consumes battery at higher rate, however Bluetooth Low Energy is power conserving variant which is used for short distance communication. BLE stays in sleep mode until it is initialized for data transfer.
ESP32 Bluetooth Classic Serial Communication
ESP32 comes with built-in Bluetooth modules which first receive data and then forward it to the Xtensa processor. So, to establish this communication “BluetoothSerial” library is used which is similar to Arduino serial library, but it is just within ESP32. Following are some functions offered by Bluetooth serial library:
- begin()
- available()
- write()
- read()
Bluetooth Controlled LED using ESP32
Let’s write a simple code that can control a LED using mobile Bluetooth over Bluetooth wireless communication. Following is the hardware required to control LED using Bluetooth serial communication:
- ESP32
- LED
- Breadboard
- Android device
- Serial Bluetooth Terminal Application
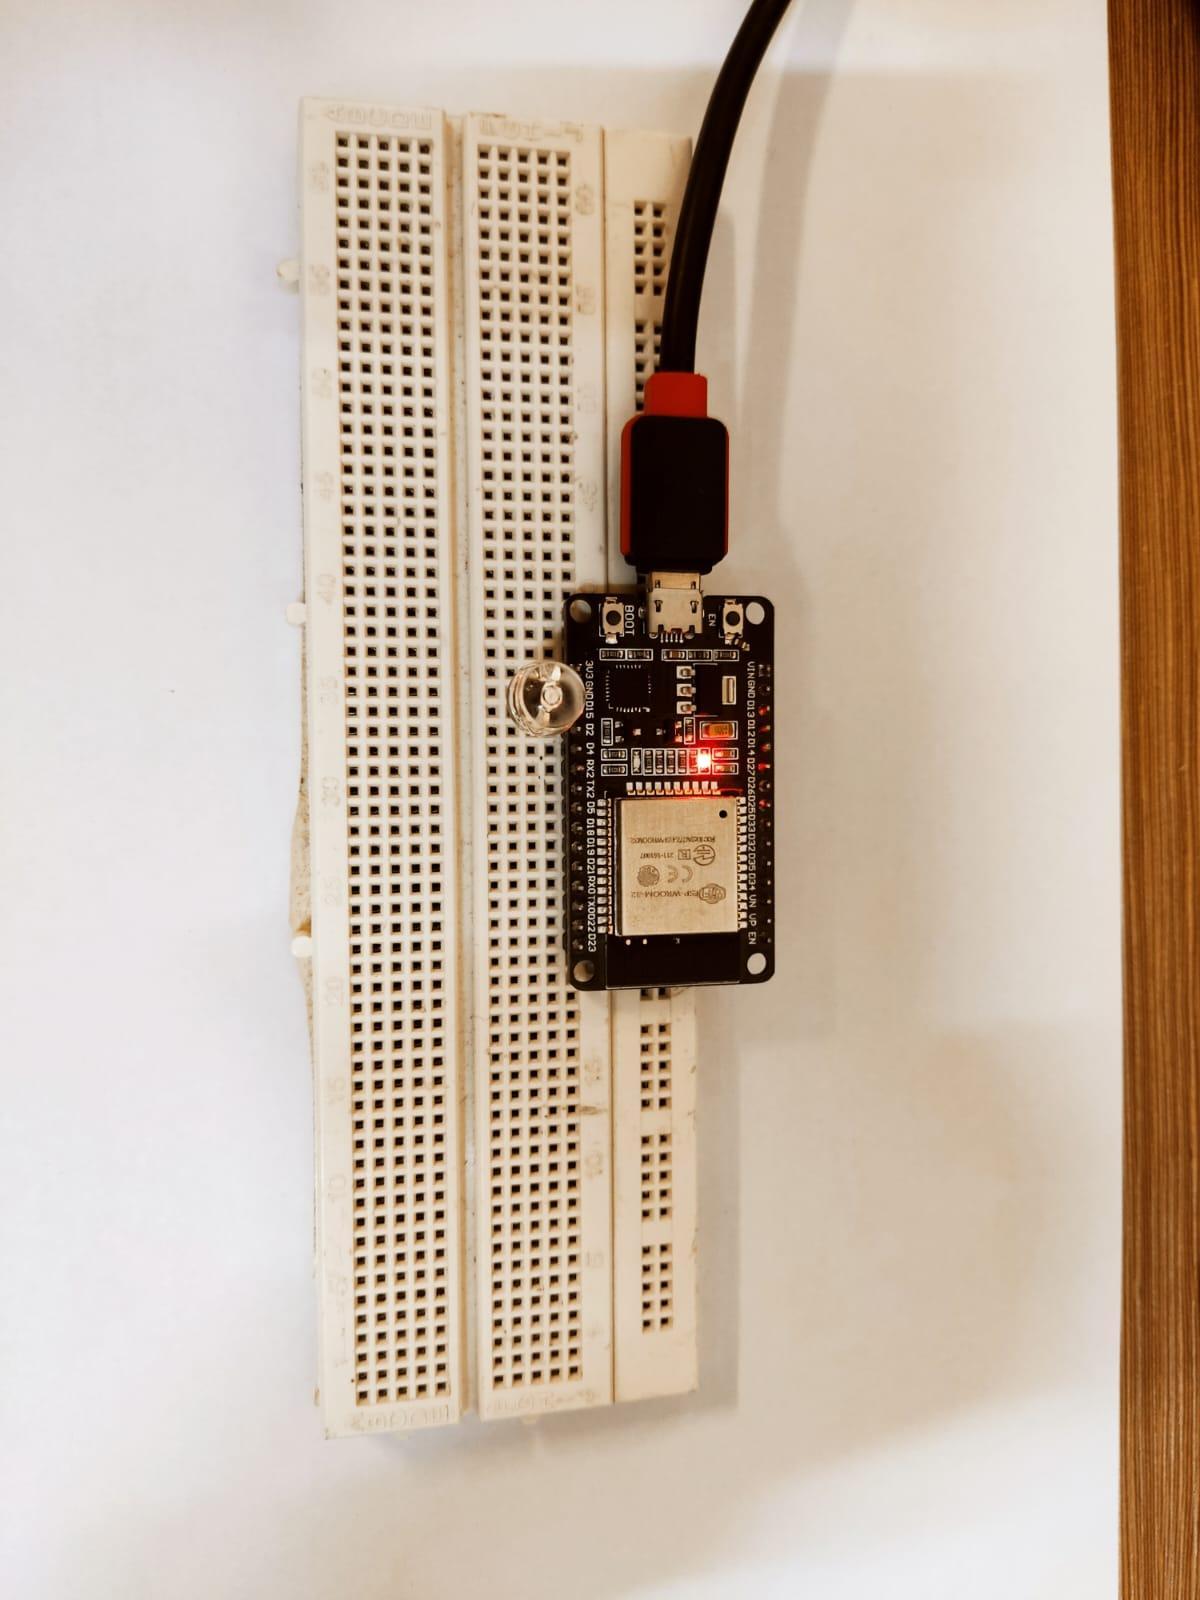
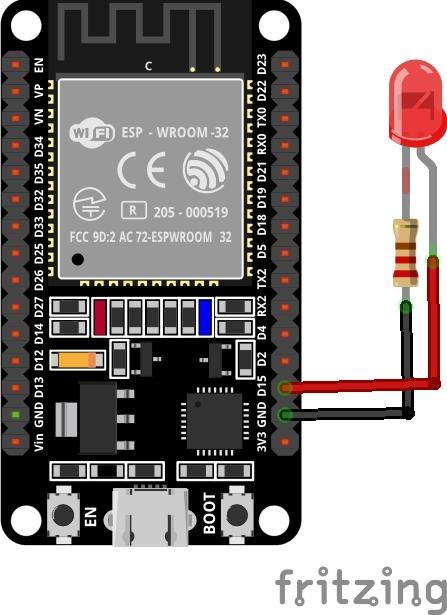
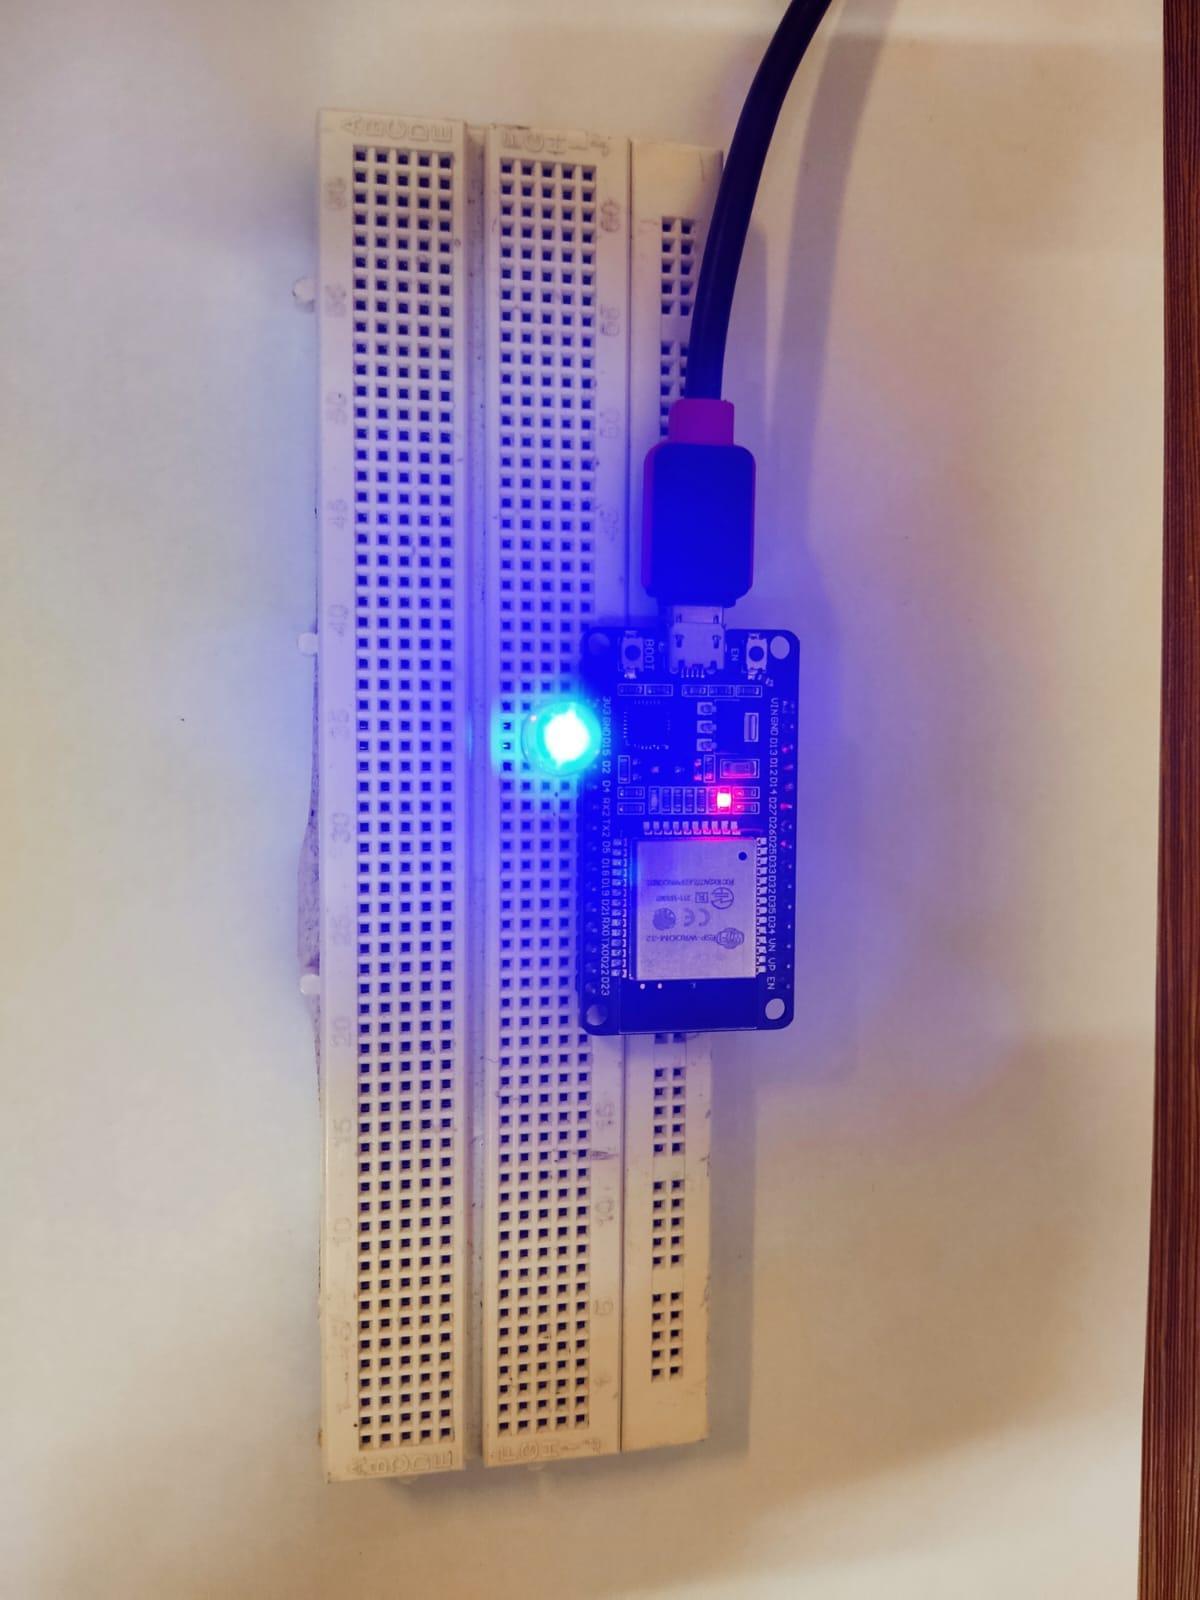
Circuit
Connect LED at digital pin 15 of ESP32 with negative terminal connected at GND of ESP32 board. For a safe current limit we can also connect the resistor (220 ohms) between them:
Code
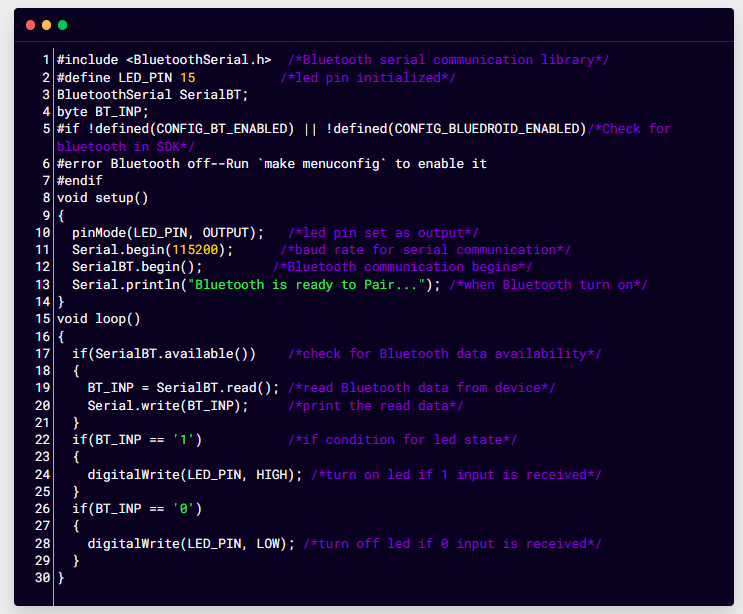
Open Arduino IDE and select the ESP32 board in the Board Manager to see how to install ESP32 board in Arduino IDE click here. After selecting the board write the code below in the editor window:
#define LED_PIN 15 /*led pin initialized*/
BluetoothSerial SerialBT;
byte BT_INP;
#if !defined(CONFIG_BT_ENABLED) || !defined(CONFIG_BLUEDROID_ENABLED)/*Check for bluetooth in SDK*/
#error Bluetooth off--Run `make menuconfig` to enable it
#endif
void setup()
{
pinMode(LED_PIN, OUTPUT); /*led pin set as output*/
Serial.begin(115200); /*baud rate for serial communication*/
SerialBT.begin(); /*Bluetooth communication begins*/
Serial.println("Bluetooth is ready to Pair..."); /*when Bluetooth turn on*/
}
void loop()
{
if(SerialBT.available()) /*check for Bluetooth data availability*/
{
BT_INP = SerialBT.read(); /*read Bluetooth data from device*/
Serial.write(BT_INP); /*print the read data*/
}
if(BT_INP == '1') /*if condition for led state*/
{
digitalWrite(LED_PIN, HIGH); /*turn on led if 1 input is received*/
}
if(BT_INP == '0')
{
digitalWrite(LED_PIN, LOW);/*turn off led if 0 input is received*/
}
}
Here in the above code, we started by including the Bluetooth serial library for ESP32. Next we have included Bluetooth serial library functions that will enable the ESP32 Bluetooth.
Next LED pin 15 is initialized and using the pinMode() function LED pin is set as output.
In loop part of the code the program will check for serial Bluetooth data availability. If the input data is 1 LED will turn ON and if the received data is 0 LED will turn off.
Once the code is uploaded. Bluetooth of the ESP32 board will turn on and the following message will appear on the serial monitor:

Installing Serial Bluetooth Terminal on Smartphone
We need a Bluetooth device that can send instructions to ESP32 so we will be using an Android smartphone to interface it with ESP32 Bluetooth. First, we need to install a serial terminal in an Android phone. Follow the steps given below to interface Android phone with ESP32:
Step 1: Open Google Play Store on your smartphone and search Serial Bluetooth Terminal. Install the below shown application:

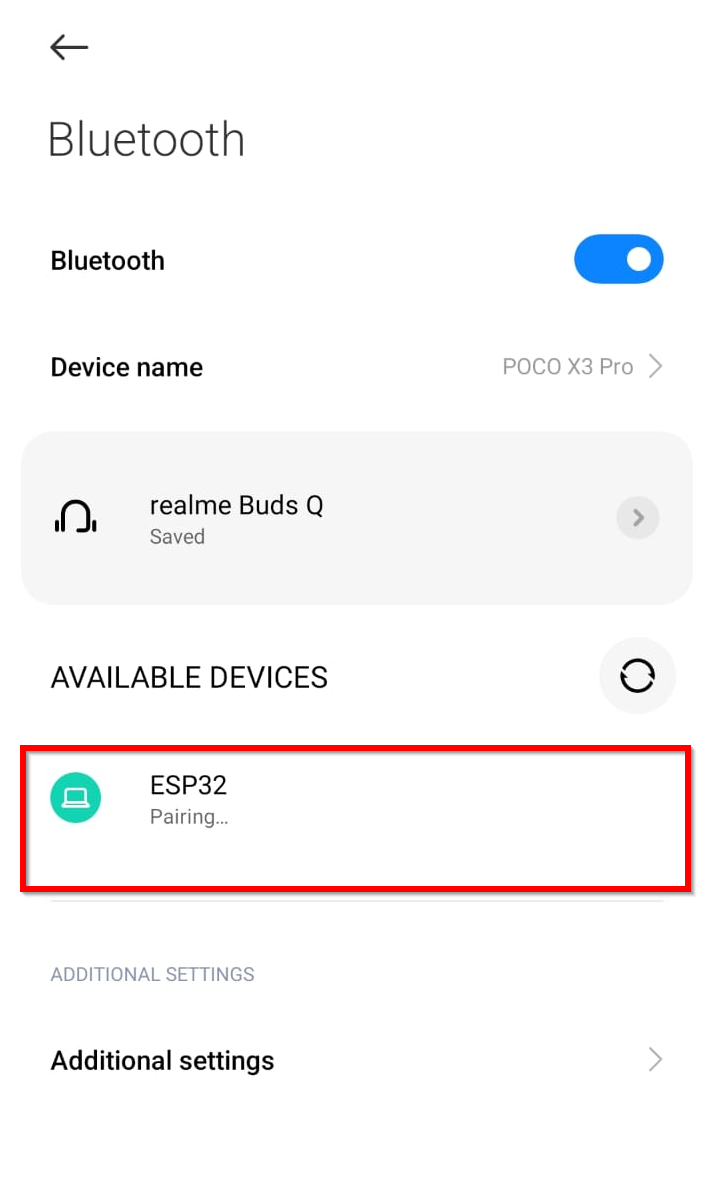
Step 2: After installing, open mobile phone Bluetooth settings. Search for ESP32 Bluetooth and click to start pairing it with your smartphone by clicking on Pair:

Step 3: After tapping on a Pair, the mobile phone will start pairing with ESP32 Bluetooth:
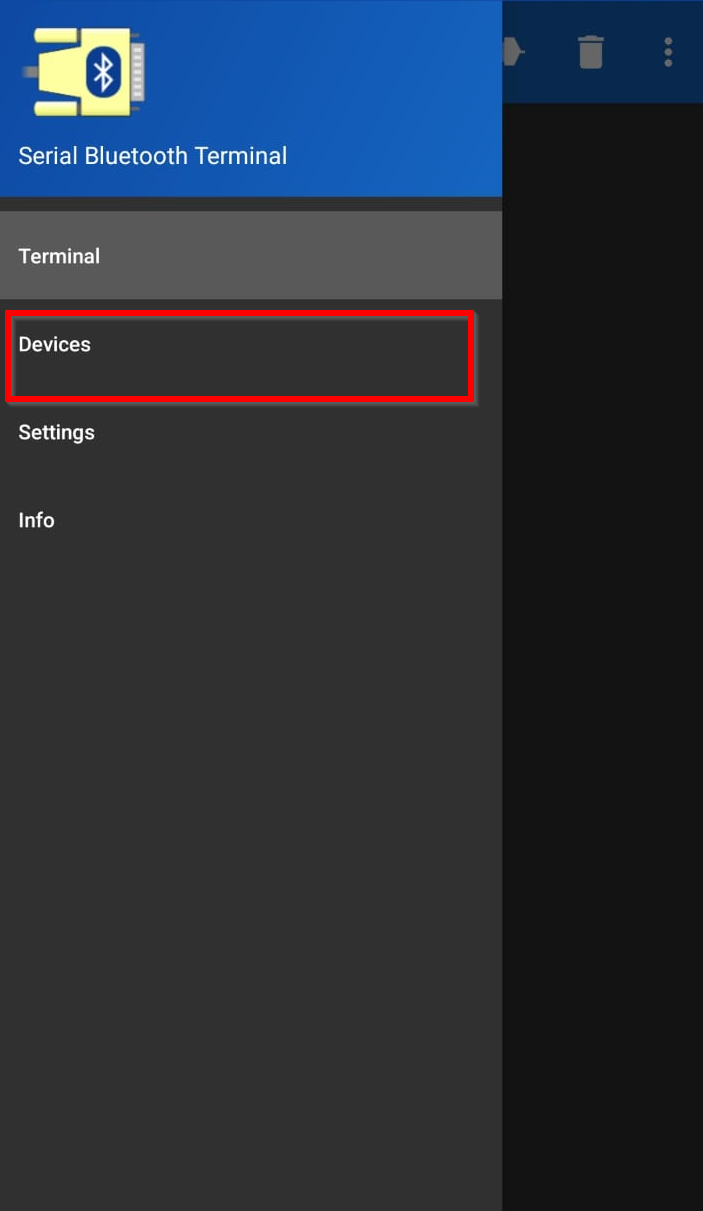
Step 4: Now open the Serial Bluetooth Terminal Application and go to Devices from the side menu:
Step 5: Once the device option is opened it will ask for some permissions or press the REFRESH button at top right corner:
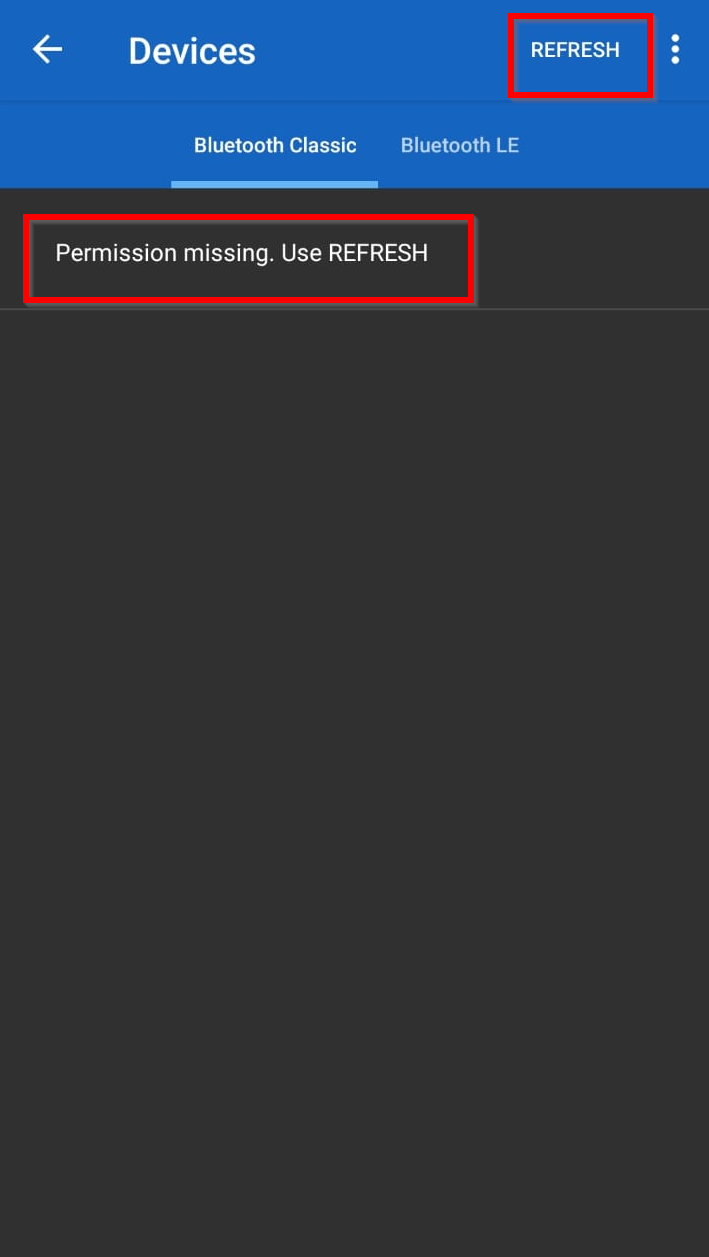
Step 6: Following pop-up will come click on Settings and allow the permission it asks for:

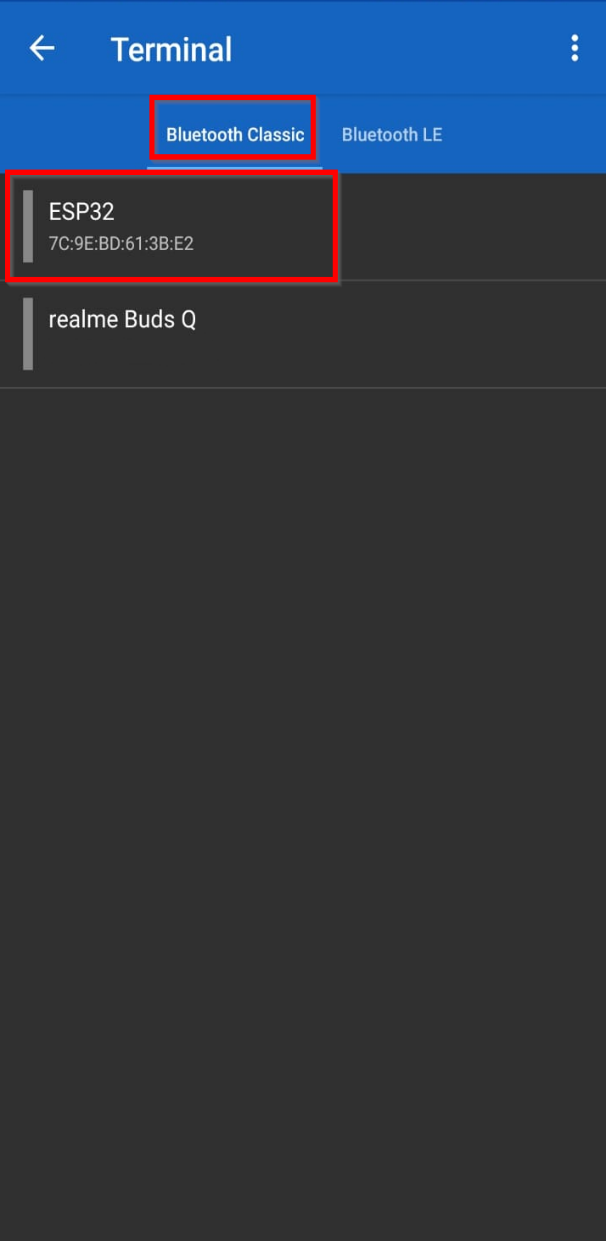
Step 7: Now ESP32 board is ready to take instructions over Bluetooth. Under Bluetooth Classic option select ESP32 board:
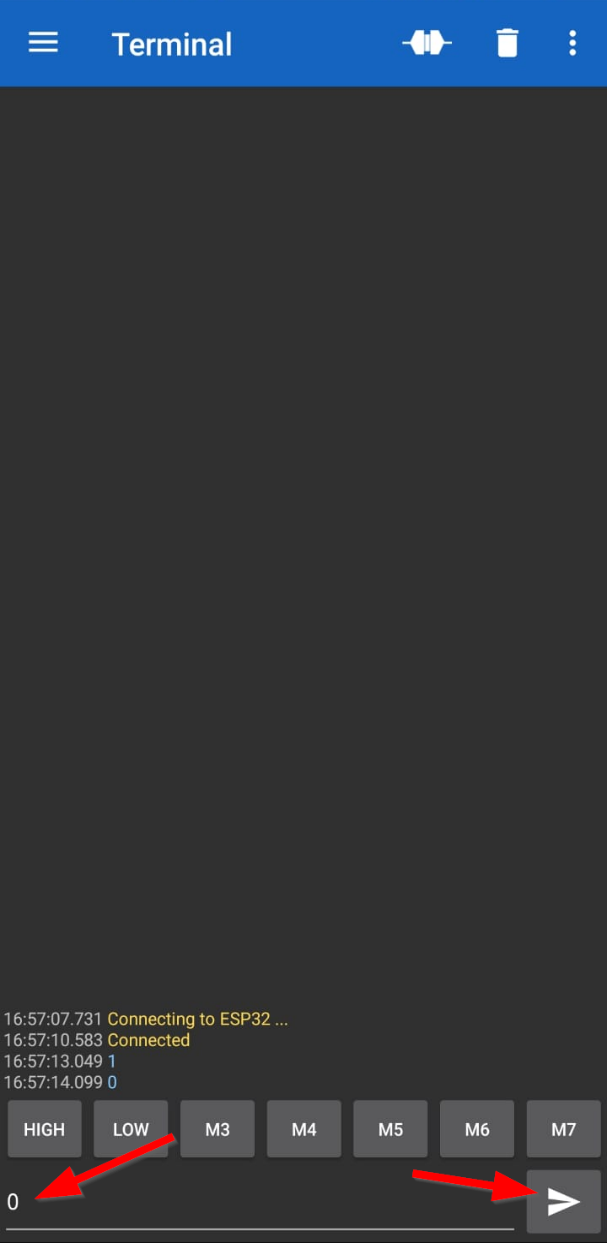
Step 8: Once ESP32 is selected it will start connecting and if successful, a Connected message will appear:

Step 9: Now we can send any instruction by typing it here. Type 1 and click the send button, LED on ESP32 board will turn On. Similarly, by typing 0 LED will turn OFF:
Similarly, we can see the output on the serial monitor of the Arduino IDE what it is receiving:

Output
LED turns ON after sending 1:
LED turns OFF after sending 0:

Note: We can also configure buttons for specific instructions like shown in image below. To do this click the buttons and set the value you want. Here we have set two buttons one for HIGH and other one for LOW state. You can also configure these shortcuts in Hexadecimal values.

2: ESP32 Bluetooth Low Energy (BLE) with Arduino IDE
BLE or Bluetooth Low Energy is a power saving mode of Bluetooth. Its prime application includes data transfer over short distances such as door entry, smart watches, wearables, blood pressure monitor, security and home automations. BLE can transfer limited data.
Unlike Bluetooth Classic which remains turned on for the whole time BLE remains in sleep mode except when it is called, or connection is initiated. This makes the BLE very power efficient and consumes 100 times less power than the classic one.
BLE Server and Client
Bluetooth Low Energy supports the device in two different ways due to which ESP32 can act as server as well as client for Low Energy Bluetooth.
BLE support following modes of communication:
- Point to Point: Communication between two points or nodes that is server and client.
- Broadcast Mode: Server transmits data to many devices.
- Mesh Network: Multiple devices connected together also known as many to many connections.
When acting as a server, ESP32 advertises its existence to nearby client devices. Once the client devices scan for available Bluetooth devices the server establishes connection between them and transfers the data from server to client device. This communication is called point to point.
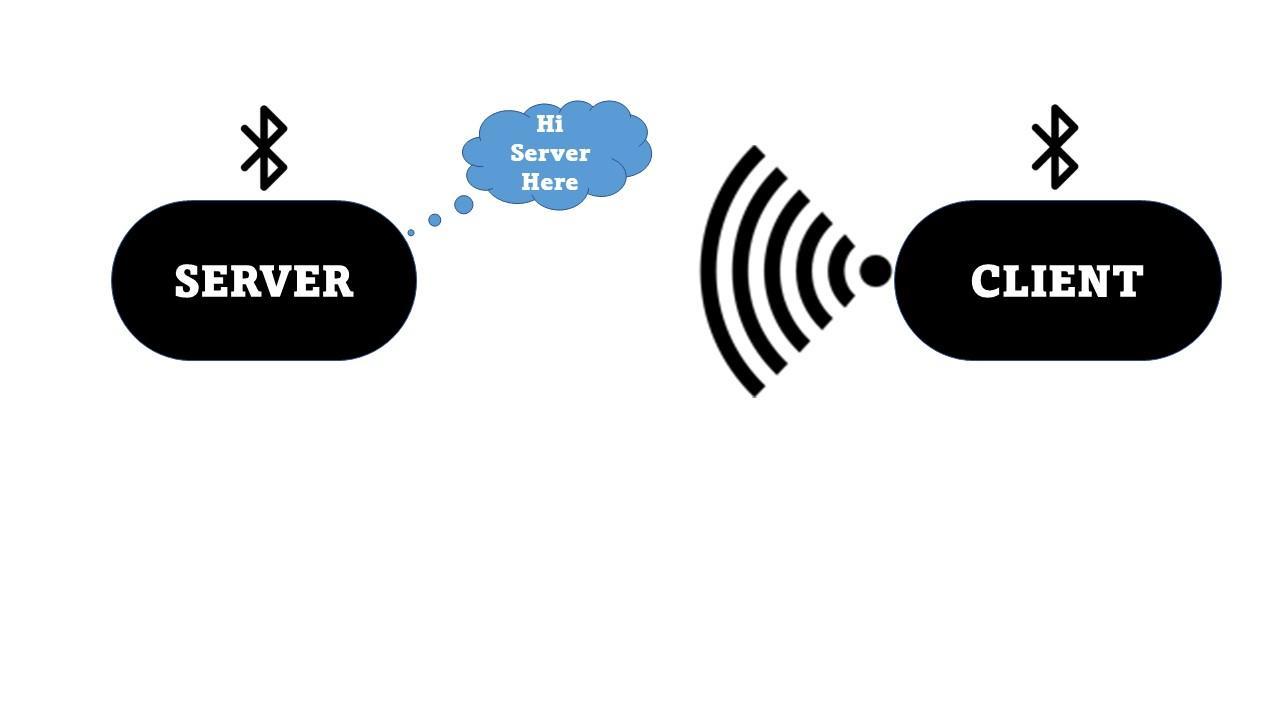
In this tutorial, we will take an example of point-to-point communication between two ESP32 boards.
Important Terms in BLE
Here are some important terms which one should know while working with ESP32 BLE applications:
GATT: GATT or Generic attributes which defines a hierarchical structure for data transfers between BLE devices using Service and Characteristic. It defines the way two devices communicate data between them.
BLE Service: Top level inside the GATT hierarchy is a profile which contains one or more services. BLE has more than one service. Each of these services have their own Characteristics which can also act as reference for other services.
BLE Characteristic: Characteristic is a group of information always owned by Service; it is where actual data is stored in hierarchy (value). It always contains two attributes:
- Declaration: Characteristic properties such as location, type, read, write and notify.
- Characteristic Value: Data value of Characteristic.
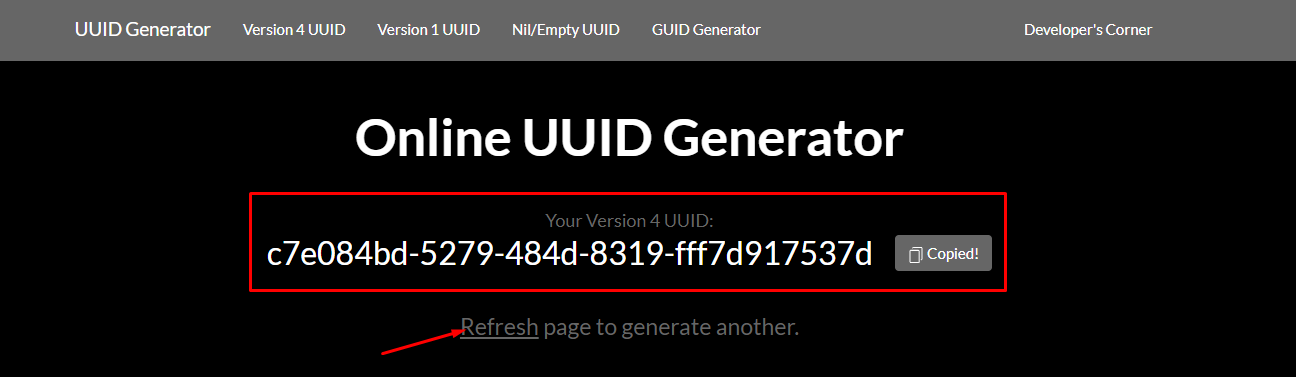
UUID: UUID (Universally Unique Identifier) is given to each service and Characteristic. It is a unique 128-bit ID which can be generated using any online UUID generator. Check this free UUID generator. A sample UUID looks like this:
A universal Bluetooth Special Interest Group (SIG) has predefined some of the shortened UUIDs for different types of services and profile, to read them click here.
Set up BLE in ESP32 with Arduino IDE
To understand the working of BLE we will be using two different ESP32 boards one of them will act as server and advertise a Bluetooth signal while the other ESP32 which is acting as a client will try to connect the server Bluetooth.
Arduino IDE has separate examples for both Scanner and Server.

To see how to install an ESP32 board with Arduino IDE in windows click here.
ESP32 BLE Server
First, we will upload server example code inside our first ESP32 board which is acting as a server.
To open BLE server example Go to: File>Examples>ESP32 BLE Arduino>BLE_server:

The below given code will be opened in Arduino IDE.
Server Code
Upload the below code in ESP32 board using Arduino IDE but make sure to disconnect the second board for a while to avoid uploading the same code to a single board:
#include <BLEUtils.h>
#include <BLEServer.h>
#define SERVICE_UUID "4fafc201-1fb5-459e-8fcc-c5c9c331914b"
#define CHARACTERISTIC_UUID "beb5483e-36e1-4688-b7f5-ea07361b26a8"
void setup() {
Serial.begin(115200);
Serial.println("Starting BLE work!");
BLEDevice::init("ESP32");
BLEServer *pServer = BLEDevice::createServer();
BLEService *pService = pServer->createService(SERVICE_UUID);
BLECharacteristic *pCharacteristic = pService->createCharacteristic(
CHARACTERISTIC_UUID,
BLECharacteristic::PROPERTY_READ |
BLECharacteristic::PROPERTY_WRITE
);
pCharacteristic->setValue("HELLO Say Linuxhint.com");
pService->start();
// BLEAdvertising *pAdvertising = pServer->getAdvertising(); // this still is working for backward compatibility
BLEAdvertising *pAdvertising = BLEDevice::getAdvertising();
pAdvertising->addServiceUUID(SERVICE_UUID);
pAdvertising->setScanResponse(true);
pAdvertising->setMinPreferred(0x06); // functions that help with iPhone connections issue
pAdvertising->setMinPreferred(0x12);
BLEDevice::startAdvertising();
Serial.println("Characteristic defined! BLE Server Ready");
}
void loop() {
// put your main code here, to run repeatedly:
delay(2000);
}
Code starts with including necessary Bluetooth library files. Then UUID is defined for both SERVICE and CHARACTERISTIC. You can go with the default UUID or can generate using the free UUID generator. Next serial communication is initialized by defining baud rate.
Next, we created a BLE device named ESP32 and after that we defined the BLE device as a server using the createServer() function and later we set the Characteristic value. At the final step we started the service by advertising it so other devices can search for it.

ESP32 BLE Scanner
Now we will upload an ESP32 scan example in the second ESP32 board. To do this Go to: File>Examples>ESP32 BLE Arduino>BLE_scan:

The code below will be open in Arduino IDE editor.
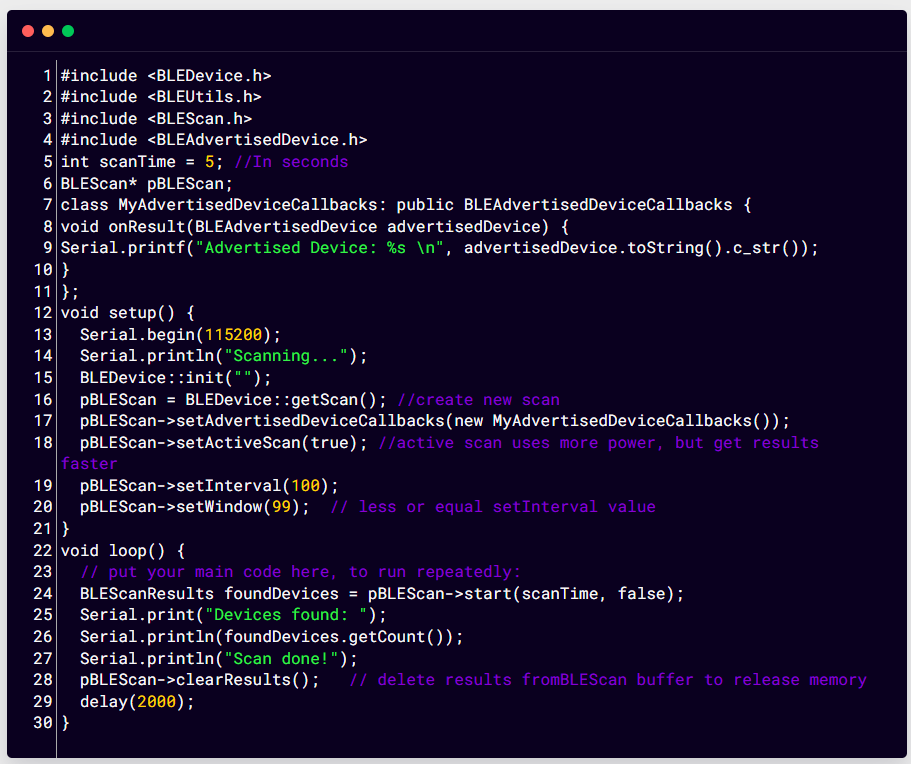
Scanner Code
The code given will be used in the Scanner ESP32 board. Open IDE and upload the code, remember to disconnect other boards before uploading the scanner code.
#include <BLEUtils.h>
#include <BLEScan.h>
#include <BLEAdvertisedDevice.h>
int scanTime = 5; //In seconds
BLEScan* pBLEScan;
class MyAdvertisedDeviceCallbacks: public BLEAdvertisedDeviceCallbacks {
void onResult(BLEAdvertisedDevice advertisedDevice) {
Serial.printf("Advertised Device: %s \n", advertisedDevice.toString().c_str());
}
};
void setup() {
Serial.begin(115200);
Serial.println("Scanning...");
BLEDevice::init("");
pBLEScan = BLEDevice::getScan(); //create new scan
pBLEScan->setAdvertisedDeviceCallbacks(new MyAdvertisedDeviceCallbacks());
pBLEScan->setActiveScan(true); //active scan uses more power, but get results faster
pBLEScan->setInterval(100);
pBLEScan->setWindow(99); // less or equal setInterval value
}
void loop() {
// put your main code here, to run repeatedly:
BLEScanResults foundDevices = pBLEScan->start(scanTime, false);
Serial.print("Devices found: ");
Serial.println(foundDevices.getCount());
Serial.println("Scan done!");
pBLEScan->clearResults(); // delete results fromBLEScan buffer to release memory
delay(2000);
}
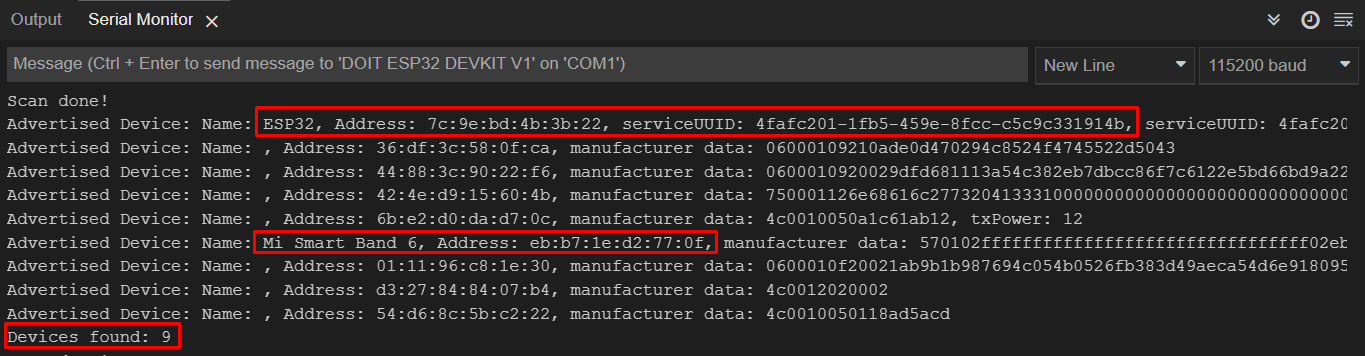
Above code will search for the number of total available devices for BLE and display their total count with addresses. After uploading the code in the ESP32 scanner board press the Enable button, ESP32 board will automatically search for available devices:
Output
Once the ESP32 scans the available devices the following result will appear. Here ESP32 scanned 9 devices among which one is an ESP32 board with BLE_server code and another device is MI band 6. Rest of all the devices are available near my ESP32.
How to Fix ESP32 BLE Scan Library Not Counting Devices
The ESP32 scan library example has a bug of not counting the total number of devices. To rectify this problem, go to the mentioned location and replace the code given below:
Remember to unhide all the folders because the AppData folder inside the C directory remains hidden by default. After opening the BLE_scan source file .cpp replace the below given condition inside the code:
m_pAdvertisedDeviceCallbacks->onResult(*advertisedDevice);
}
if (!m_wantDuplicates && !found) {
m_scanResults.m_vectorAdvertisedDevices.insert(std::pair<std::string, BLEAdvertisedDevice*>(advertisedAddress.toString(), advertisedDevice));
shouldDelete = false;
}
Testing ESP32 BLE Server with Smart Phone
Most of the modern smartphones work with BLE technology to communicate with different devices such as smartwatch, wearables, sensors and other home automation devices. Here ESP32 is an access point for devices. So, we will connect an Android phone with an ESP32 board.
BLE Server Code for ESP32 Smartphone Access
Upload the below given code in ESP32 board:
#include <BLEUtils.h>
#include <BLEServer.h>
#define SERVICE_UUID "a484a399-7272-4282-91cf-9018e075fc35"
#define CHARACTERISTIC_UUID "c7e084bd-5279-484d-8319-fff7d917537d"
class MyCallbacks: public BLECharacteristicCallbacks
{
void onWrite(BLECharacteristic *pCharacteristic)
{
std::string value = pCharacteristic->getValue();
if (value.length() > 0)
{
Serial.print("Updated Characteristic Value: ");
for (int i = 0; i createService(SERVICE_UUID);
BLECharacteristic *pCharacteristic = pService->createCharacteristic(
CHARACTERISTIC_UUID,
BLECharacteristic::PROPERTY_READ |
BLECharacteristic::PROPERTY_WRITE
);
pCharacteristic->setCallbacks(new MyCallbacks());
pCharacteristic->setValue("LINUXHINT.COM");
pService->start();
BLEAdvertising *pAdvertising = pServer->getAdvertising();
pAdvertising->start();
}
void loop()
{
delay(2000);
}
Installing BLE Application in Android Smartphone
Following steps will guide you to installing BLE applications in smartphones and help to interface mobile devices with ESP32 boards.
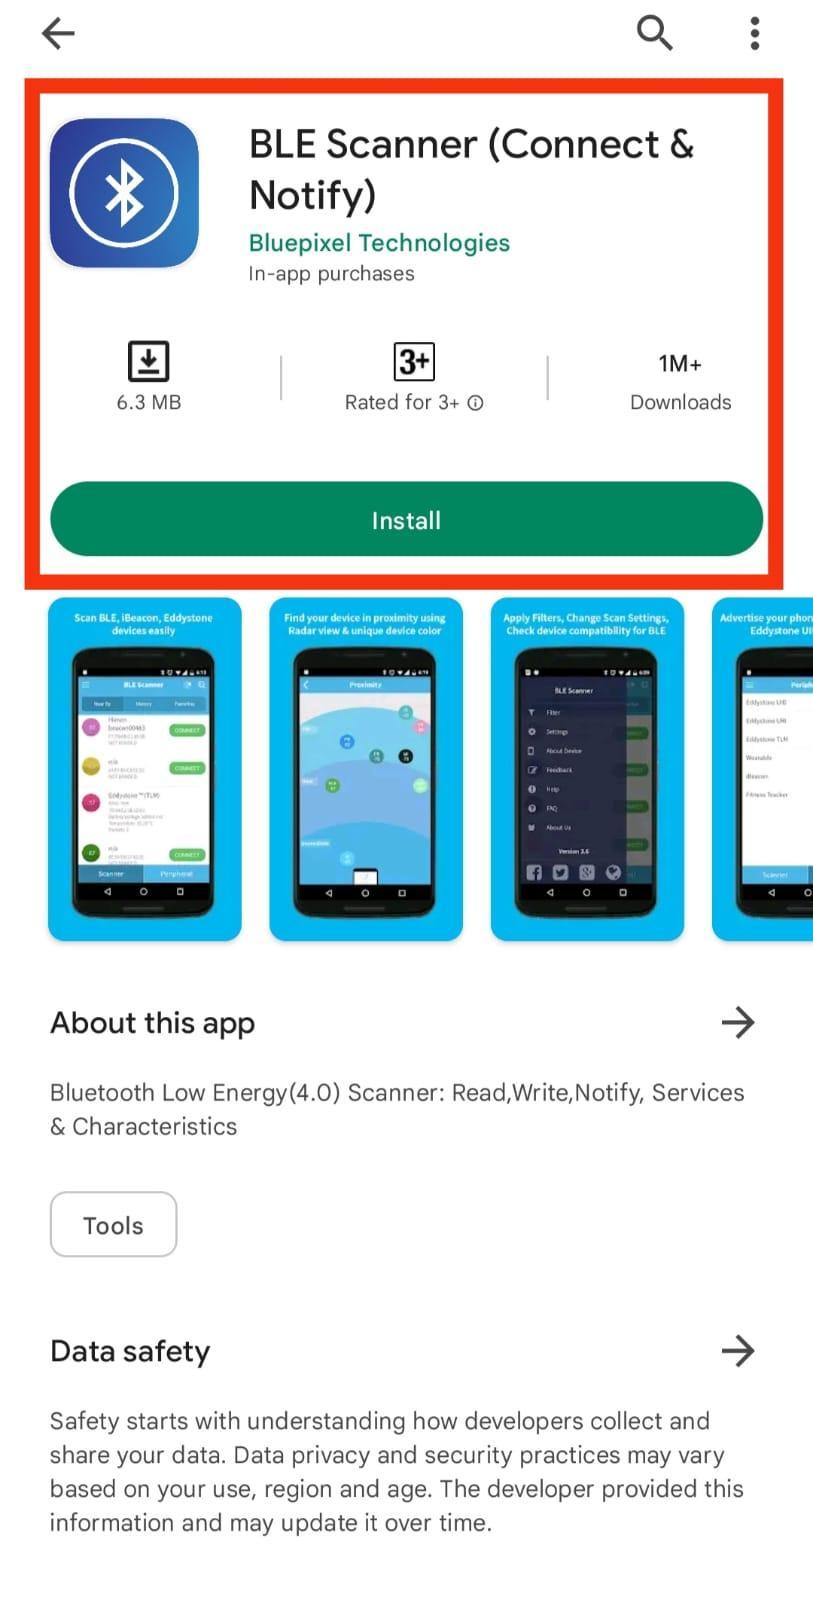
Step 1: Open Google Play Store install BLE scanner application:
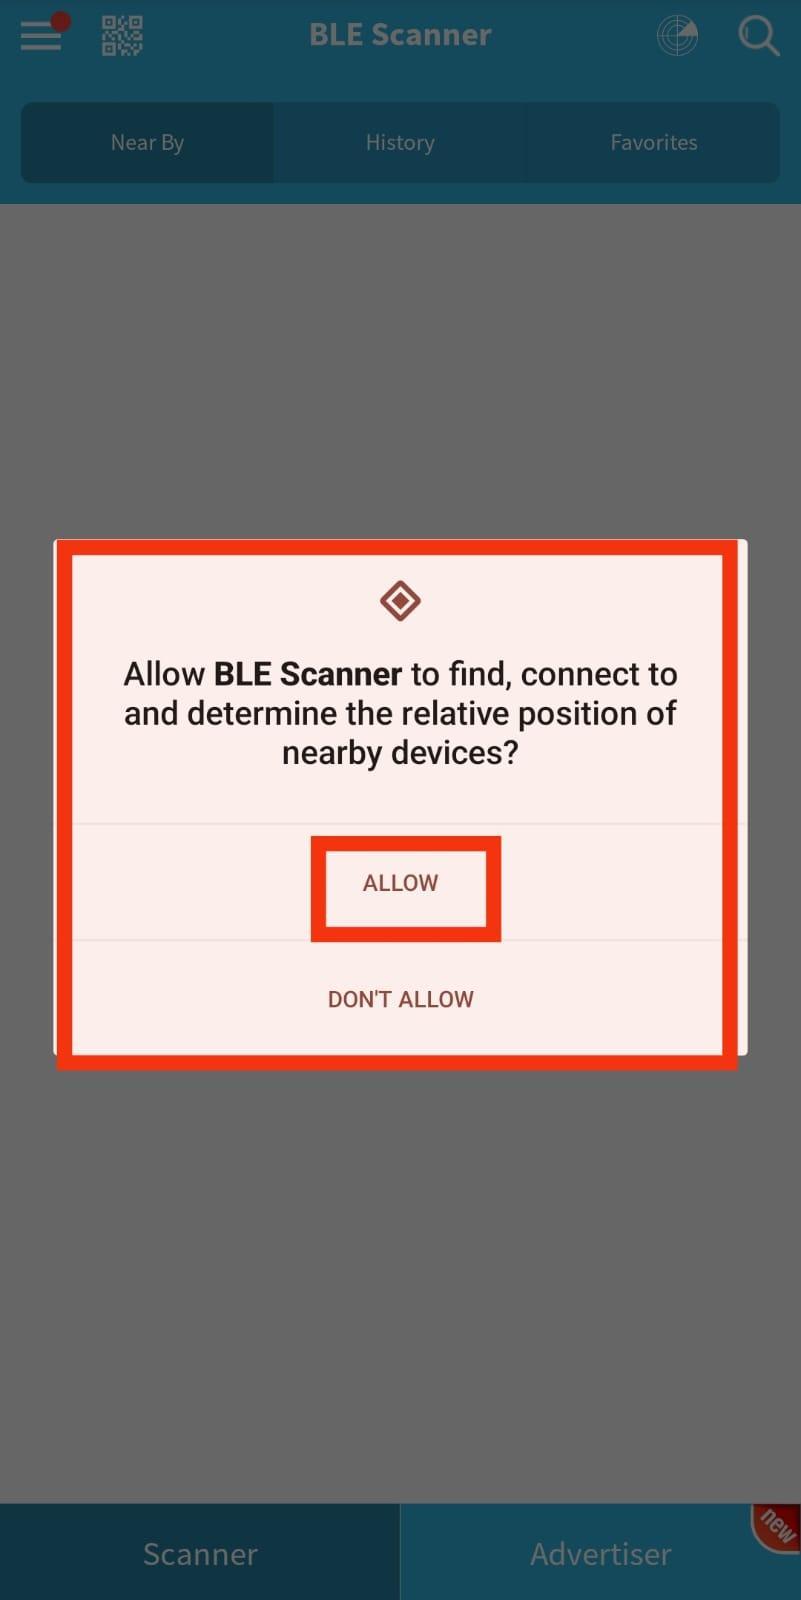
Step 2: After installing, open the application and allow all the required permission and remember to turn on mobile Bluetooth:
Step 3: Now scan for the available Bluetooth devices. Connect ESP32 board:

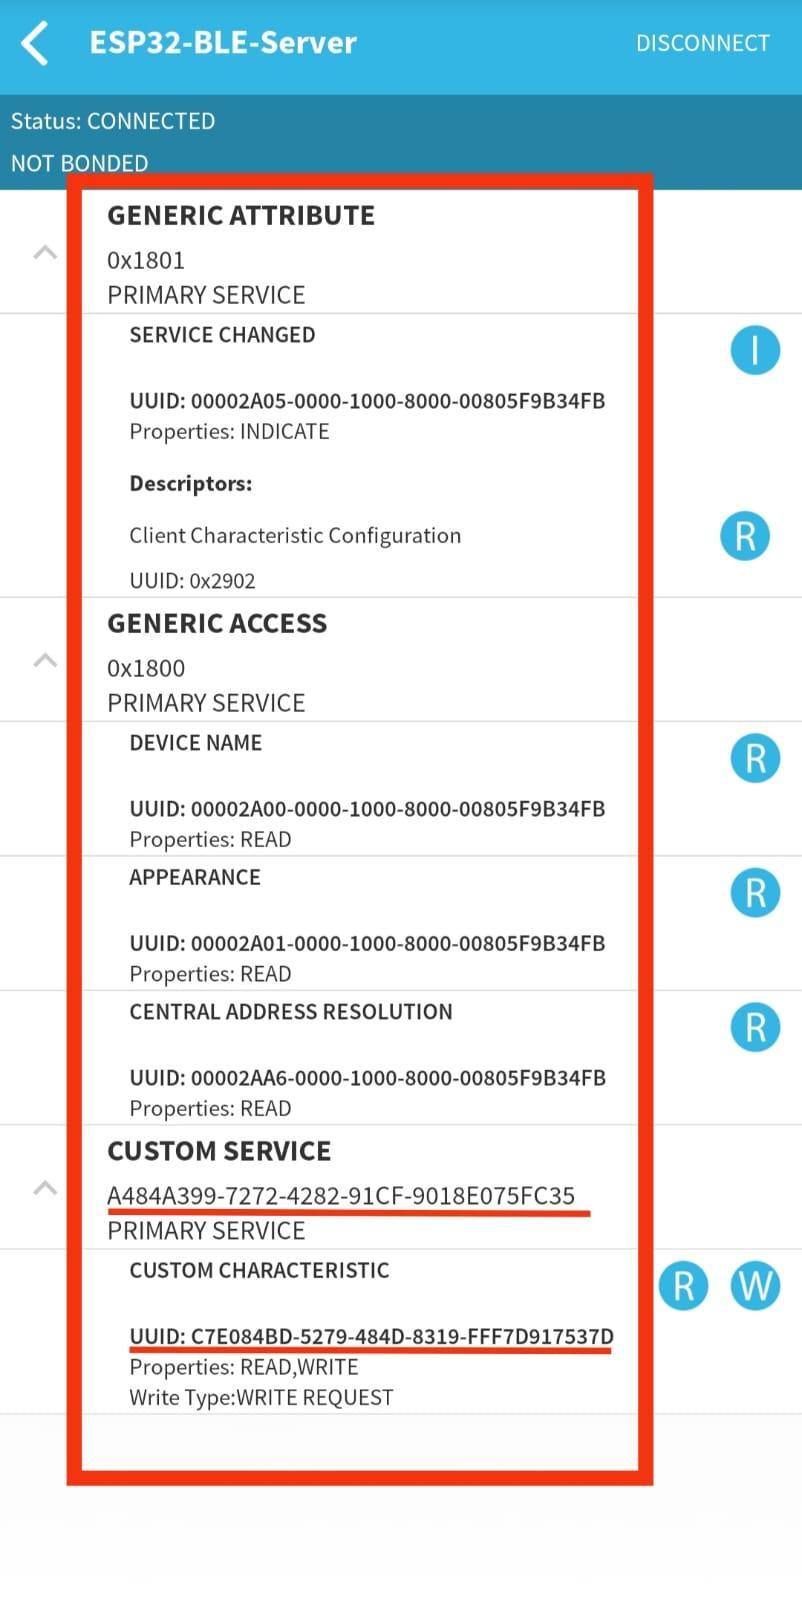
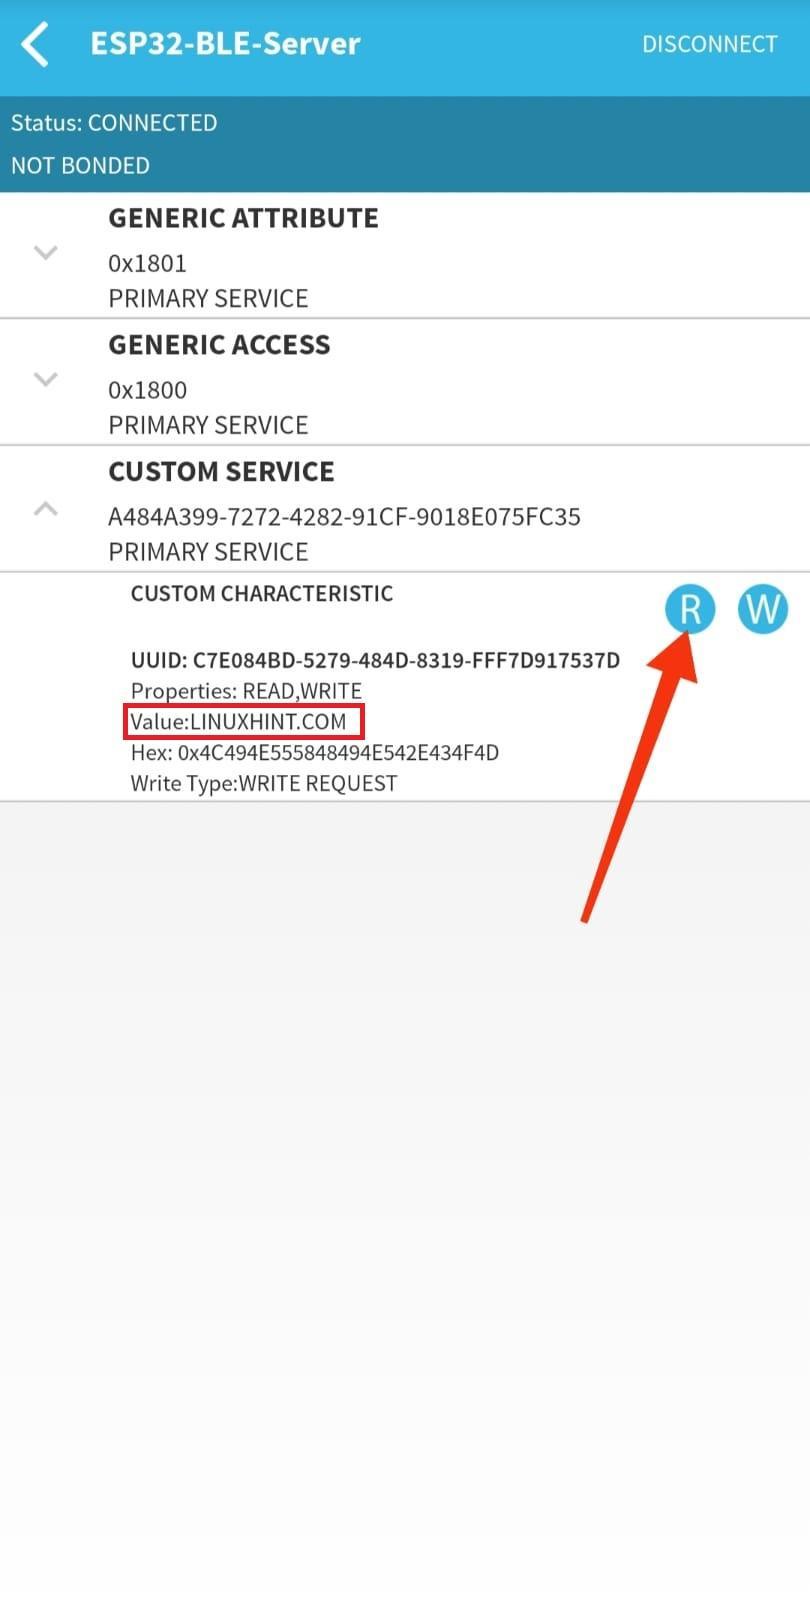
Step 4: Once ESP32 board is connected to smartphone following specification of ESP32 board will appear. Here we can see the UUID addresses and can READ and WRITE new Characteristic values:
Step 5: To read the saved Characteristic value click R. Result will be displayed as mentioned in image below:
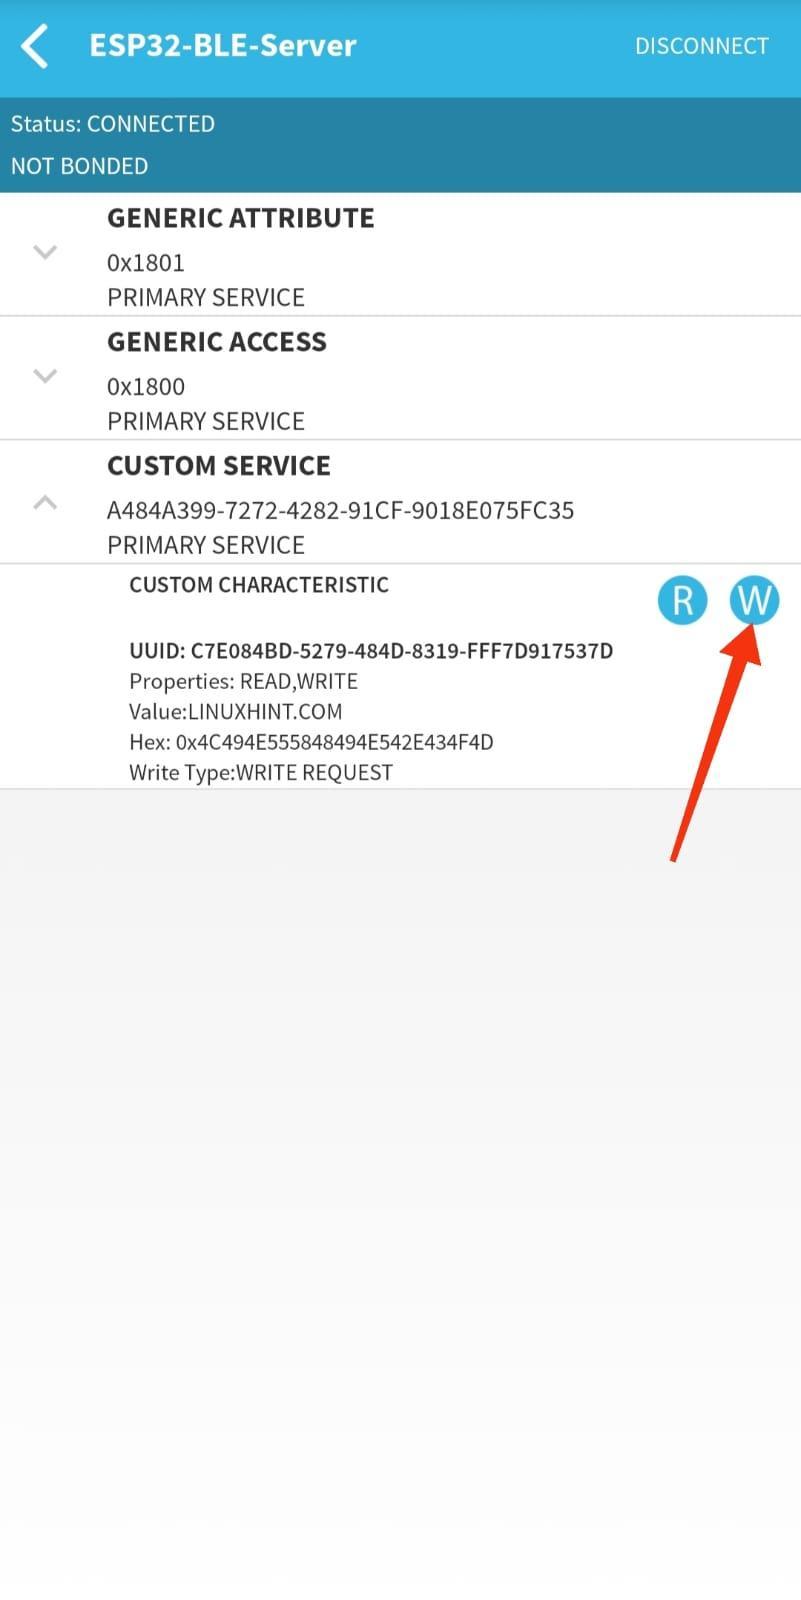
Step 6: To write any new Characteristic value click W:
Step 7: A new pop-up will appear here where we can write any Characteristic value and click Ok:

Step 8: New value which is written will appear as shown in image:

Step 9: Also, we can see the same new Characteristic value printed on the serial monitor of Arduino IDE:

We have successfully connected a device with ESP32 BLE.
Conclusion
ESP32 comes with dual Bluetooth which are Bluetooth Classic and Bluetooth Low Energy. Here in this article, we discussed both Bluetooth classic and BLE and its various applications and working. Bluetooth Classic is used for high data transfer while BLE (Bluetooth Low Energy) is used for short distances with less power requirements. This article gives an ultimate guide to ESP32 board Bluetooth working and how to configure them.