Creating a special character in Arduino
The characters which do not have any ASCII or are not present on the keyboard and are created by the user are called the customized characters. These characters can be of any form like making specific symbols like the Android, Windows or any other character. Similarly, these characters can be created by turning on some pixels of the display module and turning off of some pixels of the LCD. Moreover, we can use the binaries or hexes for creating the special characters and after that a function called createChar() is used for creating those binaries or hex into characters.
The function createChar() needs two arguments as its inputs: the first one is the number of the character by which it will be called and the second one is the binaries or the hex values of the special character.
To use the create character the following syntax should be followed:
Interfacing LCD with Arduino to display special character
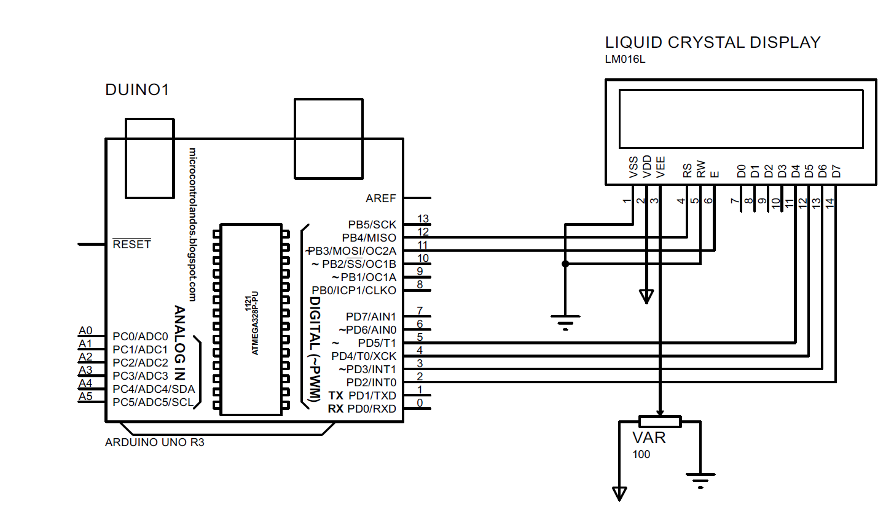
To interface the LCD with Arduino for displaying the special character we have designed a circuit whose schematic is given below. The components used for this project are:
- Arduino Uno
- Connecting wires
- Liquid Crystal Display
- Potentiometer
- Breadboard
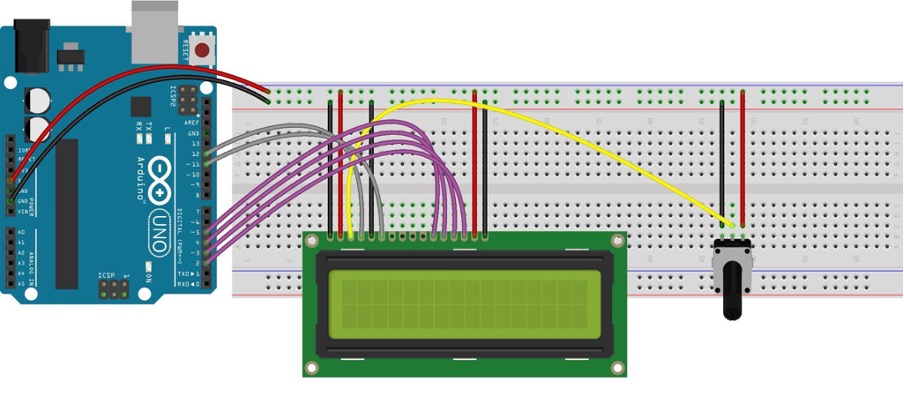
Hardware assembly
To demonstrate the displaying of the special character we have implemented the schematic of the circuit on the hardware. To implement the circuit of hardware first we have placed the LCD and the potentiometer on the breadboard and after that we interface the LCD with Arduino.
The purple wires connect the data pins of the LCD with Arduino and to adjust the brightness of the liquid crystal display the yellow wire connects the potentiometer with the LCD. The gray wires connect the RS and enable the pin of the LCD with the Arduino. The 5 volts are supplied to the LCD using the 5 volts and ground pin of the Arduino.
Arduino code for creating the special character
We have provided the Arduino code compiled for creating the special characters. In the Arduino code we have first declared the binaries of the character and then in the setup function we have initialized those characters using the create.Char() function. Next we have used the lcd.write() function for displaying the characters on LCD:
LiquidCrystal lcd(12, 11, 5, 4, 3, 2); // RS, E, D4, D5, D6, D7
// declaring the binaries of the customized characters
byte Char1[8] = {
B00100,
B11111,
B10101,
B10101,
B10101,
B10101,
B11111,
B00100
};
byte Char2[8] = {
B00000,
B00000,
B10001,
B01010,
B11111,
B00100,
B00100,
B00100
};
byte Char3[8] = {
B01111,
B01000,
B00100,
B00010,
B00100,
B01000,
B10000,
B01111
};
void setup() {
Serial.begin(9600);
lcd.begin(16, 2); // initializing the dimensions of LCD
lcd.createChar(1,Char1); // creating the first character
lcd.createChar(2,Char2); // creating the second character
lcd.createChar(3,Char3); // creating the third character
lcd.setCursor(1, 0); // place for first character
lcd.write((byte)1); // printing the character using the number given to it
lcd.setCursor(3, 0); //place for second character
lcd.write((byte)2); //printing the character using the number given to it
lcd.setCursor(5, 0); //place for third character
lcd.write((byte)3); //printing the character using the number given to it
}
void loop() {
}
Hardware implementation for displaying special characters on LCD
We have posted an image of the hardware assembled which shows the special characters created on LCD

Conclusion
When designing a project using Arduino boards it is imperative that the parameters of the Arduino program should be displayed when the code is running. Furthermore, to display the inputs and outputs of the Arduino program there are a variety of display modules available in the market. The most commonly used display unit in the Arduino projects is the 16×2 LCD which is easy to interface with Arduino. Apart from displaying the parameters of the Arduino program for better understating of the parameters we can also use special or customized characters. To create the customized character we have compiled an Arduino code and have displayed them on the LCD.