This lesson includes following topics:
- 1: Introduction to OLED Display
- 2: Wiring OLED Display Module to ESP32
- 3: Installing Required Libraries
- 4: Check OLED Display I2C Address
- 5: Display QR Code on OLED Screen with ESP32 Using Arduino IDE
- 5.1: Creating a QR Code
- 5.2: Converting QR Code to HEX Code
- 5.3: Code
- 5.4: Sample Arduino Code for QR Code Image Display
- 5.5: Output
- 5.6: Scanning QR Code from OLED Display
1: Introduction to OLED Display
Before moving further first we must know what an OLED display is. OLED (Organic Light Emitting Diode) displays are used as an alternative to LCDs. OLED LEDs are used to produce light displays on OLED screens. The LCD screen uses backlight for illuminating its pixels while OLED displays have their own self emissive LEDs. There are hundreds of self-illuminating LEDs. To display images and text brightness of these LEDs can be controlled pixel by pixel.
Now as we know some basics related to OLED display. Next step is to wire ESP32 with an OLED display module.
2: Wiring OLED Display Module to ESP32
The OLED display mainly comes with two different communication protocols. The two protocols are I2C and SPI. The serial peripheral interface (SPI) is generally faster than I2C, but we preferred I2C over SPI protocol as it required less number of pins.
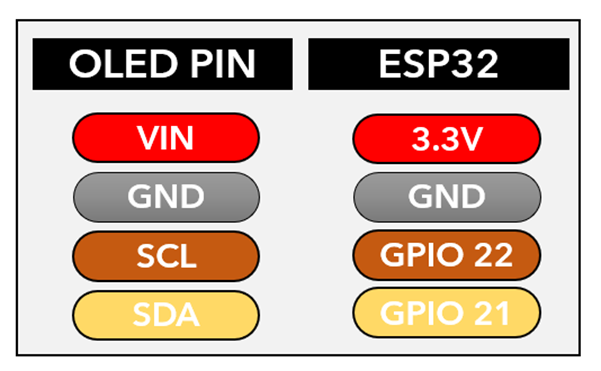
Following image illustrates ESP32 connection diagram with 128×64 pixels (0.96’’) OLED display.

Below is the connection table:
Once ESP32 is interfaced with an OLED display, the next step on the list is install all required libraries for ESP32 programming using Arduino IDE.
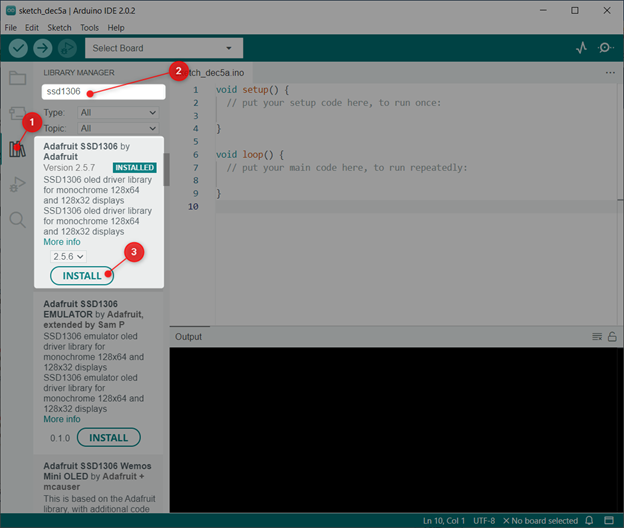
3: Installing Required Libraries
Multiple libraries are available in Arduino IDE to program ESP32 with an OLED display. Here we will be using two libraries from Adafruit: SSD1306 and GFX library.
Now in the Arduino IDE open Library Manager and search for the OLED SSD1306 library. Install SSD1306 library by Adafruit from the search bar.
Alternatively, one can also go to: Sketch>Include Library>Manage Libraries
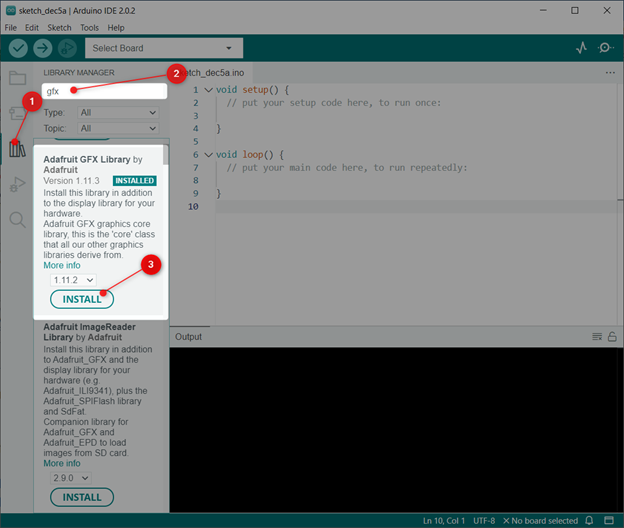
Next library we need to install is the GFX Library by Adafruit.
After both libraries are installed successfully, the next step is to check the I2C address where ESP32 is connected.
4: Check OLED Display I2C Address
I2C stands for Inter-Integrated Circuit communication. Using I2C we can interface multiple devices over 2 wires. However, while connecting them every I2C device must use a separate I2C address. This address ranges from 0 to 127. For example, if we have two different I2C devices using the same I2C address they cannot be connected on the same I2C line.
It’s important to check the I2C address first. To check the I2C address of the connected OLED display connected ESP32 with PC, upload the code given in the article Check I2C Address Using Arduino IDE.
After uploading code, the following output will appear. Here in our case the OLED display is connected at I2C address (0x3C).
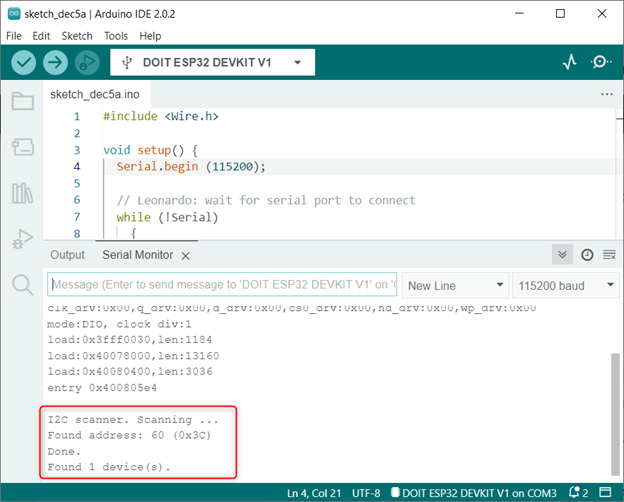
We will use the mentioned I2C address for the OLED display in Arduino code.
5: Display QR Code on OLED Screen with ESP32 Using Arduino IDE
First step which is needed to display any QR code on an OLED screen is to convert the QR code image to a HEX code. Using any online image to HEX converter we can get HEX code against an image.
But before that first we have to create a sample QR code.
5.1: Creating a QR Code
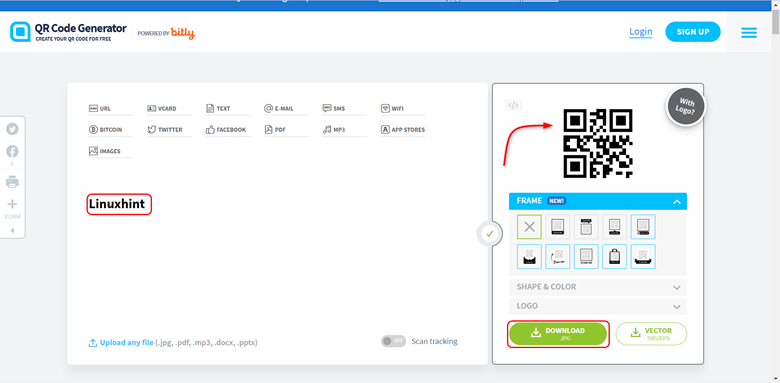
For creating QR code multiple online free tools are available. Here is a free text to QR code generator.
Using this tool any text or link can be converted into QR code. Here we created a QR code for Linuxhint website address.
5.2: Converting QR Code to HEX Code
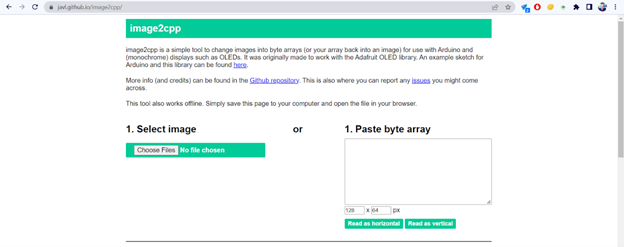
To convert any QR code to HEX code we can use any online tool, or one can also convert QR code image to HEX code using the Windows paint tool. Now follow along the steps for getting HEX code for your QR code image.
Step 1: Click here to visit free image2cpp converter.
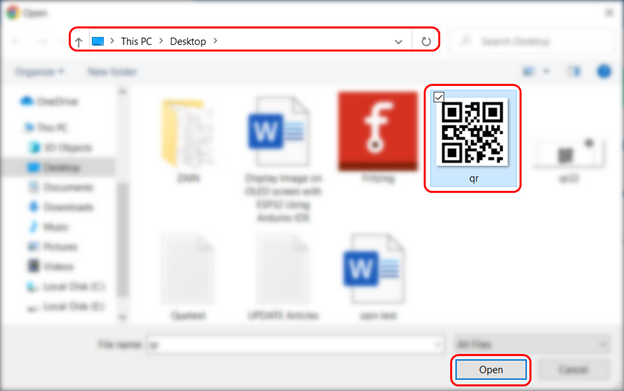
Step 2: Select the QR code image which we want to display on OLED.

Step 3: After selecting the QR code image click open.
Step 4: In the image setting set the dimensions to 128 x 64. Brightness can be set according to the image recommended number is somewhere around 150.
Scale the QR code image according to size and for reference see the output preview.

Step 5: Now set the code output format in Arduino code and prefix as bitmap. After that click generate code. Output HEX code can be copied from the output window.
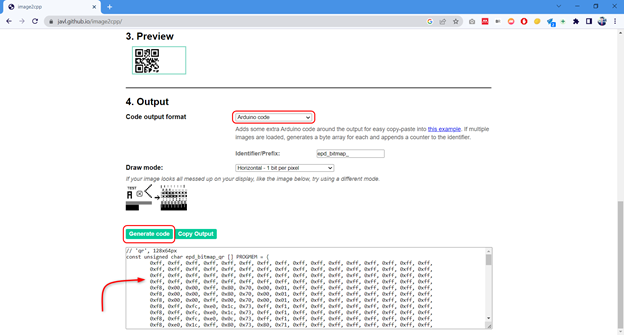
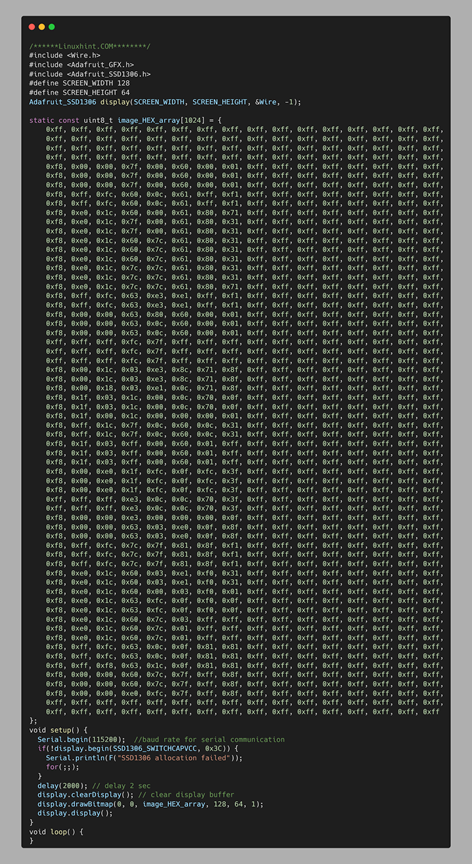
Replace the copied HEX code in Arduino IDE sample code given below.
5.3: Code
Now open the Arduino IDE and paste the below code. Remember to replace the HEX code with the one for the QR code image you need to display on an OLED screen.
#include <Wire.h>
#include <Adafruit_GFX.h>
#include <Adafruit_SSD1306.h>
#define SCREEN_WIDTH 128
#define SCREEN_HEIGHT 64
Adafruit_SSD1306 display(SCREEN_WIDTH, SCREEN_HEIGHT, &Wire, -1);
static const uint8_t image_HEX_array[1024] = {
0xff, 0xff, 0xff, 0xff, 0xff, 0xff, 0xff, 0xff, 0xff, 0xff, 0xff, 0xff, 0xff, 0xff, 0xff, 0xff,
0xff, 0xff, 0xff, 0xff, 0xff, 0xff, 0xff, 0xff, 0xff, 0xff, 0xff, 0xff, 0xff, 0xff, 0xff, 0xff,
0xff, 0xff, 0xff, 0xff, 0xff, 0xff, 0xff, 0xff, 0xff, 0xff, 0xff, 0xff, 0xff, 0xff, 0xff, 0xff,
0xff, 0xff, 0xff, 0xff, 0xff, 0xff, 0xff, 0xff, 0xff, 0xff, 0xff, 0xff, 0xff, 0xff, 0xff, 0xff,
0xf8, 0x00, 0x00, 0x7f, 0x00, 0x60, 0x00, 0x01, 0xff, 0xff, 0xff, 0xff, 0xff, 0xff, 0xff, 0xff,
0xf8, 0x00, 0x00, 0x7f, 0x00, 0x60, 0x00, 0x01, 0xff, 0xff, 0xff, 0xff, 0xff, 0xff, 0xff, 0xff,
0xf8, 0x00, 0x00, 0x7f, 0x00, 0x60, 0x00, 0x01, 0xff, 0xff, 0xff, 0xff, 0xff, 0xff, 0xff, 0xff,
0xf8, 0xff, 0xfc, 0x60, 0x0c, 0x61, 0xff, 0xf1, 0xff, 0xff, 0xff, 0xff, 0xff, 0xff, 0xff, 0xff,
0xf8, 0xff, 0xfc, 0x60, 0x0c, 0x61, 0xff, 0xf1, 0xff, 0xff, 0xff, 0xff, 0xff, 0xff, 0xff, 0xff,
0xf8, 0xe0, 0x1c, 0x60, 0x00, 0x61, 0x80, 0x71, 0xff, 0xff, 0xff, 0xff, 0xff, 0xff, 0xff, 0xff,
0xf8, 0xe0, 0x1c, 0x7f, 0x00, 0x61, 0x80, 0x31, 0xff, 0xff, 0xff, 0xff, 0xff, 0xff, 0xff, 0xff,
0xf8, 0xe0, 0x1c, 0x7f, 0x00, 0x61, 0x80, 0x31, 0xff, 0xff, 0xff, 0xff, 0xff, 0xff, 0xff, 0xff,
0xf8, 0xe0, 0x1c, 0x60, 0x7c, 0x61, 0x80, 0x31, 0xff, 0xff, 0xff, 0xff, 0xff, 0xff, 0xff, 0xff,
0xf8, 0xe0, 0x1c, 0x60, 0x7c, 0x61, 0x80, 0x31, 0xff, 0xff, 0xff, 0xff, 0xff, 0xff, 0xff, 0xff,
0xf8, 0xe0, 0x1c, 0x60, 0x7c, 0x61, 0x80, 0x31, 0xff, 0xff, 0xff, 0xff, 0xff, 0xff, 0xff, 0xff,
0xf8, 0xe0, 0x1c, 0x7c, 0x7c, 0x61, 0x80, 0x31, 0xff, 0xff, 0xff, 0xff, 0xff, 0xff, 0xff, 0xff,
0xf8, 0xe0, 0x1c, 0x7c, 0x7c, 0x61, 0x80, 0x31, 0xff, 0xff, 0xff, 0xff, 0xff, 0xff, 0xff, 0xff,
0xf8, 0xe0, 0x1c, 0x7c, 0x7c, 0x61, 0x80, 0x71, 0xff, 0xff, 0xff, 0xff, 0xff, 0xff, 0xff, 0xff,
0xf8, 0xff, 0xfc, 0x63, 0xe3, 0xe1, 0xff, 0xf1, 0xff, 0xff, 0xff, 0xff, 0xff, 0xff, 0xff, 0xff,
0xf8, 0xff, 0xfc, 0x63, 0xe3, 0xe1, 0xff, 0xf1, 0xff, 0xff, 0xff, 0xff, 0xff, 0xff, 0xff, 0xff,
0xf8, 0x00, 0x00, 0x63, 0x80, 0x60, 0x00, 0x01, 0xff, 0xff, 0xff, 0xff, 0xff, 0xff, 0xff, 0xff,
0xf8, 0x00, 0x00, 0x63, 0x0c, 0x60, 0x00, 0x01, 0xff, 0xff, 0xff, 0xff, 0xff, 0xff, 0xff, 0xff,
0xf8, 0x00, 0x00, 0x63, 0x0c, 0x60, 0x00, 0x01, 0xff, 0xff, 0xff, 0xff, 0xff, 0xff, 0xff, 0xff,
0xff, 0xff, 0xff, 0xfc, 0x7f, 0xff, 0xff, 0xff, 0xff, 0xff, 0xff, 0xff, 0xff, 0xff, 0xff, 0xff,
0xff, 0xff, 0xff, 0xfc, 0x7f, 0xff, 0xff, 0xff, 0xff, 0xff, 0xff, 0xff, 0xff, 0xff, 0xff, 0xff,
0xff, 0xff, 0xff, 0xfc, 0x7f, 0xff, 0xff, 0xff, 0xff, 0xff, 0xff, 0xff, 0xff, 0xff, 0xff, 0xff,
0xf8, 0x00, 0x1c, 0x03, 0xe3, 0x8c, 0x71, 0x8f, 0xff, 0xff, 0xff, 0xff, 0xff, 0xff, 0xff, 0xff,
0xf8, 0x00, 0x1c, 0x03, 0xe3, 0x8c, 0x71, 0x8f, 0xff, 0xff, 0xff, 0xff, 0xff, 0xff, 0xff, 0xff,
0xf8, 0x00, 0x18, 0x03, 0xe1, 0x0c, 0x71, 0x8f, 0xff, 0xff, 0xff, 0xff, 0xff, 0xff, 0xff, 0xff,
0xf8, 0x1f, 0x03, 0x1c, 0x00, 0x0c, 0x70, 0x0f, 0xff, 0xff, 0xff, 0xff, 0xff, 0xff, 0xff, 0xff,
0xf8, 0x1f, 0x03, 0x1c, 0x00, 0x0c, 0x70, 0x0f, 0xff, 0xff, 0xff, 0xff, 0xff, 0xff, 0xff, 0xff,
0xf8, 0x1f, 0x00, 0x1c, 0x00, 0x00, 0x00, 0x01, 0xff, 0xff, 0xff, 0xff, 0xff, 0xff, 0xff, 0xff,
0xf8, 0xff, 0x1c, 0x7f, 0x0c, 0x60, 0x0c, 0x31, 0xff, 0xff, 0xff, 0xff, 0xff, 0xff, 0xff, 0xff,
0xf8, 0xff, 0x1c, 0x7f, 0x0c, 0x60, 0x0c, 0x31, 0xff, 0xff, 0xff, 0xff, 0xff, 0xff, 0xff, 0xff,
0xf8, 0x1f, 0x03, 0xff, 0x00, 0x60, 0x01, 0xff, 0xff, 0xff, 0xff, 0xff, 0xff, 0xff, 0xff, 0xff,
0xf8, 0x1f, 0x03, 0xff, 0x00, 0x60, 0x01, 0xff, 0xff, 0xff, 0xff, 0xff, 0xff, 0xff, 0xff, 0xff,
0xf8, 0x1f, 0x03, 0xff, 0x00, 0x60, 0x01, 0xff, 0xff, 0xff, 0xff, 0xff, 0xff, 0xff, 0xff, 0xff,
0xf8, 0x00, 0xe0, 0x1f, 0xfc, 0x0f, 0xfc, 0x3f, 0xff, 0xff, 0xff, 0xff, 0xff, 0xff, 0xff, 0xff,
0xf8, 0x00, 0xe0, 0x1f, 0xfc, 0x0f, 0xfc, 0x3f, 0xff, 0xff, 0xff, 0xff, 0xff, 0xff, 0xff, 0xff,
0xf8, 0x00, 0xe0, 0x1f, 0xfc, 0x0f, 0xfc, 0x3f, 0xff, 0xff, 0xff, 0xff, 0xff, 0xff, 0xff, 0xff,
0xff, 0xff, 0xff, 0xe3, 0x0c, 0x0c, 0x70, 0x3f, 0xff, 0xff, 0xff, 0xff, 0xff, 0xff, 0xff, 0xff,
0xff, 0xff, 0xff, 0xe3, 0x0c, 0x0c, 0x70, 0x3f, 0xff, 0xff, 0xff, 0xff, 0xff, 0xff, 0xff, 0xff,
0xf8, 0x00, 0x00, 0xe3, 0x00, 0x00, 0x00, 0x0f, 0xff, 0xff, 0xff, 0xff, 0xff, 0xff, 0xff, 0xff,
0xf8, 0x00, 0x00, 0x63, 0x03, 0xe0, 0x0f, 0x8f, 0xff, 0xff, 0xff, 0xff, 0xff, 0xff, 0xff, 0xff,
0xf8, 0x00, 0x00, 0x63, 0x03, 0xe0, 0x0f, 0x8f, 0xff, 0xff, 0xff, 0xff, 0xff, 0xff, 0xff, 0xff,
0xf8, 0xff, 0xfc, 0x7c, 0x7f, 0x81, 0x8f, 0xf1, 0xff, 0xff, 0xff, 0xff, 0xff, 0xff, 0xff, 0xff,
0xf8, 0xff, 0xfc, 0x7c, 0x7f, 0x81, 0x8f, 0xf1, 0xff, 0xff, 0xff, 0xff, 0xff, 0xff, 0xff, 0xff,
0xf8, 0xff, 0xfc, 0x7c, 0x7f, 0x81, 0x8f, 0xf1, 0xff, 0xff, 0xff, 0xff, 0xff, 0xff, 0xff, 0xff,
0xf8, 0xe0, 0x1c, 0x60, 0x03, 0xe1, 0xf0, 0x31, 0xff, 0xff, 0xff, 0xff, 0xff, 0xff, 0xff, 0xff,
0xf8, 0xe0, 0x1c, 0x60, 0x03, 0xe1, 0xf0, 0x31, 0xff, 0xff, 0xff, 0xff, 0xff, 0xff, 0xff, 0xff,
0xf8, 0xe0, 0x1c, 0x60, 0x00, 0x03, 0xf0, 0x01, 0xff, 0xff, 0xff, 0xff, 0xff, 0xff, 0xff, 0xff,
0xf8, 0xe0, 0x1c, 0x63, 0xfc, 0x0f, 0xf0, 0x0f, 0xff, 0xff, 0xff, 0xff, 0xff, 0xff, 0xff, 0xff,
0xf8, 0xe0, 0x1c, 0x63, 0xfc, 0x0f, 0xf0, 0x0f, 0xff, 0xff, 0xff, 0xff, 0xff, 0xff, 0xff, 0xff,
0xf8, 0xe0, 0x1c, 0x60, 0x7c, 0x03, 0xff, 0xff, 0xff, 0xff, 0xff, 0xff, 0xff, 0xff, 0xff, 0xff,
0xf8, 0xe0, 0x1c, 0x60, 0x7c, 0x01, 0xff, 0xff, 0xff, 0xff, 0xff, 0xff, 0xff, 0xff, 0xff, 0xff,
0xf8, 0xe0, 0x1c, 0x60, 0x7c, 0x01, 0xff, 0xff, 0xff, 0xff, 0xff, 0xff, 0xff, 0xff, 0xff, 0xff,
0xf8, 0xff, 0xfc, 0x63, 0x0c, 0x0f, 0x81, 0x81, 0xff, 0xff, 0xff, 0xff, 0xff, 0xff, 0xff, 0xff,
0xf8, 0xff, 0xfc, 0x63, 0x0c, 0x0f, 0x81, 0x81, 0xff, 0xff, 0xff, 0xff, 0xff, 0xff, 0xff, 0xff,
0xf8, 0xff, 0xf8, 0x63, 0x1c, 0x0f, 0x81, 0x81, 0xff, 0xff, 0xff, 0xff, 0xff, 0xff, 0xff, 0xff,
0xf8, 0x00, 0x00, 0x60, 0x7c, 0x7f, 0xff, 0x8f, 0xff, 0xff, 0xff, 0xff, 0xff, 0xff, 0xff, 0xff,
0xf8, 0x00, 0x00, 0x60, 0x7c, 0x7f, 0xff, 0x8f, 0xff, 0xff, 0xff, 0xff, 0xff, 0xff, 0xff, 0xff,
0xf8, 0x00, 0x00, 0xe0, 0xfc, 0x7f, 0xff, 0x8f, 0xff, 0xff, 0xff, 0xff, 0xff, 0xff, 0xff, 0xff,
0xff, 0xff, 0xff, 0xff, 0xff, 0xff, 0xff, 0xff, 0xff, 0xff, 0xff, 0xff, 0xff, 0xff, 0xff, 0xff,
0xff, 0xff, 0xff, 0xff, 0xff, 0xff, 0xff, 0xff, 0xff, 0xff, 0xff, 0xff, 0xff, 0xff, 0xff, 0xff
};
void setup() {
Serial.begin(115200); //baud rate for serial communication
if(!display.begin(SSD1306_SWITCHCAPVCC, 0x3C)) {
Serial.println(F("SSD1306 allocation failed"));
for(;;);
}
delay(2000); // delay 2 sec
display.clearDisplay(); // clear display buffer
display.drawBitmap(0, 0, image_HEX_array, 128, 64, 1);
display.display();
}
void loop() {
}
Code started by importing necessary libraries that we installed earlier. Two libraries include the wire and Adafruit library. Wire libraries allow us to use I2C while Adafruit helps to display the written text on screen.
Next following command is written:
It contains the SCREEN_WIDTH and SCREEN_HEIGHT variables. Using these variables, we defined the size of the OLED display. Here we are using a 128×64 OLED display. After that &Wire object is defined for display.
The last parameter contains (-1), this display that the OLED screen we are using doesn’t have an external reset button. In case we have a reset button on the OLED display. We will pass this parameter to a GPIO pin. After pressing the reset button, the OLED screen will display the text.
In the middle of the code, we included the HEX code for the QR code image and after that initialized the I2C communication at I2C address (0x3C) is defined which we have found earlier using I2C scanner code.
In the last lines of code, the HEX array is printed on OLED using the bitmap function.
5.4: Sample Arduino Code for QR Code Image Display
Here is a code given for OLED interfacing with ESP32. You have to replace the HEX code of the QR code image which you want to display on screen.
#include <Wire.h>
#include <Adafruit_GFX.h>
#include <Adafruit_SSD1306.h>
#define SCREEN_WIDTH 128
#define SCREEN_HEIGHT 64
Adafruit_SSD1306 display(SCREEN_WIDTH, SCREEN_HEIGHT, &Wire, -1);
static const uint8_t image_HEX_array[1024] = {
/*******
*******
*******
[PASTE HEX CODE FOR IMAGE HERE]
*******
*******
*******/
};
void setup() {
Serial.begin(115200); //baud rate for serial communication
if(!display.begin(SSD1306_SWITCHCAPVCC, 0x3C)) {
Serial.println(F("SSD1306 allocation failed"));
for(;;);
}
delay(2000); // delay 2 sec
display.clearDisplay(); // clear display buffer
display.drawBitmap(0, 0, image_HEX_array, 128, 64, 1);
display.display();
}
void loop() {
}
5.5: Output
Here in the output, we can see the QR code displayed on the OLED screen. This is the same QR code which we converted into HEX code earlier.
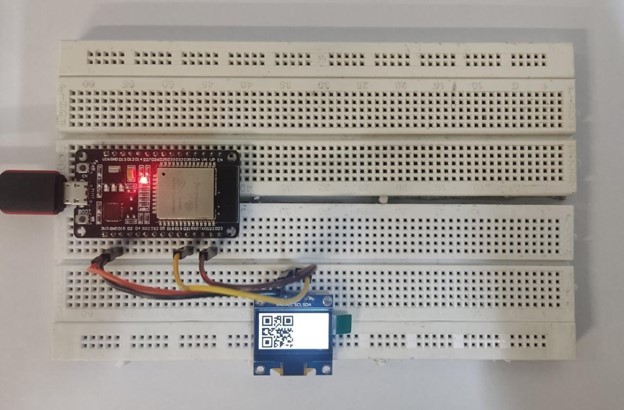
We have successfully displayed a QR code image on an OLED I2C display. Using the same steps any QR code with correct proportion can be displayed on an OLED screen.
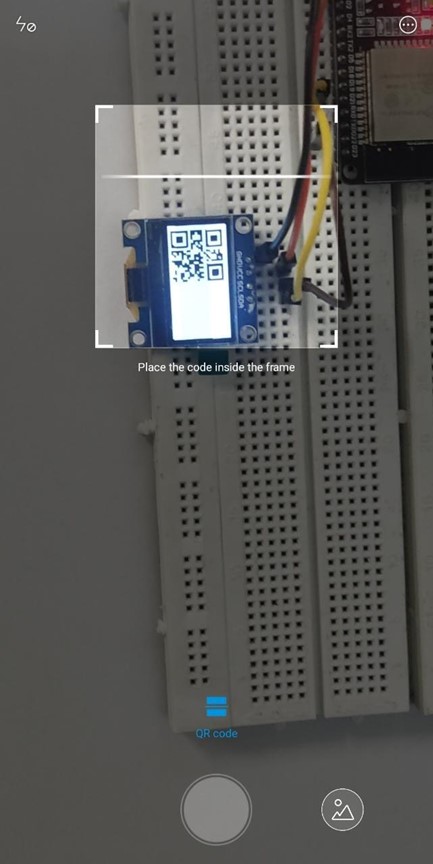
5.6: Scanning QR Code from OLED Display
Once the QR code is displayed the last step is to verify whether it is working or not for that smartphone to be used. Most smartphones come with a preinstalled QR code scanner if not available it can be easily downloaded from the App store.
Now place the camera on QR code.
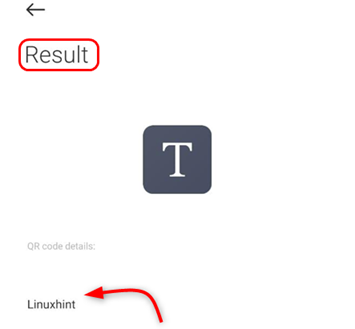
If successfully scanned the following text will appear. This is the exact same text we saved while creating the QR code.
Conclusion
An OLED display is a great way of showing outputs without any need for a serial monitor or PC. OLED displays come with two different protocols I2C and SPI. I2C OLED displays are preferred because of a lesser number of wires. OLED display can be used for displaying information on screen such as QR code or barcode using. This lesson provides all steps required in displaying a QR code image on an OLED I2C display with ESP32 using the Arduino IDE.