How to display brightness values of LED on 16×2 LCD
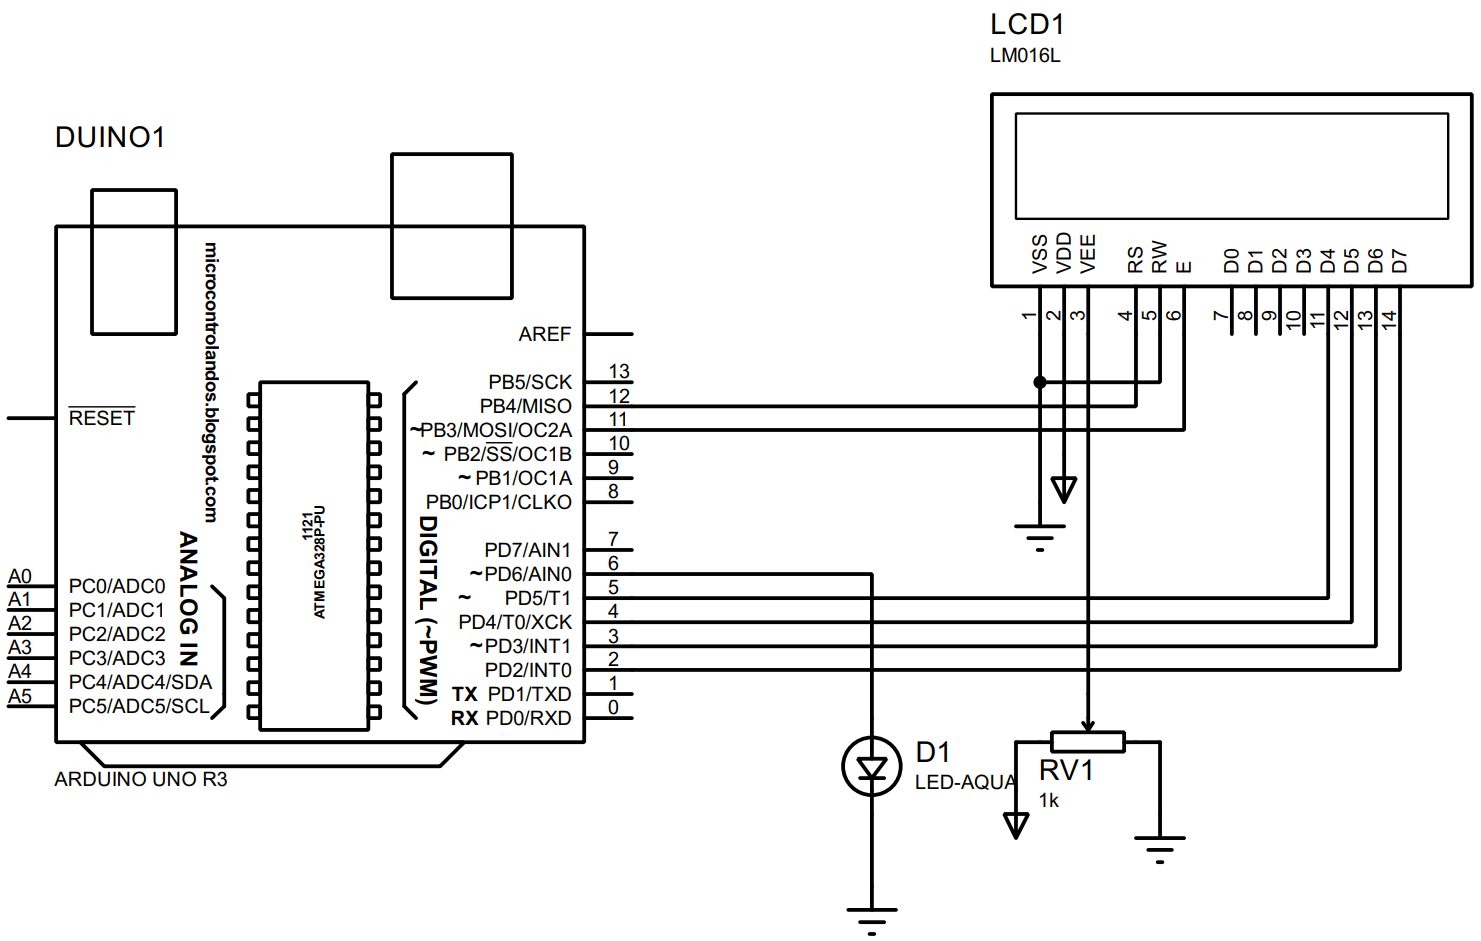
To alter the brightness and display the values on the LCD we have first created a circuit whose schematic is given below followed by the components that we have used in the circuit:
- Breadboard
- Arduino Uno
- Connecting wires
- 1 LED
- 1 Liquid Crystal Display(16×2)
- 2 potentiometers
How to create hardware for displaying the LED brightness values on LCD
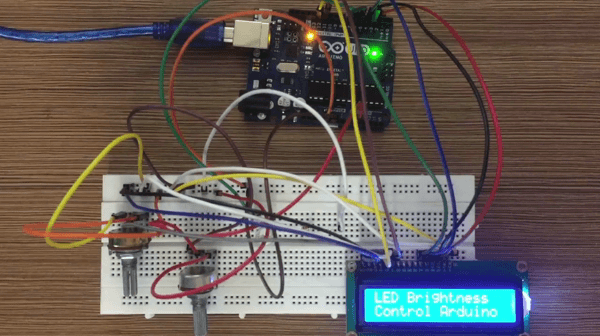
For displaying the brightness values of LED on 16×2 LCD we have assembled the circuit according to the schematic given above. The image below is the hardware assembly for the circuit that displays brightness values of LED on LCD:
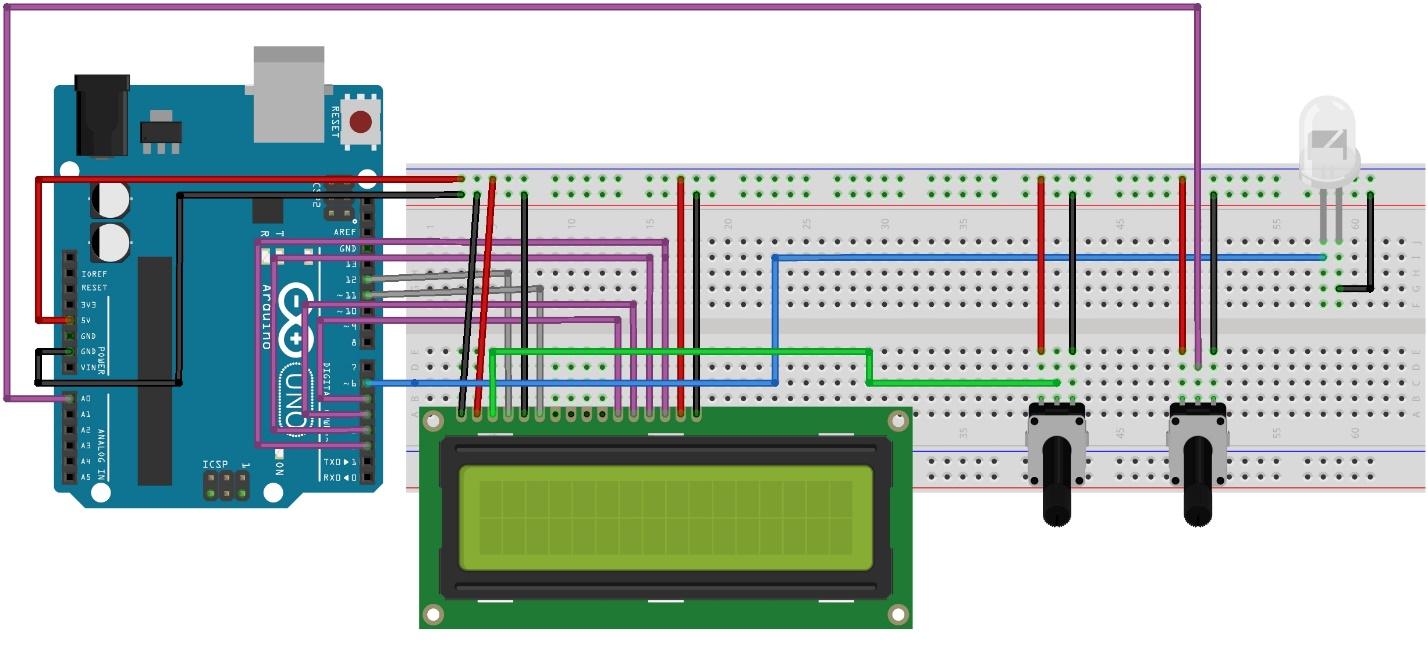
In the above figure you can see we have used two potentiometers one is used to control the brightness of LCD and the other one is used to adjust the brightness of LED. Since the potentiometer is an analog device, we have connected the output of the second potentiometer on the analog pin A0 of the Arduino using the blue color wire.
The output of the first potentiometer is connected to the V0 pin of the LCD using the green color wire. The purple wires in the hardware assembly are used to connect the data pins of LCD to Arduino using its 5,4,3,2 pins. However, the register select and enable pin of LCD is connected to Arduino using the gray wires on its 12 and 11 pins.
To control the LED we have connected one pin to Arduino using pin 6 whereas the other pin of the LED is connected to ground using the ground pin of Arduino.
We have supplied 5 volts to the topmost pin rows of the breadboard using the 5 volt pin of Arduino and from there we have connected each component with supply.
.
How to write Arduino code for controlling the brightness of LED and display it on LCD using potentiometer
To control the brightness of LED and displaying its values on LCD using Arduino Uno we have written the code which is given below:
LiquidCrystal lcd(12, 11, 5, 4, 3, 2);/* Assigning the pins of Arduinofor connecting it with LCD*/
int pot = A0;/* analog pin for potentiometer for LED brightness control*/
int led = 6;/* defining the LED pin for Arduino */
int Value = 0;/* declaring variable for storing the potentiometer value*/
int LEDvalue = 0; /* variable that will store the scalarizing value of pot*/
int status = 0; /* declaring the variable that will store the brightness value of LED */
int i = 0;/* declaring variable for using the for loop */
int status2=0;/* variable that will store the value of brightness in percentage */
byte statusbar[8] = {
B00000,
B00000,
B00000,
B01110,
B10101,
B11111,
B10101,
B01110
};
void setup() {
pinMode(led, OUTPUT); /* defining the output mode for LED*/
lcd.begin(16, 2);/* defining the size of LCD*/
lcd.setCursor(0,0);
lcd.print("LED Brightness");
lcd.setCursor(0,1);
lcd.print("Control Arduino ");
lcd.createChar(0, statusbar);/* creating the binaries into characters of status bar*/
delay(5000);
}
void loop() {
lcd.clear();
lcd.setCursor(0,0);
lcd.print("Brightness");
Value = analogRead(pot);/* getting the value of potentiometer*/
LEDvalue=map(Value, 0, 1024, 0, 255); /* scalarizing the analog values in the range of PWM*/
analogWrite(led, LEDvalue); /* assigning the scalarizing values to the LED */
status=map(LEDvalue, 0, 255, 0, 17);/* to display the status bar scalarizing the PWM values to the size of LCD*/
status2=map(status, 0, 16, 0, 100);/* to display the percentage brightness bar scalizing LCD size values to 0 to 100*/
lcd.setCursor(11,0);
lcd.print(status2);/* displaying the value of percentage on the place allocated in the above line */
lcd.setCursor(14,0);
lcd.print("%");/* display the parentage sign */
for (i=0; i < status; i++)// to display the progress bar we have used the for loop*/
{
lcd.setCursor(i, 1);
lcd.write(byte(0)); /* displaying the character declared above */
}
delay(750);
}
To control the brightness of the LED we have used the potentiometer and to convert the analog values of the potentiometer we used the map() function and then those scalarized values are given to the LED using the analogwrite() function.
The next step is to display the brightness values of the LED on LCD and for that we have used the map function twice. First to display the status bar we have to scalarize the values in the range of size of LCD. Second, to display the values of brightness in percentage we have scalarized the values mapped for displaying the status bar to the range of 0 to 100.
To display the status bar, we have used the for loop that works in such a way that the for loop runs till the respected LED brightness value and displays the character till that place of LCD.
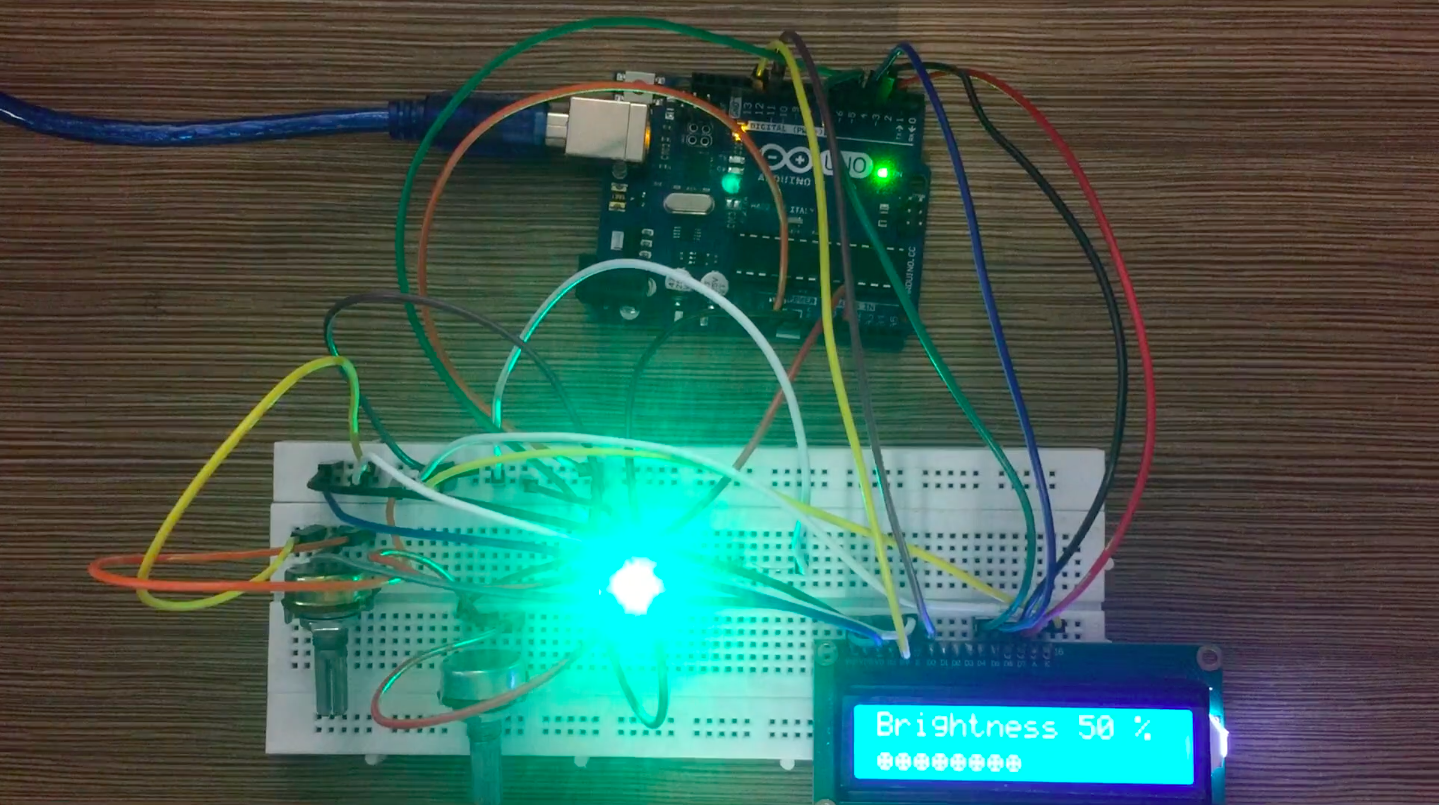
How to make LED brightness control circuit on hardware using potentiometer and LCD
We have implemented the circuit schematic according to the hardware assembly described above and it can be seen in the image below:
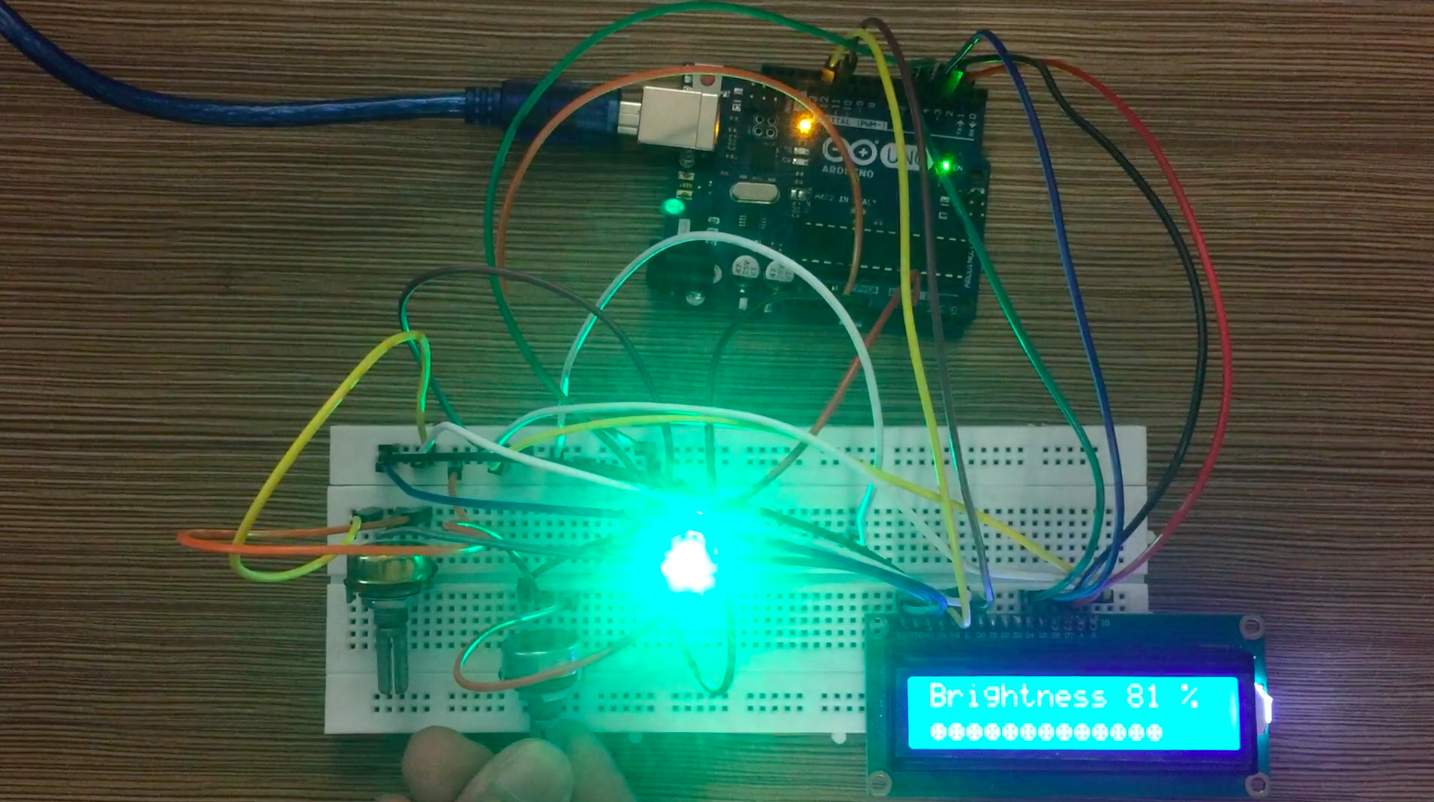
For demonstration purposes we have given a animated GIF that shows the working of Arduino sketch given above:
Conclusion
To make the working of Arduino code used in a project the best way is to display its inputs and outputs using a display module with Arduino. We have made a project that controls the brightness of the LED using the potentiometer and the value of brightness is displayed in LCD in the form of percentage and status bar. To give a clear idea of the project we have provided the Arduino code and hardware simulation as well.