This article is a detailed guideline to show you the methods to disable WiFi on Raspberry Pi when Ethernet is connected.
How to Disable WiFi when Ethernet Connected – Raspberry Pi
Disabling WiFi on Raspberry Pi is simple and it can be done via:
- GUI
- Terminal
Method 1: Disable WiFi from GUI
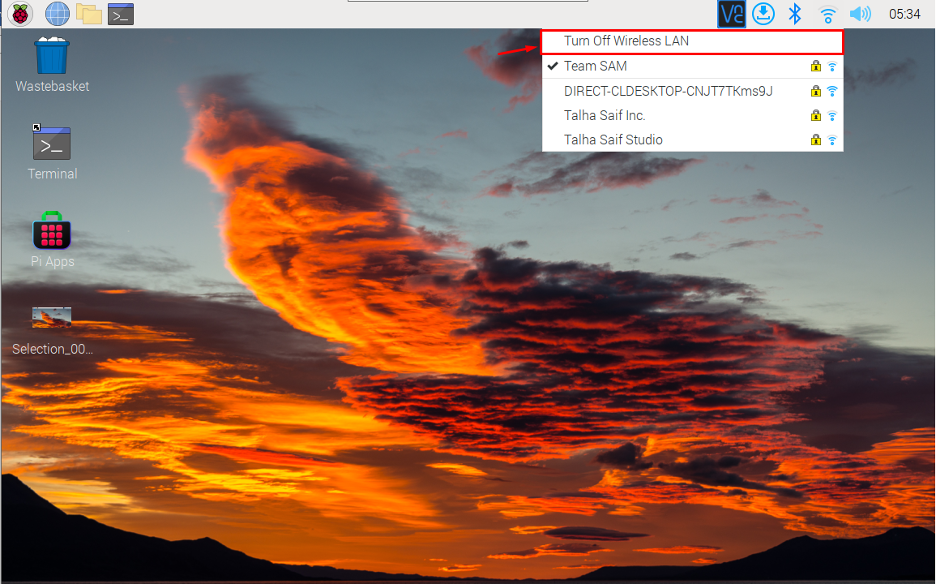
The Raspberry Pi users can easily disable the WiFi directly from the “WiFi” option on the task panel.

The users have to click on the “Wifi” option and select the “Turn Off Wireless LAN” option to disable the WiFi on Raspberry Pi.
Method 2: Disable WiFi from Terminal
For those users who wants to use terminal to disable the WiFi on Raspberry Pi, they can do it from:
- Boot Configuration File
- ifconfig Command
- rfkill Command
1: Disable WiFi from Boot Configuration File
The Raspberry Pi boot configuration file allows users to do configuration inside the system. To disable WiFi through Boot configuration file, follow the below-given steps:
Step 1: Open the boot configuration file through the nano editor.
Step 2: Then add the following line inside the boot configuration file.
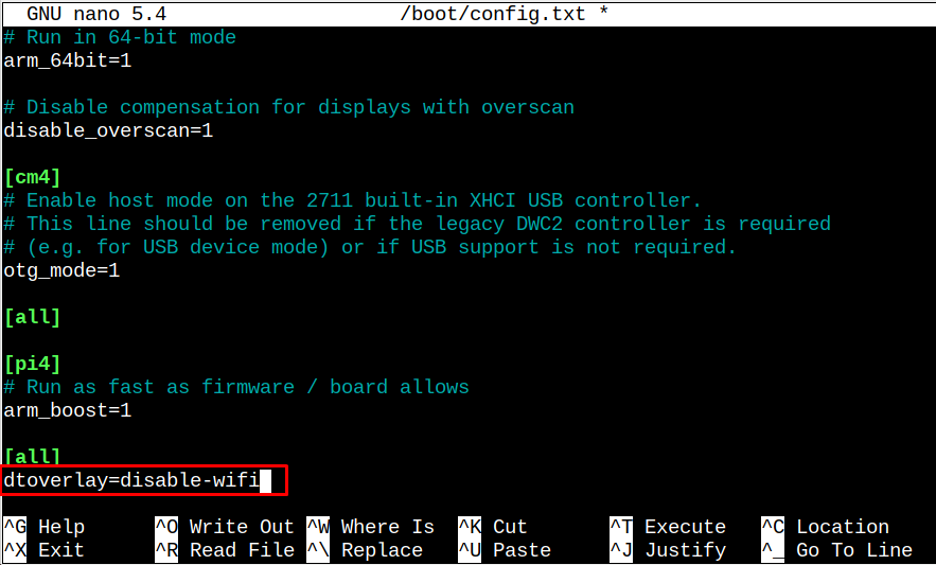
Step 3: Save the file and then reboot the device to successfully disable the WiFi on Raspberry Pi.
Note: You can enable the WiFi anytime by opening the boot configuration file and commenting the “dtoverlay” line by adding # before it.
2: Disable WiFi from ifconfig Command
The ifconfig command is used for performing network related tasks. It also allows users to enable and disable network interfaces on your system.
To disable the WiFi on Raspberry Pi, the users can follow the below-given command:

Note: You can use the ifconfig command to find the WiFi interface name.
You can enable the WiFi anytime by executing the following command:

3: Disable WiFi through rfkill Command
The rfkill is a command-line tool that allows users to manage network interfaces on the system. Through rfkill command, the users can disable the WiFi on Raspberry Pi. For this purpose, go with below-given command to disable WiFi:

To enable the WiFi again, just hit the below-given command:

Conclusion
While using the Ethernet cable to connect the Raspberry Pi device to the Internet, you can easily disable WiFi on the system through GUI and terminal. The GUI method is straightforward, while for Terminal, you can go with the boot configuration file or using ifconfig and rfkill command to disable the WiFi on Raspberry Pi.