How to create a digital 7-segment dice using Arduino Uno
To create the 7-segment dice project you will be requiring the following list of components:
- Arduino Uno
- Connecting wires
- Breadboard
- 7-segment Display
- 7 220-ohm resistors
- Push button
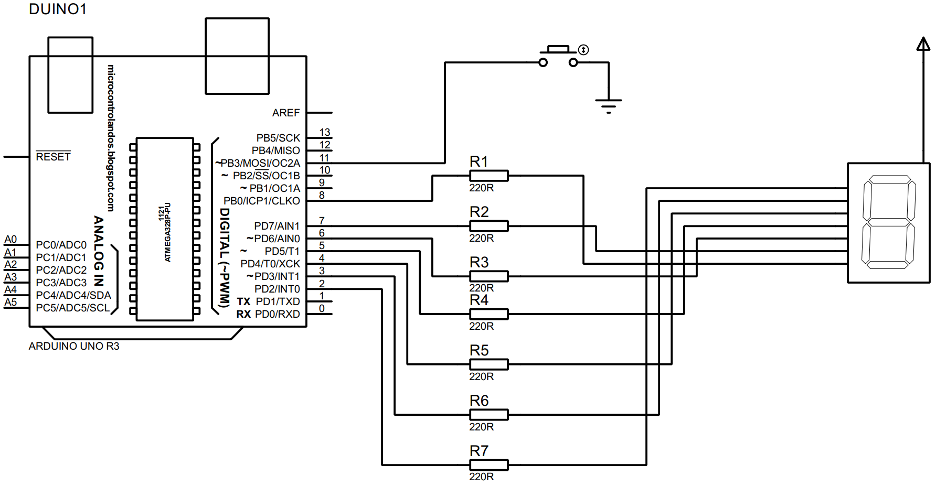
We have designed a circuit for displaying the dice values on 7-segment display using Arduino and the circuit schematic is given in the image below:
Hardware assembly for creating digital dice using 7-segment and Arduino Uno
We have implemented the circuit schematic given above on the hardware for demonstration. So, for that purpose to give better idea of the connections of the 7-segment display we have given the image for the hardware assembly of the project below:
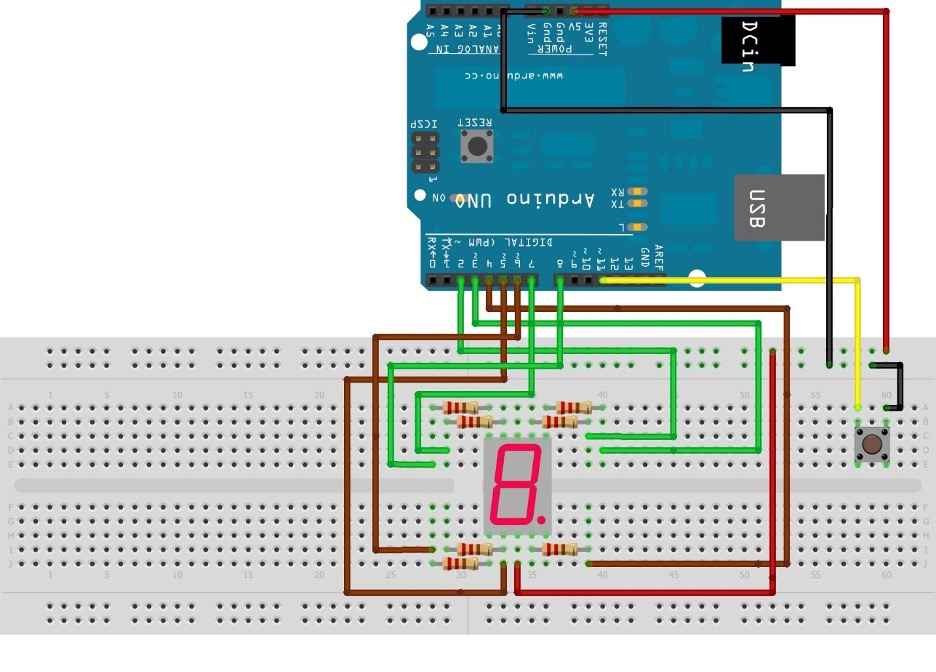
For demonstration of the connections of the hardware assembly we have used different colors of wires that will make it easy to understand the connections. For connecting pins, a, b, f and g of 7-segment we have used the green wires and Arduino pins 2, 3,7 and 8 are used to connect them to Arduino.
Similarly, we have used the brown wire to connect pin c, d, e of the 7-segment to the Arduino using its 4, 5 and 6 pins. To roll the dice we have used the push button and it is connected to Arduino using its pin 11 and in the above figure you can see that we have used the yellow wire for this purpose.
Since we have used the 7-segment with common Anode configuration, we have connected the 7-segment with a 5-volt pin of the Arduino using the breadboard by red wire. To ground the push button, we have used the black wire to connect it with the ground pin of the Arduino using the breadboard.
Arduino code for creating the digital dice using 7-segment with Arduino Uno
The Arduino code compiled for creating the digital dice using the 7-segment display is given below:
SevSeg sevseg;// initializing the variable for seven-segment
int state;/* variable for storing the state of the push button*/
int button= 11;/* Arduino pin assigned to the push button*/
void setup()
{
pinMode(button,INPUT_PULLUP);
byte sevenSegments = 1;/*defining the number of seven- segments here we are using only one seven-segment */
byte CommonPins[] = {};/* defining the common pins for the seven-segment*/
byte LEDsegmentPins[] = {2, 3, 4, 5, 6, 7, 8 };/* assigning the Arduino pins for each segment from a to g */
bool resistorsOnSegments = true; /*assigning Boolean type to the registers of the seven=segment*/
sevseg.begin(COMMON_ANODE, sevenSegments, CommonPins, LEDsegmentPins, resistorsOnSegments);/* initializing the configuration of the seven-segment */
sevseg.setBrightness(80);// giving the brightness to the seven-segment
randomSeed(analogRead(0));/* shuffling the sequence of dice number generation*/
}
void loop()
{
state=digitalRead(button);
if (state== LOW){ /* if the button is pressed then*/
for(int b = 0; b <=6; b++){
sevseg.setNumber(b);
sevseg.refreshDisplay();/*displaying the for loop values on seven-segment*/
delay(100);
}
int i=random(1,6);/* generating the values for dice */
sevseg.setNumber(i); /*displaying the dice values on seven-segment*/
sevseg.refreshDisplay(); /* refreshing the seven-segment display after every iteration */
delay(500); /* time after which the for loop will run again*/
}
}
First of all, to display the values of the dice on the 7-segment we have defined the library for the 7-segment and then we have initialized the variable used for the 7-segment. To use the push button for generating the dice values we have declared a variable that stores the state of the button and then we have assigned the Arduino pin for the push button.
To assign input as the working mode for the button we have used the function pinMode() and next we have declared the configuration of 7-segment by giving the number of display used, assigning Arduino pins to the display and then initializing that configuration using the sevseg.begin() function.
To generate the dice values we have used the random() function that will generate values from 1 to 6 randomly. Similarly to change the sequence of generation of random numbers we have used the randomSeed(analogRead(0)) function in the setup section of the Arduino code by giving it an unconnected pin of Arduino Uno.
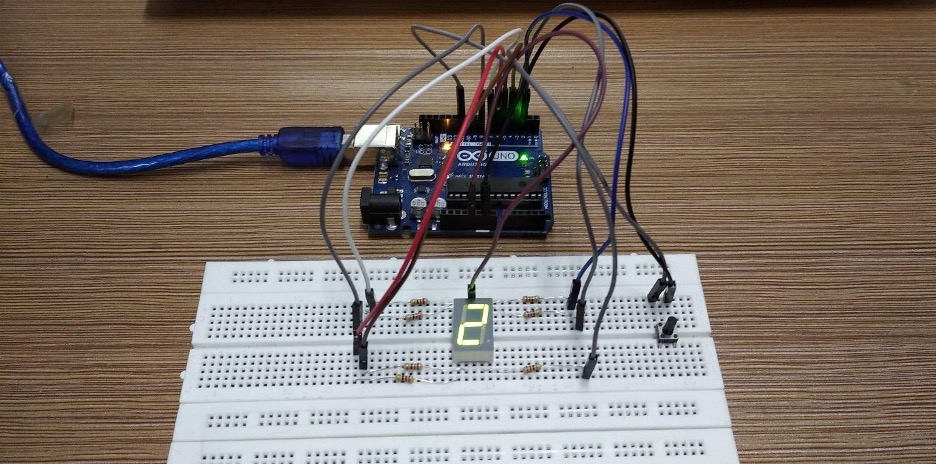
Hardware implementation for creating a digital dice using 7-segment with Arduino Uno
We have assembled the hardware right according to the hardware assembly as described above and it can be seen in the figure below:
We have given an animation below that illustrates the output of the Arduino code for creating digital dice using the 7-segment display:
Conclusion
Dice is a small object that contains numbers for one to six and is used to generate random numbers manually and is mostly used in games where the random numbers are required. The most popular use of the dice is the games played in casinos as all of these games require generation of random numbers. So, to generate the numbers electronically we have compiled an Arduino code and displayed the dice values on the 7-segment display.