MySQL is a very popular database that allows users to store and manage data for web-based dynamic applications. The good thing about MySQL is that it can handle powerful web packages and can be set up on any system such as Raspberry Pi.
If you are new to MySQL database, follow this article to find out how you can create, show, and remove the MySQL database from Raspberry Pi.
How to Create, Show and Remove MySQL Database on Raspberry Pi?
Follow the below-mentioned guidelines to learn how to create, show and remove MySQL database on Raspberry Pi:
1: Create MySQL Database on Raspberry Pi
To create a MySQL database, you have to install the MariaDB server using the following steps:
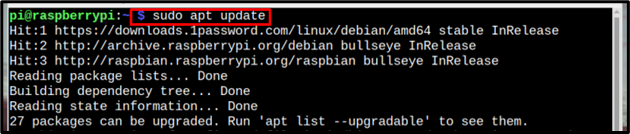
Step 1: Update the Raspberry Pi repository to get the latest packages update:
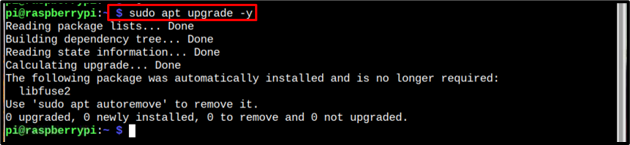
Step 2: After updating, let’s upgrade the packages by using the below-mentioned command:
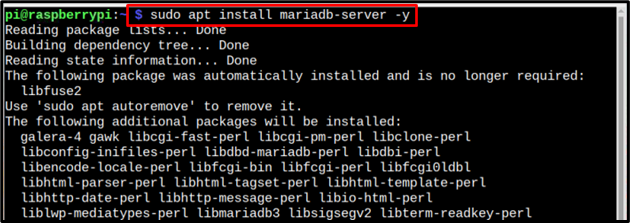
Step 3: Install MariaDB-server from the Raspberry Pi repository using the below-mentioned command:
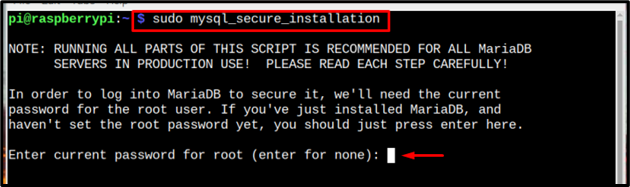
Step 4: Then to secure the installed MySQL database, run the MySQL secure installation using the below-mentioned command:
After entering the above command, you will be required to enter the password of your Raspberry Pi root user:
You have to answer a few prompts with y (yes) or n (no):
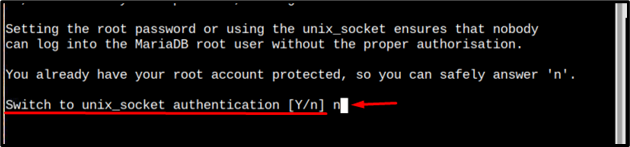
The first prompt will appear asking about switching the unix_socket, enter n here for No:
Then again enter n on the following prompt if you do not want to change the root password:

On the third prompt enter y to allow the removal of anonymous users:

On the prompt about the root login, it is recommended to enter n so that you can access the database remotely too:

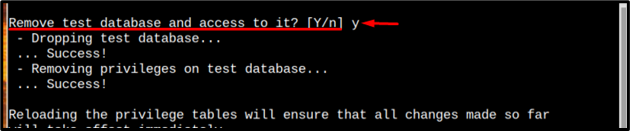
Then enter y to remove test database if you want or else you can also keep test database by entering n:
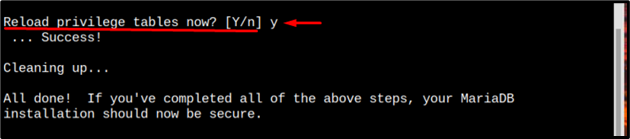
Then on the final prompt enter y to reload the privileges table successfully complete the installation securing process:
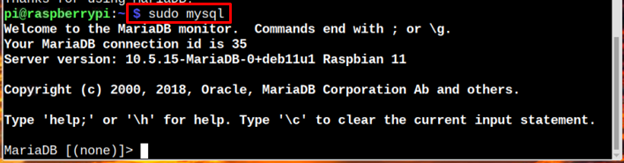
Step 5: Now login to the MySQL database using the below-given command:
Step 6: To create a database, using the below-mentioned syntax.
It is up to the user to choose a name for their database. Here, I have named my database as mysqldatabase.

Note: You can also use the “create database” tool for creating MySQL database.
Step 7: Then create a username and password for the database and assign privileges to the database using the below-mentioned syntax:
Here, I have set the user’s name as pi and for the password, I have just used a simple random password:

Step 8: Now flush the privileges using the below-written command to finalize the database:

And once you are done with working on the database, you can exit the database by using the exit command:

2: Show MySQL Database on Raspberry Pi
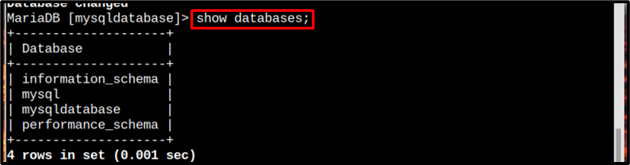
To see the list of all databases created on MySQL, you can use the following command:
The output of the command will display the list of databases:
3: Remove MySQL Database
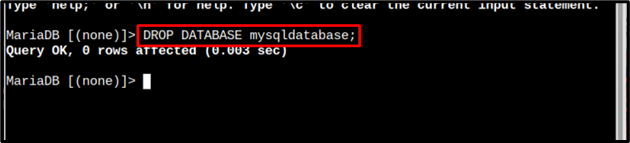
After creating the database, if you feel that it is no longer required or it has stopped working, you can remove it from MySQL database list using the following syntax:
And the database will be removed after running the above command successfully:
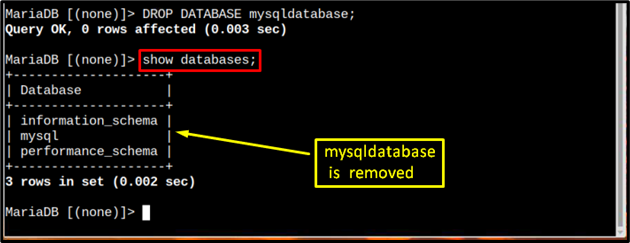
Step 1: To verify that the database is removed successfully, just run the below-written show command:
In the output, you can see that the name of the database is not present, which means it is removed:
Conclusion
To create a MySQL database, MariaDB server needs to be installed first. After the installation, you must secure the database using the secure_installation command. You must create a database using the CREATE DATABASE command and set the username and password for the created MySQL database. To view the MySQL database, you must use the show databases command and to delete the database, you have to run the “drop database” command with the name of the database you want to remove.