Well, we will try to clear out this ambiguity with the help of a use case. At times when many users start creating their mail servers, some of those mail servers might be labeled as spam servers. And hence it will get impossible to relay the emails to the recipients through these servers. Therefore, it is highly advisable to use a trusted, smart host or a relay host in between which ensures the timely delivery of your emails and also gives you the surety that your emails will not be marked as spam in any way.
The relay host or the smart host can be used with all the mail servers; however, for the course of this discussion, we are only concerned with the Postfix server. Although, the Postfix installation process allows you to choose the mail server configuration of the Satellite System through which you can easily send your emails via a relay host. However, if you have not chosen this option at the time of installation, even then, you do not have to worry about it because you can configure it later on as well. Therefore, today, we will talk about the method of configuring the Postfix relay host after its installation.
Method of Configuring Postfix Relayhost:
For configuring Postfix for using relay host, you will need to perform the following steps:
- Launch the terminal in Ubuntu 20.04. The configurations for this method are really quick and simple. All we have to do is to make some changes in the /etc/postfix/main.cf file. For doing that, we need to open this file with any text editor of our choice. In this example, we will be using the Nano editor. You can choose any other text editor as well. Now type the following command in your terminal and then press the Enter key to open the /etc/postfix/main.cf file:
This command is also shown in the image below:
![]()
- As soon as this command will execute successfully, the /etc/postfix/main.cf file will open up in the Nano editor as shown in the following image:
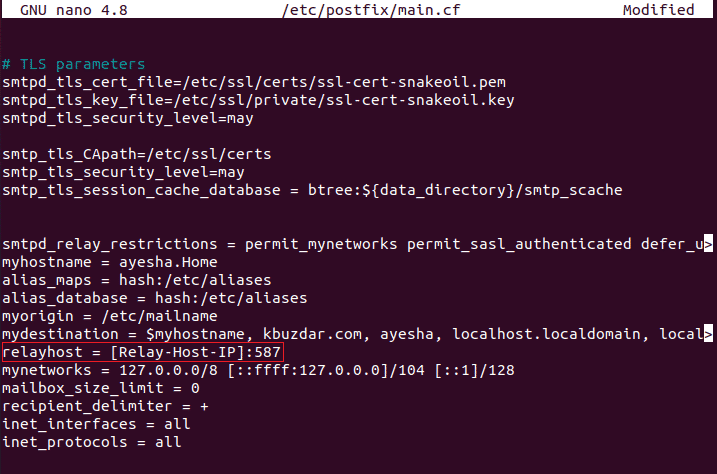
- Now scroll down to the relay host entry and type in the IP address of the server that you want to be used as the relay host or the smart host. For example, [email protected] and then type port number 587 separated by a colon, as highlighted in the image shown above.
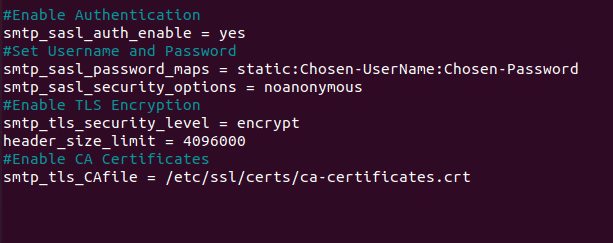
- Once you have added the relay host entry in this file, scroll down to the end of the file and then add the following lines in it to enable the authentication of your newly added relay host:
smtp_sasl_auth_enable = yes
#Set Username and Password
smtp_sasl_password_maps = static:Chosen-Username:Chosen-Password
smtp_sasl_security_options = noanonymous
#Enable TLS Encryption
smtp_tls_security_level = encrypt
header_size_limit = 4096000
#Enable CA Certificates
smtp_tls_CAfile = /etc/ssl/certs/ca-certificates.crt
Here, you need to type the username of your choice instead of Chosen-Username and a password that you want instead of Chosen-Password. Rest, you need to copy and paste these lines as it is at the end of the /etc/postfix/main.cf file. It is also shown in the image below:
- Now save this file so that its contents are updated and exit from the Nano editor by pressing Ctrl+ X. Finally, type the following command in your terminal and then press the Enter key for the newly made changes to take effect:
This command is shown in the following image:
![]()
Conclusion:
By following the simple and basic steps described in this article, you can conveniently configure Postfix relay host and hence deliver your emails to the right recipient well in time without the fear of your emails being marked as spam. This method is quite efficient and very easy to follow, as there are just a few lines of settings that you need to add to the Postfix configuration file. After that, you will be all set to relay your emails via a smart host.