A lot of hustle and bustle is going around concerning the security of the Raspberry Pi device which is compromised when enabling the SSH feature on the device. Because, anyone can access your device from a remote location using your IP address and this will create a serious security risk for all the Raspberry Pi users out there. Each one of you requires a permanent solution to cope with this issue and a Two-Factor Authentication system will be a perfect option for your device as it will add extra security protection and prevent other users from accessing your device without your permission. The authentication system will function on your mobile device and it can be done through QR code or using a strong password. Well, if you are looking for help on how to make it happen, then you should follow this tutorial.
How to configure Two-Factor Authentication for Raspberry Pi
In this guide, we will provide you the right methods to increase your device security using a Two-Factor Authentication system and you will learn to configure it for your Raspberry Pi device.
Updating your Raspberry Pi device
Before beginning any installation, make it your habit by installing the required packages updates. To perform the updates, open the terminal and execute the following command-line.

Enable the Secure Shell (SSH) service
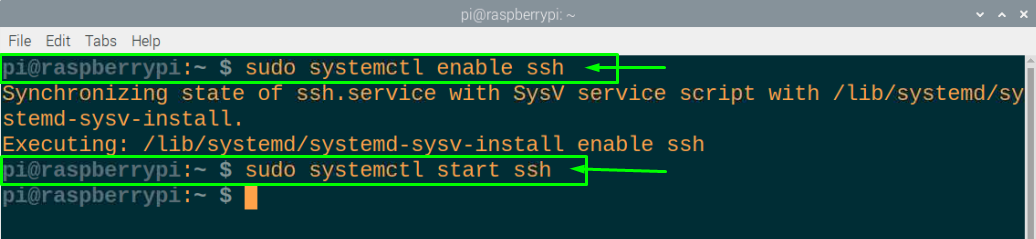
The Raspberry Pi SSH service is disabled by default and if you want to access your Raspberry Pi device though your laptop or mobile, you will need to enable the SSH service which can be done through the following commands.
There is also an easiest method available to enable the SSH from the menu option. To do this, go to the Raspberry Pi’s menu option and choose the “Raspberry Pi configuration” in the “Preferences” option.
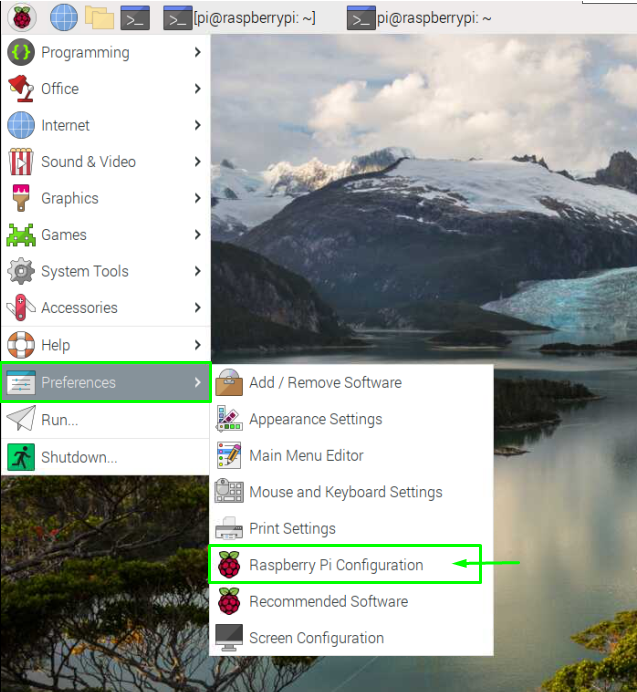
Afterwards, in the “Interfaces” tab, enable the SSH by dragging the cursor to the right direction and then click on the “OK” option to successfully enable it.

Enable Challenge Response
Ultimately, your device will be required to authenticate your identity and for that you will require some changes in the SSH service to enable the “challenge response” passwords. This can only be done through the SSH configuration file which will be opened using the following command in the terminal.
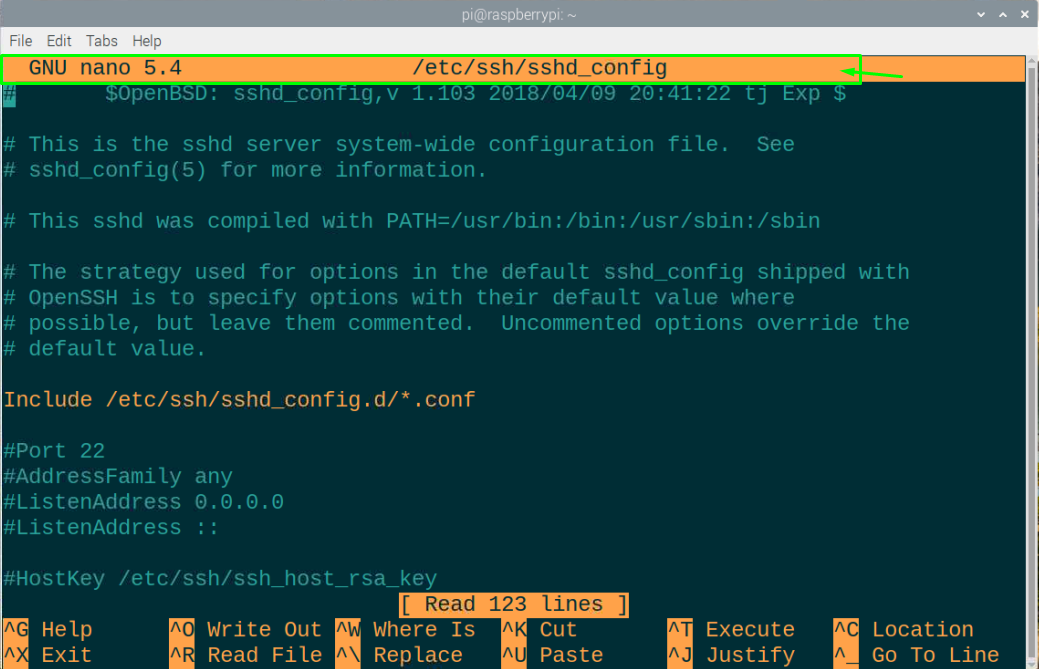
Once the file is opened, you will need to find the “Challenge Response Authentication” line in the above file by scrolling down to the bottom.

Change the “ChallengeResponseAuthentication no” to “ChallengeResponseAuthentication yes” as shown below.

Press the Ctrl and X keys simultaneously and then enter the “Y” button to accept the changes. Once done, press the “Enter” button to go towards the terminal again.
After the changes, restart the SSH service again using the following command again in the terminal.

As you have restarted your SSH service again, it is considered a good idea to check whether your SSH is working fine and to do that open the PuTTY app on your PC desktop and enter your host IP address. You can find the host IP address using the below mentioned command.
Put the IP address in the PuTTY:

Login as user “pi” and enter the default password as “raspberry” if you haven’t changed your password.

From the above terminal, it is confirmed that your SSH is working fine.
Setting up Two-Factor Authentication
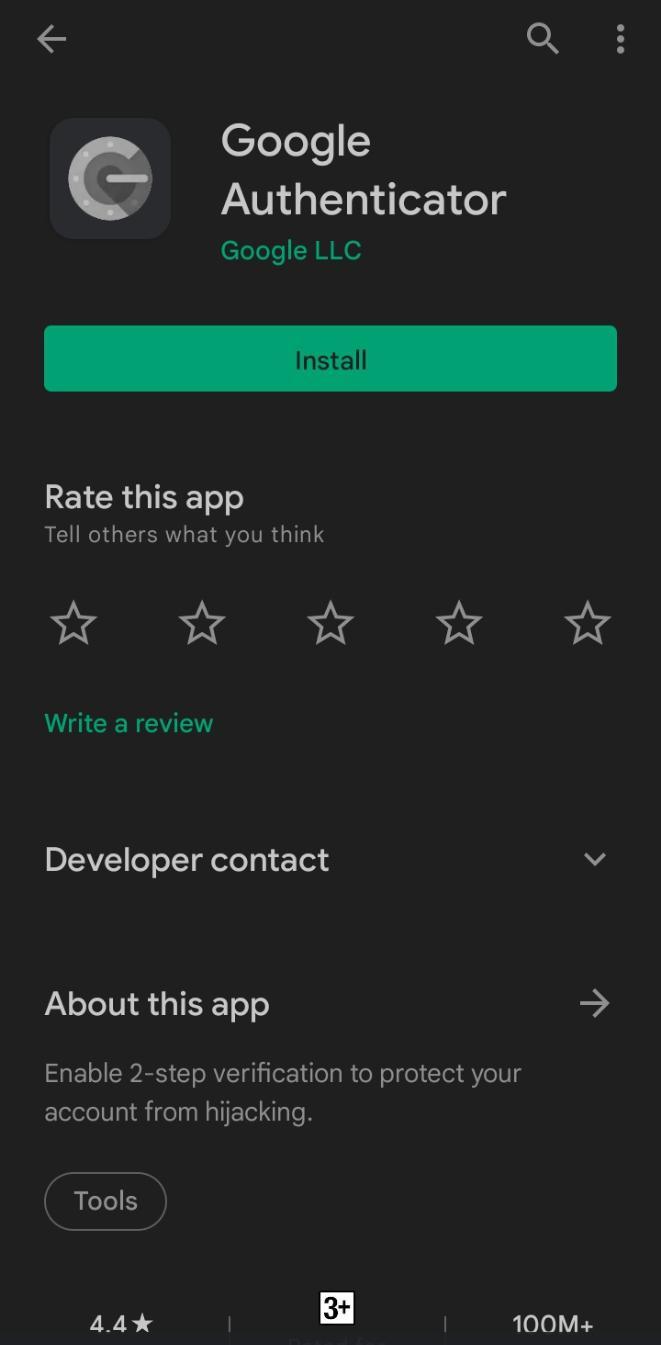
After performing all the above guidelines, you will now be required to set up a Two-Factor Authentication and for that you will need to download the “Google Authenticator” on your Android Phone’s play store.
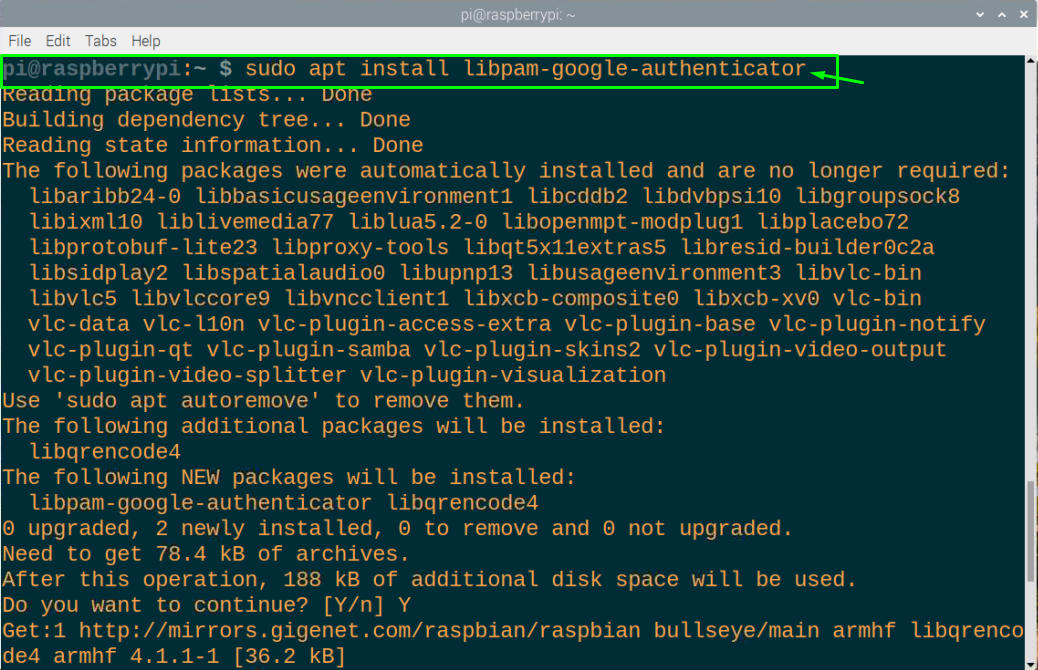
Once the app is downloaded on your phone, install this app on your Raspberry Pi device as well by executing the following command in the terminal.

In case, if you experience an error like the one shown below:
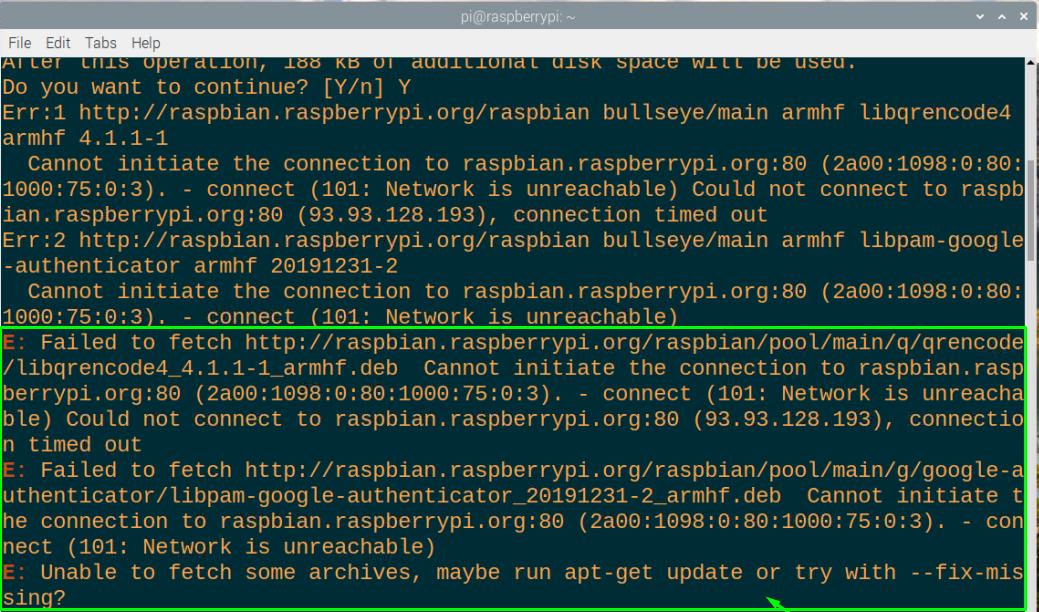
Then, run the following command to fix the error:
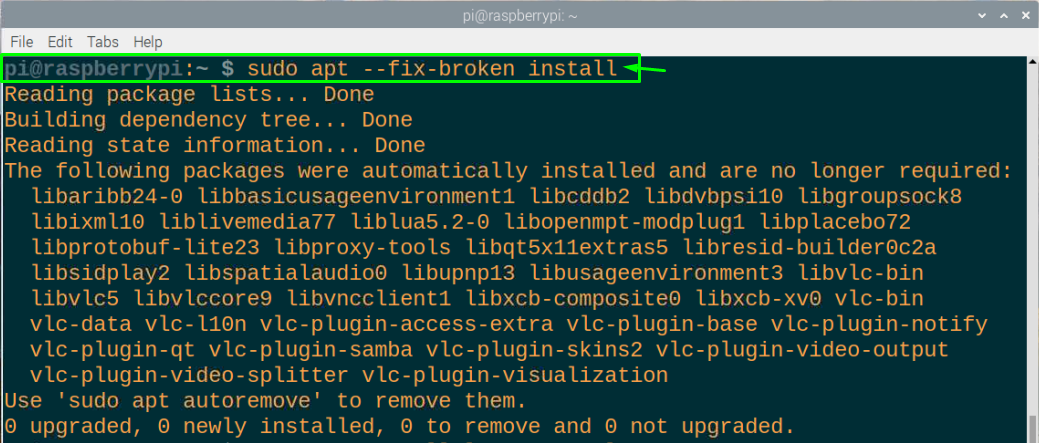
Once the above command is executed, you can now run the installation command again and this time the Google Authenticator will be successfully installed on your device.
Create a connection by linking Raspberry Pi to Android Phone
Once you have downloaded Google Authenticator app on both Raspberry Pi and your Android phone, it’s now time to link them. Open the app on Raspberry Pi through calling the name “google-authenticator” in the terminal command window.
Once you try to run the app, the Raspberry Pi will ask whether your authentication tokens are time-based and since this is more secure you will need to grant the permission by entering the “y” key.
You will need to resize your terminal window in order to view the full bar code on your terminal.
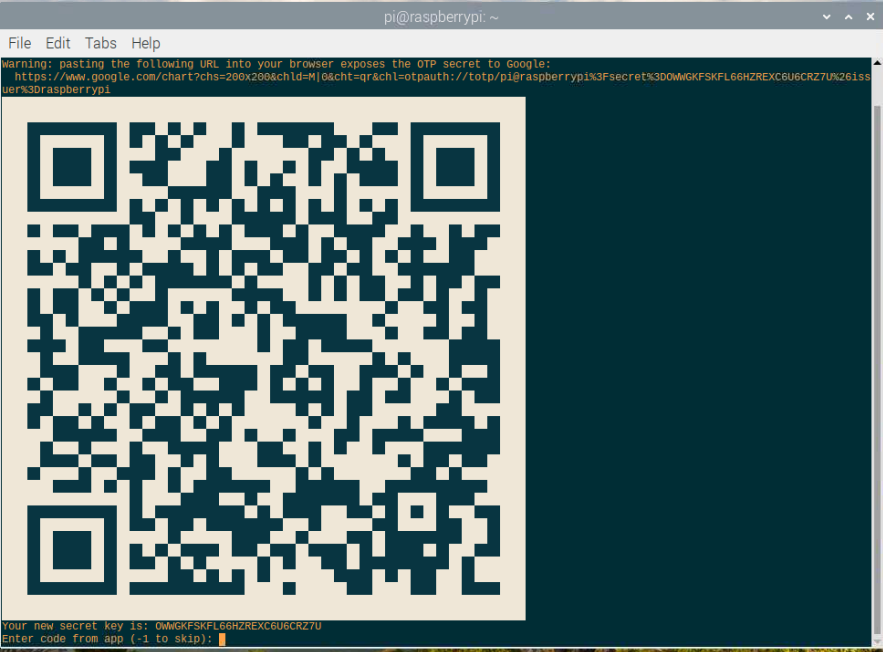
Next, open the Google Authenticator from your phone and choose the option “Scan a QR Code”.

Once its’ done it will create authentication keys continuously and you will have to enter any key in the Raspberry Pi terminal.
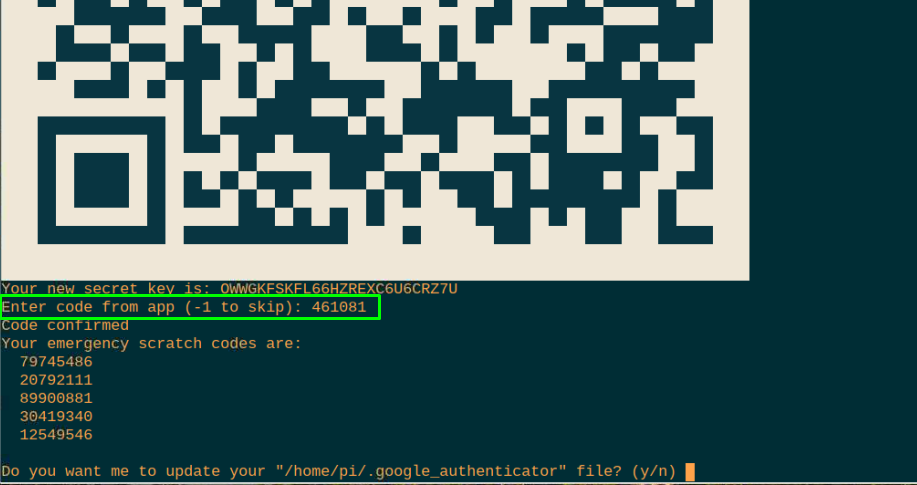
Save the emergency scratch codes as it will help you in future when you lose access to the authentication system.
Next, update your Google authenticator file on Raspberry Pi by entering the “y” key. Then, it will ask you to prevent multiple users of the same authentication token from accessing the device, thus go on and enter the key “y” to accept it.
Enter ‘n’ key when it will ask to permit for a time skew and in the next step choose to go with “y” to enable rate-limiting.

How to enable Two-Factor Authentication on Raspberry Pi
Now, it’s time to enable the two-factor authentication on your Raspberry Pi device and to do that you will need the services of Linux Pluggable Authentication Modules (PAM) which provides a two-factor authentication well supported for different applications and services.
To make it happen, you will require to make a few changes to the config file of PAM and to open the file execute the below mentioned command in the terminal.

Add the text “auth required pam_google-authenticator.so” right below the “@include common-auth” line.

Save the configuration by pressing the “Ctrl+X” followed by “Y” and the enter key.
Once done, restart the SSH service again.

That’s it now whenever you will try to connect to your Raspberry Pi device over SSH, you will need to provide authentication code which you can get from the Google Authenticator app on your mobile phone.


Conclusion
Raspberry Pi is a compact device that delivers people almost everything they look for in a PC. The users privacy and security are well safeguarded within the device if they manage to enable a two-factor authentication system on their device which will help in accessing their Raspberry Pi terminal remotely in a well-protected fashion. The above steps will be quite useful in helping you out to create two-factor authentication for your Raspberry Pi device and it will surely increase your device security.