Conditional operators in Arduino are used to decide the output on the basis of conditions. For different applications, conditional operators can be utilized. For example, they can be used in making the logic of street lights, such that the lights remain off during day time and on otherwise. In this write-up, we will discuss the conditional operators in Arduino and also understand its usage with the help of an example.
What are the conditional operators in Arduino
In Arduino, the conditional operator “?” is used which is called the ternary operator and this conditional operator works similarly to if-else statements and makes the decision on the basis of boolean values either 0 or 1.
What is the general syntax of using the conditional operators in Arduino
The general syntax of using the conditional operators in Arduino is:
The explanation to the above syntax is as follows:
- Use any variable instead of “variable” in which you will store the results
- Write any condition on the basis of which you are going to make a decision true or false
- Then use the ternary sign “?” to evaluate the condition
- Write both values between which you are going to be the outputs
How conditional operators work in Arduino
To understand the working of the conditional operators in Arduino, we will consider the above general syntax of conditional operators. If the condition is true for the value1 then the compiler will ignore the value2 and return the value1, but if the condition is false for the value1, then the compiler will ignore the value1 and will return the value2.
For a visual understanding of the working of the conditional operators, consider the following image:
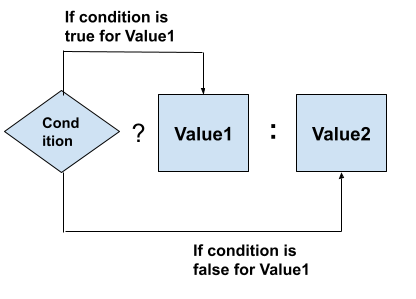
It is clear from the above demonstration how the conditional operators work in Arduino.
Example: Consider the example in which we are going to find the larger number with the help of a conditional operator using the code:
Serial.begin(9600);
int a=10, b=25,result;
result=(a>b)? a : b;
Serial.print(“The larger number is: ”);
Serial.print(result);
}
void loop(){
}
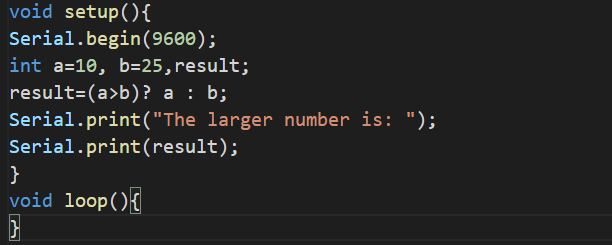

Two variables “a” and “b” are declared in the above code example and stored values 10 and 25 in them and then by using the conditional operator we checked whether the a is greater than b or not. The result of the conditional operator is stored in the variable “result”. The result is then displayed on the serial monitor output using serial communication.
Now in the above example, we will change the condition from (a>b) to (a<b) using the same code:
int a=10, b=25,result;
result=(a<b)? a : b;
Serial.print(“The smaller number is: ”);
Serial.print(result);
}
void loop(){
}
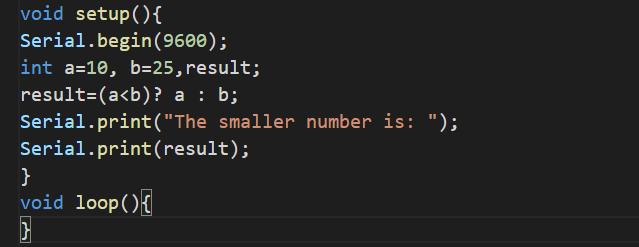

We can see from the above output, it displayed the value of “a” because the condition is true for the “a” and displayed the result on the serial monitor screen.
Conclusion
The conditional operators are used to extract the boolean results in the form of true or false. There are a lot of practical applications of the conditional operators like if we want to turn on the cooler when the temperature of the motor rises from the ambient temperature, we can use the conditional operators. In this write-up, the conditional operators are explained and also demonstrated the use of conditional operators in Arduino with the help of an example.